





rix
Community Developer
-
Joined
Everything posted by rix
-
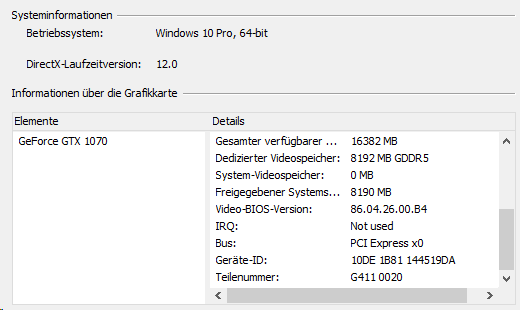
<?xml version='1.0' encoding='UTF-8'?> <domain type='kvm' id='7' xmlns:qemu='http://libvirt.org/schemas/domain/qemu/1.0'> <name>Windows</name> <uuid>HIDDEN</uuid> <description></description> <metadata> <vmtemplate xmlns="unraid" name="Windows 10" icon="Nvidia.png" os="windows10"/> </metadata> <memory unit='KiB'>16777216</memory> <currentMemory unit='KiB'>16777216</currentMemory> <memoryBacking> <nosharepages/> </memoryBacking> <vcpu placement='static'>10</vcpu> <cputune> <vcpupin vcpu='0' cpuset='6'/> <vcpupin vcpu='1' cpuset='7'/> <vcpupin vcpu='2' cpuset='8'/> <vcpupin vcpu='3' cpuset='9'/> <vcpupin vcpu='4' cpuset='10'/> <vcpupin vcpu='5' cpuset='11'/> <vcpupin vcpu='6' cpuset='12'/> <vcpupin vcpu='7' cpuset='13'/> <vcpupin vcpu='8' cpuset='14'/> <vcpupin vcpu='9' cpuset='15'/> </cputune> <resource> <partition>/machine</partition> </resource> <os> <type arch='x86_64' machine='pc-i440fx-3.1'>hvm</type> <loader readonly='yes' type='pflash'>/usr/share/qemu/ovmf-x64/OVMF_CODE-pure-efi.fd</loader> <nvram>/etc/libvirt/qemu/nvram/HIDDEN_VARS-pure-efi.fd</nvram> </os> <features> <acpi/> <apic/> <hyperv> <relaxed state='on'/> <vapic state='on'/> <spinlocks state='on' retries='8191'/> <vendor_id state='on' value='none'/> </hyperv> </features> <cpu mode='host-passthrough' check='none'> <topology sockets='1' cores='10' threads='1'/> </cpu> <clock offset='localtime'> <timer name='hypervclock' present='yes'/> <timer name='hpet' present='no'/> </clock> <on_poweroff>destroy</on_poweroff> <on_reboot>restart</on_reboot> <on_crash>restart</on_crash> <devices> <emulator>/usr/local/sbin/qemu</emulator> <disk type='block' device='disk'> <driver name='qemu' type='raw' cache='writeback'/> <source dev='/dev/disk/by-id/ata-SanDisk_SD8SN8U1T001122_161446440614'/> <backingStore/> <target dev='hdc' bus='sata'/> <boot order='1'/> <alias name='sata0-0-2'/> <address type='drive' controller='0' bus='0' target='0' unit='2'/> </disk> <disk type='block' device='disk'> <driver name='qemu' type='raw' cache='writeback'/> <source dev='/dev/disk/by-id/ata-ST8000DM0004-1ZC11G_ZKG00C3A'/> <backingStore/> <target dev='hdd' bus='sata'/> <alias name='sata0-0-3'/> <address type='drive' controller='0' bus='0' target='0' unit='3'/> </disk> <controller type='pci' index='0' model='pci-root'> <alias name='pci.0'/> </controller> <controller type='sata' index='0'> <alias name='sata0'/> <address type='pci' domain='0x0000' bus='0x00' slot='0x03' function='0x0'/> </controller> <controller type='virtio-serial' index='0'> <alias name='virtio-serial0'/> <address type='pci' domain='0x0000' bus='0x00' slot='0x04' function='0x0'/> </controller> <controller type='usb' index='0' model='ich9-ehci1'> <alias name='usb'/> <address type='pci' domain='0x0000' bus='0x00' slot='0x07' function='0x7'/> </controller> <controller type='usb' index='0' model='ich9-uhci1'> <alias name='usb'/> <master startport='0'/> <address type='pci' domain='0x0000' bus='0x00' slot='0x07' function='0x0' multifunction='on'/> </controller> <controller type='usb' index='0' model='ich9-uhci2'> <alias name='usb'/> <master startport='2'/> <address type='pci' domain='0x0000' bus='0x00' slot='0x07' function='0x1'/> </controller> <controller type='usb' index='0' model='ich9-uhci3'> <alias name='usb'/> <master startport='4'/> <address type='pci' domain='0x0000' bus='0x00' slot='0x07' function='0x2'/> </controller> <interface type='bridge'> <mac address='RANDOM-MAC-ADR'/> <source bridge='br0'/> <target dev='vnet0'/> <model type='virtio'/> <alias name='net0'/> <address type='pci' domain='0x0000' bus='0x00' slot='0x02' function='0x0'/> </interface> <serial type='pty'> <source path='/dev/pts/0'/> <target type='isa-serial' port='0'> <model name='isa-serial'/> </target> <alias name='serial0'/> </serial> <console type='pty' tty='/dev/pts/0'> <source path='/dev/pts/0'/> <target type='serial' port='0'/> <alias name='serial0'/> </console> <channel type='unix'> <source mode='bind' path='/var/lib/libvirt/qemu/channel/target/domain-7-Windows/org.qemu.guest_agent.0'/> <target type='virtio' name='org.qemu.guest_agent.0' state='disconnected'/> <alias name='channel0'/> <address type='virtio-serial' controller='0' bus='0' port='1'/> </channel> <input type='tablet' bus='usb'> <alias name='input0'/> <address type='usb' bus='0' port='1'/> </input> <input type='mouse' bus='ps2'> <alias name='input1'/> </input> <input type='keyboard' bus='ps2'> <alias name='input2'/> </input> <hostdev mode='subsystem' type='pci' managed='yes'> <driver name='vfio'/> <source> <address domain='0x0000' bus='0x2f' slot='0x00' function='0x0'/> </source> <alias name='hostdev0'/> <address type='pci' domain='0x0000' bus='0x00' slot='0x05' function='0x0'/> </hostdev> <hostdev mode='subsystem' type='pci' managed='yes'> <driver name='vfio'/> <source> <address domain='0x0000' bus='0x2f' slot='0x00' function='0x1'/> </source> <alias name='hostdev1'/> <address type='pci' domain='0x0000' bus='0x00' slot='0x06' function='0x0'/> </hostdev> <hostdev mode='subsystem' type='pci' managed='yes'> <driver name='vfio'/> <source> <address domain='0x0000' bus='0x30' slot='0x00' function='0x3'/> </source> <alias name='hostdev2'/> <address type='pci' domain='0x0000' bus='0x00' slot='0x08' function='0x0'/> </hostdev> <hostdev mode='subsystem' type='usb' managed='no'> <source> <vendor id='0x1b1c'/> <product id='0x0a14'/> <address bus='5' device='3'/> </source> <alias name='hostdev3'/> <address type='usb' bus='0' port='2'/> </hostdev> <hostdev mode='subsystem' type='usb' managed='no'> <source> <vendor id='0x28de'/> <product id='0x1142'/> <address bus='5' device='2'/> </source> <alias name='hostdev4'/> <address type='usb' bus='0' port='3'/> </hostdev> <memballoon model='none'/> </devices> <seclabel type='dynamic' model='dac' relabel='yes'> <label>+0:+100</label> <imagelabel>+0:+100</imagelabel> </seclabel> <qemu:commandline> <qemu:arg value='-global'/> <qemu:arg value='pcie-root-port.speed=8'/> <qemu:arg value='-global'/> <qemu:arg value='pcie-root-port.width=16'/> </qemu:commandline> </domain> Am I doing something wrong? Still being reported as PCIE0 - I have however never experienced a significant performance drop going virtual in gaming.
-
Thanks for the reply, I will rather go with an AIO that can be entirely controlled by my mainboard's headers.
-
I am looking into buying an x62 cooler. Is the RGB lighting working for you in general? Have you been able to set lighting / fan speed up through usb pass through (that should not at all be harmful)?
-
Let me know if you find out.
-
Qemu 3.1 in the newest 6.7 RC is much faster for me!
-

From the album: Community Created Banners
-
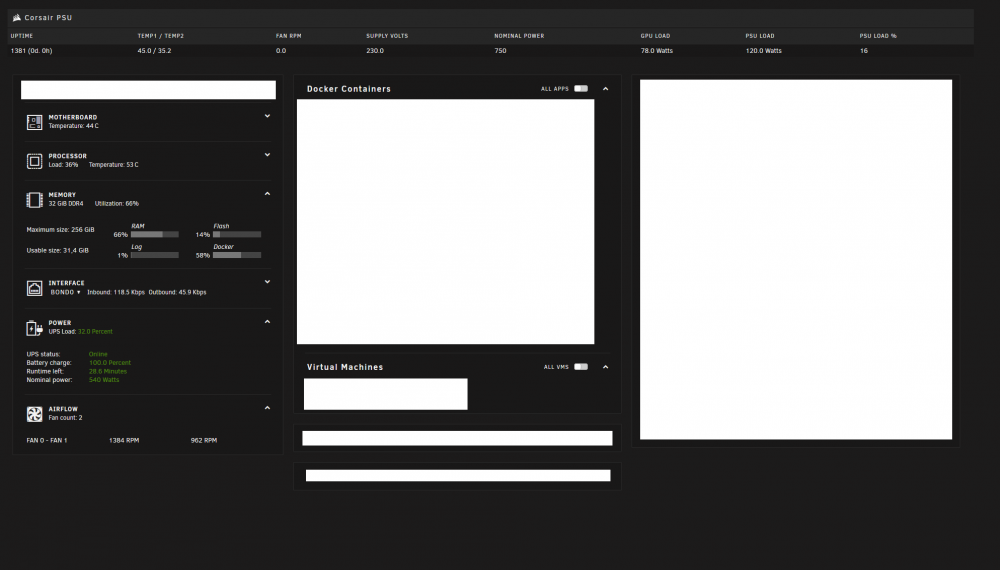
probably not much - they have added a few sections and sorted information in tiles. your plugin still works - but is misplaced at the top of the screen.. id rather have it beneath the "server hardware info" tile next to the ups stats. an easier solution would be just copying the styling of one of these tiles and moving the psu stats to the bottom
-
Any chance you could make this v.6.7.x ready?
-
I still see this in 6.6.6. Assigning 16-20 GB slows down my VM boot up to 3 minutes... first boot is always quick.
-
This has helped me with my High Sierra VM. I was soo close to giving up. Thanks a lot!
-
I have just double checked. The config from the github readme is working fine for me. Make sure that the environment variables are set correctly to DOMAIN=example.com autoJoin=true webroot=slweb serverroot=slserver autoJoinServer=https://example.com/slserver so basically your nginx config will make sure that a local synclounge instance is served at https://example.com/slserver not http://example.com/slserver, not https://www.example.com/slserver double check DOMAIN and autoJoinServer if you set this up according to the readme, this is the most likely mistake.
-
Just restart the container afterwards. The interface will show again.
-
i have to update the docker image manually so it gets rebuilt, upon a new makemkv release. for editing the ripper script, see above.
-
havent heard of aiff before your request, so me neither. best I can do is lead you towards your goal. ripper will place a script (ripper.sh) at the /config volume this script is responsible for the automated ripping process. you can find the command responsible for creating mp3/flac files at https://github.com/rix1337/docker-ripper/blob/eb5b89bebd46306521701cd8129ab4df4156ec75/root/ripper/ripper.sh#L100 all you need is to modify that line on your local machine. how, I cannot tell you
-
Yes, just edit the script yourself to include an appropriate tool. Ripper contains merely an example of what to do.
-
Thanks for the advice. I now managed to set this up. Failed to understand the options.. 😅
-
lemme try to clear up the confusion. how would i set this up: -mover running daily to move all and any files to the array (regardless of space available on the cache) -mover running hourly to only move all and any files to the array if cache is > 90 % full i understand the options that setting the 90% limit will also affect the regular daily mover process..
-
Hi Squid, up until now I have used a custom script for the following: - Run mover at 3.30 am to move all movable files - Run mover script hourly to check if cache is at > 90% used I want to prevent my cache completely filling up. I would like to stop using a script for that, but as of now, this is unsupported by the addon, correct? Would be happy if you considered adding this. Kind regards
-
Yes, this container has nothing to do with the software itself. Its just the shell that runs JDownloader. Any software specific issues have to be dealt with by the JDownloader devs.
-
See https://github.com/rix1337/docker-dnscrypt/issues/4 To be reachable outside your container, you cannot use localhost, but instead 0.0.0.0. The best ressource on setting up the file is https://github.com/jedisct1/dnscrypt-proxy/wiki/Configuration This image does only care about the toml being placed at /config Hope that helps 👍
-
I tried these io limiters, as well as the kbps commands - which did not seem to have any effect. I am forced to set those limits for a specific device (/dev/sdX), the cache pool itself is not working (/mnt/cache/appdata). Since my containers use the latter, it is not working. Strange. Looking at my build, the old MX100 could be the culprit,.. I will try to remove it from my cache pool and do some unrar-stress testing. Has anyone else experienced this? Might be worth a more genereal thread..
-
Hi @Djoss, i have, what seems to be a hardware bottlenecking issue: When JDownloader starts unpacking downloaded files, the extremely high io takes the rest of my server with it. That is, my cache-pool seems to bottleneck hard, when files are extracted. Plex/nginx, even the webinterface of Unraid, are extremely unresponsive as long as the files are processed. Afterwards, everything returns to normal (so there is no crash/error). I have tried various commands to limit reads/writes of this container - to no avail. Do you have any idea how i could limit the containers iops to keep my system running? I have ruled out ssd temps as the issue, they are fine at ~40°C or lower.
-
For time reasons this single thread will suffice. Use any VNC client to connect to the port defined when setting up the container. There is no web vnc client included.
-
What webgui? Ripper has none. Thanks for the input. I might change the script to use a variable for the disk device number.
-
Only place the settings.conf in the /config volume, if you entered a purchased app Key. Else you'll prevent ripper from automatically grabbing the latest free beta key on launch. I am almost certain that every other setting from the settings.conf is ignored, because everything else is set in ripper.sh at the /config volume. Look at line 86


