


5hurb
Members
-
Joined
-
Last visited
-
Looks like your transcode folder is set to prefer to use the cache drive. Try changing this to only so that the mover wont touch them
-
Health checks are quick and likely to be all done. Only took an hour or 2 to scan 20tb.
-
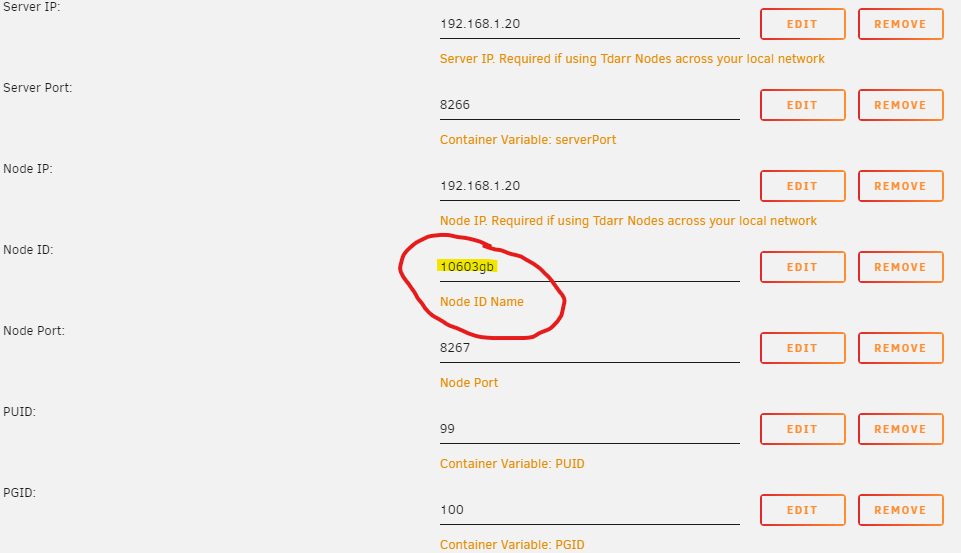
That's definitely an option. I have had another play around today and checking the node logs if you change the port of the 2nd docker to 8268 the container still thinks its 8267. Looks to be a bug in the tdarr_node. I will get the blinking node on the web interface every time the node registers [32m[2021-10-02T10:33:14.191] [INFO] Tdarr_Node - [39mStarting Tdarr_Node Preparing environment [32m[2021-10-02T10:33:14.208] [INFO] Tdarr_Node - [39mUpdating plugins [32m[2021-10-02T10:33:14.213] [INFO] Tdarr_Node - [39mTdarr_Node listening at http://localhost:8267 [32m[2021-10-02T10:33:14.300] [INFO] Tdarr_Node - [39m---------------Binary tests start---------------- [32m[2021-10-02T10:33:14.308] [INFO] Tdarr_Node - [39mhandbrakePath:HandBrakeCLI [32m[2021-10-02T10:33:14.317] [INFO] Tdarr_Node - [39mffmpegPath:ffmpeg [32m[2021-10-02T10:33:14.326] [INFO] Tdarr_Node - [39mmkvpropedit:mkvpropedit [32m[2021-10-02T10:33:14.326] [INFO] Tdarr_Node - [39mBinary test 1: handbrakePath working [32m[2021-10-02T10:33:14.327] [INFO] Tdarr_Node - [39mBinary test 2: ffmpegPath working [32m[2021-10-02T10:33:14.327] [INFO] Tdarr_Node - [39mBinary test 3: mkvpropeditPath working [32m[2021-10-02T10:33:14.327] [INFO] Tdarr_Node - [39m---------------Binary tests end------------------- [32m[2021-10-02T10:33:14.626] [INFO] Tdarr_Node - [39mCloning plugins [32m[2021-10-02T10:33:15.327] [INFO] Tdarr_Node - [39mFinished downloading plugins! [32m[2021-10-02T10:33:16.221] [INFO] Tdarr_Node - [39mNode registered [32m[2021-10-02T10:33:17.516] [INFO] Tdarr_Node - [39m[2.891s]Plugin update finished [32m[2021-10-02T10:33:20.490] [INFO] Tdarr_Node - [39mNode registered [32m[2021-10-02T10:33:24.539] [INFO] Tdarr_Node - [39mNode registered [32m[2021-10-02T10:33:28.541] [INFO] Tdarr_Node - [39mNode registered I also found another wee problem. If you name your node ID: with just numbers it will do the same behavior and just blink in the web interface. It requires letter text. So you cant just call it 1060
-
I've tried to add the 2nd GPU to the node it only uses one unfortunately. Anyone else got ideas?
-
double check you have --runtime=nvidia in advanced extra param on the node. Now the issue I have, I have 2x GPU's how the F do I get this working? Will takes months to get through my database at the rate its working at with just 1
-
Yea not working for Ryzen 3700x ASUS ROG STRIX B450-F Gaming
-
Thankyou for getting back to me. Sorry I included the XML to see if something in there was not right. I'm using the GUI to change Hyper-V setting to no but it does nothing for me when I go back in to edit the setting Hyper-V is always set to yes. Im getting the code 43 on a old 9800gt nvidia card that i'm trying to pass through for to the VM CUDA support for BlueIris in windows 10.
-
I seem to have an odd one where I change hyper-v to no and update but its automagiclly changing back to yes. Im no good with XML but this is what it looks like? <?xml version='1.0' encoding='UTF-8'?> <domain type='kvm'> <name>Windows 10 VM</name> <uuid>acdfb713-0f86-d6ac-f3a2-3d58a29e8e67</uuid> <metadata> <vmtemplate xmlns="unraid" name="Windows 10" icon="windows.png" os="windows10"/> </metadata> <memory unit='KiB'>8388608</memory> <currentMemory unit='KiB'>8388608</currentMemory> <memoryBacking> <nosharepages/> </memoryBacking> <vcpu placement='static'>3</vcpu> <cputune> <vcpupin vcpu='0' cpuset='1'/> <vcpupin vcpu='1' cpuset='2'/> <vcpupin vcpu='2' cpuset='3'/> </cputune> <os> <type arch='x86_64' machine='pc-i440fx-3.1'>hvm</type> <loader readonly='yes' type='pflash'>/usr/share/qemu/ovmf-x64/OVMF_CODE-pure-efi.fd</loader> <nvram>/etc/libvirt/qemu/nvram/acdfb713-0f86-d6ac-f3a2-3d58a29e8e67_VARS-pure-efi.fd</nvram> </os> <features> <acpi/> <apic/> <hyperv> <relaxed state='on'/> <vapic state='on'/> <spinlocks state='on' retries='8191'/> <vendor_id state='on' value='none'/> </hyperv> </features> <cpu mode='host-passthrough' check='none'> <topology sockets='1' cores='3' threads='1'/> </cpu> <clock offset='localtime'> <timer name='hypervclock' present='yes'/> <timer name='hpet' present='no'/> </clock> <on_poweroff>destroy</on_poweroff> <on_reboot>restart</on_reboot> <on_crash>restart</on_crash> <devices> <emulator>/usr/local/sbin/qemu</emulator> <disk type='file' device='disk'> <driver name='qemu' type='raw' cache='writeback'/> <source file='/mnt/user/domains/Windows 10 VM/vdisk1.img'/> <target dev='hdc' bus='virtio'/> <boot order='1'/> <address type='pci' domain='0x0000' bus='0x00' slot='0x03' function='0x0'/> </disk> <disk type='file' device='cdrom'> <driver name='qemu' type='raw'/> <source file='/mnt/user/isos/Windows.iso'/> <target dev='hda' bus='ide'/> <readonly/> <boot order='2'/> <address type='drive' controller='0' bus='0' target='0' unit='0'/> </disk> <disk type='file' device='cdrom'> <driver name='qemu' type='raw'/> <source file='/mnt/user/isos/virtio-win-0.1.160-1.iso'/> <target dev='hdb' bus='ide'/> <readonly/> <address type='drive' controller='0' bus='0' target='0' unit='1'/> </disk> <controller type='pci' index='0' model='pci-root'/> <controller type='ide' index='0'> <address type='pci' domain='0x0000' bus='0x00' slot='0x01' function='0x1'/> </controller> <controller type='virtio-serial' index='0'> <address type='pci' domain='0x0000' bus='0x00' slot='0x04' function='0x0'/> </controller> <controller type='usb' index='0' model='ich9-ehci1'> <address type='pci' domain='0x0000' bus='0x00' slot='0x07' function='0x7'/> </controller> <controller type='usb' index='0' model='ich9-uhci1'> <master startport='0'/> <address type='pci' domain='0x0000' bus='0x00' slot='0x07' function='0x0' multifunction='on'/> </controller> <controller type='usb' index='0' model='ich9-uhci2'> <master startport='2'/> <address type='pci' domain='0x0000' bus='0x00' slot='0x07' function='0x1'/> </controller> <controller type='usb' index='0' model='ich9-uhci3'> <master startport='4'/> <address type='pci' domain='0x0000' bus='0x00' slot='0x07' function='0x2'/> </controller> <interface type='bridge'> <mac address='52:54:00:fd:4e:d6'/> <source bridge='br0'/> <model type='virtio'/> <address type='pci' domain='0x0000' bus='0x00' slot='0x02' function='0x0'/> </interface> <serial type='pty'> <target type='isa-serial' port='0'> <model name='isa-serial'/> </target> </serial> <console type='pty'> <target type='serial' port='0'/> </console> <channel type='unix'> <target type='virtio' name='org.qemu.guest_agent.0'/> <address type='virtio-serial' controller='0' bus='0' port='1'/> </channel> <input type='tablet' bus='usb'> <address type='usb' bus='0' port='1'/> </input> <input type='mouse' bus='ps2'/> <input type='keyboard' bus='ps2'/> <hostdev mode='subsystem' type='pci' managed='yes'> <driver name='vfio'/> <source> <address domain='0x0000' bus='0x01' slot='0x00' function='0x0'/> </source> <address type='pci' domain='0x0000' bus='0x00' slot='0x05' function='0x0'/> </hostdev> <hostdev mode='subsystem' type='usb' managed='no'> <source> <vendor id='0x046d'/> <product id='0xc077'/> </source> <address type='usb' bus='0' port='2'/> </hostdev> <hostdev mode='subsystem' type='usb' managed='no'> <source> <vendor id='0x046d'/> <product id='0xc31c'/> </source> <address type='usb' bus='0' port='3'/> </hostdev> <memballoon model='none'/> </devices> </domain>


