






ados
Members
-
Joined
-
Last visited
Everything posted by ados
-
@wobblewoo if your not too committed to your VPN provider switch to PIA. They are affordable, fast and support port forwarding which you generally need for what your doing.
-
@tetrapod you might find Organizr interesting, check out the new guide.
-
For those wanting to restrict login access to their sub domains or sub-folders from public access through NGINX Proxy Manager I have created a guide to use Organizr. Its a powerful SSO based platform for accessing multiple resources and allows for configuration using their API to restrict access to URL resources without authentication to Organizr. Guide:
-
For those wanting to restrict login access to their sub domains or sub-folders from public access through NGINX Proxy Manager I have created a guide to use Organizr. Its a powerful SSO based platform for accessing multiple resources and allows for configuration using their API to restrict access to URL resources without authentication to Organizr. Guide:
-
For those wanting to restrict login access to their sub domains or sub-folders from public access through NGINX Proxy Manager I have created a guide to use Organizr. Its a powerful SSO based platform for accessing multiple resources and allows for configuration using their API to restrict access to URL resources without authentication to Organizr. Guide:
-
For those wanting to restrict login access to their sub domains or sub-folders from public access through NGINX Proxy Manager I have created a guide to use Organizr. Its a powerful SSO based platform for accessing multiple resources and allows for configuration using their API to restrict access to URL resources without authentication to Organizr. Guide:
-
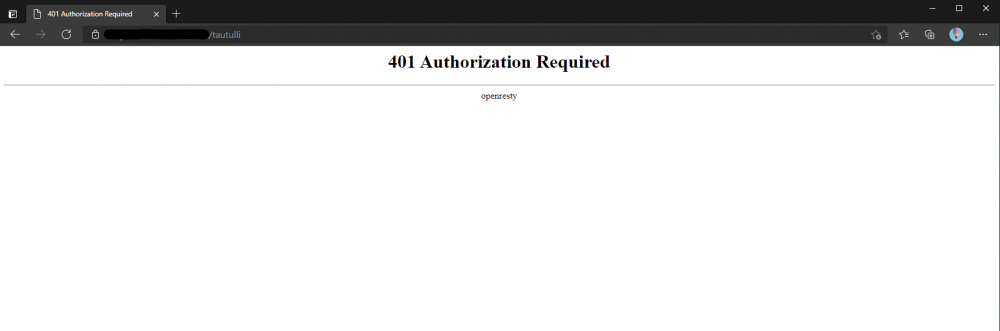
Just want to thank the developers for Organizr its made management of services so much easier. I would like to share a procedure for new peeps to secure their systems when using a reverse proxy, in this case NGINX Proxy Manager. The following I think is a typical new proxy setup: https://domain.com Then the docker apps are setup either as subdomains https://sub.domain.com or sub-folders https://domain.com/subfolder In both these instances the docker is exposed to the internet for hacking (we are dismissing firewalls in this example) You can use Organizr to collaborate them together but its still the same. https://organizr.com might be the location to access all the apps but https://sub.domain.com or sub-folders https://domain.com/subfolder is still there providing the address is used directly. This is where we can use Organizr API to lock down the access to the sub domains and sub-folders. When I access https://sub.domain.com or sub-folders https://domain.com/subfolder I get this: This is because in this session I'm not logged into Organizr and so there is no authentication session to authorise me. If I did this in a browser I was logged into Organizr it would take me directly to the app but I could always go through Organizr too; thus I can do both but the public cannot. Add this with SSO and even MFA for Organizr and we now have a secure login wall. The following procedure explains how to do this for the easier NGINX app NGINX Proxy Manager (GUI based): First you will need to have configured your NGINX PM docker, this is outside the scope of this guide so please review relevant procedures on their support forum; you will also need a configured Organizr using sub domains or sub-folders. Sub-folder setup: This setup is easier to configure and reduces complexity on domains/wildcards and SSL 1. In NGINX PM, edit the host relating to your Organizr which should have Organizr set on the "Details" screen and not a sub-folder; this ensures Organizr works effectively. 2. You have two options to configure the access: Enter the following (with your own edit using examples below) auth_request /auth-4; into the "Advanced" tab if you want a global group block for all sub-folders. OR Enter the following (with your own edit using examples below) auth_request /auth-4; into the the custom configuration field (cog icon) for each sub-folder you want to restrict. This method allows for granularity. **Remember the restriction you place also applies to the user accessing the resources from within Organizr. Replace the 4 with the match group level required to access the resource: 0=Admin 1=Co-Admin 2=Super User 3=Power User 4=User Logged In Users=998 Guests=999 3. Create a new location which will contain the API call to Organizr for this to work: Location: ~ /auth-(.*) Scheme: http Forward Hostname: 0.0.0.0/api/v2/auth?group=$1 Forward Port: 8040 **Replace the IP address values to your docker running Organizr and if you changed your default port also adjust that. In the custom configuration field (cog icon) for that same location enter the following without edits: internal; proxy_set_header Content-Length ""; I have found this no longer works for newer NGINX versions breaking everything! It seems the underlying config code has change which causes the 500 error. I cannot verify what version the issue started, but if you are on version v2.9.11 you need to do this: Edit the proxy host, select the far right advance tab and enter the following: location ~ /auth-(.*) { proxy_set_header Host $host; proxy_set_header X-Forwarded-Scheme $scheme; proxy_set_header X-Forwarded-Proto $scheme; proxy_set_header X-Forwarded-For $remote_addr; proxy_pass http://0.0.0.0:8999/api/v2/auth?group=$1; internal; proxy_set_header Content-Length ""; } **Replace the IP address values to your docker running Organizr and if you changed your default port also adjust that. 4. [Optional] if you have your Organizr connected to dockers using API (homepage items) via the proxy (don't know why you would, instead of local IP) then you will need to exclude the API call from needing authentication. For each location pointing to a docker using API in this configuration enter the following in the custom config (cog icon): Example: location /tautulli/api { auth_request off; proxy_pass http://0.0.0.0:8181/tautulli/api; } **You might also have the auth_request /auth-4 text in there too which is fine. Replace the IP and port to your docker, replacing also the app names. 5. If you save it here you will block all users from accessing Organizr. This is because you need to be logged into Organizr to access Organizr, catch 22. We fix this with one final location: Location: / Scheme: http Forward Hostname / IP: 0.0.0.0 Forward Port: 8040 **Replace the IP address values to your docker running Organizr and if you changed your default port also adjust that. In the custom configuration field (cog icon) for that same location enter the following without edits: auth_request off; This means when we go to https://domain.com it will automatically append a "/" to the end and the location bypasses the need to authenticate so we can login. 6. Setup complete Sub-domain setup: This is similar but with more repeating steps. 1. In NGINX PM, edit the host relating to your sub domain you want to restrict. 2. Enter the following (with your own edit using examples below) auth_request /auth-4; into the "Advanced" tab. **Remember the restriction you place also applies to the user accessing the resources from within Organizr. Replace the 4 with the match group level required to access the resource: 0=Admin 1=Co-Admin 2=Super User 3=Power User 4=User Logged In Users=998 Guests=999 3. Create a new location which will contain the API call to Organizr for this to work: Location: ~ /auth-(.*) Scheme: http Forward Hostname: 0.0.0.0/api/v2/auth?group=$1 Forward Port: 8040 **Replace the IP address values to your docker. In the custom configuration field (cog icon) for that same location enter the following without edits: proxy_pass_request_body off; proxy_set_header Content-Length ""; I have found this no longer works for newer NGINX versions breaking everything! It seems the underlying config code has change which causes the 500 error. I cannot verify what version the issue started, but if you are on version v2.9.11 you need to do this: Edit the proxy host, select the far right advance tab and enter the following: location ~ /auth-(.*) { proxy_set_header Host $host; proxy_set_header X-Forwarded-Scheme $scheme; proxy_set_header X-Forwarded-Proto $scheme; proxy_set_header X-Forwarded-For $remote_addr; proxy_pass http://0.0.0.0:8999/api/v2/auth?group=$1; internal; proxy_set_header Content-Length ""; } **Replace the IP address values to your docker running Organizr and if you changed your default port also adjust that. 4. [Optional] if you have your Organizr connected to dockers using API (homepage items) via the proxy (don't know why you would, instead of local IP) then you will need to exclude the API call from needing authentication. Click the "Advanced" settings tab and enter the following: Example: location /tautulli/api { auth_request off; proxy_pass http://0.0.0.0:8181/tautulli/api; } **Replace the IP and port to your docker, replacing also the app names. 5. Repeat steps 1-4 for each sub domain. 6. Setup complete Additions: For those wanting to get deluge working in a subfolder environment configure the following: Remove your Deluge location, it needs to be added manually. In the advance tab for the proxy host site add the following: location /deluge { proxy_set_header Host $host; proxy_set_header X-Forwarded-Scheme $scheme; proxy_set_header X-Forwarded-Proto $scheme; proxy_set_header X-Forwarded-For $remote_addr; proxy_pass http://0.0.0.0:8112/; proxy_set_header X-Deluge-Base "/deluge/"; include /nginxv/proxy-control.conf; add_header X-Frame-Options SAMEORIGIN; auth_request /auth-1; } **Replace the IP address values to your docker running Deluge and if you changed your default port also adjust that. Its ok if you already have code in the box, add a few lines and add the new code. Download the proxy-control.conf attached to the guide and put in the main NGINX folder. You can change the location but you will need to change the include /nginxv/proxy-control.conf; to the correct location. Restart the NGINX container as its need to load the addition config and Deluge will now work.
-
@balder thats correct, MGINX PM only supports wildcards in SSL but will work with subdomains. If you want wildcards you would be better with raw NGINX docker using config files. You should have no exposed instances to internet without a login wall and if you have that you should have SSL.
-
@tetrapod thanks for the support. It took a lot of hours but if it helps others that's the idea. It has been posted to all three Deluge repositories and NGNX PM home too. I looked at swag but seemed like more effort 'at the time' and I wasn't sure if it supported multi proxy hosts with different SSLs which I need.
-
Struggled to get Deluge VPN working with NGINX Proxy Manager After much rabbit hole diving I found the solution which can be found here: https://forums.unraid.net/topic/44109-support-binhex-delugevpn/?do=findComment&comment=980069
-
Struggled to get Deluge VPN working with NGINX Proxy Manager After much rabbit hole diving I found the solution which can be found here: https://forums.unraid.net/topic/44109-support-binhex-delugevpn/?do=findComment&comment=980069
-
Having used a few NGINX based reverse proxies this one is the best by far. Its clean GUI allows for easier management of hosts and is better if your new to the platform. However, since its based on GUI and not nitty gritty config files it can make getting troublesome dockers to work. I struggled to get Deluge working and had little issues with the 10+ other dockers. Now that I have it working I would like to share the solution which you will find here: https://forums.unraid.net/topic/44109-support-binhex-delugevpn/?do=findComment&comment=980069
-
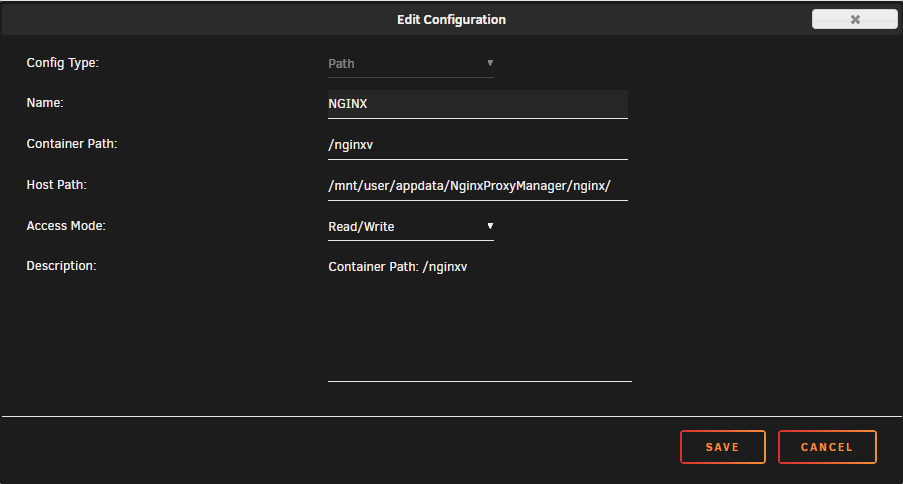
Having used a few NGINX based reverse proxies, NGINX Proxy Manager is the best by far. Its clean GUI allows for easier management of hosts and is better if your new to the platform. However, since its based on GUI and not nitty gritty config files it can make getting troublesome dockers to work. I struggled to get Deluge working and had little issues with the 10+ other dockers. Now that I have it working I would like to share the solution. NGINX Proxy Manager: If you use the default location settings for most apps its will work fine but for Deluge you will get. Now you might be inclined to Google your way to the correct custom settings that you can input per location but it will be a long road to nowhere as your actually missing a needed configuration file. This file is not included with NGINX PM and without it Deluge will not work. To fix this follow the steps precisely: 1. Create a new location for Deluge. If you have one already, delete it and start new. 2. Set the following settings: location: /deluge scheme: http forward hostname / IP: IP address to your docker + trailing slash i.e. 172.16.0.2/ forward port: 8112 (unless you have changed the default port) You must have the trailing slash or it will not work. You should avoid manually adjusting the .conf file in app folder because NGINX will replace that file if you modify locations via GUI. 3. Now we add the needed config file, I have attached this to the post. proxy-control.conf Using UNRAID console with root access, copy the file to the app directory. i.e. cp /location/proxy-control.conf <to the destination> /mnt/user/appdata/NginxProxyManager/nginx Use ls /app/location to confirm its there. 4. Create a custom path to your location within docket template. i.e. Or use the built in app location from template /config 5. Now we add the advance settings needed which includes injecting that config file. In the deluge location click the cog icon to get to the advance settings. This is the example settings provided by Deluge wiki: proxy_pass http://localhost:8112/; proxy_set_header X-Deluge-Base "/deluge/"; include proxy-control.conf; add_header X-Frame-Options SAMEORIGIN; However that's assumed for configuration based NGIX instances and PM is GUI based, we need to tweak it to: proxy_set_header X-Deluge-Base "/deluge/"; include /docker/variable/path/proxy-control.conf; add_header X-Frame-Options SAMEORIGIN; Remember to change the "include /docker/variable/path/proxy-control.conf;" to your docker variable path i.e. /config/nginx/proxy-control.conf; Or using your custom set variable path 6. Click the save and we should be done. NGINX does not inject config files until reboot so reboot the container. Follow the logs and confirm there are no errors, if you encounter one it would will be an issue loading the config file and you will need to check the following to resolve: Check your steps for something missed Confirm your variable is working using the dockers console to list the file Ensure the permissions are such the docker has access. i.e. 775 7. Now if you go to https://domain.com/deluge you should get to your docker. Hope this helps 🙂 proxy-control.conf

-
I think there is a crippling bug in a new release but I unfortunately don't know which specifically. What I can say is with the latest build when you try changing any SSL certs you get a local error. Removing a proxy host will give the same error and when docker is rebooted logs show errors that it cannot find/load the SSL which prevents the container form working any further. I created a new container (no retained settings) and tired adding just one SSL with the same issue. Delete completely and used a version from November last year with multiple SSLs added the same way without issue.
-
Another year and they still have not addressed this one? Can we please have more customisation for the main GUI.
-
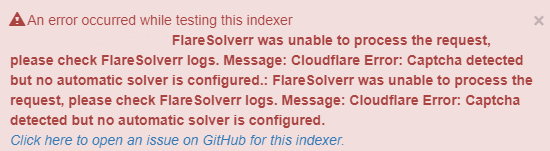
Sadly it seems Captcha is blocking it from working
-
Plex and tonemapping work without issue for me, I'm using HW transcode as I wanted to shift away from using CPU when its needed for other work. I know most QS CPUs are ok with TM but if your HW then only Pascal+ support tonemapping.
-
There seems to be two issues here, one is that Intel QuickSync is supported natively with Tdarr builds. If your having issues using the commands see examples. You must have a compatible CPU and there is debates but I prefer HW over SW transcode. The other issue from log is relating to protected DVD content which I wouldn't be able to elaborate on.
-
As specified by the docker material, Tdarr supports Handbrake and FFMPEG without any extra installing. Handbrake is good for beginners but I would suggest jumping into the deepen and go with FFMPEG. Its more powerful and generally with the right configuration outputs in better quality. However, as far as I am aware FFMPEG cannot work with ISO files as they are containers to multiple files which are not all video and in most cases are fragmented to make ripping harder for copywrite. You would need to look at Handbrake within Tdarr. You could also depending on how many ISO files you have use BDinfo which will allow the identification of the main stream which can be placed into a watched folder by Tdarr for FFMPEG processing.
-
I wrote many of my own plugins which resolved this requirement.
-
Hey guys, got a real specific/odd request could use some assistance with. I'm downloading (legally) podcasts from a distributer that allows so as long as its for personal use to your own storage. Now the file is video/audio but I want to use Tdarr to convert it to audio only via an extraction or other method. Seems Tdarr is not designed to do this with all plugins and manual methods requiring video codec information at some point or even AC3 as a saving extension is not allowed, would this be impossible?
-
PIA is not compatible with many dockers at the moment due to large changes in their server infrastructure. The new nextgen servers are not working with port forwarding outside of their specific app. Their new servers are also causing issues with connections when port forwarding is not in place, as these dockers use leak tables when the connection is not established in a desired way the app refuses to function.
-
Need more information please.
-
It will take a few minutes to confirm, set the repository to only 1X version and test your plugins. I was using a low version for the same reasons.
-
PIA has been a solid 100% no complaint service but these Next Gen servers have really killed the functionality to the point its barely useable. It would be fine if they didn't jump the gun and close their old servers forcing the new near 0 support for Linux platform. Seems their focus is on Windows/Mac/Mobile and don't think Linux is worth the support particularly with OpenVPN files.



