


Masterism
Members
-
Joined
-
Last visited
Everything posted by Masterism
-
I did. It was a brand new download of the image and install. I changed nothing but the data dir and config dir. It worked previously. I will give this a go. Thanks For whatever reason that worked. I had the config live in an appdata folder in a previous attempt and it worked fine until I ran into a separate issue. Thank you for your help.
-
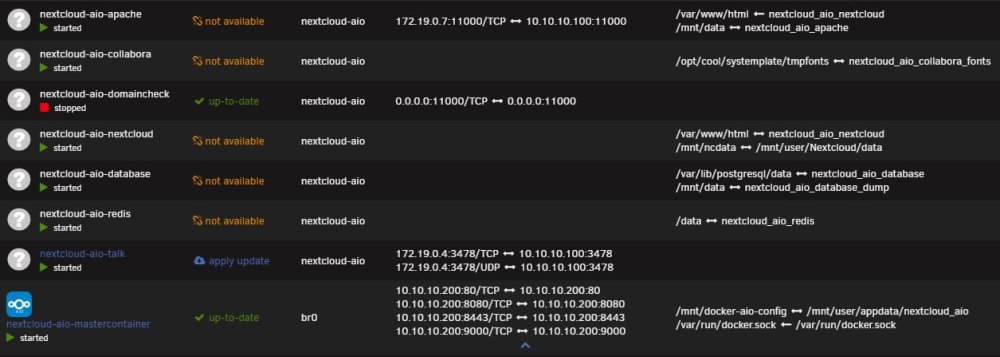
I am following that guide. and I've done everything that it said too do. I have followed This guide instead to clean remove everything to do with the nextcloud-aio and also removed the docker image. After reinstalling the container, I am still getting the: error. I'm not a docker or unraid expert, I've no idea why this is happening or how to fix it. Any help would be greatly appreciated.Thanks for that. That kinda fixed my issue and then caused another. So, I tried to install the nextcloud aio mastercontainer on unraid and for reasons I had to do a reset. I'm now trying to install it again and I'm getting this error: Nothing has changed, I followed These instructions and did exactly what it said to do. Any ideas on what I can do? ThanksThe version of obsidian that this container uses is 8 months out of date. Is there a way to update it?I went to install the nextcloud-aio-mastercontainer and for some reason or another I didn't fully finish setting it up. some time goes by and I go to finish setting it up and I can't get in because I forgot the long generated password and stupidly didn't copy it to a safe location. So I delete the containers to start fresh and now the database container seems to be in a boot loop. I can't access the logs because the window closes before anything can be read. I think just deleting the local data would solve my problems. The problem with that is, I don't know where the local data is being stored. It just says " nextcloud_aio_database ". I take that to be the root folder? But I cannot find it. Any ideas on how I can fix this issue or where the local data is stored?
 I understand. And I had read through the first few pages before posting. It was just a bit confusing when I was just following the video and it still didn't work. It's all working just fine now. Just had to replace the pflash and the nvram directory locations.However annoyed I got with your answer, it got me to compare the original xml of my vm with my edited one and I found the differences. Thank you.I'm not seeing the answer. What am I missing?Hello all, I'm having an issue with a Catalina VM where the image is repeated. This is what it looks like. On first boot it booted fine. I installed MacOS, I then shut it down, gave it more cores, more ram, changed the nic in the xml file, and of course changed the icon back. Here is my xml file: <?xml version='1.0' encoding='UTF-8'?> <domain type='kvm'> <name>MacinaboxCatalina</name> <uuid>3cb0069e-6eaf-427c-b812-a140e7bd91a3</uuid> <description>MacOS Catalina</description> <metadata> <vmtemplate xmlns="unraid" name="Windows 10" icon="/mnt/user/domains/MacinaboxCatalina/icon/catalina.png" os="Catalina"/> </metadata> <memory unit='KiB'>8388608</memory> <currentMemory unit='KiB'>8388608</currentMemory> <memoryBacking> <nosharepages/> </memoryBacking> <vcpu placement='static'>4</vcpu> <cputune> <vcpupin vcpu='0' cpuset='0'/> <vcpupin vcpu='1' cpuset='6'/> <vcpupin vcpu='2' cpuset='1'/> <vcpupin vcpu='3' cpuset='7'/> </cputune> <os> <type arch='x86_64' machine='pc-q35-3.1'>hvm</type> <loader readonly='yes' type='pflash'>/usr/share/qemu/ovmf-x64/OVMF_CODE-pure-efi.fd</loader> <nvram>/etc/libvirt/qemu/nvram/3cb0069e-6eaf-427c-b812-a140e7bd91a3_VARS-pure-efi.fd</nvram> </os> <features> <acpi/> <apic/> </features> <cpu mode='host-passthrough' check='none'> <topology sockets='1' cores='2' threads='2'/> <cache mode='passthrough'/> <feature policy='require' name='topoext'/> </cpu> <clock offset='utc'> <timer name='rtc' tickpolicy='catchup'/> <timer name='pit' tickpolicy='delay'/> <timer name='hpet' present='no'/> </clock> <on_poweroff>destroy</on_poweroff> <on_reboot>restart</on_reboot> <on_crash>restart</on_crash> <devices> <emulator>/usr/local/sbin/qemu</emulator> <disk type='file' device='disk'> <driver name='qemu' type='qcow2' cache='writeback'/> <source file='/mnt/user/domains/MacinaboxCatalina/Clover.qcow2'/> <target dev='hdc' bus='sata'/> <boot order='1'/> <address type='drive' controller='0' bus='0' target='0' unit='2'/> </disk> <disk type='file' device='disk'> <driver name='qemu' type='raw' cache='writeback'/> <source file='/mnt/user/domains/MacinaboxCatalina/Catalina-install.img'/> <target dev='hdd' bus='sata'/> <address type='drive' controller='0' bus='0' target='0' unit='3'/> </disk> <disk type='file' device='disk'> <driver name='qemu' type='raw' cache='writeback'/> <source file='/mnt/user/domains/MacinaboxCatalina/macos_disk.img'/> <target dev='hde' bus='sata'/> <address type='drive' controller='0' bus='0' target='0' unit='4'/> </disk> <controller type='sata' index='0'> <address type='pci' domain='0x0000' bus='0x00' slot='0x1f' function='0x2'/> </controller> <controller type='pci' index='0' model='pcie-root'/> <controller type='pci' index='1' model='pcie-root-port'> <model name='pcie-root-port'/> <target chassis='1' port='0x10'/> <address type='pci' domain='0x0000' bus='0x00' slot='0x02' function='0x0' multifunction='on'/> </controller> <controller type='pci' index='2' model='pcie-root-port'> <model name='pcie-root-port'/> <target chassis='2' port='0x11'/> <address type='pci' domain='0x0000' bus='0x00' slot='0x02' function='0x1'/> </controller> <controller type='pci' index='3' model='pcie-root-port'> <model name='pcie-root-port'/> <target chassis='3' port='0x12'/> <address type='pci' domain='0x0000' bus='0x00' slot='0x02' function='0x2'/> </controller> <controller type='pci' index='4' model='pcie-root-port'> <model name='pcie-root-port'/> <target chassis='4' port='0x13'/> <address type='pci' domain='0x0000' bus='0x00' slot='0x02' function='0x3'/> </controller> <controller type='virtio-serial' index='0'> <address type='pci' domain='0x0000' bus='0x02' slot='0x00' function='0x0'/> </controller> <controller type='usb' index='0' model='ich9-ehci1'> <address type='pci' domain='0x0000' bus='0x00' slot='0x07' function='0x7'/> </controller> <controller type='usb' index='0' model='ich9-uhci1'> <master startport='0'/> <address type='pci' domain='0x0000' bus='0x00' slot='0x07' function='0x0' multifunction='on'/> </controller> <controller type='usb' index='0' model='ich9-uhci2'> <master startport='2'/> <address type='pci' domain='0x0000' bus='0x00' slot='0x07' function='0x1'/> </controller> <controller type='usb' index='0' model='ich9-uhci3'> <master startport='4'/> <address type='pci' domain='0x0000' bus='0x00' slot='0x07' function='0x2'/> </controller> <interface type='bridge'> <mac address='52:54:00:bb:da:8a'/> <source bridge='br0'/> <model type='e1000-82545em'/> <address type='pci' domain='0x0000' bus='0x01' slot='0x00' function='0x0'/> </interface> <serial type='pty'> <target type='isa-serial' port='0'> <model name='isa-serial'/> </target> </serial> <console type='pty'> <target type='serial' port='0'/> </console> <channel type='unix'> <target type='virtio' name='org.qemu.guest_agent.0'/> <address type='virtio-serial' controller='0' bus='0' port='1'/> </channel> <input type='tablet' bus='usb'> <address type='usb' bus='0' port='1'/> </input> <input type='mouse' bus='ps2'/> <input type='keyboard' bus='ps2'/> <graphics type='vnc' port='-1' autoport='yes' websocket='-1' listen='0.0.0.0' keymap='en-us'> <listen type='address' address='0.0.0.0'/> </graphics> <video> <model type='qxl' ram='65536' vram='65536' vgamem='16384' heads='1' primary='yes'/> <address type='pci' domain='0x0000' bus='0x00' slot='0x01' function='0x0'/> </video> <memballoon model='virtio'> <address type='pci' domain='0x0000' bus='0x03' slot='0x00' function='0x0'/> </memballoon> </devices> <qemu:commandline> <qemu:arg value='-usb'/> <qemu:arg value='-device'/> <qemu:arg value='usb-kbd,bus=usb-bus.0'/> <qemu:arg value='-device'/> <qemu:arg value='isa-applesmc,osk=deleted'/> <qemu:arg value='-smbios'/> <qemu:arg value='type=2'/> <qemu:arg value='-cpu'/> <qemu:arg value='Penryn,kvm=on,vendor=GenuineIntel,+invtsc,vmware-cpuid-freq=on,+pcid,+ssse3,+sse4.2,+popcnt,+avx,+aes,+xsave,+xsaveopt,check'/> </qemu:commandline> </domain> After editing the xml file I go to boot the system and it gives me that screen. Any ideas on how to fix it? Thanks.
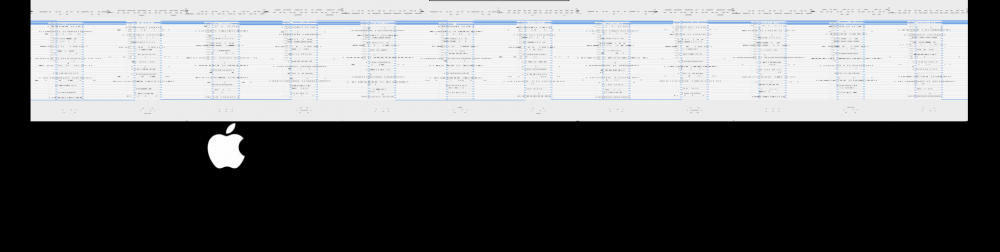 I don't use Bedrock edition, but a mod that the modpacks I play use is called Aroma Backup. It auto backups incrementally. You would have to check to see if that mod can be used with the Bedrock edition. But you could use that as a backup and then if you wanted to you could even backup the backup file. Just a suggestion.Have you tried just renaming the jar to 'server.jar' ?No worries, I was just curious as I couldn't find anything about it. Thanks a bunch for your work.Do you have more information on the new version? It is it a "it's ready when it's ready" kinda thing?I just wanted to know if it was possible to see what has been cached. Thanks for the reply.I have a quick question about the SteamCacheBundle container. Is there a way to see what exactly is being cached?All I did was download the docker and let it install. I don't have Ark installed atm to see if the server is up. Most of these game servers don't require a steam account. Also with a the couple servers that I have tried to use an account with, it just failed. So, don't use an account and it'll work!Remove the account. I just installed the docker and logged in anonymously and it downloaded, and installed just fine. After that it looks like you would need to stop the container then add the account info and start it back up. Atleast, that's what I'm guessing: Connecting anonymously to Steam Public...Logged in OK Waiting for user info...OK Success! App '376030' already up to date. ---Prepare Server--- ---Server ready--- ---Start Server--- [S_API FAIL] SteamAPI_Init() failed; SteamAPI_IsSteamRunning() failed. Setting breakpad minidump AppID = 346110 is saying. Hope this helps!Ah, I didn't see a specification on what version. I know you can do it that way, I found it easier to do it with wget, which is how I did it. Whatever Works!Shutdown the container, ssh into the server, go to the minecraft server folder inside the app folder cd /mnt/user/appdata/minecraft delete the server.jar rm server.jar then download the updated server file. wget https://launcher.mojang.com/v1/objects/3dc3d84a581f14691199cf6831b71ed1296a9fdf/server.jar And then start the container again.You can SSH into the unraid server and use cd /mnt/user/appdata/OpenTTD to get to the config files. I'll let someone else answer to the specific location in that folder where the "OpenTTD.cfg" file is located.I'll let someone more knowledgeable answer this, but I just wanted to ask: Have you tried to SSH into server and edit the file with something like nano ?I'm not sure about it it using RAM to speed up file transfers.. A cache stores the game files "locally" so that the game doesn't need to reach out to the internet for the files. It acts like an external hard drive essentially. I wouldn't think it to use RAM or CPU resources. Someone more knowledgeable than I can perhaps shed some light.Are you talking about memory usage, or storage space usage? The easiest way to see how much storage the cache is using is to ssh into the unraid server and using the: du -sh /mnt/user/steamcache/cache command. It may take a bit depending on how much space is actually being used. Or, another way is to use the binhex-krusader container. Use Alt Up to go up a directory and navigate to the above location and right click on the cache folder and click on properties.Yeah, sure.


