





ChuckTSI
Members
-
Joined
-
Last visited
Everything posted by ChuckTSI
-
It has now been 11 years. The radio has seen its share of issues. Most Seagate drives have died. I lost two controller cards due to overheating once I reached 16 drives on them (8 each) New controller cards now have a fan sitting on them. I will be at 85TB of storage by end of day (new drive coming in). My oldest drive I just took out was a 1TB WD. 15+ years powered on. The other drives unassigned DEVICE | DISK | MODEL | HOURS | DAYS | YEARS /dev/sdb | apps | WDC WDBN | 49085 | 2045 | 5.60 /dev/sdc | cache | ADATA SU650 | 21970 | 915 | 2.51 /dev/sdt | disk10 | WDC WD30EFRX | 60807 | 2534 | 6.94 /dev/sdj | disk11 | WDC WD160EDGZ | 6266 | 261 | 0.72 /dev/sdr | disk12 | WDC WD40EFRX | 60958 | 2540 | 6.96 /dev/sdm | disk15 | WDC WD120EDAZ | 37949 | 1581 | 4.33 /dev/sdi | disk4 | WDC WD120EDBZ | 31425 | 1309 | 3.59 /dev/sdk | disk6 | WDC WD30EZRX | 81700 | 3404 | 9.33 /dev/sds | disk7 | WDC WD30EZRX | 89181 | 3716 | 10.18 /dev/sdf | disk8 | WDC WD30EZRX | 100665 | 4194 | 11.49 /dev/sdg | disk9 | WDC WD30EZRX | 106479 | 4437 | 12.16 << Has 4 Million Load Cycle Counts. O.o /dev/sdq | parity | ST16000VN001 | 32269 | 1345 | 3.68 /dev/sdd | unassigned | ADATA SP550 | 3239 | 135 | 0.37 /dev/sdu | unassigned | ST3000DM001 | 76518 | 3188 | 8.73 /dev/sdl | unassigned | ST32000542AS | 46005 | 1917 | 5.25 /dev/sdo | unassigned | WDC WD10EAVS | 133436 | 5560 | 15.23 /dev/sdh | unassigned | WDC WD20EARX | 108495 | 4521 | 12.39 /dev/sdp | unassigned | WDC WD20EARX | 116225 | 4843 | 13.27 Only issue now is the fans are rattling (200mm fans). but I cut out the fan mounting plate specifically for that brand of FAN that is no longer. I have toyed with moving into a proper 4u case.
-
This is very cool. Nicely done! :)
-
Confirmed. Installed, Setup. Delete a file. Didn't Work. (But saw the .Recycle Bin folder. Empty) Restarting the Array fixed it.
-
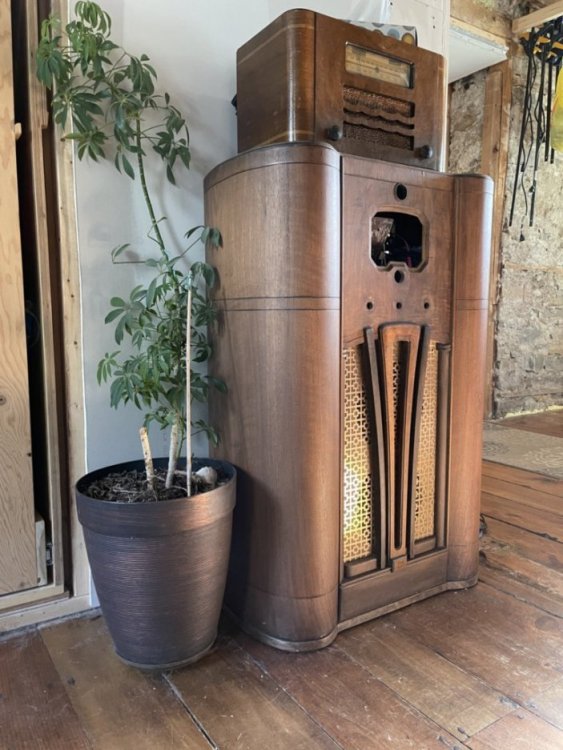
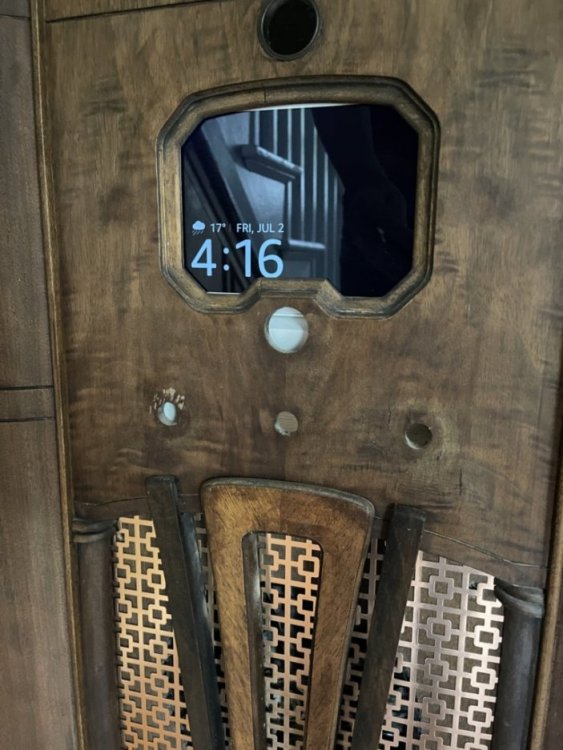
7 Years Later..... This Unraid Radio has moved into an old 1851 stone home we are renovating. It is protected by a APC 1500 VA UPSD and now has Upgraded Motherboard and CPU (i7-4790k) 24 GB Ram 4 SSDs 16 Drives (39TB) It also hosted an echo show for awhile Finally committed to a 16TB Parity drive so I can start trimming down the drive count Drive with most powered on hours is over 11y, 6m, 29d, 19h Other than getting dusty (which I did a full tear down and clean out as CPU temps were hitting 100), it has run like a champ and cooling drives working great. When I am done the house, I will get back to mounting Motherboard, PSU and SSDs correctly along with finishing the front and back panels. The small radio on top may become a gaming PC.
-
Late to the party, but: Power on hours 101490 (11y, 6m, 29d, 18h) Model Family: Western Digital Caviar Green Device Model: WDC WD10EAVS-00D7B1 Raw_Read_Error_Rate POSR-K 200 200 051 - 0 Spin_Up_Time POS--K 166 164 021 - 6658 Start_Stop_Count -O--CK 096 096 000 - 4703 Reallocated_Sector_Ct PO--CK 200 200 140 - 0 Seek_Error_Rate -OSR-K 100 253 000 - 0 Power_On_Hours -O--CK 001 001 000 - 101490 Power_Cycle_Count -O--CK 099 099 000 - 1572
-
I was going to continue Gman. I thought I figured it out. I just found this for $10 each: 3 drive cages from Corsair. for 80$ I get 24 slots. Just need to make the frame to hold them all. and for another $4, 2 SSD. To bad I am Canadian. End cost goes from $84 to $200 Still cheaper than the Norco. 1st world problems. I just really hate having to spin this radio around to add drives. It's getting fraking heavy.
-
So just an update. This project fell off the radar. Unfortunately. I have now reached 15 drives. And the problem now is my cables aren't able to reach the bottom set of drives. Also, my racks are a pain to put new drives in. I hate to say it, but I think a Norco 24bay is in the future. But for the record, the setup works and has been awesome. Just will never be completed as other life priorities have taken over. For archival sake, I will restore the broken photo links in the thread. Thanks for those that participated and see you next unfinished project I start. And sorry, UnRaid Vintage Coke Machine probably won't happen either. /sniff
-
Same deal. Now that my eth0 reads 192.168.0.101 I try bridged with eth0. Still fails. Everything other than NAT fails in one way or another. (network unreachable or interface doesn't come up) My windows installation of VirtualBox has no issues creating bridged network. UPDATE: I have got it working, but I am curious as to why it fails initially. Boot Server. Wait 2 mins for the DHCP stupid "For Wait For" to timeout Log in. ifdown enp0s3 Returns Network is Unreachable blah blah ifup enp0s3 DCHPOFFER 192.168.0.127 I can ping my network. All is good. Why won't it do this in the FIRST place!? Arhghghgh Temporary workaround is /etc/rc.local added ifdown enp0s3 ifup enp0s3
-
No. For some reason my network settings has setup bridge as enabled. Not sure if I did it assuming dockers needed it? I'm gonna go back to static and cross my fingers. Thanks Edit: Maybe at some point I did try Xen... >.> I forget.
-
Hey all. I have installed virtualbox plugin. Everything is peachy. Kinda. I have one annoyance that I can't get past. When I create a Linux virtual box (have not tried windows), I set the network adapter to be bridge (eth0). During the install of linux, it's downloading happily and things seem great. But the minute the install is done and I boot into my new OS, I get that dreaded "for Wait For" during bootup which means it isn't getting an IP. NAT is ok and I get 10.x.x.x ip. (or whatever it is) and it can surf, but I want to create hosts that reside on my 192.168.0.x using bridge mode, it fails. For the life of me, I can't get it working. Any ideas? Thanks in advance. I should note that in UnRaid: My eth0 adapter shows no IP. Ifconfig shows xenbr0 as having the 192.168.0.x number that is used on my network.
-
Found it!! Oddly.. along with some 2 Carat Diamond Earrings...
-
OLA! Long time no speak. I shouldn't have moved production UnRaid into the radio so soon. Prevents me from doing work on the chassis! Anyway.. was able to give it some downtime today. (after playing with UnRaid 6. Bravo Tom and Contributors. Well done. I'm enjoying the docker though during my upgrade to 6, there were boot issues. I went to plug in monitor only to realize the on-board video plug was 1 inch from the front face of the radio. I had to take the entire thing apart to get it going. Now looking for PCI video card so that doesn't happen again.Anyway.. on with some pics. I decided I wanted to finish the grill. Last we saw... it was a mess of wires. I cut a piece of oak veneer and fastened to front plate. Made to fit. Stained Test Mounted I then attached some fancy aluminum sheet to the front. Drilled out the holes for the mounting of the trim piece and voila. And back into the storage room she goes. Can't wait to have her done and shown off in the house Next is the display but there is a problem. In my infinite wisdom, I put the glass somewhere safe to not break it. So safe in fact.. I can't find it. To be continued..... ** update ** Drive Temps have risen. Nothing the drives can't handle. (up from 27 to 31 degrees). The range is 25 to 31 for Array Drives Cache drive is 7200rpm and old. Runs at 35 most of the time. Found the Faceplate!
-
When it's done. Till then it's in a bedroom in the basement.
-
Here is a little bit of an update. The server is running great. Temps are stable. Added a 3/4 inch plate to the bottom with felts underneath. Slides nicely on the hardwood floor. (Nearly too heavy to lift alone) Items to tackle: NEW Vibration from 1 or 2 older drives is resonating withing the case. (1 of them is VERY loud) EXISTING - Veneer the top - Find front cover material (perforated aluminum sheet) or maybe wood veneer for matching? - Complete the back panel - Find Radio Component that will work in radio and make custom knobs (was missing 1 when I bought it, want all to match) - Work out glass display functionality (worries me, I can't remember where I put it >.<) - Power Button. Screwdriver is annoying. This server lives in a basement room with the door closed. Room temp is held at 23.6 degrees C. Rest of House is 20.
-
I'll be working on a cage at some point. I really would like to use: Concerned about depth and width. (and interference).. I can't leave it in the case. Too deep and too wide. I was just offered another radio by a friend cause he likes my first project. Liking this one as well. Maybe this one can be my main PC. + Web Server + DHCP Server + Etc Etc.
-
Quick update: I tried placing a small 10$ portable am / fm radio inside the case. Interference is huge. There is a sweet spot in the bottom of the case. Went to use it only to realize that those portable radios have zero bass. The 2.1 sub wouldn't work. Only higher freq through 2 channels. TBC.
-
Gary, those casters are great. I was actually thinking of building a platform that is the same shape as the bottom but inset. Allowing minimal clearance from radio to floor. No damage to radio and somewhat hidden wheels. I can't remember if there are existing holes in the bottom radio framing. If so, then just mount wood across and inside. Then mount wheels. I know that from being moved, the veneer at the bottom has been chipped, so getting it slightly off the floor would be nice. My other worry is that with all those drives, the weight is suspended from the front framing of the radio. I'll weight it tonight as it stands, but should be ok as it distributed across two frame members,
-
I fear that the interference from the electronics inside may make it near impossible. There is a radio in the workshop about 4 feet away and when UnRAIDIO was turned on, the channel was affected. I found this: Take it apart. Looks like there is a small circular frequency display in it. Could use it in the larger hole, place tuning adjustment below, volume left, am / fm selector right. Power it with USB, then use a pair of PC speakers 2.1, tear apart, build custom enclosures and add in. Currently, I am having a hard time moving this beast as is. Adding a sub, some speakers, FM equipment (let alone 10 more drives), will make this project almost impossible to move without some sort of handles and two people. Ha! ... and I wanted to add built in UPS... yeah.. no. ** I thought I would be the first.. but I guess I am wrong **
-
Sorry. Did a parity check but with no corrections. cancelled it after 15 mins as I had to shut it down cause I can't stop working on it) So now the question is: 4 Holes. (5th top is reserved for magic eye). What to do with them? There was missing a wooden radio dial when I bought it so I am one short (of the small ones).
-
My date is fine. Looking at my Last parity check date?
-
Ok. I screwdriver'ed it. IT'S ALIVE!!! (I feel like Henry Frankenstein running around the house saying it) So far, so good. ** Parity Check brought temps to no higher than 30 degrees **
-
Tonight was taking care of some little things that were driving me crazy. Changed the adapter plate bolts to low profile. Had to custom cut. Change out the warped board for a straight one. Better motherboard clearance now. Added cage/tray lock bolts. Didn't want my production drives falling on the floor. Cleaned up some wiring for now. Bought the hardboard for the back. Until I know exactly where everything is going, can't cut it. I think I am taking a small break. Then again, tomorrow is a new day. If I find a temporary switch, I might try and fire it up.
-
There was no restoring the top veneer. Fully split, cracked and water damaged (flower pot on top?) Previous owners stored it outside in covered sun room (no humidity control) The 4 holes you see in the adapter bracket (http://lime-technology.com/forum/index.php?topic=34329.msg334452#msg334452) is in line with the 4 holes in the mid-plate of the radio which are used to mount the radios component. Any additional hole would not interfere nor would it create any structural issue. The problem I struggle with is: Yes. I did strip off the old veneer but to benefit the original look (should it go back to a radio). Making a hole is something the radio doesn't need to look new again. I know I'm quibbling over semantics.
-
You are right. Unraid and reset button bad idea. I am rethinking the power button as the magic eye. I don't need people walking by pushing the button (unless I make the power button in back and just use it for the glowing eye part). Some bumps in the road I need to tackle: 1) How to get the power and data cables past the motherboard shelf. a) I am thinking of making a back for the radio using 1/8th inch backerboard. Cut holes like they used to in the old days to hide the cables running down the back. But I would know it's messy back there. Use velcro to hold in place (no damage) b) Cutting out one corner of the midshelf (break my promise of no damage).. but it's inside and would not affect any mounting of original equipment. c) Start making custom data and power cables (cables will fit, connectors won't clear the hole) 2) Existing cables are too short to make clean runs. a) Make custom cables that would appear to look like old phone patch chords b) Keep standard look and buy longer and just route cleanly. 3) Rebuild motherboard wooden adapter plate (curved issue) 4) Fan Controller Location (18inch temp leads) 5) Power Button / Magic Eye Decision 6) Using the original glass dial face in some fashion. 7) Power Supply positioning. (will depend on cable / routing decision) 8 ) To pivot or not pivot the racks. Just simple pull out? Need lock pin ideas. 9) Fan/Speaker location covering. Can't use speaker cloth. Air won't move past it easily. Thinking of perforated sheet metal. or And then having it air brushed to an old speaker cloth pattern.
-
I just spotted this power button... maybe an easy way out for the magic eye? http://www.kustompcs.co.uk/acatalog/info_2208.html Cheaper but silver http://www.ebay.ca/itm/1-25mm-12V-Green-Led-Stainless-Switch-Momentary-Push-Button-6-Pins-Waterproof-/321144879239?pt=LH_DefaultDomain_0&hash=item4ac5b9f887



