A couple weeks ago I stumbled on this guide and decided to give it a go. Unfortunately much of it is outdated, and it took a lot of searching, troubleshooting, and help from @PSYCHOPATHiO to fill in the gaps. After hitting what feels like every possible snag I finally got it all working and wanted to share what I've learned. This guide doesn't include video chat, but it will give you a matrix server with an improved postgresql database, element web app, and voice chat.
This guide will be assuming you already have swag setup (or know your way around an equivalent like nginx proxy manager).
-------------------------------------------------------
DNS Setup:
-------------------------------------------------------
• Create a CNAME record pointed to your unraid server.
• I'll be using the "chat" subdomain in this guide but you can use what you'd like.
(If you're on Cloudflare and want federation "Proxy status" has to be toggled to "DNS only". It works internally with a proxy but I couldn't communicate with other matrix servers).
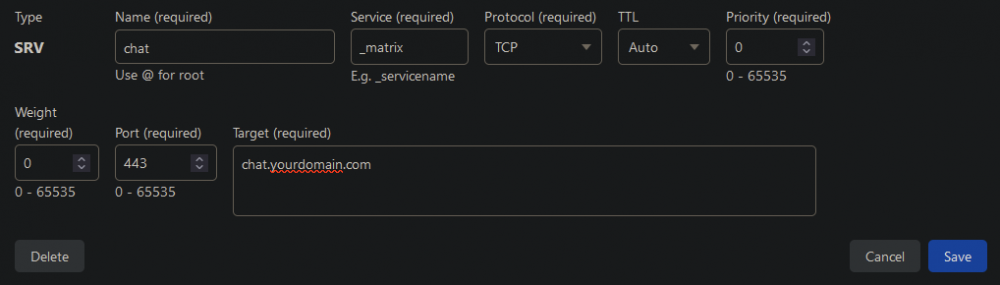
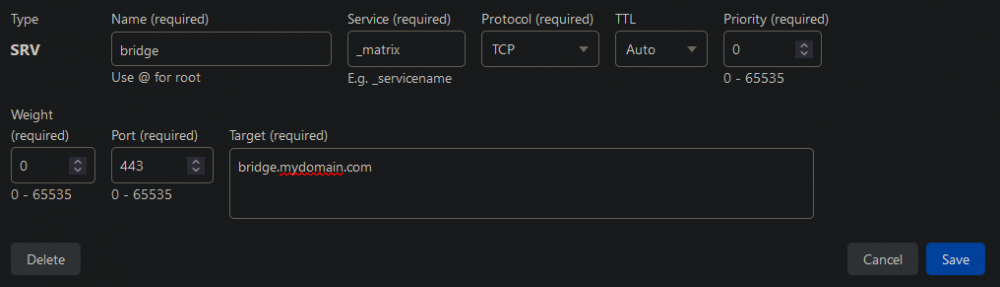
• Create an SRV record for the service _matrix targeted at your subdomain like so:
• Create a CNAME record for element pointed to your unraid server:
-------------------------------------------------------
Swag (proxy) Setup
-------------------------------------------------------
Navigate to /appdata/swag/nginx/proxy-confs and create the following configs:
element-web.subdomain.conf
server {
listen 443 ssl;
server_name element.*;
include /config/nginx/ssl.conf;
client_max_body_size 0;
location / {
include /config/nginx/proxy.conf;
resolver 127.0.0.11 valid=30s;
set $upstream_app element-web;
set $upstream_port 80;
set $upstream_proto http;
proxy_pass $upstream_proto://$upstream_app:$upstream_port;
}
}
matrix.subdomain.conf
server {
listen 443 ssl;
listen [::]:443 ssl;
server_name chat.*;
include /config/nginx/ssl.conf;
client_max_body_size 32M;
location / {
include /config/nginx/proxy.conf;
include /config/nginx/resolver.conf;
set $upstream_app UNRAIDSERVERIP;
set $upstream_port 8008;
set $upstream_proto http;
proxy_pass $upstream_proto://$upstream_app:$upstream_port;
}
location ^~ /_matrix {
include /config/nginx/proxy.conf;
include /config/nginx/resolver.conf;
set $upstream_app UNRAIDSERVERIP;
set $upstream_port 8008;
set $upstream_proto http;
proxy_pass $upstream_proto://$upstream_app:$upstream_port;
}
location ^~ /.well-known/matrix/server {
include /config/nginx/proxy.conf;
include /config/nginx/resolver.conf;
set $upstream_app UNRAIDSERVERIP;
set $upstream_port 8008;
set $upstream_proto http;
proxy_pass $upstream_proto://$upstream_app:$upstream_port;
}
location ^~ /.well-known/matrix/client {
include /config/nginx/proxy.conf;
include /config/nginx/resolver.conf;
set $upstream_app UNRAIDSERVERIP;
set $upstream_port 8008;
set $upstream_proto http;
proxy_pass $upstream_proto://$upstream_app:$upstream_port;
}
}
• Change UNRAIDSERVERIP to your unraid IP in all 4 spots above.
-------------------------------------------------------
Postgres Database Setup:
-------------------------------------------------------
Matrix defaults to an SQLite database, but performance is better with postgres. Before installing matrix we'll prepare a database.
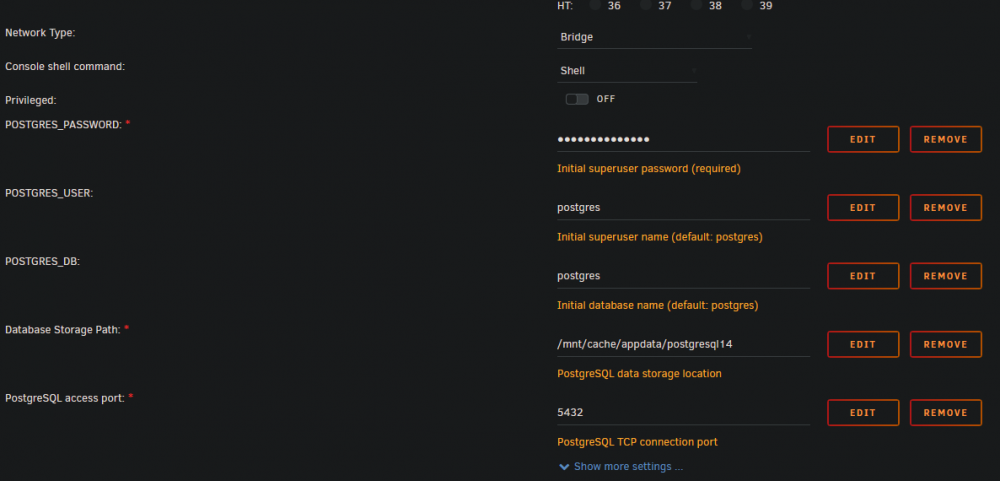
• Search CA for "postgres" and install postgresql14 from jj9987.
• Set a superuser password and leave the rest on default.
• After installing open the console and enter the following commands to set a password for the default postgres user:
su
passwd postgres
Now exit out of su (type: "exit") and login (type: "login") as the user postgres with the password you just created.
Now we're going to create a superuser in the maintenance database named "matrix" in psql by running the following commands:
psql
CREATE USER matrix SUPERUSER PASSWORD 'passwordstring';
(replace passwordstring with your own password but leave the quotes)
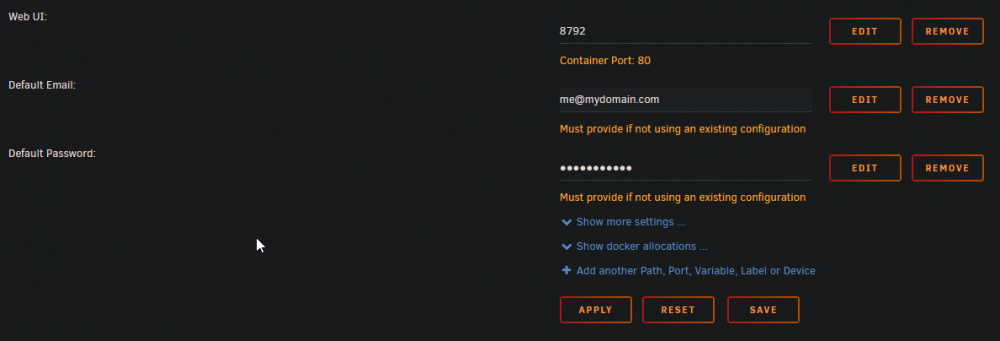
Now that we have a database superuser setup lets install pgadmin4 to make administration easier. Search CA for pgadmin4 and grab the one from FoxxMD. Enter an email/password into the template - email doesn't need to be functional it's just serving as a username.
(It can take a minute to load after install so be patient with it.)
• Login to pgadmin with the the email/password you just set.
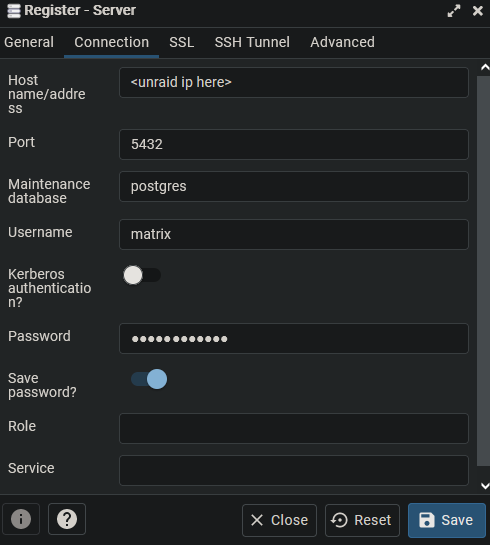
• Select Add New Server and give it a name (I used my unraid server name)
• Go to the Connections tab and specify your unraid server IP in the host field.
• Enter the database user matrix and passwordstring that you created above in psql.
• Click Save and you should see your server pop up on the list to the left. Right click it and select Create > Database
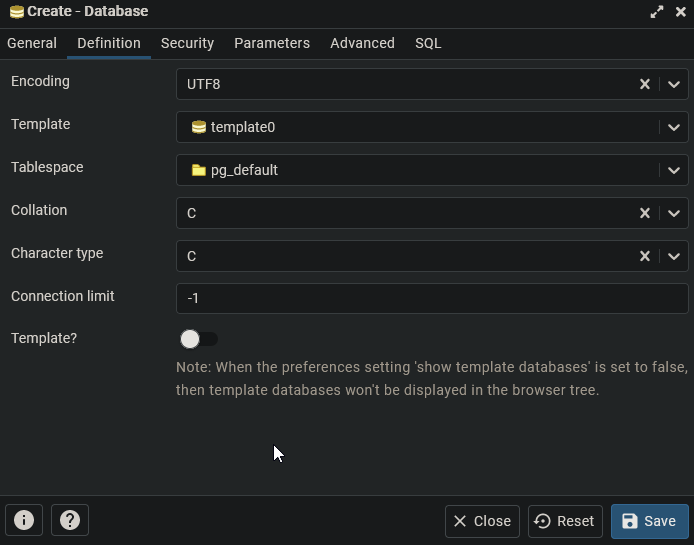
• Give the database a name (I named it matrix) and go to the Definition tab. Set everything just like this:
• Click Save and you should see the database show up on the left.
Now that we have a database ready to go its time to actually install matrix.
-------------------------------------------------------
Matrix Setup:
-------------------------------------------------------
• Go to CA and Install matrix from A75G.
• Set "Network Type" to your custom proxy network.
• Set "Server Name" to chat.yourdomain.com
Leave the rest on default and install.
Navigate to \appdata\matrix and edit the homeserver.yaml file to this:
server_name: "chat.yourdomain.com"
pid_file: /data/homeserver.pid
web_client_location: https://element.yourdomain.com
public_baseurl: https://chat.yourdomain.com
listeners:
- port: 8008
tls: false
type: http
x_forwarded: true
bind_addresses: ['0.0.0.0']
resources:
- names: [client,federation]
compress: false
database:
name: psycopg2
args:
user: matrix
password: "PASSWORDSTRING"
database: matrix
host: UNRAIDSERVERIP
port: 5432
cp_min: 5
cp_max: 10
log_config: "/data/chat.yourdomain.com.log.config"
media_store_path: "/data/media_store"
suppress_key_server_warning: true
report_stats: false
macaroon_secret_key: "KEY1"
form_secret: "KEY2"
signing_key_path: "/data/chat.yourdomain.com.signing.key"
serve_server_wellknown: true
trusted_key_servers:
- server_name: "matrix.org"
## TURN ##
# The public URIs of the TURN server to give to clients
turn_uris: ["turn:chat.yourdomain.com:3478?transport=udp", "turn:chat.yourdomain.com:3478?transport=tcp"]
# The shared secret used to compute passwords for the TURN server
turn_shared_secret: "KEY3"
# New User Registration
registration_shared_secret: "KEY4"
# vim:ft=yaml
• Replace yourdomain.com with your own in all spots
• Change PASSWORDSTRING to your psql matrix user password
• Change UNRAIDSERVERIP to your host IP.
If you used something other than "matrix" for the database name/user then adjust accordingly.
Open a terminal window and paste the following command:
cat /dev/urandom | tr -dc 'a-zA-Z0-9' | fold -w 32 | head -n 1
This will give you a random string. Copy it and replace the macaroon_secret_key with it.
Repeat this process for the form_secret, turn_shared_secret, and registration_shared_secret. Restart the matrix docker to apply changes.
Now its time to create your first matrix user. Open the console again and paste the command:
register_new_matrix_user http://localhost:8008 -c /data/homeserver.yaml
Follow the prompts to create your matrix admin user.
You should now have a functional matrix server. Feel free to log in and try it out. Visit https://federationtester.matrix.org/ to test federation.
Also I recommend installing synapse-admin from A75G in CA for easier administration. (Install with all defaults and login with the admin user you just created above).
-------------------------------------------------------
Element Setup:
-------------------------------------------------------
First we need to manually create the config path and pull in the default config.
• Open the unraid terminal and run the command:
mkdir -p /mnt/user/appdata/element-web/config
• Then download the default config by running:
wget -O /mnt/user/appdata/element-web/config/config.json https://raw.githubusercontent.com/vector-im/element-web/develop/element.io/app/config.json
• In CA search for element-web by vectorim
• Set the "Network Type" to your custom proxy.
• Install
• Navigate to /appdata/element-web/config and edit config.json
• Change "default_server_name" to chat.yourdomain.com
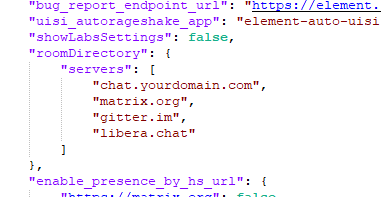
• And add chat.yourdomain.com under "roomDirectory" like so:
• Save and restart element.
Visit element.yourdomain.com and test that it works. (chat.yourdomain.com should also redirect to it).
-------------------------------------------------------
Coturn Setup:
-------------------------------------------------------
• Search for coturn by xthursdayx on CA.
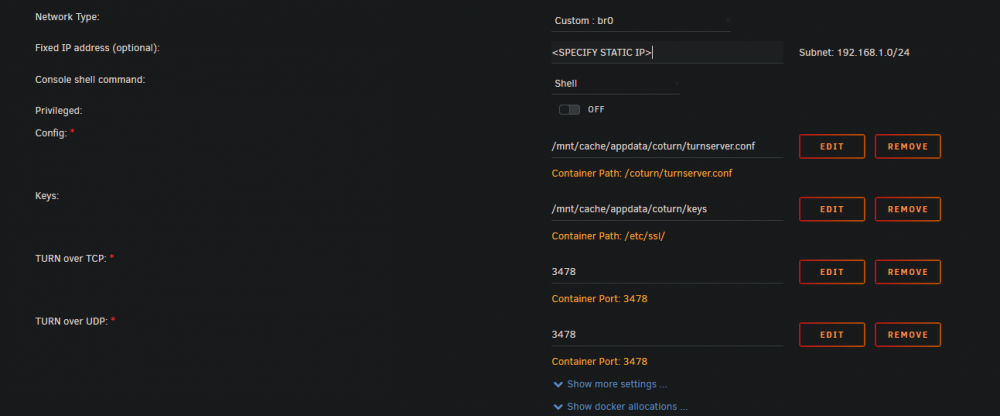
• Change Network Type to "Custom: br0" and give it its own static IP on your LAN
• Delete all ports from template except 3478 TCP & UDP.
• Install
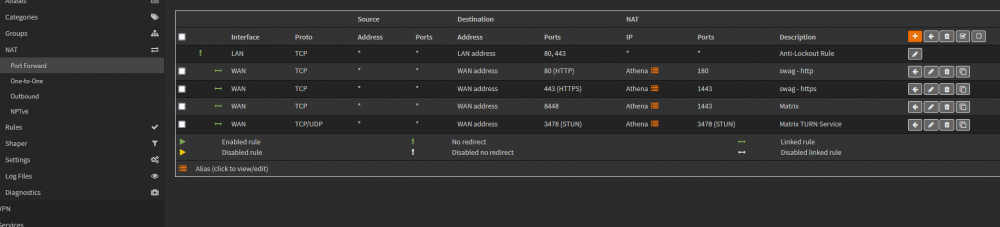
Next go to your firewall settings and forward the following ports:
WAN UDP 3478 -> coturn static ip
WAN UDP range 49152:49172 -> coturn static ip
And lastly we have to edit our coturn settings. Navigate to /appdata/coturn and edit turnserver.conf so it looks like this:
listening-port=3478
listening-ip=0.0.0.0
external-ip=COTURNIP
min-port=49152
max-port=49172
lt-cred-mech
use-auth-secret
static-auth-secret=TURN_SHARED_SECRET
total-quota=100
stale-nonce=600
realm=chat.yourdomain.com
server-name=chat.yourdomain.com
• Change COTURNIP to the static IP you gave the coturn docker
• Change TURN_SHARED_SECRET to the key you generated for that field in your homeserver.yaml file above.
• Change realm and server-name to your subdomain.
That's it. We're finally done. Make sure to restart coturn to apply your settings and then give it a try.
(https://icetest.info/ is a great TURN troubleshooting tool if you have issues).
----------------------------------------------------------------------------------------------------------------------------------------------------
Hopefully if you've correctly followed all these steps you now have a fully functional matrix server with a few bells and whistles.
This is what worked for me but I'm sure there's more elegant ways to do parts of this. I really struggled to get to this point and I AM NO EXPERT. I'm sure there's room for improvement so let me know if anything should be changed. I will do my best to keep it updated and implement suggested changes/improvements.
Shoutout to @yinzer for the original guide and @HojojojoWololo for his supplemental post!
And a huge thank you to @PSYCHOPATHiO for all of his help! I never would have gotten all this working without him. He runs a support channel at #support:sykorp.com that was invaluable to me - If you have trouble feel free to drop in and we'll try to help.