





007craft
Members
-
Joined
-
Last visited
Everything posted by 007craft
-
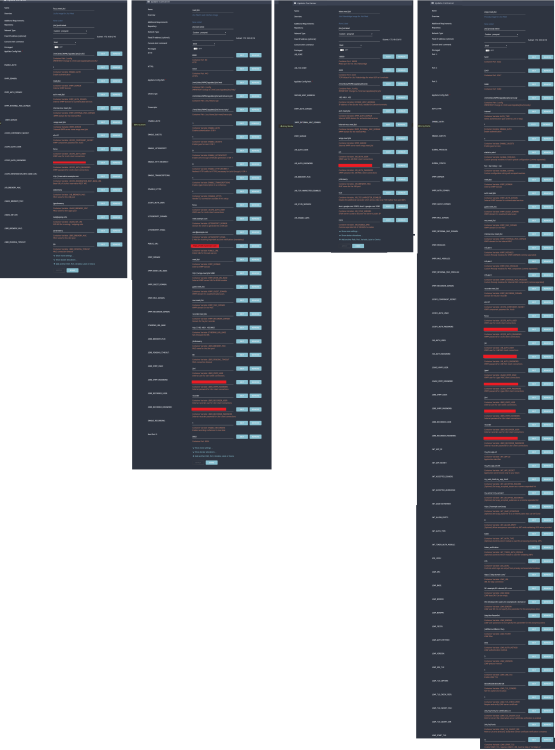
I tried switching to using Jitsi meet on the unraid docker templates instead of docker compose. I used all 4 containers and got it mostly setup, but alas it doesn't work. Here are my configs. I get it all working but the problem is the video bridge. It just has errors and then when users join the meeting everybody else just appears muted and cant see webcams to one another. We need somebody who knows what their doing to give us the settings they used for the jitsi JVB container (the Jitsi video bridge)
-
Dashy Template is broken. Please update it or remove from community apps. Somebody made a post on July 27th about this so its been broken for at least 2.5 months
-
Same problem here. Switched to nginx proxy manager and still get the 500 error. followed all online sources troubleshooting, error remains.
-
Sure: ## Version 2022/09/08 # make sure that your dns has a cname set for navidrome and that your navidrome container is not using a base url server { listen 443 ssl; listen [::]:443 ssl; server_name music.*; include /config/nginx/ssl.conf; client_max_body_size 0; # enable for ldap auth (requires ldap-location.conf in the location block) #include /config/nginx/ldap-server.conf; # enable for Authelia (requires authelia-location.conf in the location block) #include /config/nginx/authelia-server.conf; location / { # enable the next two lines for http auth #auth_basic "Restricted"; #auth_basic_user_file /config/nginx/.htpasswd; # enable for ldap auth (requires ldap-server.conf in the server block) #include /config/nginx/ldap-location.conf; # enable for Authelia (requires authelia-server.conf in the server block) #include /config/nginx/authelia-location.conf; include /config/nginx/proxy.conf; include /config/nginx/resolver.conf; set $upstream_app 192.168.1.102; set $upstream_port 4533; set $upstream_proto http; proxy_pass $upstream_proto://$upstream_app:$upstream_port; # authentik-specific config auth_request /outpost.goauthentik.io/auth/nginx/; error_page 401 = @goauthentik_proxy_signin; auth_request_set $auth_cookie $upstream_http_set_cookie; add_header Set-Cookie $auth_cookie; auth_request_set $authentik_username $upstream_http_x_authentik_username; auth_request_set $authentik_groups $upstream_http_x_authentik_groups; auth_request_set $authentik_email $upstream_http_x_authentik_email; auth_request_set $authentik_name $upstream_http_x_authentik_name; auth_request_set $authentik_uid $upstream_http_x_authentik_uid; proxy_set_header X-authentik-username $authentik_username; proxy_set_header X-authentik-groups $authentik_groups; proxy_set_header X-authentik-email $authentik_email; proxy_set_header X-authentik-name $authentik_name; proxy_set_header X-authentik-uid $authentik_uid; } location /outpost.goauthentik.io { proxy_pass http://auth.mydomain.com/outpost.goauthentik.io/; # ensure the host of this vserver matches your external URL you've configured # in authentik proxy_set_header Host $host; proxy_set_header X-Original-URL $scheme://$http_host$request_uri; add_header Set-Cookie $auth_cookie; auth_request_set $auth_cookie $upstream_http_set_cookie; # required for POST requests to work proxy_pass_request_body off; proxy_set_header Content-Length ""; } # Special location for when the /auth endpoint returns a 401, # redirect to the /start URL which initiates SSO location @goauthentik_proxy_signin { internal; add_header Set-Cookie $auth_cookie; return 302 /outpost.goauthentik.io/start?rd=$request_uri; # For domain level, use the below error_page to redirect to your authentik server with the full redirect path # return 302 https://auth.mydomain.com/outpost.goauthentik.io/start?rd=$scheme://$http_host$request_uri; } } Checking my Nginx errors log I get: 2022/10/09 16:09:10 [error] 315#315: *7 auth request unexpected status: 301 while sending to client, client: 192.168.1.1, server: music.mydomain.com, request: "GET / HTTP/2.0", host: "music.mydomain.com" ...when I try to goto the site. If I comment out the auth_request line, the config works just fine. But of course Im trying to get this working WITH authentik. If I actually goto http://auth.mydomain.com/outpost.goauthentik.io it gives me a page but says { "Message": "no app for hostname", "Host": "192.168.1.102:9001", "Detail": "Check the outpost settings and make sure '192.168.1.102:9001' is included." } So Im not sure if I need to change something in Authentik or in Swag.
-
Anybody have a guide on how to get authentik working with swag? Ive tried using the config files for nginx proxy manager for it to no avail. I've been using swag for years but Authentik seems to be the new big SSO solution and I dont think it works with swag. All guides written for it involve either NPM, Traefik or Caddy. Seems like SWAG is old news now ?
-
How do I install via a docker command on unraid when there is no dockerhub image for it? Trying to install this https://github.com/ant-media/Ant-Media-Server/wiki/Building-and-Running-Docker-Container-for-Ant-Media-Server But it requires that I download the .zip and then run some commands to start the docker. They dont have a dockerhub repository.
-
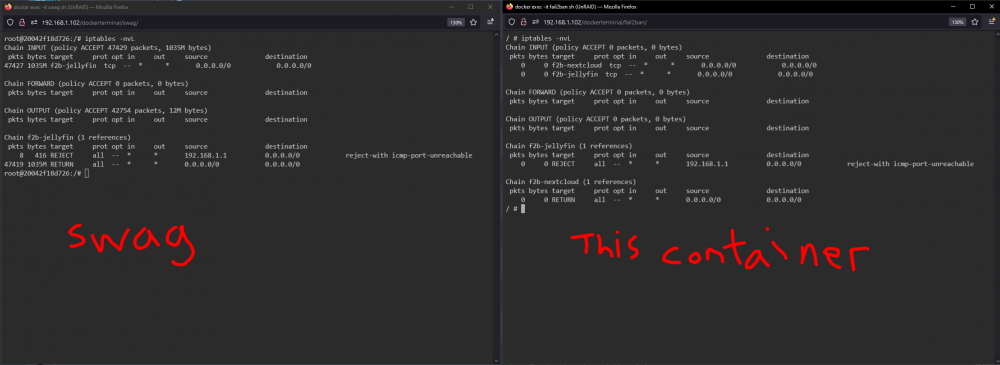
I'm having the same issue as mentioned here above. This install of fail2ban does not seem to work. Ok So I have 2 instances of fail2ban. One is this docker here, the other is the swag docker. I have done identical jails and setups in both dockers. Here I have banned myself in the jellyfin docker. Take a look at what happens when I run the command iptables -nvL in both containers It says Reject on both, but it looks slightly different on the left in Swags, have a return line. I must note that swag is also running my reverse proxy, where as this standalone fail2ban container is not. I do however have both containers running on my same custom network "proxynet". Swags fail2ban works but for some reason this standalone fail2ban does not.
-
I have a docker Template I'm using for octoprint and defined my printer with a new device type with this path "/dev/ttyUSB0". Now if the printer is turned on, everything works correctly. The docker container starts and I can see my printer. If I power off my printer, I lose connection to it in octoprint, and if I power it on, I can once again connect! The problem lies however is if I power off my printer and then stop/restart the docker. The container wont start up. Since it cant detect the USB device (Because its off and doesnt exist) the docker fails to initialize and says bad execution error. How can I force the container to start up even tho it cant see the device thats defined in the template?
-
By key do you just mean another device variable, pointing to my next webcam (/dev/video2)? How would I get the container to create another mjpeg streamer for the second camera? Ideally I don't want a separate docker because its not a separate printer (Just one printer with multiple webcams). And there is a plugin in octoprint to use multiple webcams. I guess I can run a second octoprint container and just use the stream url pasted into the first container, but it seems overkill to run a whole separate container and octoprint instance just to setup a second webcam for the first instance. The only instructions I could find for setting up multiple webcams was for octopi, and it mentions editing a text file which I dont think the docker uses.
-
Is there a way to get multiple webcams working with this template? I know it can be done, and theres an octoprint plugin to view multi webcams easily and octolapse also works with multiple webcams. I just cant figure out how to pass multiple cameras into the container. A second mjpeg streaming instance needs to be made for the second webcam I believe.
-
Does anybody have a guide for how to get this working on Unraid? It looks like it never made it to the app store. Is there a docker for this on dockerhub or does it need to be installed via docker-compose? I tried installing this via docker compose using the instructions to clone the git and run it found in some other thread, but then I get an error when I try to goto the web interface: django.channels.server ERROR HTTP GET /accounts/login/ 500 [0.13, 192.168.1.100:56738] django.request WARNING Not Found: /favicon.ico django.request ERROR Internal Server Error: /accounts/login/
-
I did a quick search for this but couldnt find a solution in this thread. Inc ase you guys (or anybody else who comes across this in the future) is wondering, the config file is just a generic config you use. octoprint.subdomain.conf server { listen 443 ssl; listen [::]:443 ssl; server_name print.*; include /config/nginx/ssl.conf; client_max_body_size 0; location / { include /config/nginx/proxy.conf; resolver 127.0.0.11 valid=30s; set $upstream_app 192.168.1.102; set $upstream_port 5003; set $upstream_proto http; proxy_pass $upstream_proto://$upstream_app:$upstream_port; proxy_buffering off; } } You only need to setup port 5003 as octoprint is accessible form there and 5002. The camera runs on 5003, so might as well just do 5003. One thing to note, if youre having trouble with the webcam working in whatever android/ios remote app youre using, make sure you enter https for the address. I was using the octoremote app and while http:\\print.mydomain worked for the printer connection, it didnt work for the webcam url until I wrote in https in the app. (the above ports are assuming youre using the spants template from the community app store for your octoprint instance. If you changed the ports on your template, use those instead. )
-
When I use /dev/serial/by-id/usb-1a86_USB_Serial-if00-port0 (The only entry I have, and is indeed my printer as when I unplug it, that entry goes away), it doesn't work. But when I use /dev/ttyUSB0 it works. Why is this?
-
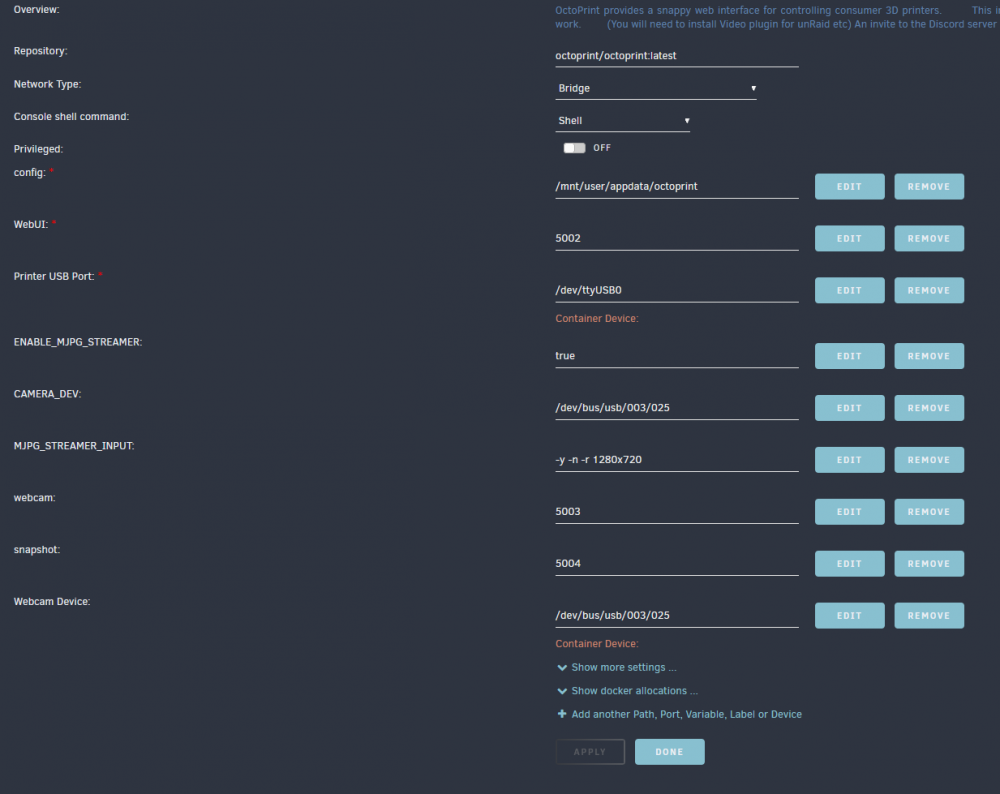
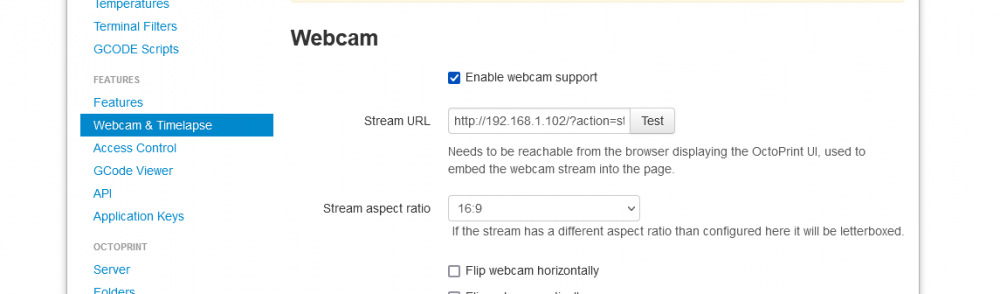
Can somebody help me get webcam working? I setup Octoprint with this template and my settings are as indicated below: The printer is detecting fine, but the webcam doesnt work. I enter http://192.168.1.102/?action=stream in the test URL in Octoprint but nothing comes up. SOLVED!!! I have figured out a solution in case anybody comes across this in the future having the same issue. First off, if your webcam is showing up as a USB device when you type the command "lsusb" in unraid, but NOT assigning a dev/video0 to it, it is a driver issue. My picture above shows me using the USB Device ( dev/bus/usb/003/025) because I had no dev/video0. I figured out that it was because my webcam (Logitech C270) was old and even tho is was listed correctly in USB devices, it was missing drivers. This thread talks about this issue. So I went to the Unraid app store and searched for DVB drivers by ich777 and installed that. Upon server reboot, I was now getting a dev/video0 and dev/video1. I tried both and the octoprint log spazed out with dev/video1 (so I guess that was incorrect) but worked correctly with dev/video0. The last part of the puzzle was figuring out the stream URLs to enter in octoprints timelapse settings page. They are: Stream Url: http://xxx.xxx.xxx.xxx:5003/webcam/?action=stream Snapshot URL: http://xxx.xxx.xxx.xxx:5004/?action=snapshot (This did work for me but then gave me problems later. http://127.0.0.1:8080/?action=snapshot later worked for me) I needed to enter the port numbers set on the unraid template. the internal port numbers of 80 and 8080 dont work. You can also test the stream url by just entering it in your browser, and should see your webcam if its working.
-
I'm confused as to what this plugin actually does? So I have jitsi installed through docker compose (it uses 4 containers in 1 stack) and I downloaded this program, hoping to see information about my containers or the stack in the unraid webui but I dont see anything? Just as shown below in the screenshot:

-
After spending several hours trying to tourbleshoot this I think thats what I will do, just ignore the warnings. Because I change my .yml file for example from: - ${CONFIG}/jicof:/config:rw To - ${CONFIG}/jicofTESTING:/config:rw,slave and the volume mapping definitely changes to the new location of jicofTESTING but the mode remains the same, as rw. And reading docker volume documentation I see that the rw setting is actually the default setting, so when my original .yml file had the Z option, it also didnt apply that, and just alwaysvdefaulted to the RW setting. It seems just ignoring this does not cause me a problem because even tho jitsi is supposed to have the z mode setting (So it can share volume mappings between containers) it doesn't actually appear to need it, as it is still working. I just hope this isint a future problem for another application I may download on unraid that uses docker-compose.
-
I made the changes, but the Unraid error persists. I even tried running docker-compose down -v and then docker-compose up -V -d to ensure the volumes where remade but without success. Unraid is still reporting the error. I try running docker inspect meet.jitsi and then see this "Mounts": [ { "Type": "bind", "Source": "/mnt/disks/NVME/appdata/jitsi/jitsi-meet-cfg/web/crontabs", "Destination": "/var/spool/cron/crontabs", "Mode": "rw", "RW": true, "Propagation": "rprivate" }, So it doesnt look like entering rw,slave in my .yml file is doing anything.
-
I tried adding :rw,slave after volume: so it looked like this volume: rw,slave .... but it didnt seem to work. I can't really make heads or tails of anything on that webpage, so I'm not sure if I'm using long or short syntax? Here is my docker-compose.yml file: Wait after looking at it further, I think I need to edit the lines like ${CONFIG}/web:/config:Z so it looks like ${CONFIG}/web:/config:rw, slave Would that be right? I read about that Z option but couldnt understand it. Is it not important? version: '3' services: # Frontend web: image: jitsi/web:latest restart: ${RESTART_POLICY} ports: - '${HTTP_PORT}:80' - '${HTTPS_PORT}:443' volumes: - ${CONFIG}/web:/config:Z - ${CONFIG}/web/crontabs:/var/spool/cron/crontabs:Z - ${CONFIG}/transcripts:/usr/share/jitsi-meet/transcripts:Z environment: - AMPLITUDE_ID - ANALYTICS_SCRIPT_URLS - ANALYTICS_WHITELISTED_EVENTS - CALLSTATS_CUSTOM_SCRIPT_URL - CALLSTATS_ID - CALLSTATS_SECRET - CHROME_EXTENSION_BANNER_JSON - CONFCODE_URL - CONFIG_EXTERNAL_CONNECT - DEFAULT_LANGUAGE - DEPLOYMENTINFO_ENVIRONMENT - DEPLOYMENTINFO_ENVIRONMENT_TYPE - DEPLOYMENTINFO_REGION - DEPLOYMENTINFO_SHARD - DEPLOYMENTINFO_USERREGION - DESKTOP_SHARING_FRAMERATE_MIN - DESKTOP_SHARING_FRAMERATE_MAX - DIALIN_NUMBERS_URL - DIALOUT_AUTH_URL - DIALOUT_CODES_URL - DISABLE_AUDIO_LEVELS - DISABLE_DEEP_LINKING - DISABLE_GRANT_MODERATOR - DISABLE_HTTPS - DISABLE_KICKOUT - DISABLE_POLLS - DISABLE_REACTIONS - DROPBOX_APPKEY - DROPBOX_REDIRECT_URI - DYNAMIC_BRANDING_URL - ENABLE_AUDIO_PROCESSING - ENABLE_AUTH - ENABLE_BREAKOUT_ROOMS - ENABLE_CALENDAR - ENABLE_COLIBRI_WEBSOCKET - ENABLE_FILE_RECORDING_SERVICE - ENABLE_FILE_RECORDING_SERVICE_SHARING - ENABLE_FLOC - ENABLE_GUESTS - ENABLE_HSTS - ENABLE_HTTP_REDIRECT - ENABLE_IPV6 - ENABLE_LETSENCRYPT - ENABLE_LIPSYNC - ENABLE_NO_AUDIO_DETECTION - ENABLE_NOISY_MIC_DETECTION - ENABLE_PREJOIN_PAGE - ENABLE_P2P - ENABLE_WELCOME_PAGE - ENABLE_CLOSE_PAGE - ENABLE_RECORDING - ENABLE_REMB - ENABLE_REQUIRE_DISPLAY_NAME - ENABLE_SIMULCAST - ENABLE_STATS_ID - ENABLE_STEREO - ENABLE_SUBDOMAINS - ENABLE_TALK_WHILE_MUTED - ENABLE_TCC - ENABLE_TRANSCRIPTIONS - ENABLE_XMPP_WEBSOCKET - ETHERPAD_PUBLIC_URL - ETHERPAD_URL_BASE - GOOGLE_ANALYTICS_ID - GOOGLE_API_APP_CLIENT_ID - HIDE_PREMEETING_BUTTONS - INVITE_SERVICE_URL - JICOFO_AUTH_USER - LETSENCRYPT_DOMAIN - LETSENCRYPT_EMAIL - LETSENCRYPT_USE_STAGING - MATOMO_ENDPOINT - MATOMO_SITE_ID - MICROSOFT_API_APP_CLIENT_ID - NGINX_RESOLVER - NGINX_WORKER_PROCESSES - NGINX_WORKER_CONNECTIONS - PEOPLE_SEARCH_URL - PUBLIC_URL - P2P_PREFERRED_CODEC - RESOLUTION - RESOLUTION_MIN - RESOLUTION_WIDTH - RESOLUTION_WIDTH_MIN - START_AUDIO_MUTED - START_AUDIO_ONLY - START_BITRATE - START_SILENT - START_WITH_AUDIO_MUTED - START_VIDEO_MUTED - START_WITH_VIDEO_MUTED - TESTING_CAP_SCREENSHARE_BITRATE - TESTING_OCTO_PROBABILITY - TOKEN_AUTH_URL - TOOLBAR_BUTTONS - TZ - VIDEOQUALITY_BITRATE_H264_LOW - VIDEOQUALITY_BITRATE_H264_STANDARD - VIDEOQUALITY_BITRATE_H264_HIGH - VIDEOQUALITY_BITRATE_VP8_LOW - VIDEOQUALITY_BITRATE_VP8_STANDARD - VIDEOQUALITY_BITRATE_VP8_HIGH - VIDEOQUALITY_BITRATE_VP9_LOW - VIDEOQUALITY_BITRATE_VP9_STANDARD - VIDEOQUALITY_BITRATE_VP9_HIGH - VIDEOQUALITY_ENFORCE_PREFERRED_CODEC - VIDEOQUALITY_PREFERRED_CODEC - XMPP_AUTH_DOMAIN - XMPP_BOSH_URL_BASE - XMPP_DOMAIN - XMPP_GUEST_DOMAIN - XMPP_MUC_DOMAIN - XMPP_RECORDER_DOMAIN networks: meet.jitsi: # XMPP server prosody: image: jitsi/prosody:latest restart: ${RESTART_POLICY} expose: - '5222' - '5347' - '5280' volumes: - ${CONFIG}/prosody/config:/config:Z - ${CONFIG}/prosody/prosody-plugins-custom:/prosody-plugins-custom:Z environment: - AUTH_TYPE - DISABLE_POLLS - ENABLE_AUTH - ENABLE_AV_MODERATION - ENABLE_BREAKOUT_ROOMS - ENABLE_GUESTS - ENABLE_LOBBY - ENABLE_XMPP_WEBSOCKET - GLOBAL_CONFIG - GLOBAL_MODULES - JIBRI_RECORDER_USER - JIBRI_RECORDER_PASSWORD - JIBRI_XMPP_USER - JIBRI_XMPP_PASSWORD - JICOFO_AUTH_USER - JICOFO_AUTH_PASSWORD - JICOFO_COMPONENT_SECRET - JIGASI_XMPP_USER - JIGASI_XMPP_PASSWORD - JVB_AUTH_USER - JVB_AUTH_PASSWORD - JWT_APP_ID - JWT_APP_SECRET - JWT_ACCEPTED_ISSUERS - JWT_ACCEPTED_AUDIENCES - JWT_ASAP_KEYSERVER - JWT_ALLOW_EMPTY - JWT_AUTH_TYPE - JWT_TOKEN_AUTH_MODULE - LOG_LEVEL - LDAP_AUTH_METHOD - LDAP_BASE - LDAP_BINDDN - LDAP_BINDPW - LDAP_FILTER - LDAP_VERSION - LDAP_TLS_CIPHERS - LDAP_TLS_CHECK_PEER - LDAP_TLS_CACERT_FILE - LDAP_TLS_CACERT_DIR - LDAP_START_TLS - LDAP_URL - LDAP_USE_TLS - PUBLIC_URL - TURN_CREDENTIALS - TURN_HOST - TURNS_HOST - TURN_PORT - TURNS_PORT - TZ - XMPP_DOMAIN - XMPP_AUTH_DOMAIN - XMPP_GUEST_DOMAIN - XMPP_MUC_DOMAIN - XMPP_INTERNAL_MUC_DOMAIN - XMPP_MODULES - XMPP_MUC_MODULES - XMPP_INTERNAL_MUC_MODULES - XMPP_RECORDER_DOMAIN - XMPP_CROSS_DOMAIN networks: meet.jitsi: aliases: - ${XMPP_SERVER} # Focus component jicofo: image: jitsi/jicofo:latest restart: ${RESTART_POLICY} volumes: - ${CONFIG}/jicofo:/config:Z environment: - AUTH_TYPE - BRIDGE_AVG_PARTICIPANT_STRESS - BRIDGE_STRESS_THRESHOLD - ENABLE_AUTH - ENABLE_AUTO_OWNER - ENABLE_CODEC_VP8 - ENABLE_CODEC_VP9 - ENABLE_CODEC_H264 - ENABLE_OCTO - ENABLE_RECORDING - ENABLE_SCTP - ENABLE_AUTO_LOGIN - JICOFO_AUTH_USER - JICOFO_AUTH_PASSWORD - JICOFO_ENABLE_BRIDGE_HEALTH_CHECKS - JICOFO_CONF_INITIAL_PARTICIPANT_WAIT_TIMEOUT - JICOFO_CONF_SINGLE_PARTICIPANT_TIMEOUT - JICOFO_ENABLE_HEALTH_CHECKS - JICOFO_SHORT_ID - JICOFO_RESERVATION_ENABLED - JICOFO_RESERVATION_REST_BASE_URL - JIBRI_BREWERY_MUC - JIBRI_REQUEST_RETRIES - JIBRI_PENDING_TIMEOUT - JIGASI_BREWERY_MUC - JIGASI_SIP_URI - JVB_BREWERY_MUC - MAX_BRIDGE_PARTICIPANTS - OCTO_BRIDGE_SELECTION_STRATEGY - SENTRY_DSN="${JICOFO_SENTRY_DSN:-0}" - SENTRY_ENVIRONMENT - SENTRY_RELEASE - TZ - XMPP_DOMAIN - XMPP_AUTH_DOMAIN - XMPP_INTERNAL_MUC_DOMAIN - XMPP_MUC_DOMAIN - XMPP_RECORDER_DOMAIN - XMPP_SERVER depends_on: - prosody networks: meet.jitsi: # Video bridge jvb: image: jitsi/jvb:latest restart: ${RESTART_POLICY} ports: - '${JVB_PORT}:${JVB_PORT}/udp' - '${JVB_TCP_PORT}:${JVB_TCP_PORT}' volumes: - ${CONFIG}/jvb:/config:Z environment: - DOCKER_HOST_ADDRESS - ENABLE_COLIBRI_WEBSOCKET - ENABLE_OCTO - JVB_AUTH_USER - JVB_AUTH_PASSWORD - JVB_BREWERY_MUC - JVB_PORT - JVB_MUC_NICKNAME - JVB_TCP_HARVESTER_DISABLED - JVB_TCP_PORT - JVB_TCP_MAPPED_PORT - JVB_STUN_SERVERS - JVB_OCTO_BIND_ADDRESS - JVB_OCTO_PUBLIC_ADDRESS - JVB_OCTO_BIND_PORT - JVB_OCTO_REGION - JVB_WS_DOMAIN - JVB_WS_SERVER_ID - PUBLIC_URL - SENTRY_DSN="${JVB_SENTRY_DSN:-0}" - SENTRY_ENVIRONMENT - SENTRY_RELEASE - COLIBRI_REST_ENABLED - SHUTDOWN_REST_ENABLED - TZ - XMPP_AUTH_DOMAIN - XMPP_INTERNAL_MUC_DOMAIN - XMPP_SERVER depends_on: - prosody networks: meet.jitsi: # Custom network so all services can communicate using a FQDN networks: meet.jitsi:
-
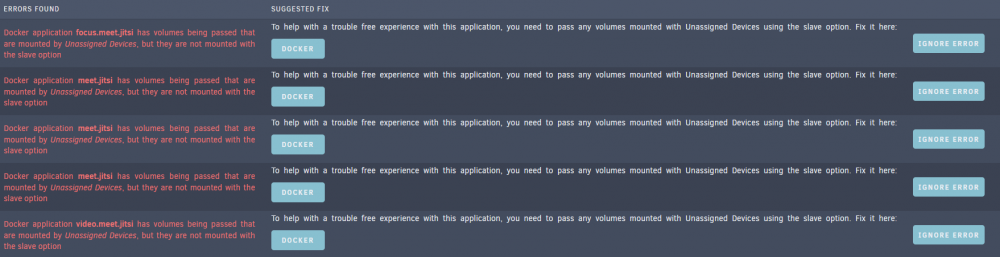
I have my appdata folder on an unassigned disk. For all my unraid templates, this is not a problem because I simply change the template to set the appdata folder to read/write slave. But I recently installed Jitsi using docker compose with Spaceinvaderones guide. Now Im getting these errors in the fix problems plugin: If I click the docker button it just takes me to the docker tab, but there's no way to make any edits from there for these jitsi containers.
-
How do I do this? I think I have old containers lingering around cause they were all made with the _1 but I dont see the containers as I deleted them from portainer? So why is it adding _1 ?
-
How do I forward a subdomain to an EXTERNAL site? For example I have games.mydomain.com and when a user goes there I want to redirect them to https://dosgames.com I set up a games.subdomain.conf file which contains: server { listen 443 ssl; listen [::]:443 ssl; server_name games.*; include /config/nginx/ssl.conf; client_max_body_size 0; location / { include /config/nginx/proxy.conf; resolver 127.0.0.11 valid=30s; proxy_pass https://www.dosgames.com/; proxy_max_temp_file_size 2048m; } } But when I goto the site it looks wrong and says connection not secure. Like it wont switch over to https for some reason. How do I fix this? Im running other subdomains going to various dockers like jellyfin, radar, ect and those all work, but this is the first time Ive tried to direct a subdomain to an EXTERNAL site, and not some app on my server.
-
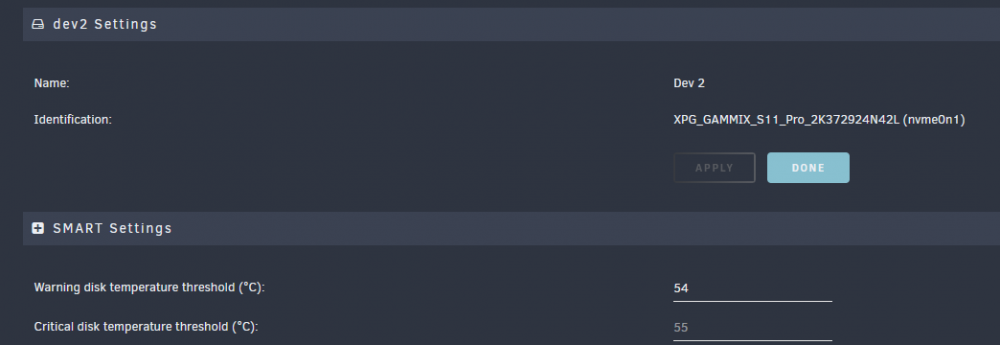
There is a bug with this plugin and the notifications for temperature not working. See picture below: Notice how I set the warning temperatures to 54 and 55 degrees? Well it doesnt matter, because at 45 degrees (the default), I get a warning. This only happens with drives in the unassigned devices. Any drives in the array where I changed the temperature threshold actually work with the changed values.
-
My swag broke on update. None of my sites work. I had 2 domains and several subdomains on my 1st domain running. This is only error I get: nginx: [emerg] "proxy_redirect" directive is duplicate in /config/nginx/site-confs/mydomain2.conf:28 What does this mean? I created the mydomain2.conf file in the past and I need it as it redirects to my wordpress docker. Heres the contents of mydomain2.conf server { listen 80; listen [::]:80; server_name mydomain2.com; return 301 https://$host$request_uri; } # main server block server { listen 443 ssl http2; listen [::]:443 ssl http2; server_name mydomain2.com; # all ssl related config moved to ssl.conf include /config/nginx/ssl.conf; client_max_body_size 0; location / { include /config/nginx/proxy.conf; resolver 127.0.0.11 valid=30s; set $upstream_app 192.168.1.102; set $upstream_port 8086; set $upstream_proto http; proxy_pass $upstream_proto://$upstream_app:$upstream_port; proxy_redirect off; } } In the meantime I rolled back to an older version using linuxserver/swag:version-1.16.0 as the repository (Which works fine). What is changed in Swag 1.17 that is causing this error? Swag is just so overly complicated. I would switch to nginx proxy manager in a heartbeat but I need fail2ban.
-
Thanks, but that discussion got complicated for me. I couldnt really follow what the problem was. Perhaps tho it has to do with an old version of radarr because I just checked the settings in radarr now and theres a "recycle bin" option to input a folder and then after 7 days (or however many days you set) it will delete the files. I guess ill just use that. No need for this plugin at all I guess since its built into radarr.
-
Ive been using this plugin for a while now without fail, but I just noticed it does not recycle files deleted by Radarr/Sonarr. So if I go into my movies folder and delete a file, it keeps a copy in the .trash folder under the host name of the computer that deleted it so the plugin works perfectly. But if Radarr deletes a file (Like say when doing a movie upgrade from 720p to 1080p), it deletes that 720p file but it doesnt goto the recycle bin. It's just gone. Anyway to have the plugin save those files too? Sometimes radarr does an upgrade and the higher resolution version may have something wrong with it, or be worse than the file before and now my original file is gone forever. Radarr is running in a docker on the unraid machine.




