JaY_III
Members-
Posts
143 -
Joined
-
Last visited
Converted
-
Gender
Undisclosed
Recent Profile Visitors
1615 profile views
JaY_III's Achievements
Apprentice (3/14)
5
Reputation
-
CTRL+A Just highlight the text you are having difficulty reading Or you can "ctrl + A" and all the text is highlighted and readable
-
As far as I can tell they are working great. Side note, I haven't had physical access to the drives yet as I am stuck out of country..... But temps do look good from what I can see, and speeds seem great, cant speak on the noise other than the wife hasn't complained. Unraid Parity check: 20-10-2020 21:43 Notice [UNRAID] - Parity check finished (0 errors) Duration: 19 hours, 12 minutes, 36 seconds. Average speed: 202.4 MB/s Pre clear takes a few days, I think it was about 3. Value is great. I picked them up for $386 Canadian each. Not bad at all for data center drives if you ask me, and they are CMR drives and that is a must have IMHO
-
-
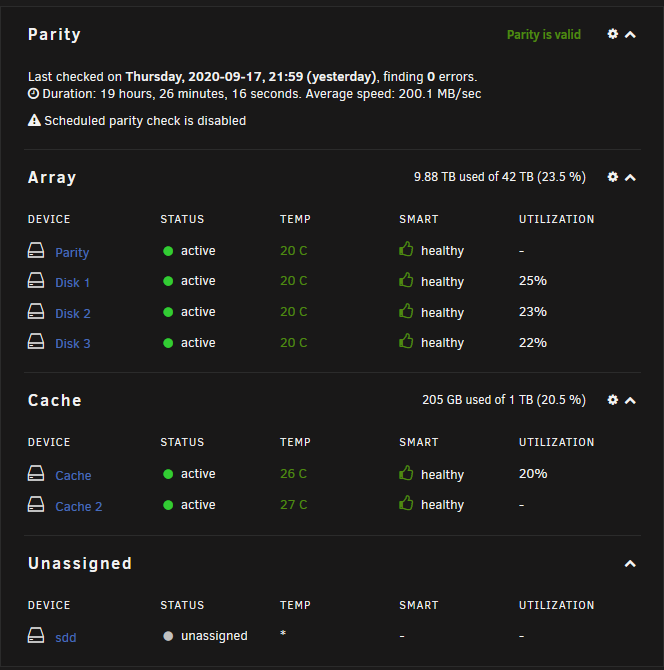
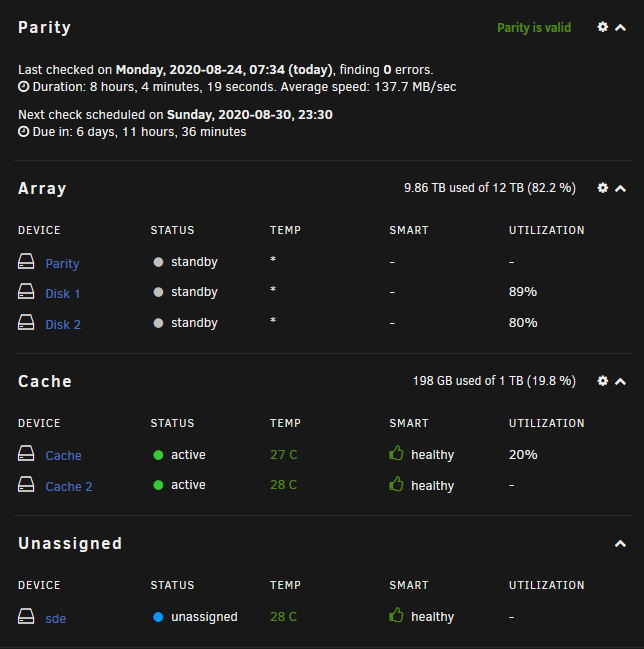
My apologies for not sharing this from the get go. Picture is worth a thousand words, or so they say sde is my disk 3, or should I say it was. As disk 3 is currently being emulated by the remaining 3. I set smart to healthy, so I can monitor SMART without going into the details if nothing changed..... Fully agree. The system is also online right now with new data having being written, thus I would require a rebuild anyhow to the best of my understanding Its my disk 3 that needs to be rebuilt from the other 3 drives in the system Some people are picky and call that a quick (fake) format as it doesn't do a traditional format of writing all zeros and scanning for bad sectors. Anyhow no need to split hairs over that Long story short is, I did not attempt to re-add the sde back and rebuild onto it. My new 14TB HDD's order seems to have gone through. With any luck I will be rebuilding disk 3 in a week or so. Changing the Parity drive after that and tripping my storage.
-
Sorry typed / read that last post out on my phone, so missed some stuff. I deleted the partition in unassigned devices, changed it to btrfs, (yes i know not a true format), copied 300GB of data or so. Formatted it back to XFS, copied around 600 GB of data to it and it on the surface it seems to be working. Was monitoring SMART and wanted to see the drive if it failed as hard as its seems to think it has. So what worries you when someone mentions format?
-
Well aware that drive isn't being used. It's been formated and pre cleared twice as I mentioned. No other warnings for the other disks, but I am replacing all my 4TB drives as they are about 6 years old now and fully realize they are without parity. Overall health of the system looks good from what I can see. Just that drive I am concerned about. Think I am agreeing with that not rebuilding yet. I should have my confirmation email on Monday and hopefully this weekend I can put the wife to work and start the drive swapping. I am guessing 2-3 days a precleare now.
-
So I have a disk (Seagate ST4000VN000) that fell out of my single parity array. From what I gather it was during a storm with power going in and out. I am behind a UPS and the timing is probably a coincidence, but who knows. 197 Current pending sector 0x0012 080 080 000 Old age Always Never 3376 198 Offline uncorrectable 0x0010 080 080 000 Old age Offline Never 3376 Doesn't look good I know So I have been running it through Preclear 187 Reported uncorrect 0x0032 001 001 000 Old age Always Never 311 And this is where I currently stand. Did a second Preclear and no change, SMART 187 is 311 after both runs. Looks like it is time to replace the drive. However, I am out of country and will not be able to return home for a few months. So my question is, would adding that drive in its current state back into the array be a bad move. Disks were scheduled to be replaced with larger drives anyhow (age and space running out), so I am thinking of picking up Toshiba MG07ACA14TE drives as I have found them for a good price. I may be able to get Mrs. JaY_III to swap the drive. When looking at the shipping and preclear time. Finnaly convincing her to actually do it by walking her though the process over a video call, this might be a few more weeks yet. The turning it off option until the drives arrive, I am really trying to avoid. Not only with the Mrs. be annoyed at me, so will the little monsters losing the on demand system. Witch in turn will further anyone the Mrs. as our youngest will most likely not leave her alone to finish her workouts, never mind make dinner. Basically you build something and now they cant live without it. So anyone have some advice for me? Thank you
-
JaY_III started following Cannot connect to unRaid shares from Windows 10
-
@SlrG All is well with the latest plugin update. Thank you again.
-
This is the error I get without the script I posted. Mar 10 08:05:35 unRAID proftpd[9325]: 127.0.0.1 (192.168.1.1[192.168.1.1]) - notice: unable to use DefaultRoot '~/' [resolved to '/tmp/FTP/']: No such file or directory Mar 10 08:05:35 unRAID proftpd[9325]: 127.0.0.1 (192.168.1.1[192.168.1.1]) - chroot to '~/' failed for user 'JaY_III': No such file or directory Mar 10 08:05:35 unRAID proftpd[9325]: 127.0.0.1 (192.168.1.1[192.168.1.1]) - error: unable to set DefaultRoot directory
-
For anyone looking to get this working with unRAID 6.8.x it is actually fairly simple. First I would like to talk about why this plugin no longer works with 6.8.x as it is currently implemented. Due to the tightening of security in 6.8.x we are no longer able to execute from the flash drive. mountscript.sh no longer is executing and as such the FTP will not have the folder structure require to allow logins and this can be seen in the system log. So we are left with a few options to fix this mountscript not executing. We can manually create the file structure required as defined in the mountscript. However this does not survive a reboot, so other than testing, its not a viable option. The go file, you might be able to use it, but that is not the intention of the go file. You may cause further issues so best to leave that alone. crontab could work, with limitations. You need to implement crontab in a hacky way in order for your scripts to survive a reboot. The easy fix for 6.8.x is to use "CA User Scripts" Install this plugin add new script edit script copy the mountscript.sh into your new script. (#comments can be copied without issues) set to run at "At first array start only" apply either run the script now and your FTP will now work or reboot and test it. That's it, ProFTPD now works in 6.8.x
-
Unraid Forum 100K Giveaway
JaY_III replied to SpencerJ's topic in Unraid Blog and Uncast Show Discussion
Love: Docker Engine and KVM Would love to see: TRIM support on the array -
Thank you for this correction. I sort of forgot I was in a tunnel while setting up the software.
-
If anyone is having troubles getting this working, here is what I did to set it all up using OpenVPN From the CA app, click the install button, it will bring up the settings we need to tweak to get this to work Step 1: Port Setup -> Remove : Host Port 3: Container Port: 8080 -> Set : Key 8: <to a free port number you wish to run this container on> Container Variable: WEBUI_PORT" -> Click : "Add another Path, Port, Variable, Label or Device" Set it up as follows Config Type: Port Name: Host Port 3 (or leave blank) Host Port: <same as key 8 port> Connection type : TCP Description: Container Port: <same as key 8 port> ->Edit : WebUI http://[IP]:[PORT:8080]/ (if you don't see this option ensure the advanced view toggle on the top right is enabled) change the port number to <same as key 8 port> Step 2: Download Dir -> Edit: Host Path 2: < location you would like to store your downloads > Container Path: /data Step 3a: VPN Key 1: Yes Container Variable: VPN_ENABLED Key 2: <username goes here> Container Variable: VPN_USER Key 3: <password goes here> Container Variable: VPN_PASS Key 4: Custom Container Variable: VPN_PROV Key 8: <set in step 1> Container Variable: WEBUI_PORT Key 9: (LAN specific, common network is <192.168.1.0/24>) Container Variable: LAN_NETWORK Key 10: (defaults may work for you) <192.168.1.1,9.9.9.9,149.112.112.112> Container Variable: NAME_SERVERS * Set VPN to "no" if you do not wish to setup the VPN at this time Click "APPLY" The docker will now download and unpack however if you have your VPN key 1 set to "Yes" the web interface will fail to load at this time as we do not have our certs setup yet. Step 3b: VPN cert Once the container has unpacked Go to your /appdata location the default install director is /binhex-qbittorrentvpn inside that directory you will see another directory called /openvpn -> Copy your < vpn.ovpn > file here. This is provided by your VPN provider Restart the container Step 4: Web interface config ->Click on the container icon WebUI *Providing you set the webui port in step 1 correctly L: admin P: adminadmin ->Click gear Icon (options) Down Load Tab Ensure the following is set as follows: Default Save Path: /data/ your downloads will be saved to the location set in step 2 I also like to set the following: <checked> Keep incomplete torrents in: /data/incomplete/ <checked> Copy .torrent files to: /data/incomplete/torrent <checked> Copy .torrent files for finished downloads to: /data/incomplete/torrent/done <checked> Create sub-folder for torrents with multiple files <checked> Delete .torrent files afterwards <checked> Append .!qB extension to incomplete files Automatically add torrents from: Monitored Folder | Override Save Location /data/incomplete/torrent/monitor/ | Default Save Location Connection Tab Port used for incoming connections: < as per your firewall/router settings > Web UI Authentication Username: <web UI username> Password: <web UI pass> <checked> Bypass authentication for clients on localhost <checked> Bypass authentication for clients in whitelisted IP subnets : <same as key9 durring setup> *only do this step if you don't want to worry about passwords for LAN (local) users -> Click Save Your Done! Now test everything out. If all goes well you will have a working VPN'd Torrent Client Linux Mint downloaded at my full network speed. Hopefully this helps anyone looking to set this up
-
mountscript.sh is stored in the plugin directory on your flash drive. Might be a little easier for you do this with notepad++ in windows than with nano or vi over SSH You can enabled sharing of your flash drive by login into unRAID -> Main ->Boot Device ->Flash ->SMB Security Settings Setup the security appropriately for your needs. You can then access it in windows \\unraid-name-or-ip\flash\config\plugins\ProFTPd
-
Just an FYI Samsung is ending B-Die production https://www.anandtech.com/show/14327/samsung-to-end-b-die-ddr4-memory


