





Ndgame
Members
-
Joined
-
Last visited
Everything posted by Ndgame
-
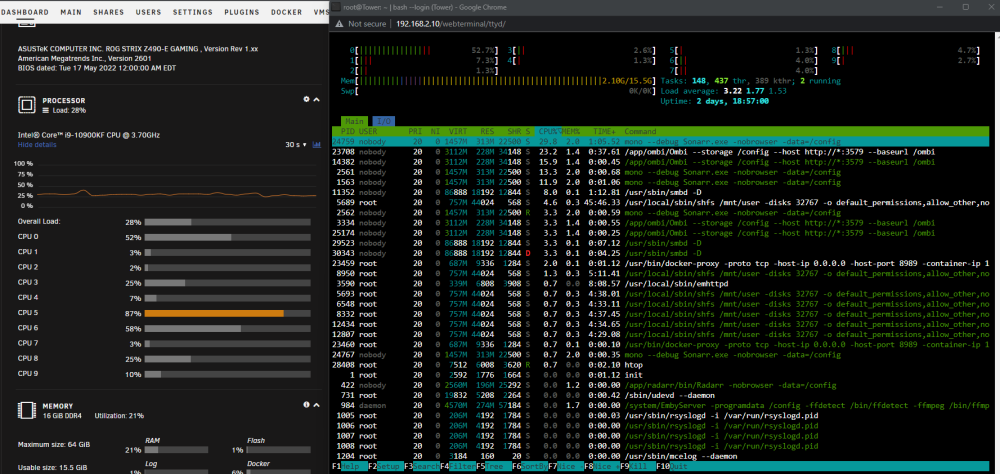
Yeah this doesn't add up at all. If I stop the transfer everything goes to normal. Here is a screenshot during a file transfer.
-
So this problem is a weird one. I am having an issue where if I am copying data to or from any share or directly from one disk to another that my systems comes to a holt. During file movement if you click on the Dashboard you will see that at least 4 of my cores are red and maxed out with the others over half usage. This blows my mind as when copying data to or from a share or disk should have no usage of the CPU. During this time the main plex page is sluggish and you are not able to use plex as nother plays but instead just sits there and spins. My setup is a Intel i9 10900k 16GB Ram netapp 24 disk shelf connected to a LSI card I have attached the Diagnostics to the thread and I greatly appreacite anyones support. tower-diagnostics-20230113-1245.zip
-
Does anyone know anything about putting Seagate drives in “IT Mode”
-
I purchased 3 Seagate Constellation ES.3 drives and been trying to install them into my unraid server. I have plugged each of them in at different times and the drives are not showing up in Unraid. I have attached diagnostics to see if anyone can see a problem and help me out. tower-diagnostics-20221101-1519.zip
-
Ok so I found a configuration that gets rid of the pink tint. But wanted to ask some questions for anyone out there that may know. If I set the Refresh Rate on the PC to 24hz the pink goes away. As soon as I go higher than that it comes back. Does anyone have any input on this? Thanks,
-
Ok I could use somenes help. I have a Windows 11 VM that I am passing through a 3060Ti GPU with no problems except for this 1 thing. Just a little background I Built this VM to be a HTPC for my Home Theater. So I am using Kodi and JRiver as my Media Center on it. The problem is that when a movie with HDR is played and the Projector changes it mode or even if it doesn't HDR has a Pink Tint accross the whole screen. Here are the steps I have take to resolve it. 1. Updated the Nvidia Driver (No Luck) 2. Put the GPU in a standalone PC and tested using the same HDMI with no problem. 3. Changed the HDMI cable (No Luck) 4. Created a Windows 10 VM to test in ( NO Luck) 5. Rebooted both the VM's and the Unraid Server 6. Tried using both the Display port and HDMI still (No Luck) 7. I disabled the color filter in Windows (No Luck) 8. Enabled Night Vision and turned it all the way down as I read on google. (No luck) At this point I am scratching my head. If anyone knows anything on this please let me know. Thanks, Aaron
-
I downloaded the diagnostics and posted here. Any help would be greatly appreciated. tower-diagnostics-20220823-2134.zip
-
Hello, Thanks in advance for any help anyone can give me. My setup is as follows. Asus Z-490-E Intel I9 10900KF MSI XGamer 3060Ti I setup a VM with Windows install on it and I have been watching Spaceinvaders for the past week doing everything he says to do but with no luck on my end. I was successful at getting a vbios dumped by putting it in the 2nd slot on the motherboard. This is the only GPU on the system. When I power up the VM and I assign the GPU and the related Sound card I am getting no picture on the monitor. When I reboot the server I am seeing unraid booting ad after it gets past the selection screen it goes awy. However I am able to access Unraid from the browser. What logs or information can I share here that would help me figure out why this won't work. Here is the XML fol of the VM <?xml version='1.0' encoding='UTF-8'?> <domain type='kvm'> <name>Windows 11</name> <uuid>6af1a39d-f7ea-eb33-79b4-a9660a903292</uuid> <metadata> <vmtemplate xmlns="unraid" name="Windows 11" icon="windows11.png" os="windowstpm"/> </metadata> <memory unit='KiB'>8388608</memory> <currentMemory unit='KiB'>8388608</currentMemory> <memoryBacking> <nosharepages/> </memoryBacking> <vcpu placement='static'>8</vcpu> <cputune> <vcpupin vcpu='0' cpuset='6'/> <vcpupin vcpu='1' cpuset='16'/> <vcpupin vcpu='2' cpuset='7'/> <vcpupin vcpu='3' cpuset='17'/> <vcpupin vcpu='4' cpuset='8'/> <vcpupin vcpu='5' cpuset='18'/> <vcpupin vcpu='6' cpuset='9'/> <vcpupin vcpu='7' cpuset='19'/> </cputune> <os> <type arch='x86_64' machine='pc-i440fx-6.2'>hvm</type> <loader readonly='yes' type='pflash'>/usr/share/qemu/ovmf-x64/OVMF_CODE-pure-efi-tpm.fd</loader> <nvram>/etc/libvirt/qemu/nvram/6af1a39d-f7ea-eb33-79b4-a9660a903292_VARS-pure-efi-tpm.fd</nvram> </os> <features> <acpi/> <apic/> <hyperv mode='custom'> <relaxed state='on'/> <vapic state='on'/> <spinlocks state='on' retries='8191'/> <vendor_id state='on' value='none'/> </hyperv> </features> <cpu mode='host-passthrough' check='none' migratable='on'> <topology sockets='1' dies='1' cores='4' threads='2'/> <cache mode='passthrough'/> </cpu> <clock offset='localtime'> <timer name='hypervclock' present='yes'/> <timer name='hpet' present='no'/> </clock> <on_poweroff>destroy</on_poweroff> <on_reboot>restart</on_reboot> <on_crash>restart</on_crash> <devices> <emulator>/usr/local/sbin/qemu</emulator> <disk type='file' device='cdrom'> <driver name='qemu' type='raw'/> <source file='/mnt/user/isos/Windows/Window11_Insiders.iso'/> <target dev='hda' bus='sata'/> <readonly/> <boot order='2'/> <address type='drive' controller='0' bus='0' target='0' unit='0'/> </disk> <disk type='file' device='cdrom'> <driver name='qemu' type='raw'/> <source file='/mnt/user/isos/virtio-win-0.1.190.iso'/> <target dev='hdb' bus='sata'/> <readonly/> <address type='drive' controller='0' bus='0' target='0' unit='1'/> </disk> <disk type='file' device='disk'> <driver name='qemu' type='raw' cache='writeback'/> <source file='/mnt/cache/VMs/vdisk1.img'/> <target dev='hdc' bus='sata'/> <boot order='1'/> <address type='drive' controller='0' bus='0' target='0' unit='2'/> </disk> <controller type='pci' index='0' model='pci-root'/> <controller type='sata' index='0'> <address type='pci' domain='0x0000' bus='0x00' slot='0x03' function='0x0'/> </controller> <controller type='virtio-serial' index='0'> <address type='pci' domain='0x0000' bus='0x00' slot='0x04' function='0x0'/> </controller> <controller type='usb' index='0' model='ich9-ehci1'> <address type='pci' domain='0x0000' bus='0x00' slot='0x07' function='0x7'/> </controller> <controller type='usb' index='0' model='ich9-uhci1'> <master startport='0'/> <address type='pci' domain='0x0000' bus='0x00' slot='0x07' function='0x0' multifunction='on'/> </controller> <controller type='usb' index='0' model='ich9-uhci2'> <master startport='2'/> <address type='pci' domain='0x0000' bus='0x00' slot='0x07' function='0x1'/> </controller> <controller type='usb' index='0' model='ich9-uhci3'> <master startport='4'/> <address type='pci' domain='0x0000' bus='0x00' slot='0x07' function='0x2'/> </controller> <interface type='bridge'> <mac address='52:54:00:cd:34:63'/> <source bridge='br0'/> <model type='e1000'/> <address type='pci' domain='0x0000' bus='0x00' slot='0x02' function='0x0'/> </interface> <serial type='pty'> <target type='isa-serial' port='0'> <model name='isa-serial'/> </target> </serial> <console type='pty'> <target type='serial' port='0'/> </console> <channel type='unix'> <target type='virtio' name='org.qemu.guest_agent.0'/> <address type='virtio-serial' controller='0' bus='0' port='1'/> </channel> <input type='tablet' bus='usb'> <address type='usb' bus='0' port='1'/> </input> <input type='mouse' bus='ps2'/> <input type='keyboard' bus='ps2'/> <tpm model='tpm-tis'> <backend type='emulator' version='2.0' persistent_state='yes'/> </tpm> <audio id='1' type='none'/> <hostdev mode='subsystem' type='pci' managed='yes'> <driver name='vfio'/> <source> <address domain='0x0000' bus='0x01' slot='0x00' function='0x0'/> </source> <rom file='/mnt/user/isos/vbios/vbiosGeForce RTX 3060 Ti Lite Hash Rate'/> <address type='pci' domain='0x0000' bus='0x00' slot='0x05' function='0x0'/> </hostdev> <hostdev mode='subsystem' type='pci' managed='yes'> <driver name='vfio'/> <source> <address domain='0x0000' bus='0x01' slot='0x00' function='0x1'/> </source> <address type='pci' domain='0x0000' bus='0x00' slot='0x06' function='0x0'/> </hostdev> <hostdev mode='subsystem' type='usb' managed='no'> <source> <vendor id='0x04d9'/> <product id='0xa0ea'/> </source> <address type='usb' bus='0' port='2'/> </hostdev> <hostdev mode='subsystem' type='usb' managed='no'> <source> <vendor id='0x413c'/> <product id='0x2107'/> </source> <address type='usb' bus='0' port='3'/> </hostdev> <hostdev mode='subsystem' type='usb' managed='no'> <source> <vendor id='0x8087'/> <product id='0x0026'/> </source> <address type='usb' bus='0' port='4'/> </hostdev> <memballoon model='none'/> </devices> </domain> Also Here is the logs of the VM after I click start. netdev tap,fd=36,id=hostnet0 \ -device e1000,netdev=hostnet0,id=net0,mac=52:54:00:cd:34:63,bus=pci.0,addr=0x2 \ -chardev pty,id=charserial0 \ -device isa-serial,chardev=charserial0,id=serial0,index=0 \ -chardev socket,id=charchannel0,fd=34,server=on,wait=off \ -device virtserialport,bus=virtio-serial0.0,nr=1,chardev=charchannel0,id=channel0,name=org.qemu.guest_agent.0 \ -chardev 'socket,id=chrtpm,path=/run/libvirt/qemu/swtpm/11-Windows 11-swtpm.sock' \ -tpmdev emulator,id=tpm-tpm0,chardev=chrtpm \ -device tpm-tis,tpmdev=tpm-tpm0,id=tpm0 \ -device usb-tablet,id=input0,bus=usb.0,port=1 \ -audiodev '{"id":"audio1","driver":"none"}' \ -device 'vfio-pci,host=0000:01:00.0,id=hostdev0,bus=pci.0,addr=0x5,romfile=/mnt/user/isos/vbios/vbiosGeForce RTX 3060 Ti Lite Hash Rate' \ -device vfio-pci,host=0000:01:00.1,id=hostdev1,bus=pci.0,addr=0x6 \ -device usb-host,hostdevice=/dev/bus/usb/001/004,id=hostdev2,bus=usb.0,port=2 \ -device usb-host,hostdevice=/dev/bus/usb/001/003,id=hostdev3,bus=usb.0,port=3 \ -device usb-host,hostdevice=/dev/bus/usb/001/007,id=hostdev4,bus=usb.0,port=4 \ -sandbox on,obsolete=deny,elevateprivileges=deny,spawn=deny,resourcecontrol=deny \ -msg timestamp=on char device redirected to /dev/pts/1 (label charserial0) 2022-08-24T01:30:47.772958Z qemu-system-x86_64: libusb_set_interface_alt_setting: -5 [NOT_FOUND] 2022-08-24T01:31:26.027963Z qemu-system-x86_64: terminating on signal 15 from pid 7320 (/usr/sbin/libvirtd) 2022-08-24 01:31:28.630+0000: shutting down, reason=destroyed 2022-08-24 01:32:05.632+0000: Starting external device: TPM Emulator /usr/bin/swtpm socket --ctrl 'type=unixio,path=/run/libvirt/qemu/swtpm/12-Windows 11-swtpm.sock,mode=0600' --tpmstate dir=/var/lib/libvirt/swtpm/6af1a39d-f7ea-eb33-79b4-a9660a903292/tpm2,mode=0600 --log 'file=/var/log/swtpm/libvirt/qemu/Windows 11-swtpm.log' --terminate --tpm2 2022-08-24 01:32:05.650+0000: starting up libvirt version: 8.2.0, qemu version: 6.2.0, kernel: 5.15.46-Unraid, hostname: Tower LC_ALL=C \ PATH=/bin:/sbin:/usr/bin:/usr/sbin \ HOME='/var/lib/libvirt/qemu/domain-12-Windows 11' \ XDG_DATA_HOME='/var/lib/libvirt/qemu/domain-12-Windows 11/.local/share' \ XDG_CACHE_HOME='/var/lib/libvirt/qemu/domain-12-Windows 11/.cache' \ XDG_CONFIG_HOME='/var/lib/libvirt/qemu/domain-12-Windows 11/.config' \ /usr/local/sbin/qemu \ -name 'guest=Windows 11,debug-threads=on' \ -S \ -object '{"qom-type":"secret","id":"masterKey0","format":"raw","file":"/var/lib/libvirt/qemu/domain-12-Windows 11/master-key.aes"}' \ -blockdev '{"driver":"file","filename":"/usr/share/qemu/ovmf-x64/OVMF_CODE-pure-efi-tpm.fd","node-name":"libvirt-pflash0-storage","auto-read-only":true,"discard":"unmap"}' \ -blockdev '{"node-name":"libvirt-pflash0-format","read-only":true,"driver":"raw","file":"libvirt-pflash0-storage"}' \ -blockdev '{"driver":"file","filename":"/etc/libvirt/qemu/nvram/6af1a39d-f7ea-eb33-79b4-a9660a903292_VARS-pure-efi-tpm.fd","node-name":"libvirt-pflash1-storage","auto-read-only":true,"discard":"unmap"}' \ -blockdev '{"node-name":"libvirt-pflash1-format","read-only":false,"driver":"raw","file":"libvirt-pflash1-storage"}' \ -machine pc-i440fx-6.2,usb=off,dump-guest-core=off,mem-merge=off,pflash0=libvirt-pflash0-format,pflash1=libvirt-pflash1-format,memory-backend=pc.ram \ -accel kvm \ -cpu host,migratable=on,hv-time=on,hv-relaxed=on,hv-vapic=on,hv-spinlocks=0x1fff,hv-vendor-id=none,host-cache-info=on,l3-cache=off \ -m 8192 \ -object '{"qom-type":"memory-backend-ram","id":"pc.ram","size":8589934592}' \ -overcommit mem-lock=off \ -smp 8,sockets=1,dies=1,cores=4,threads=2 \ -uuid 6af1a39d-f7ea-eb33-79b4-a9660a903292 \ -display none \ -no-user-config \ -nodefaults \ -chardev socket,id=charmonitor,fd=35,server=on,wait=off \ -mon chardev=charmonitor,id=monitor,mode=control \ -rtc base=localtime \ -no-hpet \ -no-shutdown \ -boot strict=on \ -device ich9-usb-ehci1,id=usb,bus=pci.0,addr=0x7.0x7 \ -device ich9-usb-uhci1,masterbus=usb.0,firstport=0,bus=pci.0,multifunction=on,addr=0x7 \ -device ich9-usb-uhci2,masterbus=usb.0,firstport=2,bus=pci.0,addr=0x7.0x1 \ -device ich9-usb-uhci3,masterbus=usb.0,firstport=4,bus=pci.0,addr=0x7.0x2 \ -device ahci,id=sata0,bus=pci.0,addr=0x3 \ -device virtio-serial-pci,id=virtio-serial0,bus=pci.0,addr=0x4 \ -blockdev '{"driver":"file","filename":"/mnt/user/isos/Windows/Window11_Insiders.iso","node-name":"libvirt-3-storage","auto-read-only":true,"discard":"unmap"}' \ -blockdev '{"node-name":"libvirt-3-format","read-only":true,"driver":"raw","file":"libvirt-3-storage"}' \ -device ide-cd,bus=sata0.0,drive=libvirt-3-format,id=sata0-0-0,bootindex=2 \ -blockdev '{"driver":"file","filename":"/mnt/user/isos/virtio-win-0.1.190.iso","node-name":"libvirt-2-storage","auto-read-only":true,"discard":"unmap"}' \ -blockdev '{"node-name":"libvirt-2-format","read-only":true,"driver":"raw","file":"libvirt-2-storage"}' \ -device ide-cd,bus=sata0.1,drive=libvirt-2-format,id=sata0-0-1 \ -blockdev '{"driver":"file","filename":"/mnt/cache/VMs/vdisk1.img","node-name":"libvirt-1-storage","cache":{"direct":false,"no-flush":false},"auto-read-only":true,"discard":"unmap"}' \ -blockdev '{"node-name":"libvirt-1-format","read-only":false,"cache":{"direct":false,"no-flush":false},"driver":"raw","file":"libvirt-1-storage"}' \ -device ide-hd,bus=sata0.2,drive=libvirt-1-format,id=sata0-0-2,bootindex=1,write-cache=on \ -netdev tap,fd=36,id=hostnet0 \ -device e1000,netdev=hostnet0,id=net0,mac=52:54:00:cd:34:63,bus=pci.0,addr=0x2 \ -chardev pty,id=charserial0 \ -device isa-serial,chardev=charserial0,id=serial0,index=0 \ -chardev socket,id=charchannel0,fd=34,server=on,wait=off \ -device virtserialport,bus=virtio-serial0.0,nr=1,chardev=charchannel0,id=channel0,name=org.qemu.guest_agent.0 \ -chardev 'socket,id=chrtpm,path=/run/libvirt/qemu/swtpm/12-Windows 11-swtpm.sock' \ -tpmdev emulator,id=tpm-tpm0,chardev=chrtpm \ -device tpm-tis,tpmdev=tpm-tpm0,id=tpm0 \ -device usb-tablet,id=input0,bus=usb.0,port=1 \ -audiodev '{"id":"audio1","driver":"none"}' \ -device 'vfio-pci,host=0000:01:00.0,id=hostdev0,bus=pci.0,addr=0x5,romfile=/mnt/user/isos/vbios/vbiosGeForce RTX 3060 Ti Lite Hash Rate.rom' \ -device vfio-pci,host=0000:01:00.1,id=hostdev1,bus=pci.0,addr=0x6 \ -device usb-host,hostdevice=/dev/bus/usb/001/004,id=hostdev2,bus=usb.0,port=2 \ -device usb-host,hostdevice=/dev/bus/usb/001/003,id=hostdev3,bus=usb.0,port=3 \ -device usb-host,hostdevice=/dev/bus/usb/001/007,id=hostdev4,bus=usb.0,port=4 \ -sandbox on,obsolete=deny,elevateprivileges=deny,spawn=deny,resourcecontrol=deny \ -msg timestamp=on char device redirected to /dev/pts/1 (label charserial0) 2022-08-24T01:32:19.320476Z qemu-system-x86_64: libusb_set_interface_alt_setting: -5 [NOT_FOUND] ^A
-
I installed a 3060Ti and I keep trying to use the script to dump the vbios but this is the errors I am getting. Script location: /tmp/user.scripts/tmpScripts/Dump Vbios v2/script Note that closing this window will abort the execution of this script You have selected this device to dump the vbios from 01:00.0 VGA compatible controller: NVIDIA Corporation GA104 [GeForce RTX 3060 Ti Lite Hash Rate] (rev a1) This does look like a valid GPU to me. Continuing ......... Checking if location to put vbios file exists Vbios folder already exists Disconnecting the graphics card tee: '/sys/bus/pci/devices/0000\:01\:00.0/remove': No such file or directory 1 Entered suspended (sleep) state ...... PRESS POWER BUTTON ON SERVER TO CONTINUE Rescanning pci bus 1 Graphics card has now sucessfully been disconnected and reconnected It is now ready to begin the dump vbios process Defining temp vm with gpu attached Domain 'dumpvbios' defined from /tmp/dumpvbios.xml Starting the temp vm to allow dump error: Failed to start domain 'dumpvbios' error: internal error: qemu unexpectedly closed the monitor: 2022-08-21T02:33:21.962135Z qemu-system-x86_64: -device vfio-pci,host=0000:01:00.0,id=hostdev0,bus=pci.2,addr=0x0: vfio 0000:01:00.0: group 1 is not viable Please ensure all devices within the iommu_group are bound to their vfio bus driver. Waiting for a few seconds ..... Stopping the temp vm error: Failed to destroy domain 'dumpvbios' error: Requested operation is not valid: domain is not running Removing the temp vm Domain 'dumpvbios' has been undefined Okay dumping vbios file named GeForce RTX 3060 Ti Lite Hash Rate to the location /mnt/user/isos/vbios/ /mnt/user/isos/vbios/GeForce RTX 3060 Ti Lite Hash Rate is less than 70kb This seems too small. Probably the GPU is Primary and needs disconnecting and reconnecting to get proper vbios Running again Disconnecting the graphics card tee: '/sys/bus/pci/devices/0000\:01\:00.0/remove': No such file or directory 1 Entered suspended (sleep) state ...... PRESS POWER BUTTON ON SERVER TO CONTINUE Rescanning pci bus 1 Graphics card has now sucessfully been disconnected and reconnected It is now ready to begin the dump vbios process Defining temp vm with gpu attached Domain 'dumpvbios' defined from /tmp/dumpvbios.xml Starting the temp vm to allow dump error: Failed to start domain 'dumpvbios' error: internal error: qemu unexpectedly closed the monitor: 2022-08-21T02:35:33.805898Z qemu-system-x86_64: -device vfio-pci,host=0000:01:00.0,id=hostdev0,bus=pci.2,addr=0x0: vfio 0000:01:00.0: group 1 is not viable Please ensure all devices within the iommu_group are bound to their vfio bus driver. Waiting for a few seconds ..... Stopping the temp vm error: Failed to destroy domain 'dumpvbios' error: Requested operation is not valid: domain is not running Removing the temp vm Domain 'dumpvbios' has been undefined Okay dumping vbios file named GeForce RTX 3060 Ti Lite Hash Rate to the location /mnt/user/isos/vbios/ /mnt/user/isos/vbios/GeForce RTX 3060 Ti Lite Hash Rate is less than 70kb This seems small but maybe its correct. Please try it. All done !
-
i have installed the newest bios and even went as far as rolling back a couple versions. This issue is a complete Mystery to as I have not had this problems with with motherboards.
-
Thanks for the reply. Yes both of thos are enabled. My cpu is Intel i9 10900k
-
I am not down in the basement now but I enabled a total of 4 items in the bios with no luck.. I spent about 3 hours yesterday going through the bios and reading forums and the asus manual with no luck. Is there anything I can provide that would help? I am unsure how to read the Diag files or I would.
-
Hello I need some help with IOMMU groups. My motherboard is Asus z490-E and in the bios I have VT enabled and it says it is supported and I have also enabled the Intel Virtual enabled and Hyper Threading is enabled. With all this enabled in Unraid under about it still says IOMMU - Disabled. I am trying to build a VM and pass through the NIC's to the VM and can't get it to work. I added this to the config and still no luck. append vfio_iommu_type1.allow_unsafe_interrupts=1 initrd=/bzroot Any help would be appreciated. Thanks, Aaron
-
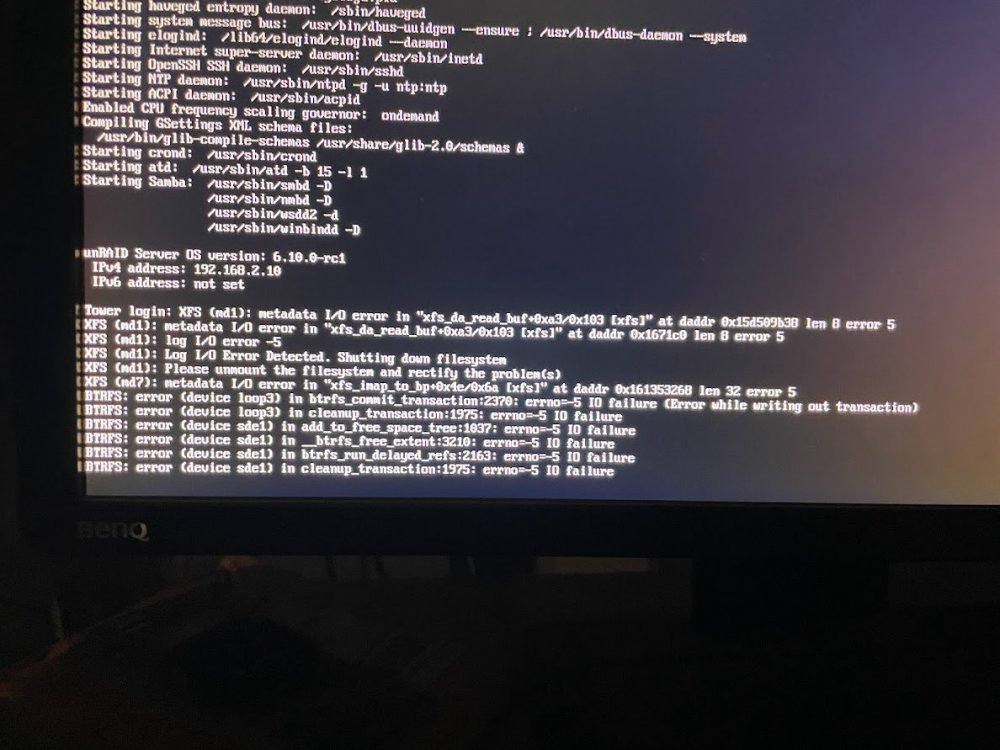
I hope someone here can help me. Every time I hit check the drives to sync the server will lock up. I have attached a screenshot of the error on the monitor and the Diag file. I have taken the parity out and formatted it and using the PreClear plugin if I have it check the MBR that fails as well. I am open for some advice on fixing. tower-diagnostics-20211029-1023.zip
-
Hey Guys, I built a new unraid box and when I connect the MediaSonic ProBox to the USB-C controller card non of the drives are showing. I have rebooted several times and have looked through the logs but see nothing standing out. I have attached the diagnostics zip so that someone else can take a look for me to help out. tower-diagnostics-20211005-1938.zip
-
When I try to run a parity check my server completely locks up. I thought it was the drive but even after formatting it and deleting the filesystem and writing all zeros to the drive it still fails. Can anyone look a the Diag file and tell me what they might see please? tower-diagnostics-20210703-1751.zip
-
I am trying to setup this up for the first time however I get a page can't be reached when I lauch it. Attached is the log file that was created. Some help would be appreciated. HBLog.txt
-
Thank you for the response. I have another question. Where can I confirm that it even seems my end nic?
-
I did this and help did not explain all the different mode options and which is better to use. Can anyone explain the difference in them or tell me which to use. On Server 2012 I just teamed the NICS together to get a 4GB connection along with the settings on my switch. All I want to do is create a 2Gb pipe with teaming 2 nics..
-
Is there a guide for bonding 2 NICS in UNRAID 6.1.7. I have LAG enabled on my managed Netgear Switch.. I have 2 Intel pro cards installed. At one time I have 5 different TV's in the house streaming and I am trying to team the nics for more bandwidth. Any instruction on how to do this from the GUI would be greatly appreciated. Thanks in advance.

