


SpaceInvaderOne
Community Developer
-
Joined
Everything posted by SpaceInvaderOne
-
No sorry no more logs are available. If you get it to dump and it says its less than 70kb you could just stop the script at that point and see if that vbios is in fact okay. Some older gpus may have a smaller vbios size ( i have a very old card a cirus logic from the 1990s that is a pci card, i use in a pcie to pci bridge, its vbios is only 30kb !)
-
@soana @frodr @reporrted Some extra things you can try . 1. Stub gpu 2 Shutdown fully the server then start server. (not reboot) 3. make a temp vm using ovmf attach the gpu you want vbios from start vm up then after couple seconds force stop.(the script makes one with seabios ) run script If still getting an error repeat above then edit sctipt and look for a variable forcereset="no" and change it to yes. This will force the scr4upt to always disconnect sleep the server then reconnect before dumping the vbios.
-
Hi Guys. So I have found that recently i have had to use a vbios with both my GPUs in my server whether Primary or Secondary GPUs. So i thought i would try and write a script that would automatically dump the vbios from a GPU in the server even if its a Primary GPU without having to do any command line work or without having to download a vbios from techpowerup and then hex edit it. I have tested this in about a half a dozen servers and it has worked for all of them. Before running the script I recommend shuting down the server completely (not rebooting) the start it back up. Make sure no containers are running (disable docker service) and make sure no VMs are running. This is because if the GPU is Primary the script will need to temporarily put the server to sleep for a few seconds to allow the GPU to be in a state where it can have the vbios dumped from it. If alot of containers are running the server doesnt always goto sleep and the script fails. How the script works. It will list the GPUs in the server showing the ids. Then with your choosen GPU id the script will dump the vbios using these steps. It will make a temporary seabios vm with the card attached, then quickly start and stop the vm with GPU passed through. This will put the GPU in the correct state to dump the vBios. It will then delete the temporary vm as no longer needed. It will try to dump the vbios of the card then check the size of the vbios. If the vbios looks correct (which normally if gpu is NOT primary it will be) it will finish the process and put the vbios in the location specified in the script (default /mnt/user/isos/vbios) However if the vbios looks incorrect and the vbios is under 70kb then it was probably dumped from a primary GPU and will need an additional stage. This is because the vbios was shadowed during the boot process of the server and so the resulting vbios is a small file which is not correct. So the script will now disconnect the GPU then put the server to sleep. Next it will prompt you to press the power button to resume the server from its sleep state. Once server is woken the script will rescan the pci bus reconnecting the GPU. This now allows the primary gpu to be able to have the vbios dumped correctly. Script will then redump the vbios again putting the vbios in the loaction specified in the script (defualt /mnt/user/isos/vbios) Here is a video showing how to use the script Of course you will need squids excellent user scripts plugin to use this script. You wil find the dump script on my github here https://github.com/SpaceinvaderOne/Dump_GPU_vBIOS I was hoping that if this script works for most people then we could get a big repository of dumped vbioses (not hexedited) and I will put them in the github. I have made a start with a few of my GPUs. So if you want to contribute then please post a link too your vbios and i will add it. Please name the vbios like this. Tith type, vendor and model and memory size. For example RTX 2080ti - Palit GAMING PRO - 11G The vbios collection is here https://github.com/SpaceinvaderOne/Dump_GPU_vBIOS/tree/master/vBIOSes Well I hope the script works for you and you find it useful. Oh and as its the now 12 midnight here in the UK - its Christmas day. So merry christmas fellow Unraiders I hope you have a great day and a good new year
-
You can just run the vm with the opencore vdisk as the first vdisk. You dont have to transfer it into the main vdisk
-
Try setting the nvidia gpu as a multifunction device as in this video here
-
If you have the "stuck on updating" with a vm this is normally due to when you have had something added previously (like a usb device passed through) and the device is no longer there. Or if you have removed the vdisk etc. Basically Unraid cant see all the devices that are defined in the template so when clicking on update it just hangs Have you removed anything from the vm since creating it?
-
working on a solution
-
If you want to delete the vm and it moans about not being able to remove the nvram please do the following 1. In unraid vm manager click to edit the vm 2. scroll to bottom and click update. (dont run helper script afterwards) 3. now you can delete the vm from in unraid vm manager
-
You shouldnt need to do anything on the opencore config You will just need to download the nvidia drivers once booted into osx. Run this in terminal and it will download the correct nvidia drivers in high sierra bash <(curl -s https://raw.githubusercontent.com/Benjamin-Dobell/nvidia-update/master/nvidia-update.sh)
-
After installing Big Sur next goto the docker template and choose Catalina, goto the bottom of the template click apply and it will then install catalina.
-
Try passing the same device to another vm a windows or linux to see if it is the hardward just not passing through or is os specific.
-
Was wondering if maybe your card has dual bios and can switch. https://forums.macrumors.com/threads/cmp-5-1-opencore-catalina-installed-rx-580-but-no-boot-scren.2236992/
-
Your welcome. Thanks for your kind comments. Glad you like macinabox
-
nvidia gt 710 works out the box and you can get on ebay for about $30 to $40
-
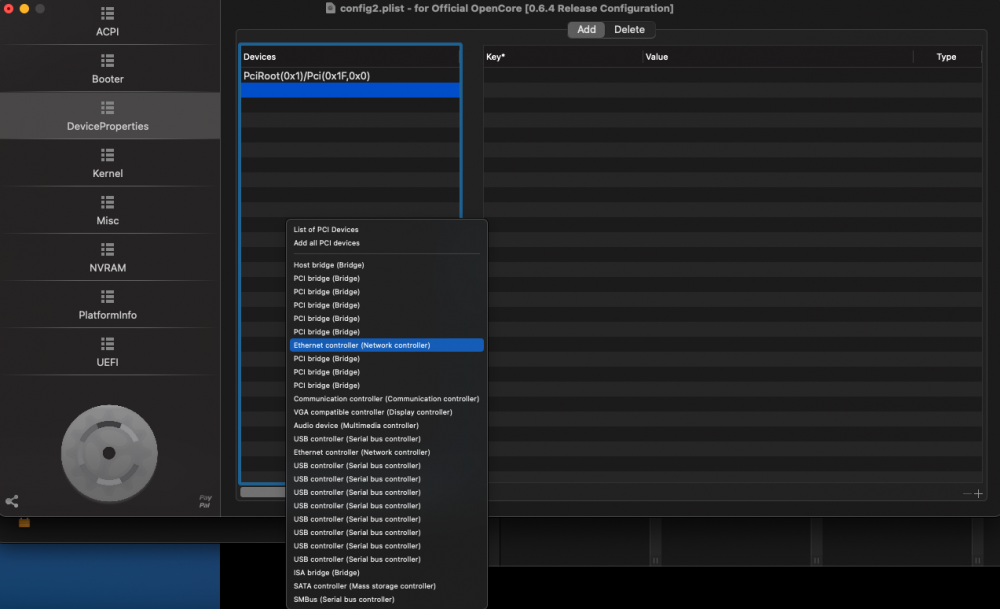
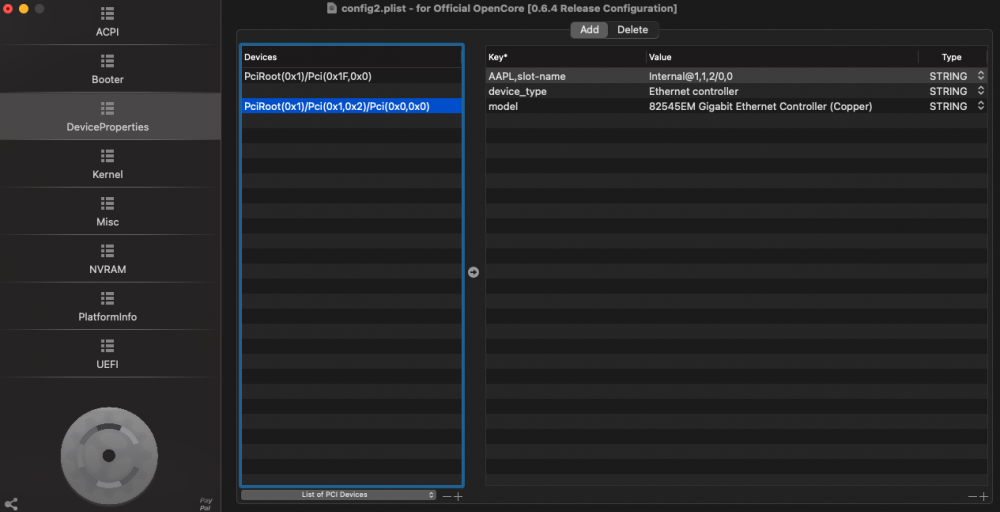
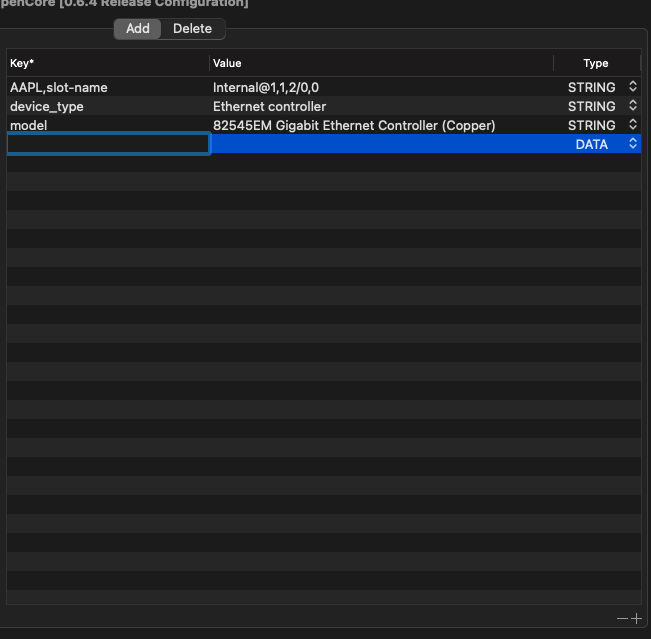
Yes you can fix that by doing the following 1. download hackintool https://github.com/headkaze/Hackintool/releases/tag/3.4.9 2. Open it and goto peripherals 3. Your nic should be en0 and a virtual intel nic (you can have other nics but you must have en0 which is intel. 4. if your nic is not en0 then run the following in mac terminal then reboot the vm. Then it should be en0 sudo rm /Library/Preferences/SystemConfiguration/NetworkInterfaces.plist sudo rm /Library/Preferences/SystemConfiguration/preferences.plist 5. You want the nic to say en0 and have a tick where it says built in as in the pic below 6. If it doesnt then you will need to open your opencore configurator goto tools then open the efi partition and open the config.plist file with open core. 7. goto device properties then at the bottom click on the list of pci devices. Find your network adapter and click it. It will add it in as below Now we need to click the plus button on the bottom far right of the screen. It will allow us to add a key Now we need to add the key built-in with the type set as Data and the value as 01 Now whilst here in opencore configurator double check that you do have a system definition defined in platform info. Now save the changes and reboot the vm, check with hackintool that it now has a tick on builtin. Now log into apple services


-
Just make sure when you have passed through the device that afterwards you have re run the macinabox helper script to fix the xml. Usually sticking on the apple logo is down to the missing qemu args at the bottom of the xml template.
-
What the script does is check if a folder called autoinstall had been made in the macinabox appdata. This folder is made and contains the xml to define the vm. #!/bin/bash # script to notify on Unraid server when Macinabox has finished downloading install media # by SpaceinvaderOne while [ ! -d /mnt/user/appdata/macinabox/autoinstall/ ] do sleep 5 #wait 5 seconds before rechecking done /usr/local/emhttp/webGui/scripts/notify -e "Unraid Server Notice" -s "Macinabox" -d "macOS now ready to install (now run helper script)" -i "normal" exit This is created after the install media has been converted from dmg to img and moved into the iso share. There may be 2 cases which happen why the notification script would not show this to be done. 1. Manual install was selected and not auto install. With manaul install this folder and xml is not created. 2. Your appdata is not in the default unraid location. ie ( /mnt/user/appdata/ ) the script then will not see the folder as it uses the direct path. So you could change the script with the location of your appdata. But you would also need to change the location in the helper script aswell in the installvm function part of that script as it also references the appdata there too when the vm is first installed
-
Hi Mukita. Which verion os macOS are you using? Which version of Unraid? What is failing exactly? Black screen. Error message?
-
Yes you can try again or if you would rather just change the location (in advanced view) to http://[IP]:[PORT:7800]
-
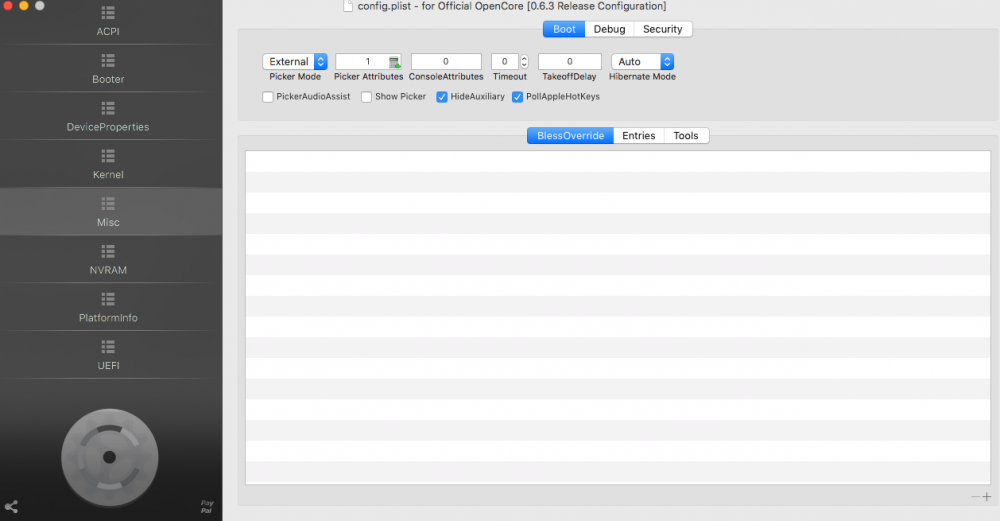
Yes. Using opencore configurator. Mount your efi partition and open the config.plist with the configurator. goto misc and set as in this pic (check hideauxillary and uncheck show picker)
-
If when clicking webui it goes to the old macinabox youtube video then the old template was still installed when you downloaded the container. (this is not in the new template - so it has now just merged the pld and new template together) Please delete the container. Then goto the bottom of the docker page. Click add template. Then click select template. From the list of your previously installed templates choose macinabox. Then to the right of its name click the black cross. It will remove the template. Then goto the apps tab search for and install macinabox and it will download the template from ca and install the new one.
-
You havent finished the install. The base system is the install media. The macOS installer is your big sur disk. Just select it and it will continue installing. (it has named itsself macOS installer because when you formatted the disk in disk utility you didnt name it) It will restart to this bootloader a few times during install just keep pressing enter to continue each time and the install will finish
-
please send a pic of the opencore bootloader screen
-
You must remove the original template as shown in the video. Then download macinabox. This is very impotant else the new and old templates will merge causing a problem.
-
Im thats very strange. You can also find a copy of the scripts in the macinabox appdata in the the subfolder macinabox. ( /mnt/user/appdata/macinabox/macinabox You can copy and paste into the userscripts manually.


