


SpaceInvaderOne
Community Developer
-
Joined
Everything posted by SpaceInvaderOne
-

From the album: Community Created Banners
-

From the album: Community Created Banners
-
Heres what to do if your isp blocks port 80 and you cant use http authentication to create your certificates. Also how to make a wildcard certificate.
-
Yep that will be because there is no config file that uses that subdomain. Just edit a config file to direct to whichever container you want to access from outside.
-
try passing through this aswell along with the other devices "
-
The error that you get "internal error: qemu unexpectedly closed the monitor" what is after that. What is the complete message please.
-
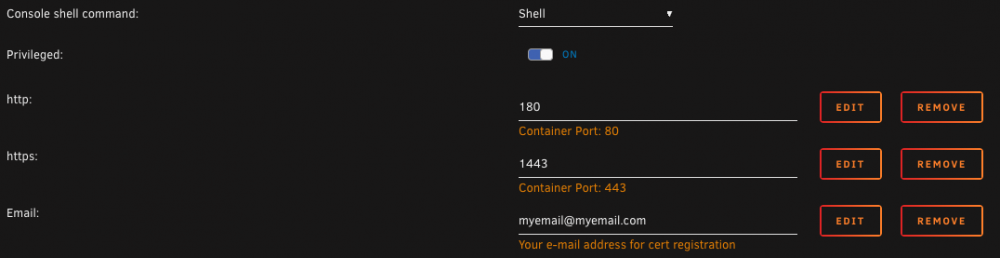
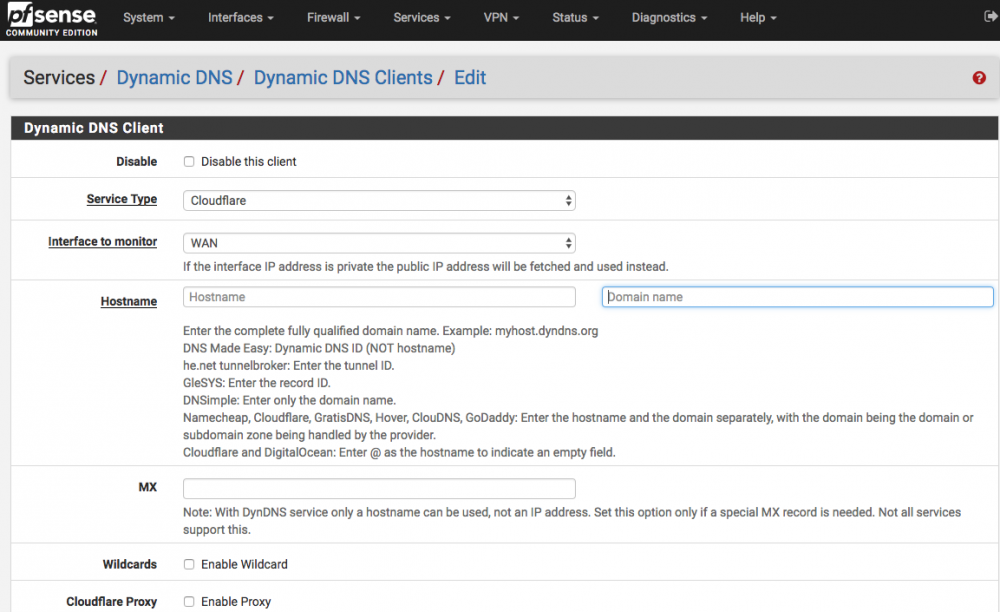
Were you forwarding port 443 to your Unraid server to access the webUI from outside? If not you need make no changes. If you were then you will need to change the forwarding of external port 443 to internal port 443. Change it to forward external port 443 to for example internal port 1443. Then map in the letsencrypt template port 1443 to 443 in the container like below You dont have to use duckdns if using your own domain. But you need to make sure that your subdomain is always pointing to your wan Ip if you dont have a static wan IP. So you would need to have some dynamic dns tracker. If you are using cloudflare you can setup cloudflare dns in pfSense and use that with your subdomain. Hope thats helps.
-
Ah glad that worked Alot of private trackers don't allow these features as it allows connecting to clients which are not registered with the tracker.
-
Can you check in deluge preferences/network that you dont have peer exchange or dht enabled
-
click on the container and goto console then run curl ifconfig.co That will show the ip inside the container. Then goto https://www.iplocation.net/ you will see your wan ip here (not through the vpn) they should be different Then paste the ip from the curl command into the ip lookup page on the above location. It should report the location as CA Toronto. If it doesnt maybe something wrong with your openvpn config files
-
It looks like the nic that you are passing through isnt in its own iommu. You will need to break it up or passthrough everything in that group. have a look at my vid here https://www.youtube.com/watch?v=qQiMMeVNw-o&t=791s
-
It should work just changing the container name to the server ip resolver 127.0.0.11 valid=30s; upstream collabora { server 10.10.20.199:9980; } This part above sets the name collabora to 10.10.20.199:9980 so then nothing else needs changing after its defined. Then later when collabora is in the config as below, it relates to what was defined above. # static files location ^~ /loleaflet { proxy_pass https://collabora; proxy_set_header Host $host; } So then the https://collabora is the same as https://10.10.20.199:9980; But how your file is will work too specifying the IP and port each time instead.
-
I don't like your office chair much
-
Ah, @Squid I was about to post a request for a feature then read the thread to realize that I never said thank you for what you did last time. So I should just be told to f off for being an ungrateful sod. Well if you forgive me for forgetting could I ask for something else for you to consider? It would be awesome to be able to have a custom tab that runs a user script. That would be awesome. I use a script with one of my VMS at the moment. What it does is delete the vdisk of that VM then copy another 'backup' of it when the VM was first set up. So it kind of resets the windows VM to factory defaults! I use it for things that I would trust running/doing on a normal VM. Then afterward I just run the script and the VM is back how it was. Would be great to be able to click a custom tab to run that script the have it do that then start the VM. I know not many people would have the same use case as me for that but it would be cool to just be able to do things such as run a script that you often use right from any web UI page. I am sure that it would take quite a bit of work to do and I am sure that you have enough to do already. But maybe I could do a deal with you. In exchange as I live in the UK and not too far away from @CHBMB If he annoys you on the forums I could try and find his house and cut his telephone line so he has no internet
-
Hey guys here is a tutorial on how to install and setup a Collabora Document Server and configure it to work with Nextcloud as a Docker container on Unraid. It shows how to set it up running through a reverse nginx proxy. Collabora is a LibreOffice Online document suite. this gives you control over your own documents and integrates with nextcloud. So no longer any need for google drive and google docs! This video guide makes use of @chvb great container.
-
The error Unknown PCI header type '127' is because the card isn't resetting correctly. This is a problem that can happen with some AMD cards. However, you have no problem with the windows VM. So why is this? Well by default there is a difference in a Windows VM and a Linux VM. The Windows VM will use a machine type of i440fx whilst the Linux VM will use a machine type of pc-Q35. I have found that you can start and stop as many VMS as you want using machine type i440fx without this error occurring. However, if you start and stop a VM using pc-Q35 then you will get this error and only a reboot will fix it. You could make a Linux VM using i440fx so then you could stop your windows VM then start the Linux one without having to reboot the server.
-
Yes any container that you pin cores/hyperthreads to will be restricted to running only on those cores Glad you like the videos.
-
part 2 now added https://youtu.be/NA_sO3rH2mU @Josh.5 sent you a pm
-
another thing i forgot to mention, make sure the onboard aspeed vga is set as the primary gpu in the bios of the mb. If it is it should output the Unraid consoles from its display.
-
Hi, @slimshizn thanks for posting that. looking at your iommu groups you do not need to use the PCIe acs override patch for your iommu. the grouping is fine how it is. Also if you don't get an error when starting the VM then you don't need to enable the unsafe interrupts either. So that's good news. I think your problem of the crash is related to the USB controller: Fresco Logic FL1100 USB 3.0 Host Controller If I remember @CHBMB discovered that this chipset doesn't play nicely with supermicro motherboards and would cause a crash. Please try removing the USB card from the server and do some testing and see if that resolves your problem. Edit -- found post where CHBMB discussed this findings
-
Hi @slimshizn sorry to hear that you are having problems with your server. Reading through your post I was a little confused reading about the MSI interrupts. I am guessing that you are adding to your syslinux config file/setting in vm settings and allowing unsafe interrupts. Unsafe interrupts are used when your server doesn't support interrupt remapping, this is different to MSI interrupts in the VM. I know too many bloody interrupts gets confusing The MSI interrupts are enabled in the os and are normally used when the sound isn't working correctly and it breaks up a bit. Its commonly known as demonic sound. But this wouldn't help you using this in your vms when it comes to the vm and the crashing. So to troubleshoot, lets start from the beginning. Can you try the following, please? Remove all of the custom settings in settings/VM Manager (and or syslinux config if you manually added things) so both PCIe ACS override and VFIO allow unsafe interrupts set them both to disabled and reboot your server. Once rebooted please go to tools/system devices and copy your PCI Devices and IOMMU Groups into this thread so we can see them. That way we can see what gpu you have and its natural iommu grouping. Then with your gpu passed through to the VM (and its sound counterpart) start the VM. If you get an error copy that error and also paste it into this thread. Then we can advise you on what settings to try next.
-
@Josh.5 yes, having the SCHEDULE_FULL_SCAN_MINS set to 0 and it not scanning the library at all, would be great. Most of the time I would just like to point the container at my media and it only convert new things as they are added. However, having the ability to disable the inotify watcher in the template as well may be useful too. I was thinking of using 2 instances of the container. One which would run 24/7 doing only the inotify watcher encodes (probably just limited to using a couple of cores) and the other instance, I would have user scripts start at night and stop in the morning working on only the library encodes but using all the available cores. Yes, using the ram for the cache files is a good idea but I guess one would have to keep the worker threads low otherwise it would use too much ram. I was wondering what the use case of using multiple worker threads beyond one for each library location and one for the inotify watcher would be. I did notice that when running the container on 8 cores it would just about max out those cores. But running it on 16 cores only about 45% of each core is being used. So I guess having more workers would saturate higher core counts? Or is there another use case? Oh also, I forgot to ask before would it be possible to be able to adjust the various video encoding quality settings, please? (although the ones used seem to produce good results that I have seen) Anyway just want to thank you for all you work on this container its great
-
Hi @Josh.5 Great work. I have had a play with the container and it really nice. My thoughts 1. I can't get the container not to scan the library folder. Setting the variable to zero and when the container starts it will still start going through the files that are there. It would be good if it could be disabled for the scan to happen when the container starts. 2. I am used to looking in the log on the handbrake container to see how far through an encode job is. It would be great if we could see this in the log too. 3. If the container is stopped then the temp file is left. This isn't a problem if the container is started again and it does the same job again. However if for some reason it doesn't (maybe the source file has been moved or deleted) it is left behind. Maybe when the container starts it should erase that temp folder. 4. I agree with @trekkiedj multiple library folders would be great.
-
Hi, @Josh.5 yes it sounds great. Please let me know when its ready. I would love to try your container. Sounds like a much more elegant solution than mine and much easier. It is annoying having to wait for conversion before watching. Have you seen the unraid port of FallingSnow's H265ize? I had a quick look at that yesterday as it will convert whole folders full of video and was thinking of using it to convert some of my existing media. But your container sounds like it takes that one step further, can't wait to try it.
-
The 16 -16 etc isn't really telling you the slot speed but what it is currently running at. To get the correct speed you really need to put a load onto the card. It is into do with power saving of the gpu when not being used. It quite easy to see this in a windows VM using gpuz. You will see the speed there that the card can run at under bus speed. Hover over that and it will tell you the speed the card is currently running. Then to the right if you click on the question mark you get the option to put some stress on the gpu and you will see the number change then.


