






SpaceInvaderOne
Community Developer
-
Joined
Everything posted by SpaceInvaderOne
-
Here is a guide about how to setup a Bitwarden server using the Bitwardenrs container. Also last part of video shows having setup the container how to use the chrome extension and importing passwords from chrome into Bitwarden. I hope you guys find it useful.
-
I have made a video guide about Bitwardenrs that maybe helpful for people new to setting this up.
-
Just tried installing container again and don't get the same error. Please can you try removing the container and try and install again and see if you still have the same problem.
-
Yeah a mobile app would be nice. But it works well from the webui. I just add it to the homepage of my phone (android)
-
Ha that will serve me right for being lazy and copy and pasting from another support thread !!
-
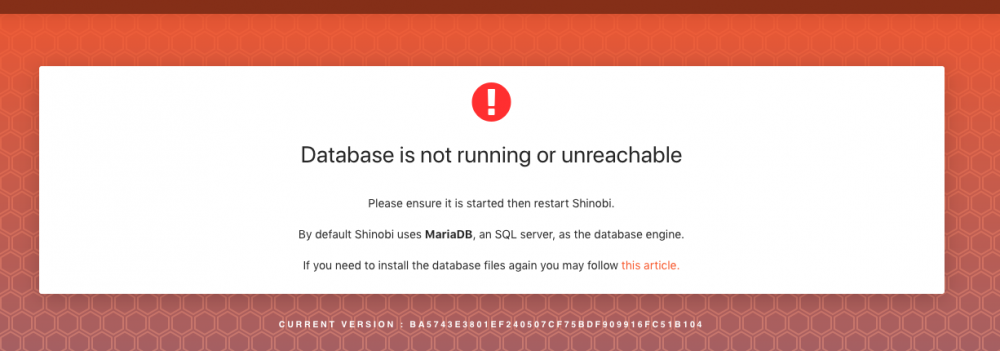
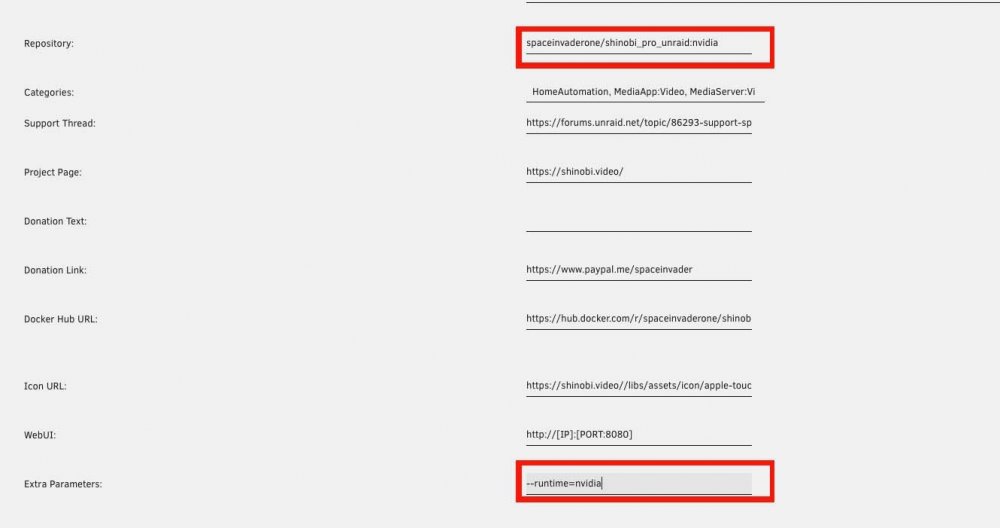
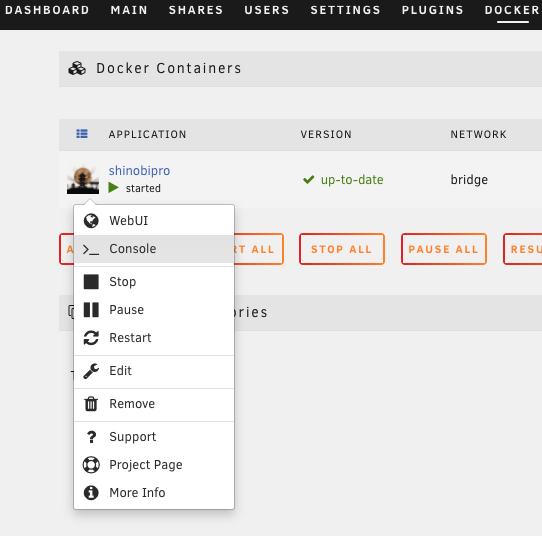
July 29 2020 On new installs it is now necessary to manually install the database files on first run. Going to http://xxx.xxx.xxx.xxx/8080/super and logging in you will see this Now goto the docker tab and select the shinobipro container and click console. This will open a terminal inside of the container. Now run these commands below mysql source sql/framework.sql; source sql/user.sql; exit Now close terminal window and restart the container. ---------------------------------------------------------------------------------------------------------------------------------------------- NVIDIA UNRAID USERS ONLY You can use your gpu to do the encoding when you are using Linuxserver's Nvidia Unraid build. To do this you will need to make some changes to the template when you install the container. You will need to change the view to advanced view then 1. Change the tag on the repository from :latest to :nvidia as below spaceinvaderone/shinobi_pro_unraid:nvidia 2. Under Extra parameters add --runtime=nvidia Lastly you will see 2 parts in the template relating to Nvidia Driver capabilities set to all GPU is set to the ID of your nvidia gpu as shown in the Unraid nvidia plugin

-
Overview: Support for Docker image Shinobi Pro Documentation: https://shinobi.video/docs/ Video Guide: Showing how to setup and configure Shinobi Pro. If you want to run Shinobi Pro through a reverse proxy then below is a config file that you can edit. Save it as shinobi.subdomain.conf # make sure that your dns has a cname set for Shinobi server { listen 443 ssl; listen [::]:443 ssl; server_name shinobi.*; include /config/nginx/ssl.conf; client_max_body_size 0; location / { include /config/nginx/proxy.conf; proxy_pass http://IP-OF-CONTAINER:8080; proxy_set_header Upgrade $http_upgrade; proxy_set_header Connection 'upgrade'; proxy_set_header Host $host; } } If you appreciate my work, then please consider buying me a beer

-
Using a hackintosh its always possible that an update can break things. But for us using a vm hackintosh we dont use any strange kexts etc so is not as likely I dont think. The Catalina product code changing only effects the container as it tries to download that id. So when it changes it cant find what it needs to download. No doubt the id will change again. (it has now 3 times since release i think). Anyone who has already installed Catalina it will not effect that at all. I will have a look on photos next time im on that machine
-
So you are able to boot and get output through your 1060 as you can get to about this mac. Then gpu is passed through. Otherwise you would see nothing when the vm boots. That means MacOS doesnt have the nvidia webdrivers loaded. Have you enabled nvidiaweb in clover configurator? Then installed the correct nvidia web drivers and rebooted ?
-
Container updated with new Catalina product code
-
Hi @maxse I am glad that you got it all working with mulvad If you want to backup the vm. Manually backup the vdisk for it that you will find in the domains share /mnt/user/domains The libvirt image just contains the xml for the vm not its 'contents' I will be making a new video for a virtual router that will be much easier to configure very soon.
-
Backup the clover vdisk before you start. Boot up then use clover configurator and make the change there. If for any reason afterwards, you cant boot then just replace the clover image with the backup.
-
I use the saphire rx570 4gb pulse mini. Works fine without a hitch. I have to passthrough the vbios though. Also for sound to work the gpu and sound counterpart must be put on the same bus. Here is my xml below for reference. <hostdev mode='subsystem' type='pci' managed='yes'> <driver name='vfio'/> <source> <address domain='0x0000' bus='0x0f' slot='0x00' function='0x0'/> </source> <rom file='/mnt/user/domains/vbios/Sapphire.RX570.4096.180105.rom'/> <address type='pci' domain='0x0000' bus='0x05' slot='0x00' function='0x0' multifunction='on'/> </hostdev> <hostdev mode='subsystem' type='pci' managed='yes'> <driver name='vfio'/> <source> <address domain='0x0000' bus='0x0f' slot='0x00' function='0x1'/> </source> <address type='pci' domain='0x0000' bus='0x05' slot='0x00' function='0x1'/> </hostdev>
-
Sorry I don't have a Mullvad account
-
Hi. Splashtop works better with e1000-82545 nic type than vmxnet Please try changing the nic type to that by changing this line <model type='vmxnet3'/> to <model type='e1000-82545em'/> For sound you should be able to get it working through splashtop by adding a virtual sound card. (also i think splashtop supports clipboard sharing..) Please add this to the xml <sound model='ich9'> </sound>
-
Yep enable bridging and you will have br0
-
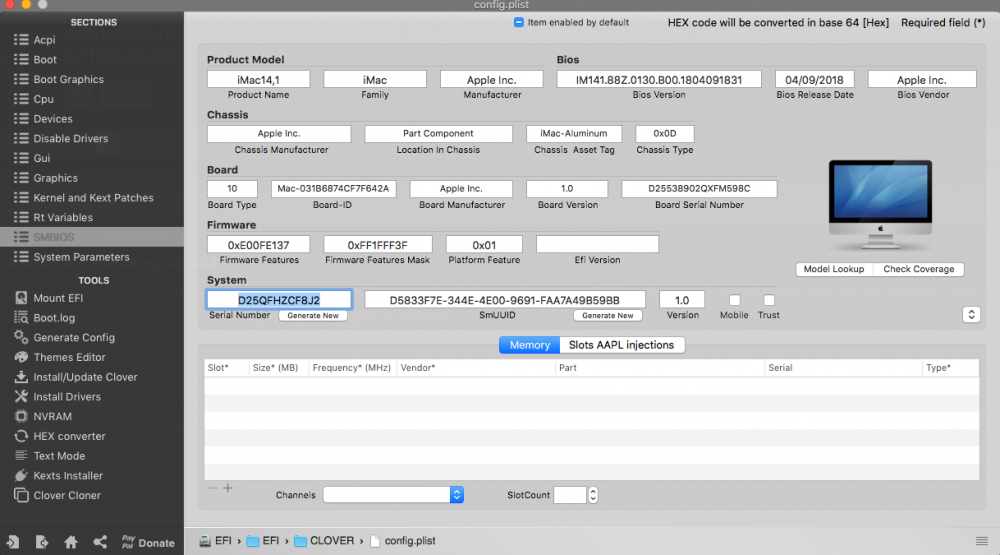
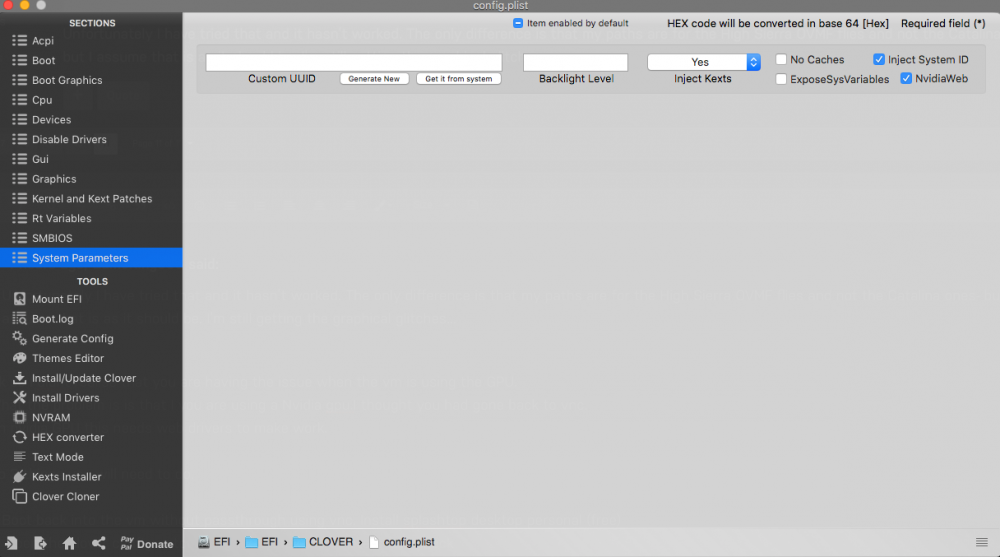
Ok so I didnt realise that you are having the issue when the vm is using the GPU. What the problem is is that I you are using a Nvidia gpu.I thought you had gone back to vnc. An nvidia GPU this needs web drivers to make work. So 3 things you will need to do. 1. Boot back into the vm without passthrough using vnc. Install splashtop desktop personal streamer (free) https://www.splashtop.com/streamer on the vm. And the Spalashtop desktop on your computer. 2. Open the clover configurator and goto system parameters and check nvidia web then on smbios make sure you have product imac 14,1 (see pics) 3. Stop then vm. passthrough the graphics card again, then boot. (you will still see the garbled screen) Use splashtop to connect to the screen. It will be very small screen but don't worry. Open terminal and run this bash <(curl -s https://raw.githubusercontent.com/Benjamin-Dobell/nvidia-update/master/nvidia-update.sh) That will install the webdrivers for the gpu easily. After that reboot and you should have a workable vm !! ....hopefully 😃
-
The macinabox template uses custom ovmf files. If you change <os> <type arch='x86_64' machine='pc-q35-3.1'>hvm</type> <loader readonly='yes' type='pflash'>/usr/share/qemu/ovmf-x64/OVMF_CODE-pure-efi.fd</loader> <nvram>/etc/libvirt/qemu/nvram/e930dfa3-ce5f-4a14-a642-d140ed8035bd_VARS-pure-efi.fd</nvram> </os> to be as below you will be back without the screen corruption. <os> <type arch='x86_64' machine='pc-q35-3.1'>hvm</type> <loader readonly='yes' type='pflash'>/mnt/user/domains/MacinaboxCatalina/ovmf/OVMF_CODE.fd</loader> <nvram>/mnt/user/domains/MacinaboxCatalina/ovmf/OVMF_VARS.fd</nvram> </os> hope that helps 😀
-
Yes this is the problem here. The clover image is a qcow2 image not a raw image <disk type='file' device='disk'> <driver name='qemu' type='raw' cache='writeback'/> <source file='/mnt/user/VDisks/MacinaboxCatalina/Clover.qcow2'/> <target dev='hdc' bus='sata'/> <boot order='1'/> <address type='drive' controller='0' bus='0' target='0' unit='2'/> </disk> Please change the xml to be as follows <disk type='file' device='disk'> <driver name='qemu' type='qcow2' cache='writeback'/> <source file='/mnt/user/VDisks/MacinaboxCatalina/Clover.qcow2'/> <target dev='hdc' bus='sata'/> <boot order='1'/> <address type='drive' controller='0' bus='0' target='0' unit='2'/> </disk>
-
I passthough a controller that i known is compatible with macOS. You may have to use a kext if the usb controller that you are passing through isn't native to osx.
-
I like splashtop desktop. Works well is easy to setup and has sound.Ah I was hoping people wouldn't post the osk key here in the forum. Yes i should have put that in the first post. Post is now updated.@hernandito wow love the icon. It is now the official icon for the container. Many thanks 😀yep you can change core numbers etc. Just make sure to add the custom parts at the bottom of the xml back in. Also if passing through a large amount of cores or or a non Apple stand such as 6 cores then remove topology line in xml. for example here <cpu mode='host-passthrough' check='none'> <topology sockets='1' cores='14' threads='1'/> </cpu> would change to <cpu mode='host-passthrough' check='none'> </cpu> Otherwise macOS wont boot with 14 cores assigned Also the gpu that you have makes a difference. Nvidia gpus are good in upto high sierra. For mojave and above you will need an AMD gpu. I am using a saphire rx 570 4gb Also to get sound working correctly from an amd card you need to put the sound part on the same bus as a multi function bit. I will explain this in a future video that i will make. But basically heres how mine looks in case you or anyone reading this wants to see. <hostdev mode='subsystem' type='pci' managed='yes'> <driver name='vfio'/> <source> <address domain='0x0000' bus='0x0a' slot='0x00' function='0x0'/> </source> <rom file='/mnt/disk1/domains/vbios/Sapphire.RX570.4096.180105.rom'/> <address type='pci' domain='0x0000' bus='0x05' slot='0x00' function='0x0' multifunction='on'/> </hostdev> <hostdev mode='subsystem' type='pci' managed='yes'> <driver name='vfio'/> <source> <address domain='0x0000' bus='0x0a' slot='0x00' function='0x1'/> </source> <address type='pci' domain='0x0000' bus='0x05' slot='0x00' function='0x1'/> </hostdev>





