


SpaceInvaderOne
Community Developer
-
Joined
Everything posted by SpaceInvaderOne
-
The built-in new permissions, not Docker Safe New Perms, but the standard one, doesn't work any longer in 6.6.5
-
Hi Guys been thinking about how to get sonarr and radarr to auto re-encode downloads automatically using handbrake. There will be 2 parts to this and i will post the next under this one in a few days time. This video the first part shows how to automatically re-encode video files downloaded by sonarr or radarr using an advanced docker path mapping sending the media files through handbrake first before then being processed by sonarr/radarr. I use h265 as i want smaller video files but any format can be choosen. This first part goes through the principles of how this works. The second video will go deeper using detailed examples. It is recommended to watch this video first. PART ONE PART 2
-
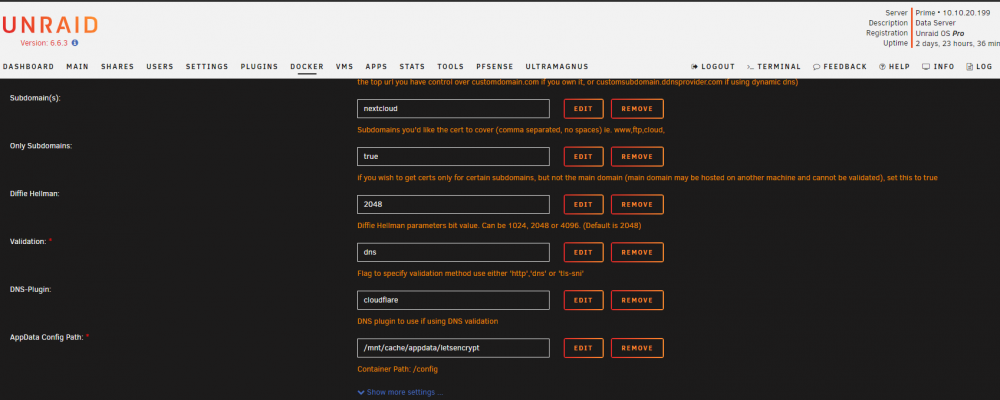
Probably the problem is due to your isp blocking port 80, which some do. Because of this HTTP authentification will fail. But you can work around this but you will need to buy your own domain. Then sign up for a free Cloudflare account and add your domain to it You would point your own subdomains (using cname) to your duck DNS (example nextcloud. sonarr. radarr. yourdomain.com to myserver.duckdns.org) When this is set up you would then change the template for lets encrypt to use DNS authentification and Cloudflare like this. Then you will need to goto your appdata share then letsencrypt and the folder dns-config Here you will find a file called cloudflare.ini in this file you will need to put your email address which you used to sign up for cloudflare and also your cloudflare api key. Once you have done this, restart lets encrypt and it will validate and generate the certs that you need. Hope that helps.
-
If you are dropping into the UEFI shell then it is most likely a problem with the install media. It is trying to boot but not finding any UEFI compatible media to boot from. This could be one of 2 things 1. (most likely) that the win 10 media isn't UEFI compatible so doesn't boot. I have had old windows 10 images I downloaded a while back and they aren't UEFI compatible. So get a new image, try downloading Windows 10 directly from the Microsoft website here https://www.microsoft.com/en-us/software-download/windows10ISO 2. The VM template is trying to boot from the vdisk first. So the boot order means the windows 10 install media isn't being booted from. Its trying to boot from the vdisk and cant so dropping into UEFI shell. So delete the windows template that you are using now and start from scratch and start fresh to avoid this.
-
Thanks, Greygoose. I really appreciate your support Glad you have the macOS vm up and running.
-
The problem is is that the disk image clover.qcow2m is well a qcow2 image MacOS VM will boot a qcow2 image fine. But it seems like you forgot to set the disk type as qcow2 for this one and it is expecting a raw image. Easiest way to change it (as you cant change it in the template now) is just to change the xml from this. <driver name='qemu' type='raw cache='writeback'/> to this <driver name='qemu' type='qcow2' cache='writeback'/> Then it will boot fine and not hit the efi shell
-
I have updated my guide for MacOS. Shows how to install Mojave and High Sierra and passthrough various hardware
-
If you create or change an existing vm to have no vdisk. Then try to add a vdisk ( from none to auto/manual) Once clicking update get the error VM creation error unsupported configuration: per-device boot elements cannot be used together with os/boot elements
-
@Squid its next weekend now!! Any chance you may have some time ?? 😁
-
Great thanks. Will do. .........Alexa set reminder.......whats the reminder for? .....to remind @Squid ...... when should i remind you? .... Next saturaday.....what time?.....10 oclock.....is that 10 oclock in the morning or the evening?.....the morning.....ok i will remind you to remind squid at 10 oclock on saturday......thankyou Alexa... Ok lets see if bloody Alexa will work !! 😁
-
Hi @Squid is there any chance you could make an option so that we could have a custom tab just open over the parent window. i would really like to have a link from each of my servers, to the other server's webGui like this. Then i could easily switch from server to server from with the Unraid webGui 😀Please! 😀

-
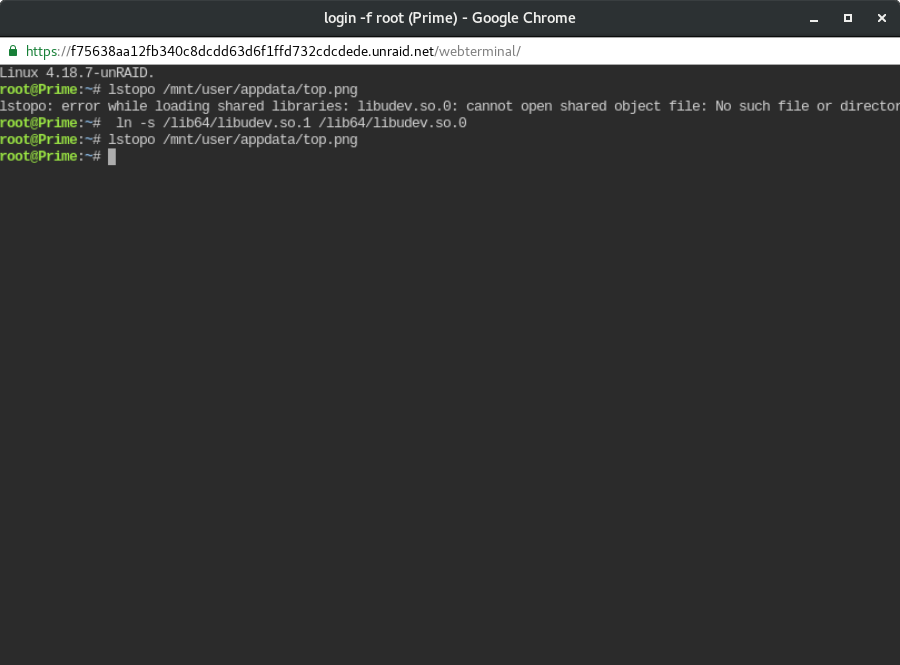
Sorry I never tested this on the new rc unraid versions. This happens because libudev has been updated from .so.0 to .so.1 so it can't find libudev.so.0. So to fix this just create a symlink and it will fix this ln -s /lib64/libudev.so.1 /lib64/libudev.so.0
-
Hi Guys. This video is a tutorial on how to examine the topology of a multi CPU or a Threadripper server which has more than one numa node. This is useful so we can pin vCpu cores from the same numa node as the GPU which we want to pass through so therefore, getting better performance. The video shows how to download and install hwloc and all of its dependencies using a script and @Squid great user script plugin. Hope you find it useful --------------------------------------------------------------------------------------------------------------------------------------------------------------------------------------------------------------------------------------------------------------- **note** If using the new 6.6.0 rc versions of unraid (or above)** before running the lstopo command you will need to create a symlink using this command first ln -s /lib64/libudev.so.1 /lib64/libudev.so.0 ** dont run the above command unless on unraid 6.6.0 or above! --------------------------------------------------------------------------------------------------------------------------------------------------------------------------------------------------------------------------------------------------------------- EDIT-- Unraid now has lstopo built in! You will need to boot your server in GUI mode for it to work. Then once you are in GUI mode just open terminal and run the command and you are good to go. Much easier than messing with loading it manually like in my video.
-
I am having some problems with this version using a server with a threadripper 2990wx, 64 gigs ram, a gtx 1080 GPU and a gigabyte x399 gaming 7 motherboard with bios version f10 (AGESA 1.1.0.0 ) On 6.5.3 my boot times of vms are very fast and everything works as expected. 1. ubuntu mate with 32 cores (64 threads), 32 gigs ram .... passed through gtx 1080 time from clicking start to desktop ......43 seconds 2. windows 10 with 16 cores(32 threads), 32 gigs ram ...passed through nvme drive, gtx 1080, USB controller time from clicking start to desktop ..... 33 seconds 3. windows 10 6 cores (12 threads) 4 gigs ram...passed through gtx1080 time from clicking start to boot ......25 seconds. On 6.6.0-rc1 1. ubuntu mate with 32 cores (64 threads), 32 gigs ram .... passed through gtx 1080 time from clicking start to desktop .......4 minutes 5 seconds 2. windows 10 with 16 cores(32 threads), 32 gigs ram ...passed through nvme drive, gtx 1080, USB controller time from clicking start to desktop ..... after 10 minutes forced stopped vm 3. windows 10 6 cores (12 threads) 4 gigs ram...passed through gtx1080 time from clicking start to boot .......2 minutes and 19 seconds Also, benchmarks suffering about 50 % drop in single thread scores and 25 percent drop in multi core (using geek bench on ubuntu vm) Any other people having issues with threadripper and VMS? ultramagnus-diagnostics-20180904-2110.zip
-
Hi @Enver Firstly are sonarr and radarr on a custom user defined docker network? I see that from the above config that you have removed the hash tags before the auth_ parts to use a password. have you created that in the container itself by running htpasswd -c /config/nginx/.htpasswd <yourusername> personally i didnt have luck using both .htpasswd file with sonarr and sonarr's own password system it just didnt seem to work for me. Not sure why? But i am sure the devs here could shed light on as to why. So i only use sonarr's password in that container without .htpasswd. I should try and get it working without the htpasswd first then add that later when you are sure it works fine.
-
Are you running the latest unRAID. You will only see it in the dropdown from 6.5.1 onwards. For older unRAID builds you will have to goto advance settings then manually enter into the extra parameters like this. --network=[networkname] I would upgrade to the latest stable unRAID unless there is any reason that you must stay on the older one.
-
How do you find opensense? I havent tried it. I know its a fork of pfsense. Any reason you use it instead of pfsense?
-
Hi @zirconi using the custom docker network allows us to use the config files that the Linux Server guys have included in the container. These files work 'out the box' because when using a custom docker network the containers have automatic dns resolution between each other. Check here to read more https://docs.docker.com/network/bridge/ If you have everything setup and working then no advantage that i am aware of to change to the custom network.
-
Finally, finished making my video on setting up a reverse proxy. Hope it helps people who haven't set it up before
-
So following on from the next cloud video, here is a tutorial that shows how to set up and configure a reverse proxy on unRAID It uses the linuxserver's excellent docker container Letsencrypt with NGINX. You will see how to use both our own domain with the proxy as well as just using duckdns subdomains. The video covers using both subdomains and subfolders. It also goes through setting up next cloud with the reverse proxy. Hope its useful Heres what to do if your isp blocks port 80 and you cant use http authentication to create your certificates. Also how to make a wildcard certificate.
-
Hi @FreeMan Are you trying in install Sierra? If so you have to emulate Penryn for CPU type. Sierra and onwards is not compatible with core2duo. <qemu:arg value='Penryn,vendor=GenuineIntel'/> Looking at the XML you have posted in the previous posts it seems you are using "old" XML from installing el Capitan with seabios. Have a look at some of my newer osx videos you will probably have better results with them.
-
Ah yeah, I see. Thanks ?
-
lol thats fine. Just tell them to pm me on my other contact address here, this one, " @saarg " ...I will respond straight away to any messages !!! ?
-
lol ? ok soon ! soon ! ok soon ! soon ! ok soon ! soon ! ok soon ! soon ! ok soon ! soon ! ok soon ! soon ! ok soon ! soon ! ok soon ! soon ! ok soon ! soon ! ok soon ! soon ! ok soon ! soon ! ok soon ! soon ! ok soon ! soon ! ok soon ! soon ! ok soon ! soon ! ok soon ! soon ! ok soon ! soon ! ok soon ! soon ! ok soon ! soon ! ok soon ! soon ! ok soon ! soon ! ok soon ! soon ! ok soon ! soon ! ok soon ! soon ! ok soon ! soon ! ok soon ! soon ! ok soon ! soon ! ok soon ! soon ! ok soon ! soon ! ok soon ! soon ! ok soon ! soon ! ok soon ! soon ! ok soon ! soon ! ok soon ! soon ! ok soon ! soon ! ok soon ! soon ! ok soon ! soon ! ok soon ! soon ! ok soon ! soon ! ok soon ! soon ! ok soon ! soon ! ok soon ! soon ! ok soon ! soon ! ok soon ! soon ! ok soon ! soon ! ok soon ! soon ! ok soon ! soon ! ok soon ! soon ! ok soon ! soon ! ok soon ! soon ! ok soon ! soon ! ok soon ! soon ! ok soon ! soon ! ok soon ! soon ! ok soon ! soon ! ok soon ! soon ! ok soon ! soon ! ok soon ! soon ! ok soon ! soon ! ok soon ! soon ! ok soon ! soon ! ok soon ! soon ! ok soon ! soon ! ok soon ! soon !
-
Thanks @jonathanm Yeah that's a good idea. I will check that out. So i guess you tweak the file size on the duplicati end yes? Any tips? ?


