


SpaceInvaderOne
Community Developer
-
Joined
Everything posted by SpaceInvaderOne
-
@1812 I found that you must use vmxnet3 for the initial download and install. It didnt work at all for me without that. However after install of Catalina I shutdown and swapped back to e1000-82545em (only a single nic - will try dual later) This worked fine for me and i was able to access the apple store and update a few programmes that were not supported in Catalina.
-
I dont use vnc at all for my macos just gpu and usb controller passed through. So havent really looked until just now. I did notice the bad performance of the vnc mouse generally though. I noticed while playing around with the xml the mouse performance in the webui is greatly improved by doing the following. In the xml change remove the mouse part from below (must leave the keyboard part) <qemu:commandline> <qemu:arg value='-usb'/> <qemu:arg value='-device'/> <qemu:arg value='usb-mouse,bus=usb-bus.0'/> <qemu:arg value='-device'/> <qemu:arg value='usb-kbd,bus=usb-bus.0'/> <qemu:arg value='-device'/> <qemu:arg value='isa-applesmc,osk=??????????????????????????????????'/> <qemu:arg value='-smbios'/> <qemu:arg value='type=2'/> <qemu:arg value='-cpu'/> <qemu:arg value='Penryn,kvm=on,vendor=GenuineIntel,+invtsc,vmware-cpuid-freq=on,+pcid,+ssse3,+sse4.2,+popcnt,+avx,+aes,+xsave,+xsaveopt,check'/> </qemu:commandline> </domain> So to like this <qemu:commandline> <qemu:arg value='-usb'/> <qemu:arg value='-device'/> <qemu:arg value='usb-kbd,bus=usb-bus.0'/> <qemu:arg value='-device'/> <qemu:arg value='isa-applesmc,osk=?????????????????????????APPLE OSK goes here????????????????????'/> <qemu:arg value='-smbios'/> <qemu:arg value='type=2'/> <qemu:arg value='-cpu'/> <qemu:arg value='Penryn,kvm=on,vendor=GenuineIntel,+invtsc,vmware-cpuid-freq=on,+pcid,+ssse3,+sse4.2,+popcnt,+avx,+aes,+xsave,+xsaveopt,check'/> </qemu:commandline> </domain> I will change this in the default templates that the container uses to reflect this. But everyone who has already downloaded and installed i would suggest making this change.
-
I dont use auto backup script myself. I manually backup my vdisks when needed which is probably not often as i should as i accidentally formatted an unassigned drive whilst tired that had a few vms i hadnt backed up for a while! 😪
-
Hey there @1812 great glad to hear its working. Did it take a long time to download the image during install? Also what disk type did you use. Raw or qcow2 and what file system format did you use, apfs or macos extended? Just interested as some people have an issue on first reboot.
-
Other than just force stopping the vm and rebooting please try this. open terminal from the webui on Unraid rm -r /mnt/user/domains/MacinaboxMojave/ then delete the vm template. Unraid will say it cant delete the template due to the OVMF_VARS. So remove this line from the xml (on line 25) update then the template can be removed <nvram>/mnt/user/domains/MacinaboxMojave/ovmf/OVMF_VARS.fd</nvram> Then retry the installation but in the docker template select disk type to raw. This helped someone else here, it shouldnt make a difference really but worth trying.
-
Should work fine on Ryzen 2700x i am using similar. So you are getting through the install and set everything up (country -timezone etc) and you reach the macOS desktop then you get the question mark on the screen after reboot? Or is this after the first reboot after the installer has downloaded the install
-
Hey @rorton to be honest not sure. It should work ok. If it works on a hackintosh will work for the vm. Best practice is beforehand just copy the vdisk in case anything goes wrong then you are safe. Glad to hear its all working. Just one thing to note. Dont run the container again now its intalled as a bug it will re create the vdisk that its installed on and basically wipe the install. i am just changing that at the moment and will fix that in next push.
-
If you already have have the full installer from the app store created on a mac you can just use that instead of the baseimage that the container downloads. Just link it here <disk type='file' device='disk'> <driver name='qemu' type='raw' cache='writeback'/> <source file='/mnt/user/domains/MacinaboxCatalina/Catalina-install.img'/> <target dev='hdd' bus='sata'/> <address type='drive' controller='0' bus='0' target='0' unit='3'/> </disk> Have a look at my last macOS videos last was for mojave here for how to do manually install macOS and create media from the app store. The video is a year old but still relevant. https://www.youtube.com/watch?v=YWT4oOz2VK8 Unfortunately I cant include any local install media directly in a container as then it would contain copyrighted material. I can only have it download from the Apple servers then the container itself doesn't actually contain any software. However to allow the user the option to select that they already have install media would be possible. I could have the template have an option to allow the user to select his own image on the server. The container could then copy that and rename it placing it in the correct location that would be compatible with the xml.
-
With a macOS vm it has custom things in the xml. If you look at the end of the first xml you posted and the second you will see. Because of this any changes that you need to do to the template cant be done in the Unraid template manager as it removes custom edits at present. So edit the xml and put this in its place. <?xml version='1.0' encoding='UTF-8'?> <domain type='kvm' xmlns:qemu='http://libvirt.org/schemas/domain/qemu/1.0'> <name>MacinaboxMojave</name> <uuid>fe4cdace-a7b4-456d-9885-c28ea78fde83</uuid> <description>MacOS Mojave</description> <metadata> <vmtemplate xmlns="unraid" name="MacOS" icon="/mnt/user/vms/MacinaboxMojave/icon/mojave.png" os="Mojave"/> </metadata> <memory unit='KiB'>4194304</memory> <currentMemory unit='KiB'>4194304</currentMemory> <memoryBacking> <nosharepages/> </memoryBacking> <vcpu placement='static'>2</vcpu> <cputune> <vcpupin vcpu='0' cpuset='0'/> <vcpupin vcpu='1' cpuset='1'/> </cputune> <os> <type arch='x86_64' machine='pc-q35-3.1'>hvm</type> <loader readonly='yes' type='pflash'>/mnt/user/vms/MacinaboxMojave/ovmf/OVMF_CODE.fd</loader> <nvram>/mnt/user/vms/MacinaboxMojave/ovmf/OVMF_VARS.fd</nvram> </os> <features> <acpi/> <apic/> </features> <cpu mode='host-passthrough' check='none'> <topology sockets='1' cores='2' threads='1'/> </cpu> <clock offset='utc'> <timer name='rtc' tickpolicy='catchup'/> <timer name='pit' tickpolicy='delay'/> <timer name='hpet' present='no'/> </clock> <on_poweroff>destroy</on_poweroff> <on_reboot>restart</on_reboot> <on_crash>restart</on_crash> <devices> <emulator>/usr/local/sbin/qemu</emulator> <disk type='file' device='disk'> <driver name='qemu' type='qcow2' cache='writeback'/> <source file='/mnt/user/vms/MacinaboxMojave/Clover.qcow2'/> <target dev='hdc' bus='sata'/> <boot order='1'/> <address type='drive' controller='0' bus='0' target='0' unit='2'/> </disk> <disk type='file' device='disk'> <driver name='qemu' type='raw' cache='writeback'/> <source file='/mnt/user/vms/MacinaboxMojave/Mojave-install.img'/> <target dev='hdd' bus='sata'/> <address type='drive' controller='0' bus='0' target='0' unit='3'/> </disk> <disk type='file' device='disk'> <driver name='qemu' type='qcow2' cache='writeback'/> <source file='/mnt/user/vms/MacinaboxMojave/macos_disk.qcow2'/> <target dev='hde' bus='sata'/> <address type='drive' controller='0' bus='0' target='0' unit='4'/> </disk> <controller type='usb' index='0' model='ich9-ehci1'> <address type='pci' domain='0x0000' bus='0x00' slot='0x07' function='0x7'/> </controller> <controller type='usb' index='0' model='ich9-uhci1'> <master startport='0'/> <address type='pci' domain='0x0000' bus='0x00' slot='0x07' function='0x0' multifunction='on'/> </controller> <controller type='usb' index='0' model='ich9-uhci2'> <master startport='2'/> <address type='pci' domain='0x0000' bus='0x00' slot='0x07' function='0x1'/> </controller> <controller type='usb' index='0' model='ich9-uhci3'> <master startport='4'/> <address type='pci' domain='0x0000' bus='0x00' slot='0x07' function='0x2'/> </controller> <controller type='sata' index='0'> <address type='pci' domain='0x0000' bus='0x00' slot='0x1f' function='0x2'/> </controller> <controller type='pci' index='0' model='pcie-root'/> <controller type='pci' index='1' model='pcie-root-port'> <model name='pcie-root-port'/> <target chassis='1' port='0x10'/> <address type='pci' domain='0x0000' bus='0x00' slot='0x02' function='0x0' multifunction='on'/> </controller> <controller type='pci' index='2' model='pcie-root-port'> <model name='pcie-root-port'/> <target chassis='2' port='0x11'/> <address type='pci' domain='0x0000' bus='0x00' slot='0x02' function='0x1'/> </controller> <controller type='pci' index='3' model='pcie-root-port'> <model name='pcie-root-port'/> <target chassis='3' port='0x12'/> <address type='pci' domain='0x0000' bus='0x00' slot='0x02' function='0x2'/> </controller> <controller type='pci' index='4' model='pcie-root-port'> <model name='pcie-root-port'/> <target chassis='4' port='0x13'/> <address type='pci' domain='0x0000' bus='0x00' slot='0x02' function='0x3'/> </controller> <controller type='virtio-serial' index='0'> <address type='pci' domain='0x0000' bus='0x02' slot='0x00' function='0x0'/> </controller> <interface type='bridge'> <mac address='52:54:00:c8:13:3a'/> <source bridge='br0'/> <model type='vmxnet3'/> <address type='pci' domain='0x0000' bus='0x01' slot='0x00' function='0x0'/> </interface> <serial type='pty'> <target type='isa-serial' port='0'> <model name='isa-serial'/> </target> </serial> <console type='pty'> <target type='serial' port='0'/> </console> <channel type='unix'> <target type='virtio' name='org.qemu.guest_agent.0'/> <address type='virtio-serial' controller='0' bus='0' port='1'/> </channel> <input type='tablet' bus='usb'> <address type='usb' bus='0' port='1'/> </input> <input type='mouse' bus='ps2'/> <input type='keyboard' bus='ps2'/> <graphics type='vnc' port='-1' autoport='yes' websocket='-1' listen='0.0.0.0' keymap='en-us'> <listen type='address' address='0.0.0.0'/> </graphics> <video> <model type='qxl' ram='65536' vram='65536' vgamem='16384' heads='1' primary='yes'/> <address type='pci' domain='0x0000' bus='0x00' slot='0x01' function='0x0'/> </video> <memballoon model='virtio'> <address type='pci' domain='0x0000' bus='0x03' slot='0x00' function='0x0'/> </memballoon> </devices> <qemu:commandline> <qemu:arg value='-usb'/> <qemu:arg value='-device'/> <qemu:arg value='usb-mouse,bus=usb-bus.0'/> <qemu:arg value='-device'/> <qemu:arg value='usb-kbd,bus=usb-bus.0'/> <qemu:arg value='-device'/> <qemu:arg value='isa-applesmc,osk=Taken out as not allowed on the forums'/> <qemu:arg value='-smbios'/> <qemu:arg value='type=2'/> <qemu:arg value='-cpu'/> <qemu:arg value='Penryn,kvm=on,vendor=GenuineIntel,+invtsc,vmware-cpuid-freq=on,+pcid,+ssse3,+sse4.2,+popcnt,+avx,+aes,+xsave,+xsaveopt,check'/> </qemu:commandline> </domain> Please note i have changed one line that you will need to change back <qemu:arg value='isa-applesmc,osk=Taken out as not allowed on the forums'/> This should container the osk key. You can see it in your first post with the xml (but please edit your post to remove it due to forum rules..thanks)
-
please post your xml as it is now
-
OK the template that the container makes , assumes ovmf is in the /mnt/user/domains share which is the default for Unraid for a while now. You will just have to make a small adjustment in the template to reflect your location where the ovmf files are and also where the disk images are. <os> <type arch='x86_64' machine='pc-q35-3.1'>hvm</type> <loader readonly='yes' type='pflash'>/mnt/user/domains/MacinaboxMojave/ovmf/OVMF_CODE.fd</loader> <nvram>/mnt/user/domains/MacinaboxMojave/ovmf/OVMF_VARS.fd</nvram> </os> You should change this to as below (note difference is swapping the location from domains to vms as you have on your server) <os> <type arch='x86_64' machine='pc-q35-3.1'>hvm</type> <loader readonly='yes' type='pflash'>/mnt/user/vms/MacinaboxMojave/ovmf/OVMF_CODE.fd</loader> <nvram>/mnt/user/vms/MacinaboxMojave/ovmf/OVMF_VARS.fd</nvram> </os> Also the templates disk locations need to be changed from this <disk type='file' device='disk'> <driver name='qemu' type='qcow2' cache='writeback'/> <source file='/mnt/user/domains/MacinaboxMojave/Clover.qcow2'/> <target dev='hdc' bus='sata'/> <boot order='1'/> <address type='drive' controller='0' bus='0' target='0' unit='2'/> </disk> <disk type='file' device='disk'> <driver name='qemu' type='raw' cache='writeback'/> <source file='/mnt/user/domains/MacinaboxMojave/Mojave-install.img'/> <target dev='hdd' bus='sata'/> <address type='drive' controller='0' bus='0' target='0' unit='3'/> </disk> <disk type='file' device='disk'> <driver name='qemu' type='qcow2' cache='writeback'/> <source file='/mnt/user/domains/MacinaboxMojave/macos_disk.qcow2'/> <target dev='hde' bus='sata'/> <address type='drive' controller='0' bus='0' target='0' unit='4'/> </disk> to the below ( again the /domains swapped ti your location /vms ) <disk type='file' device='disk'> <driver name='qemu' type='qcow2' cache='writeback'/> <source file='/mnt/user/vms/MacinaboxMojave/Clover.qcow2'/> <target dev='hdc' bus='sata'/> <boot order='1'/> <address type='drive' controller='0' bus='0' target='0' unit='2'/> </disk> <disk type='file' device='disk'> <driver name='qemu' type='raw' cache='writeback'/> <source file='/mnt/user/vms/MacinaboxMojave/Mojave-install.img'/> <target dev='hdd' bus='sata'/> <address type='drive' controller='0' bus='0' target='0' unit='3'/> </disk> <disk type='file' device='disk'> <driver name='qemu' type='qcow2' cache='writeback'/> <source file='/mnt/user/vms/MacinaboxMojave/macos_disk.qcow2'/> <target dev='hde' bus='sata'/> <address type='drive' controller='0' bus='0' target='0' unit='4'/> </disk> I mention about the non standard vm location in the video which accompanies this container working on it as i type this ! (will be at the top of the post when finished)
-
Hi please ignore the linked video in the webui of the template for now. That is not the correct video guide for this container. I was testing and linked to my old video for macOS from last year when making this container. I then forgot to remove it in the template. ( i have removed from the template now and will only add back when new video guide is finished and uploaded later today ) You don't need to change the resolution in the bios. The resolution is already set to 1080 in both bios and the clover config. I have also seen the boot loop happen. it happened to me once yesterday. This was after the recovery media has downloaded the Catalina install and attempts to reboot to finish. I believe this is just that the image hasn't downloaded correctly for some reason (maybe the apple servers are very busy) and the image is corrupt. I only have had this happen once during my testing and after reading your issue I ran a Catalina install again to test. During the install the image took a very long time to download over an hour and i have quite fast internet (450 down) However after the reboot there was no boot loop and install finshed Unfortunately I would suggest just trying again. Remove the directory in the domains share where files are rm -r /mnt/user/domains/MacinaboxCatalina/ If using a qcow2 maybe try raw image instead (although i have installed to both image types sucessfully) Also what cpu do you have in the server it must support . It must support SSE 4.2 & AVX2
-
23 Sept 2024 Basic usage instructions. Overview Macinabox is now self-contained and no longer requires any helper scripts. It is designed to send notifications through the Unraid GUI during the installation process. To ensure you receive these notifications: • Set notifications to Detailed. • Configure Docker update notification to any option other than Never (e.g., Once per Day). Installation Steps 1. Compliance: Ensure you are compliant with the Apple EULA for macOS virtual machines. Select whether you are compliant or not. 2. Select OS: In the template, choose the macOS version you wish to install. 3. VM Name: By default, Macinabox uses the OS name for the VM. If you prefer a different name, enter it in the Custom VM Name field (default is blank). 4. VDisk Type: Choose the vdisk type: Raw or QCOW2. The default option is Raw. 5. VDisk Size: Specify the size for the macOS vdisk in gigabytes. The default size is 100 GB. 6. Default Variables: You can leave all other settings as default. If needed, you can change the default locations for your domains, ISOs, or appdata shares. Running the Container • Launch the container. It will download the recovery media from Apple servers, name it, and place it in your ISO share. • The container will create your vdisk and an OpenCore image for your VM, which will be placed in your domain share within a folder named after your VM. • The XML for the VM will be dynamically generated based on your settings, and the container will perform checks on your server: • It will check the version of QEMU installed and calculate the highest compatible version of Q35. • It will set the default VM network source in the XML. • It will add the appropriate custom QEMU command line arguments to the XML. Notifications During the container’s operation, you will receive notifications: • When the installation media has been successfully downloaded. • When the VM has been defined and is available on the VMs tab of your server. • Or if any errors occur during the process. Additional VM Configuration Once the VM is installed, you may want to adjust it to your preferences: 1. On the Unraid vm tab. Click the vm and click edit. Now modify the CPU core count and RAM amount as needed. Fixing broken XML Configuration When making changes to the VM in the Unraid VM manager, the XML will be changed making the VM XML inorrect for macOS, which requires specific configurations. To fix this: • Run Macinabox again. It will check if a macOS VM with the specified name already exists. If it does, it will fix the XML instead of attempting to install another VM. (This step is necessary for both Unraid 6 and 7.) • If you make any changes to the VM in the Unraid VM manager, be sure to run the container again to update the XML. Starting the VM 1. Start the VM and open a VNC window to proceed with the installation. 2. Boot into the OpenCore boot loader and select the bootable image labelled macOS Base System. Press Enter to continue. Installing macOS 1. Once booted into recovery media, open Disk Utility to format your vdisk. 2. After formatting, close Disk Utility and select Reinstall macOS. Follow the wizard to complete the installation. The installation process may cause the VM to reboot approximately four times. Hope you guys like this new macinabox
-
PLEASE - PLEASE - PLEASE EVERYONE POSTING IN THIS THREAD IF YOU POST YOUR XML FOR THE VM HERE PLEASE REMOVE/OBSCURE THE OSK KEY AT THE BOTTOM. IT IS AGAINST THE RULES OF THE FORUM FOR OSK KEY TO BE POSTED....THANKYOU The first macinabox is now been replaced with a newer version as below. V1 Macinabox October 2019 -- No longer supported V2 Macinabox December 09 2020 -- No longer supported V3 Macinabox Added 22 September 2024 Please watch this video for how to use the container. It is not obvious from just installing the container. If you had the old macinabox installed it's important to remove the old template as the new macinabox has a new template which is needed for it to function. To remove old macinabox please first remove the container. The goto the apps tab (CA). and on the left click on previous. You will see macinabox listed as a previous app. Select it and click delete. That removes the template and you can now install macinabox and it will work correctly
-
Made a short vid on 6.8.0
-
No it the peer setting in the plugin. Check post here
-
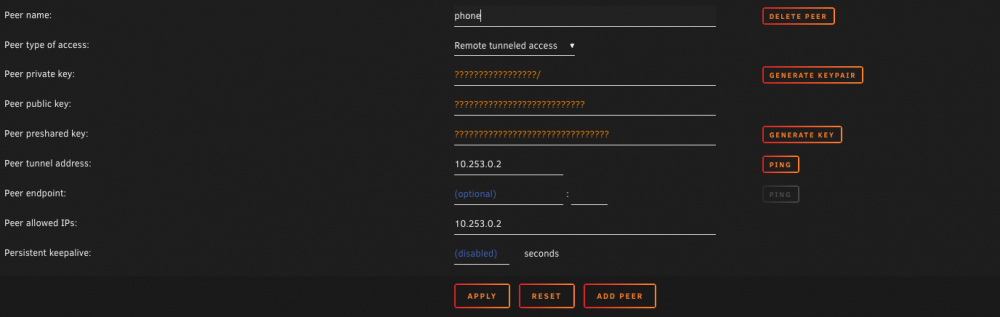
Set the peer type to remote tunneled access rather than remote access to server. (but you must add the peer tunnel address)
-
Its still in heavy developement and hasn't reached 1.0 yet. But people do think that it is very secure and it uses proven cryptographic protocols. The peers are identified to other peers using small public keys a bit like key-based authentication in ssh. It is very difficult to see it running on another machine even because it doesnt respond to packets from peers it doesn't know making a network scan not show that wireguard is running. .................but............lol shouldn't you have asked that before setting it up ! 😉
-
Just add the 'peer tunnel address' manually. Says its not used but add as below then will conif and QR code will be made and work fine.

-
A series of videos about creating and using encrypted disks using the unassigned devices plugin. How to format disks How to mount disks How to use multiple encrypted disks at once with different keyfiles Auto mounting using unassigned devices scripts Using encrypted disks with multiple paritions Hope its useful
-
I have made un updated video guide for setting up this great container. It covers setting up the container, port forwarding and setting up clients on Windows, macOS Linux (ubuntu Mate) and on cell phone - Android and IOS. Hope this guide helps people new to this setting up OpenVPN
-
Hi @johnnie.black I thought that I would chip into this post. I logged into @uaeproz server yesterday morning to help to do some testing with a new array and clean install. This was because his normal array (of 170tb and 11 data drives and 2 parity drives, encrypted xfs) the array will never start on any version of Unraid above 6.5.3. It always hangs after mounting the first or second drive in the array. He has been trying to upgrade to each new release of Unraid as they come out with the same problem and then having to downgrade back to 6.5.3 for his server to work correctly. What we thought that we would do yesterday, is to see if we could do a clean install of 6.7.0 stable. Then make a 1 drive array and see if the problem persisted. He removed all of his normal data and parity drives from the server. One 4tb drive was attached. An array was created with just one data drive with a clean install onto flashdrive of Unraid 6.7.0. The file system chosen was encrypted xfs (to be the same as the normal array) On clicking 'start the array' the drive was formatted but as the array started, the services started to start and it hung there. The gui saying starting services. The array never fully became available. I looked at the data on the disk and saw that the system share/folder only had the docker folder and had it had not created the libvirt folder. So i assumed that the vm service was unable to start but the docker service had. The server wouldn't shut down from the gui or command line so had to be hard reset. On restarting the server , before starting the array, I disabled the vm service. This time the array started as expected. However, stopping the array again it hang on stopping the services and the array wouldn't stop. Again needed hard reset. Next starting the array without the docker service or vm service running the array would start and stop fine. So next i tried starting the array without the docker or vm service running. Then once the array had finished starting then manually starting the docker and vm service. This worked fine. And so long as these services were manually stopped before attempting to stop the array, then the array would stop fine. ----- So next I deleted that array and made a new one using standard xfs (not encrypted) with the same 4tb drive. The array started fine with both the docker and vm service running without issue. The array could stop fine too. So basically everything worked as expected when the drive was not encrypted. I was hoping from the results of those tests that when we connected the original drives went back to the original flash drive, and upgraded the system to 6.7.0. that the array would start if docker service and vm service were disabled. This wasn't the case. The array didn't finishing mounting the drives. It stopped after mounting the first drive and had to be hard reset. So this is a strange problem. The OP has also tried removing all non-esstential hardware such as GPU. Also tried moving disk controller to different PCIe slot. He has run memtest on the ram which has passed. The diag file that he attached to the post, if I remember, was taken with one drive in the server formatted as xfs encrypted. Starting the array with the vm service enable. The array never finished starting just stuck on starting services. That when this file was downloaded. before hard resetting Hope that helps.
-

From the album: Community Created Banners
-

From the album: Community Created Banners
-

From the album: Community Created Banners


