





mathgoy
Members
-
Joined
-
Last visited
Everything posted by mathgoy
-
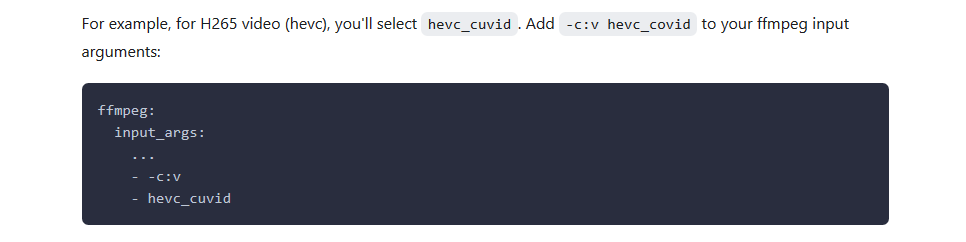
Hi @IpDo Thanks for the Tips. I did exactly what you were advising and It worked. I was missing the GPUID (i was using 'all" as it is mentioned in the documentation) as well as the extra arguments After it worked with the regular template, I moved to the new frigate-nvidia template (big thanks to @yayitazale) and it was even easier since all the variables were created. Just one thing. In the YAML config file, the documentation is telling us to add the following to enable the hardware decoding: It didn't work for me and it crashed the docker (even deleting it for some reason, several times!) Instead of that, I followed your recommendations and added the following which worked like a charm: Thanks again mate

-
hi, Thanks for your feedback Yes I did install the Unraid Nvidia Plugin and it is functionnal with Plex for instance. Please let me know about any information I could help you with
-
Hi Same feedback as @remati here. Just loaded my M.2 Dual edge TPU (using a PCIE adator) and it worked right off the bat. However, I am struggling with the Nvidia Hardware acceleration. I pulled the nvidia version of the docker and added the 2 environment variables as explained in the documentation. There is one sentence I don't understand in the documentation though. What does it mean? For your information, the error I get for the stream I am trying to process with my nvidia card is the following: [h264_cuvid @ 0x563acb21c380] Failed loading nvcuvid. [h264_cuvid @ 0x563acb21c380] Cannot load libnvcuvid.so.1 Thanks for your help!
-
After some further investigations, I found out that it's related to the Reolink Cameras I use. It's recommended to use a RTMP stream instead of an RTSP. For those who may have the same issue, here is the link format for RTMP streams on reolink cameras: rtmp://IPADRESS/bcs/channel0_main.bcs?channel=0&stream=0&user=USER&password=PASSWORD You will find below the block that worked for my Reolink camera (with the input_args) cameras: descente: ffmpeg: inputs: - path: rtmp://IP_ADDRESS/bcs/channel0_main.bcs?channel=0&stream=0&user=YOURUSER&password=YOURPASSWORD roles: - detect - clips - record input_args: - -avoid_negative_ts - make_zero - -fflags - nobuffer - -flags - low_delay - -strict - experimental - -fflags - +genpts+discardcorrupt - -rw_timeout - '5000000' - -use_wallclock_as_timestamps - '1' width: 2560 height: 1920 fps: 6

-
Hi All, Considering moving from BI+Deepstack to Frigate so I installed that docker First of all, thanks a lot for the work because I had it up and running in less than 10min. Installation was really ez. Now I am running some few tests (CPU mode) and I have to say the detection is pretty good. However, the whole thing will work for 10-15min and then I noticed some issues. My camera stream becomes messy (see attached) and I have the errors below in the log (it's just an extract) [h264 @ 0x562cc0734d00] left block unavailable for requested intra mode [h264 @ 0x562cc0734d00] error while decoding MB 0 4, bytestream 954579 [h264 @ 0x562cc0734d00] left block unavailable for requested intra mode [h264 @ 0x562cc0734d00] error while decoding MB 0 114, bytestream 16535 [h264 @ 0x55fa44f00d00] error while decoding MB 158 17, bytestream -31 [h264 @ 0x55fa44f00d00] cabac decode of qscale diff failed at 109 2 [h264 @ 0x55fa44f00d00] error while decoding MB 109 2, bytestream 1134689 [h264 @ 0x55fa44f00d00] error while decoding MB 104 5, bytestream -9 [h264 @ 0x559eba2b6d00] error while decoding MB 115 13, bytestream -20 [h264 @ 0x559eba2b6d00] cabac decode of qscale diff failed at 19 66 [h264 @ 0x559eba2b6d00] error while decoding MB 19 66, bytestream 27113 [h264 @ 0x55dc86788d00] error while decoding MB 144 2, bytestream -31 [h264 @ 0x55dc86788d00] cabac decode of qscale diff failed at 55 50 [h264 @ 0x55dc86788d00] error while decoding MB 55 50, bytestream 40441 [h264 @ 0x556c09134d00] error while decoding MB 54 17, bytestream -21 The stream comes from a reolink camera and when I have a look on it in BlueIris, it is crystal clear I believe this is an FFMPEG issuer but I have no idea how to fix it Any idea what could be the issue?
-
Hi all, Thanks for all the information and tips shared. unfortunately, for the first time ever, I couldn't find anything that would help me solving my problem. Just like many others, I am trying to create a Pfsense VM and passthrough a qud NIC card. I did follow numerous tutorials, tried countless tweaks on my XML but I just can't make Pfsense detecting my card. My card has its own IOMMU as shown below: IOMMU group 13: [108e:abcd] 02:00.0 Ethernet controller: Oracle/SUN Multithreaded 10-Gigabit Ethernet Network Controller (rev 01) [108e:abcd] 02:00.1 Ethernet controller: Oracle/SUN Multithreaded 10-Gigabit Ethernet Network Controller (rev 01) [108e:abcd] 02:00.2 Ethernet controller: Oracle/SUN Multithreaded 10-Gigabit Ethernet Network Controller (rev 01) [108e:abcd] 02:00.3 Ethernet controller: Oracle/SUN Multithreaded 10-Gigabit Ethernet Network Controller (rev 01) and my auto-generated XML looks like this: <?xml version='1.0' encoding='UTF-8'?> <domain type='kvm'> <name>Pfsense</name> <uuid>edef17bf-972b-18f0-8ccb-2db77e95496a</uuid> <metadata> <vmtemplate xmlns="unraid" name="FreeBSD" icon="pfsense.png" os="freebsd"/> </metadata> <memory unit='KiB'>8388608</memory> <currentMemory unit='KiB'>8388608</currentMemory> <memoryBacking> <nosharepages/> </memoryBacking> <vcpu placement='static'>4</vcpu> <cputune> <vcpupin vcpu='0' cpuset='2'/> <vcpupin vcpu='1' cpuset='12'/> <vcpupin vcpu='2' cpuset='3'/> <vcpupin vcpu='3' cpuset='13'/> </cputune> <os> <type arch='x86_64' machine='pc-q35-4.2'>hvm</type> <loader readonly='yes' type='pflash'>/usr/share/qemu/ovmf-x64/OVMF_CODE-pure-efi.fd</loader> <nvram>/etc/libvirt/qemu/nvram/edef17bf-972b-18f0-8ccb-2db77e95496a_VARS-pure-efi.fd</nvram> </os> <features> <acpi/> <apic/> </features> <cpu mode='host-passthrough' check='none'> <topology sockets='1' cores='2' threads='2'/> <cache mode='passthrough'/> </cpu> <clock offset='utc'> <timer name='rtc' tickpolicy='catchup'/> <timer name='pit' tickpolicy='delay'/> <timer name='hpet' present='no'/> </clock> <on_poweroff>destroy</on_poweroff> <on_reboot>restart</on_reboot> <on_crash>restart</on_crash> <devices> <emulator>/usr/local/sbin/qemu</emulator> <disk type='file' device='cdrom'> <driver name='qemu' type='raw'/> <source file='/mnt/user/isos/pfSense-CE-2.4.5-RELEASE-amd64.iso'/> <target dev='hda' bus='sata'/> <readonly/> <boot order='2'/> <address type='drive' controller='0' bus='0' target='0' unit='0'/> </disk> <disk type='file' device='disk'> <driver name='qemu' type='qcow2' cache='writeback'/> <source file='/mnt/user/domains/Pfsense/vdisk1.img'/> <target dev='hdc' bus='sata'/> <boot order='1'/> <address type='drive' controller='0' bus='0' target='0' unit='2'/> </disk> <controller type='usb' index='0' model='ich9-ehci1'> <address type='pci' domain='0x0000' bus='0x00' slot='0x07' function='0x7'/> </controller> <controller type='usb' index='0' model='ich9-uhci1'> <master startport='0'/> <address type='pci' domain='0x0000' bus='0x00' slot='0x07' function='0x0' multifunction='on'/> </controller> <controller type='usb' index='0' model='ich9-uhci2'> <master startport='2'/> <address type='pci' domain='0x0000' bus='0x00' slot='0x07' function='0x1'/> </controller> <controller type='usb' index='0' model='ich9-uhci3'> <master startport='4'/> <address type='pci' domain='0x0000' bus='0x00' slot='0x07' function='0x2'/> </controller> <controller type='sata' index='0'> <address type='pci' domain='0x0000' bus='0x00' slot='0x1f' function='0x2'/> </controller> <controller type='pci' index='0' model='pcie-root'/> <controller type='pci' index='1' model='pcie-root-port'> <model name='pcie-root-port'/> <target chassis='1' port='0x10'/> <address type='pci' domain='0x0000' bus='0x00' slot='0x02' function='0x0' multifunction='on'/> </controller> <controller type='pci' index='2' model='pcie-root-port'> <model name='pcie-root-port'/> <target chassis='2' port='0x11'/> <address type='pci' domain='0x0000' bus='0x00' slot='0x02' function='0x1'/> </controller> <controller type='pci' index='3' model='pcie-root-port'> <model name='pcie-root-port'/> <target chassis='3' port='0x12'/> <address type='pci' domain='0x0000' bus='0x00' slot='0x02' function='0x2'/> </controller> <controller type='pci' index='4' model='pcie-root-port'> <model name='pcie-root-port'/> <target chassis='4' port='0x13'/> <address type='pci' domain='0x0000' bus='0x00' slot='0x02' function='0x3'/> </controller> <controller type='pci' index='5' model='pcie-root-port'> <model name='pcie-root-port'/> <target chassis='5' port='0x14'/> <address type='pci' domain='0x0000' bus='0x00' slot='0x02' function='0x4'/> </controller> <controller type='pci' index='6' model='pcie-root-port'> <model name='pcie-root-port'/> <target chassis='6' port='0x15'/> <address type='pci' domain='0x0000' bus='0x00' slot='0x02' function='0x5'/> </controller> <controller type='pci' index='7' model='pcie-root-port'> <model name='pcie-root-port'/> <target chassis='7' port='0x16'/> <address type='pci' domain='0x0000' bus='0x00' slot='0x02' function='0x6'/> </controller> <controller type='virtio-serial' index='0'> <address type='pci' domain='0x0000' bus='0x02' slot='0x00' function='0x0'/> </controller> <serial type='pty'> <target type='isa-serial' port='0'> <model name='isa-serial'/> </target> </serial> <console type='pty'> <target type='serial' port='0'/> </console> <channel type='unix'> <target type='virtio' name='org.qemu.guest_agent.0'/> <address type='virtio-serial' controller='0' bus='0' port='1'/> </channel> <input type='tablet' bus='usb'> <address type='usb' bus='0' port='1'/> </input> <input type='mouse' bus='ps2'/> <input type='keyboard' bus='ps2'/> <graphics type='vnc' port='-1' autoport='yes' websocket='-1' listen='0.0.0.0' keymap='fr'> <listen type='address' address='0.0.0.0'/> </graphics> <video> <model type='qxl' ram='65536' vram='65536' vgamem='16384' heads='1' primary='yes'/> <address type='pci' domain='0x0000' bus='0x00' slot='0x01' function='0x0'/> </video> <hostdev mode='subsystem' type='pci' managed='yes'> <driver name='vfio'/> <source> <address domain='0x0000' bus='0x02' slot='0x00' function='0x0'/> </source> <address type='pci' domain='0x0000' bus='0x03' slot='0x00' function='0x0'/> </hostdev> <hostdev mode='subsystem' type='pci' managed='yes'> <driver name='vfio'/> <source> <address domain='0x0000' bus='0x02' slot='0x00' function='0x1'/> </source> <address type='pci' domain='0x0000' bus='0x04' slot='0x00' function='0x0'/> </hostdev> <hostdev mode='subsystem' type='pci' managed='yes'> <driver name='vfio'/> <source> <address domain='0x0000' bus='0x02' slot='0x00' function='0x2'/> </source> <address type='pci' domain='0x0000' bus='0x05' slot='0x00' function='0x0'/> </hostdev> <hostdev mode='subsystem' type='pci' managed='yes'> <driver name='vfio'/> <source> <address domain='0x0000' bus='0x02' slot='0x00' function='0x3'/> </source> <address type='pci' domain='0x0000' bus='0x06' slot='0x00' function='0x0'/> </hostdev> <memballoon model='none'/> </devices> </domain> Do you guys have any idea what I am doing wrong? Thanks for your valuable support!
-
Hi all, I'm just getting started with Shinobi which I like so far especially because of the API that works very well with my home automation system (Jeedom. 1st Issue: I am having almost the same issue here. What I mean is that I have 6 cameras that are working fine when I fire up Shinobi. 3 of them are recording 24/7. However, after a random amount of time (from few minutes to several hours/days) the monitors of some cameras will become black, similare to Martintheshred's screenshot. The funny thing is that even if the monitors turn black, the recording are stillworking just fine. Also, when I switch a black monitor from recording to watch only (or vice versa), the monitor will work again. 2nd Issue: RAM usage For some reason, after a few days running, Shinobi usues more than 20GB on my unraid server. When I fire it up it's only few gigs. Any idea what's going on here? Thanks!!!
-
hi mates, excellent video and explanations. The docker worked like a charm and I can launch my macinabox VM. However, even if I can see the mouse on the Cloverfoeld Splash Screen, I can't move it. I don't think it's a macinabox issue per say. When I saw that issue opened a VNC session on another VM and noticed a similar issue (the mouse cursor is actually a large white square). Any idea what could be that issue? Thanks
-
Hi, I did try this with no success. Therefore, I used darqfallen's advice and did install zoneminder in a VM (ubuntu server). This works now evnthough Zoneminder is not the easiest piece of software to setup (those freakin filters are a pain in the neck to setup). Thanks for your support anyway
-
Hi Guys, I would like to use zoneminder on my unraid server. Unfortunately, the docker container won't start. When I launch it, I get an error message "Execution error Server error". Also the log is completely empty. I tried to uninstall the container and reinstall it again but it didn't make the trick. Any thoughts? Cheers!
-
It works now. There was 2 mistakes I made. Mistake #1: my ISP modem had a built-in functionnality for remote administration that was using the port #443. I disabled that and the port forwarding then worked Mistake #2 : it's not really a mistake but I dropped duckdns and used my dyndns subdomain. Then, by following the tutorial (again) I made it work. I can now access my next cloud through https://nextcloud.MYDOMAIN.dyndns.org. Thanks for the valuable help!
-
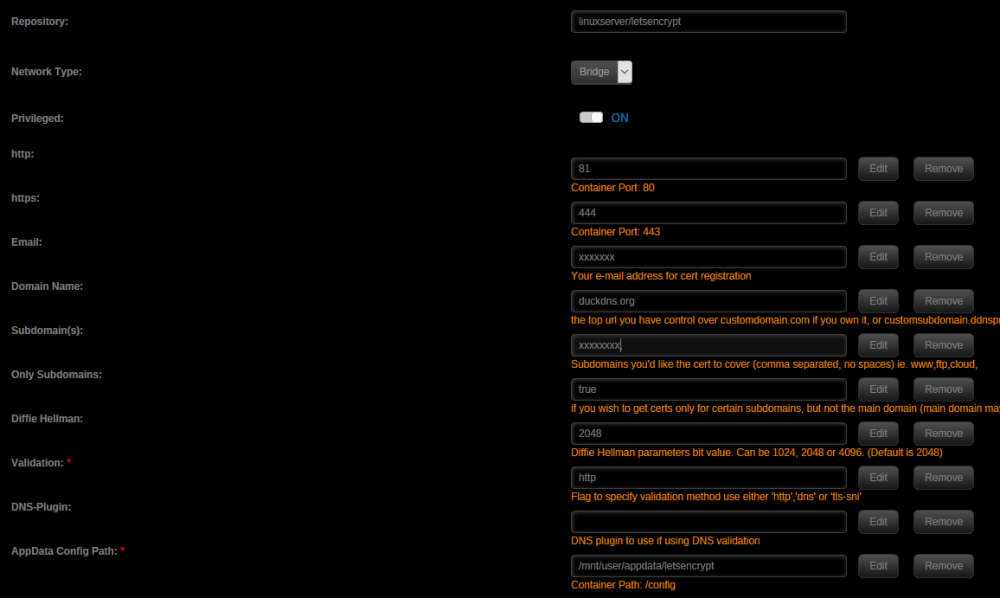
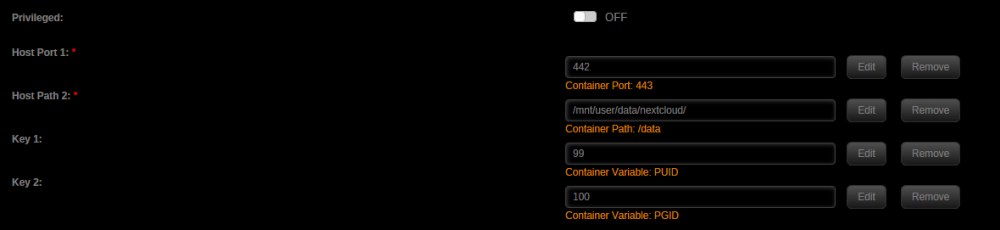
Hi all, Like many others I am struggling with Letsencrypt and NextCloud. I spent a lot of time following numerous tutorials but none of them could make it work. What is installed: duckdns nextcloud letsencrypt What does work: Local access to nextcloud through an unsecured connection by using my unraid local address: 192.168.1.206:442 (I have to add an exception in my browser so it will connect) Remote access to nextcloud through an unsecured connection by using my duckdns address XXXXX.duckdns.org:442 (I have to add an exception in my browser so it will connect) Looks like duckdns works as well as port forwarding on port 442 Letsencrypt works I guess, here is the log: Processing /etc/letsencrypt/renewal/XXXX.duckdns.org.conf ------------------------------------------------------------------------------- Cert not yet due for renewal ------------------------------------------------------------------------------- The following certs are not due for renewal yet: /etc/letsencrypt/live/XXXX.duckdns.org/fullchain.pem expires on 2018-08-13 (skipped) No renewals were attempted. No hooks were run. ------------------------------------------------------------------------------- [cont-init.d] 50-config: exited 0. [cont-init.d] done. [services.d] starting services [services.d] done. Server ready What does not work: Local secured access to next cloud Remote secure acess to next cloud What is my configuration: letsencrypt\nginx\site-confs\default upstream backend { server 192.168.1.206:19999; keepalive 64; } server { listen 443 ssl; listen 80 default_server; root /config/www; index index.html index.htm index.php; server_name XXXX.duckdns.org; ssl_certificate /config/keys/letsencrypt/fullchain.pem; ssl_certificate_key /config/keys/letsencrypt/privkey.pem; ssl_dhparam /config/nginx/dhparams.pem; ssl_ciphers 'ECDHE-RSA-AES128-GCM-SHA256:ECDHE-ECDSA-AES128-GCM-SHA256:ECDHE-RSA-AES256-GCM-SHA384:ECDHE-ECDSA-AES256-GCM-SHA384:DHE-RSA-AES128-GCM-SHA256:DHE-DSS-AES128-GCM-SHA256:kEDH+AESGCM:ECDHE-RSA-AES128-SHA256:ECDHE-ECDSA-AES128-SHA256:ECDHE-RSA-AES128-SHA:ECDHE-ECDSA-AES128-SHA:ECDHE-RSA-AES256-SHA384:ECDHE-ECDSA-AES256-SHA384:ECDHE-RSA-AES256-SHA:ECDHE-ECDSA-AES256-SHA:DHE-RSA-AES128-SHA256:DHE-RSA-AES128-SHA:DHE-DSS-AES128-SHA256:DHE-RSA-AES256-SHA256:DHE-DSS-AES256-SHA:DHE-RSA-AES256-SHA:AES128-GCM-SHA256:AES256-GCM-SHA384:AES128-SHA256:AES256-SHA256:AES128-SHA:AES256-SHA:AES:CAMELLIA:DES-CBC3-SHA:!aNULL:!eNULL:!EXPORT:!DES:!RC4:!MD5:!PSK:!aECDH:!EDH-DSS-DES-CBC3-SHA:!EDH-RSA-DES-CBC3-SHA:!KRB5-DES-CBC3-SHA'; ssl_prefer_server_ciphers on; client_max_body_size 0; location = / { return 301 /htpc; } location /sonarr { include /config/nginx/proxy.conf; proxy_pass http://192.168.1.206:8989/sonarr; } location /radarr { include /config/nginx/proxy.conf; proxy_pass http://192.168.1.206:7878/radarr; } location /htpc { include /config/nginx/proxy.conf; proxy_pass http://192.168.1.206:8085/htpc; } location /downloads { include /config/nginx/proxy.conf; proxy_pass http://192.168.1.206:8112/; proxy_set_header X-Deluge-Base "/downloads/"; } #PLEX location /web { # serve the CSS code proxy_pass http://192.168.1.206:32400; } # Main /plex rewrite location /plex { # proxy request to plex server proxy_pass http://192.168.1.206:32400/web; } location /nextcloud { include /config/nginx/proxy.conf; proxy_pass https://192.168.1.206:442/nextcloud; } location ~ /netdata/(?<ndpath>.*) { proxy_set_header X-Forwarded-Host $host; proxy_set_header X-Forwarded-Server $host; proxy_set_header X-Forwarded-For $proxy_add_x_forwarded_for; proxy_pass http://backend/$ndpath$is_args$args; proxy_http_version 1.1; proxy_pass_request_headers on; proxy_set_header Connection "keep-alive"; proxy_store off; } } nextcloud config.php <?php $CONFIG = array ( 'memcache.local' => '\\OC\\Memcache\\APCu', 'datadirectory' => '/data', 'instanceid' => 'oc4xjllsleky', 'passwordsalt' => 'AePwbt7LYPhHr9QW/xhQEHG3Upk+XC', 'secret' => 'eg8adPotUPdkAphDtJKC0abNfglncPMdGPYlx5ujkwWRhZBf', 'trusted_domains' => array ( 0 => '192.168.1.206:442', 1 => 'XXXXX.duckdns.org', ), 'overwrite.cli.url' => 'https://192.168.1.206:442', 'dbtype' => 'mysql', 'version' => '13.0.1.1', 'dbname' => 'nextcloud', 'dbhost' => '192.168.1.206:3305', 'dbport' => '', 'dbtableprefix' => 'oc_', 'dbuser' => 'xXxXxXxX', 'dbpassword' => 'xXxXxX', 'installed' => true, ); And attached, the docker configuration of both Letsencrypt and Nextcloud There must be something stupid I did but I can't put my finger on it. Thanks a lot for your help!
-
Hi everyone, Gridrunner videos convinced me to switch from Ubuntu Server to Unraid. I followed all his tutorial to setup my server and it was incredibly easy and well documented. This was logic for me to follow his tutorial to setup a High Sierra VM on my server. Unfortunately, I am currently facing an issue that I couldn't solve with any of the fix proposed in the thread. I must be missing something! When I boot on the freshly created VM, the progress bar won't go further than 5 or 7% and then the machine will reboot. I used several tweaks I could read on the forum and it's the best scenario I can have so far (ther worst scenario being the machine rebooting on apple's logo without showing the progress bar). After several tweaks here and there here is the XML I have at the minute. I also tried to create a new install disk with no success. Thanks for the help! <domain type='kvm' xmlns:qemu='http://libvirt.org/schemas/domain/qemu/1.0'> <name>OSX</name> <uuid>1d2e866e-e08b-0f09-d351-e30bf9de8391</uuid> <metadata> <vmtemplate xmlns="unraid" name="Linux" icon="linux.png" os="linux"/> </metadata> <memory unit='KiB'>8388608</memory> <currentMemory unit='KiB'>8388608</currentMemory> <memoryBacking> <nosharepages/> </memoryBacking> <vcpu placement='static'>2</vcpu> <cputune> <vcpupin vcpu='0' cpuset='6'/> <vcpupin vcpu='1' cpuset='14'/> </cputune> <os> <type arch='x86_64' machine='pc-q35-2.9'>hvm</type> <loader readonly='yes' type='pflash'>/usr/share/qemu/ovmf-x64/OVMF_CODE-pure-efi.fd</loader> <nvram>/etc/libvirt/qemu/nvram/1d2e866e-e08b-0f09-d351-e30bf9de8391_VARS-pure-efi.fd</nvram> </os> <features> <acpi/> <apic/> </features> <cpu mode='custom' match='exact' check='partial'> <model fallback='allow'>core2duo</model> <vendor>Intel</vendor> </cpu> <clock offset='utc'/> <on_poweroff>destroy</on_poweroff> <on_reboot>restart</on_reboot> <on_crash>restart</on_crash> <devices> <emulator>/usr/local/sbin/qemu</emulator> <disk type='file' device='disk'> <driver name='qemu' type='raw' cache='writeback'/> <source file='/mnt/user/isos/highsierra2.img'/> <target dev='hdc' bus='sata'/> <boot order='1'/> <address type='drive' controller='0' bus='0' target='0' unit='2'/> </disk> <disk type='file' device='disk'> <driver name='qemu' type='raw' cache='writeback'/> <source file='/mnt/user/domains/Linux/vdisk2.img'/> <target dev='hdd' bus='sata'/> <address type='drive' controller='0' bus='0' target='0' unit='3'/> </disk> <controller type='usb' index='0' model='ich9-ehci1'> <address type='pci' domain='0x0000' bus='0x00' slot='0x07' function='0x7'/> </controller> <controller type='usb' index='0' model='ich9-uhci1'> <master startport='0'/> <address type='pci' domain='0x0000' bus='0x00' slot='0x07' function='0x0' multifunction='on'/> </controller> <controller type='usb' index='0' model='ich9-uhci2'> <master startport='2'/> <address type='pci' domain='0x0000' bus='0x00' slot='0x07' function='0x1'/> </controller> <controller type='usb' index='0' model='ich9-uhci3'> <master startport='4'/> <address type='pci' domain='0x0000' bus='0x00' slot='0x07' function='0x2'/> </controller> <controller type='sata' index='0'> <address type='pci' domain='0x0000' bus='0x00' slot='0x1f' function='0x2'/> </controller> <controller type='pci' index='0' model='pcie-root'/> <controller type='pci' index='1' model='pcie-root-port'> <model name='pcie-root-port'/> <target chassis='1' port='0x10'/> <address type='pci' domain='0x0000' bus='0x00' slot='0x02' function='0x0' multifunction='on'/> </controller> <controller type='pci' index='2' model='pcie-root-port'> <model name='pcie-root-port'/> <target chassis='2' port='0x11'/> <address type='pci' domain='0x0000' bus='0x00' slot='0x02' function='0x1'/> </controller> <controller type='pci' index='3' model='pcie-root-port'> <model name='pcie-root-port'/> <target chassis='3' port='0x12'/> <address type='pci' domain='0x0000' bus='0x00' slot='0x02' function='0x2'/> </controller> <controller type='pci' index='4' model='pcie-root-port'> <model name='pcie-root-port'/> <target chassis='4' port='0x13'/> <address type='pci' domain='0x0000' bus='0x00' slot='0x02' function='0x3'/> </controller> <controller type='virtio-serial' index='0'> <address type='pci' domain='0x0000' bus='0x01' slot='0x00' function='0x0'/> </controller> <interface type='bridge'> <mac address='52:54:00:e7:8b:6f'/> <source bridge='br0'/> <model type='e1000-82545em'/> <address type='pci' domain='0x0000' bus='0x02' slot='0x00' function='0x0'/> </interface> <serial type='pty'> <target port='0'/> </serial> <console type='pty'> <target type='serial' port='0'/> </console> <channel type='unix'> <target type='virtio' name='org.qemu.guest_agent.0'/> <address type='virtio-serial' controller='0' bus='0' port='1'/> </channel> <input type='mouse' bus='ps2'/> <input type='keyboard' bus='ps2'/> <graphics type='vnc' port='-1' autoport='yes' websocket='-1' listen='0.0.0.0' keymap='fr'> <listen type='address' address='0.0.0.0'/> </graphics> <video> <model type='qxl' ram='65536' vram='65536' vgamem='16384' heads='1' primary='yes'/> <address type='pci' domain='0x0000' bus='0x00' slot='0x01' function='0x0'/> </video> <memballoon model='virtio'> <address type='pci' domain='0x0000' bus='0x03' slot='0x00' function='0x0'/> </memballoon> </devices> <qemu:commandline> <qemu:arg value='-usb'/> <qemu:arg value='-device'/> <qemu:arg value='usb-mouse,bus=usb-bus.0'/> <qemu:arg value='-device'/> <qemu:arg value='usb-kbd,bus=usb-bus.0'/> <qemu:arg value='-device'/> <qemu:arg value='isa-applesmc,osk=xxxxxxxxOSK_KEY_xxxxxxxxxxxxxxxxxxxxxx'/> <qemu:arg value='-smbios'/> <qemu:arg value='type=2'/> <qemu:arg value='-cpu'/> <qemu:arg value='Penryn,vendor=GenuineIntel,kvm=on,+invtsc,vmware-cpuid-freq=on,'/> </qemu:commandline> </domain>
-
I did reinstall it once and it didn't work. I did reinstall it another time after rebooting my server and it did worK Thanks !
-
Hi, Thanks for the prompt reply. First here is the log I could get from the docker: Mar 25 14:12:36 f4b5626ab1b7 syslog-ng[12]: EOF on control channel, closing connection; *** Running /etc/my_init.d/20_apt_update.sh... Hit:1 http://archive.ubuntu.com/ubuntu xenial InRelease Get:2 http://security.ubuntu.com/ubuntu xenial-security InRelease [102 kB] Get:3 http://archive.ubuntu.com/ubuntu xenial-updates InRelease [102 kB] Get:4 http://archive.ubuntu.com/ubuntu xenial-backports InRelease [102 kB] Get:5 http://archive.ubuntu.com/ubuntu xenial-updates/main amd64 Packages [962 kB] Get:6 http://archive.ubuntu.com/ubuntu xenial-updates/universe amd64 Packages [780 kB] Fetched 2048 kB in 2s (749 kB/s) Reading package lists... E: dpkg was interrupted, you must manually run 'dpkg --configure -a' to correct the problem. E: dpkg was interrupted, you must manually run 'dpkg --configure -a' to correct the problem. E: dpkg was interrupted, you must manually run 'dpkg --configure -a' to correct the problem. *** /etc/my_init.d/20_apt_update.sh failed with status 100 And the Run command: root@localhost:# /usr/local/emhttp/plugins/dynamix.docker.manager/scripts/docker run -d --name='LogitechMediaServer' --net='bridge' -e TZ="Europe/Paris" -e HOST_OS="unRAID" -e 'PUID'='99' -e 'PGID'='100' -p '9000:9000/tcp' -p '3483:3483/tcp' -p '3483:3483/udp' -p '9090:9090/tcp' -v '/mnt/user/media/Musique/':'/music':'rw' -v '/mnt/user/appdata/LogitechMediaServer':'/config':'rw' --log-opt max-size=50m --log-opt max-file=1 'dlandon/logitechmediaserver' 9df8876117ca2622f9f41b87ad77db02ad80d0d4231af7d37ff27edeff38c0b5 The command finished successfully! Then I didn't modify any port (using the 9000 one) and I am trying to get in to the GUI via a left click on the docker icon in Unraid
-
Hi there first of all, thanks for the great work done on that Docker. However, I couldn't use it yet since I can't access the GUI. The installation of the docker was flawless but when I try to connect to the GUI, the address is unknown. I'll be happy to provide all the information required to solve that issue. Cheers
-
That's interesting; thanks for your feedback. I have absolutely no idea why it didn't work on your server. 16GB of ram seem enough for that. I could read from here and their that transcoding from the SSD could wear it quite quickly. That's why I use ram transcoding. To be honnest, it doesn't seem to improve the user experience but at least, it will significantly reduce the I/O on my ssd. One subsidary question, I can read that you use kodi and I was used to use it as well but honnestly, I couldn't find a reliable way to make it work with plex. plexkodiconnect is struggling so hard when it comes to sync the large libraries and the plex app for Kodi is just not that great. Can I ask you what is your solution because I would love using Kodi again (because of its decoding capabilities!) thanks
-
Well if you want to enable the ram transcoding, you need to use /tmp as a host path in your floder mapping. Then, with an ssh connection, you can check that plex uses the /tmp folder with ls /tmp/transcode (you should see a session folder and in that session folder one folder per active stream). Anyway, I ran some test using my SSD for transcoding and the performance are still the same. Also, even if all the cores are used, none of them will go higher than 50% when encoding a file
-
When you made that test did you make sure to specify the tarsncode folder (the one you mapped to /tmp) in the plex server settings (within the webgui)?
-
I am using ram to transcode (mapped the /transcode folder to /tmp) so I don't think it is the issue here
-
HI again, So I ran a test again once the parity check was over and the results are the same. Running conversion at 5x speed maximum, all my cores are used but only at 30 to 50% Any idea? THanks
-
Actually, you might be right. I am running several tasks in parallel and one of them is a parity check. I will make a new converting test once it's done and will let you know. Anyway, thanks a lot for the quick reply wgstarks
-
Hi all, I just migrated from an ubuntu server to unraid and am pretty happy so far. I installed the linuxserver.io-docker container, setup my complete library pretty smoothly and started streaming some media over my network. The streaming works great, and my sever (Xeon e-2650 + 32GB ECC ram + 250GB cache drive + 16TB array) can handle 7 to 8 streams in parallel. However, I noticed that converting some medias (not transcoding on the fly) was pretty slow. It will convert at 4.8x and will never use more than 40% of my CPU. So my question is, how can I get the best out of my CPU so I can transcode faster than that? Thanks for your reply, cheers.



