


Hawkins
Members
-
Joined
Everything posted by Hawkins
-
I am getting error when trying to connect. Where would you like me to report the errors?
-
I wanted to make this prettier and more informative. Feedback welcome. #!/bin/bash # ============================================================================== # Docker Container Log Cleanup Script # ============================================================================== # This script displays Docker container log sizes before zeroing them # Output shows size in bytes, container name, and total size # Designed for Unraid/Linux systems # ============================================================================== # HTML color code variables for output formatting COLOR_RED="<font color='red'>" COLOR_GREEN="<font color='green'>" COLOR_BLUE="<font color='blue'>" COLOR_END="</font>" COLOR_RED_BOLD="<font color='red'><b>" COLOR_GREEN_BOLD="<font color='green'><b>" COLOR_BLUE_BOLD="<font color='blue'><b>" COLOR_END_BOLD="</b></font>" # Function to display log sizes for all containers display_log_sizes() { docker ps -qa | while read -r container_id; do # Get the log file path for this container log_path=$(docker inspect --format='{{.LogPath}}' "$container_id") # Check if log path exists and is a file if [ -n "$log_path" ] && [ -f "$log_path" ]; then # Get size in bytes size=$(stat -c%s "$log_path" 2>/dev/null) # Get container name name=$(docker ps --format "{{.Names}}" --filter "id=$container_id") # Only include non-zero sizes if [ -n "$size" ] && [ "$size" != "0" ]; then echo "$size|$name" fi fi done | sort -n | awk -F'|' ' { # Store sizes and names in arrays sizes[NR] = $1 names[NR] = $2 total += $1 # Track the maximum width needed len = length($1) if (len > max_width) { max_width = len } } END { # Ensure total width is also considered total_len = length(total) if (total_len > max_width) { max_width = total_len } # Print all entries with dynamic padding for (i = 1; i <= NR; i++) { printf "%0*d bytes = %s\n", max_width, sizes[i], names[i] } # Print separator matching the width of the numbers for (j = 0; j < max_width + 6; j++) { printf "=" } printf "\n" printf "%0*d bytes TOTAL\n", max_width, total }' } # ============================================================================== # Display current log sizes # ============================================================================== echo "Script to display Docker container log sizes in sorted order." echo "Output shows size in bytes, container name, and total size." echo "" echo "${COLOR_BLUE_BOLD}===== Current Log Sizes ===============================================${COLOR_END_BOLD}" echo "" display_log_sizes echo "" # ============================================================================== # Zero out all log files # ============================================================================== echo "${COLOR_GREEN_BOLD}===== Zeroing Logs ====================================================${COLOR_END_BOLD}" echo "" echo "${COLOR_GREEN}Cleaning Logs${COLOR_END}" # Find all Docker log files and zero them out while read -r log; do # Get size in bytes size=$(stat -c%s "$log" 2>/dev/null) # Only include non-zero sizes if [ -n "$size" ] && [ "$size" != "0" ]; then # Extract just the log filename for display filename=$(basename "$log") printf "${COLOR_GREEN}Zeroing out %s${COLOR_END}" "$filename" # Zero out the log file if cat /dev/null > "$log" 2>/dev/null; then echo "${COLOR_GREEN} ... done.${COLOR_END}" else echo "${COLOR_RED_BOLD} ... failed!${COLOR_END_BOLD}" echo "${COLOR_RED_BOLD}Error: Failed to zero out log file. Exiting.${COLOR_END_BOLD}" exit 1 fi fi done < <(find /var/lib/docker/containers/ -name '*.log') echo "${COLOR_GREEN}Cleaning complete!${COLOR_END}" echo ""
-
Watch state: I don't think it does. The watch state is stored in a SQLite database. You can read more about it here. Repulling metadata: Correct, but that is simply a matter of time. Backing up Plex's entire directory takes me a little under an hour and eats many 10's of GB of disk space. That means all containers are down, there is extra wear/tear on my disks, and I am backing up data that is neither unique nor user-created. I can simply have Plex pull all that data down again should I need it. Manually or automatically? If manually: cp <destination_directory_configured_in_plugin>\<name_of_backup_file> <location_to_keep_second_backup> If automatically, create a script with all the cp commands you need and run it automatically using either cron on a script-running plugin. Hear, hear! I already offered, now I am offering again. PayPal? Venmo? Charitable donation to a cause you feel strongly about?
-
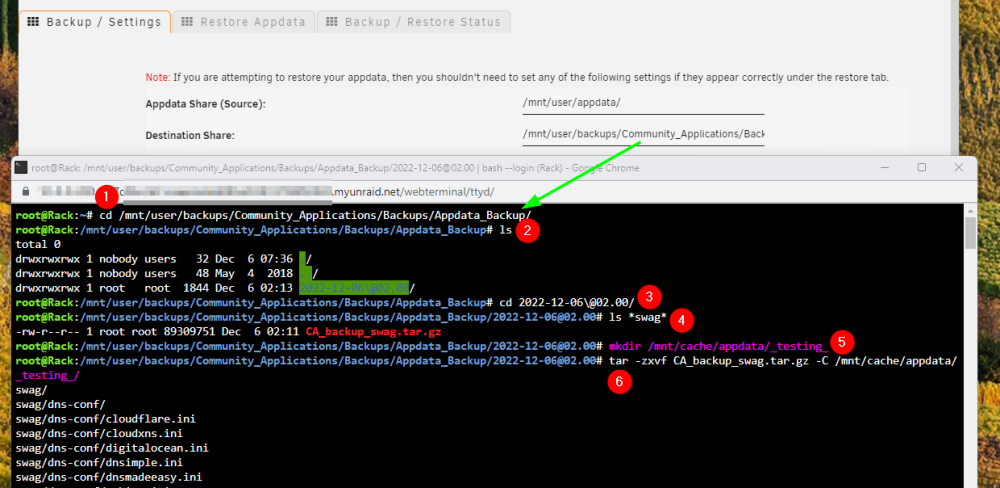
I can help here. Open the unRAID terminal and go to your backup Destination Share: cd <Destination_Share> Find the backup you are looking for: ls Go into the directory of the backup you want to restore from: cd <backup_directory> Find the backup file you are looking for. In my example I am looking for <any>swag<any>: ls *swag* [Used only for demo purposes, don't do this.] I created a temp directory that I'll later delete: mkdir /mnt/cache/appdata/_testing_ Extract the backup file from step 4 into your appdata directory [I used my temp directory.]: tar -zxvf <backup_filename> -C /mnt/cache/appdata/
-
Just type them in here, each separated by a comma: As for what to type in that field, I use QDirStat running in a Docker container to figure out where the large (in file size and in file count) directories are. I think it would be *stellar* to see that kind of visibility within the backup plugin itself. Something like this: Now you can see why I picked to exclude these directories. I second this! I've been bitten by the 'days old' setting before. If you configure it to backup every n days and you set the 'days old' setting to a number less than n, I believe it will delete your previous backups (all of them!). I think it would be great to have setting like, "keep 3 backs minimum, regardless of age, and 6 backups maximum".

-
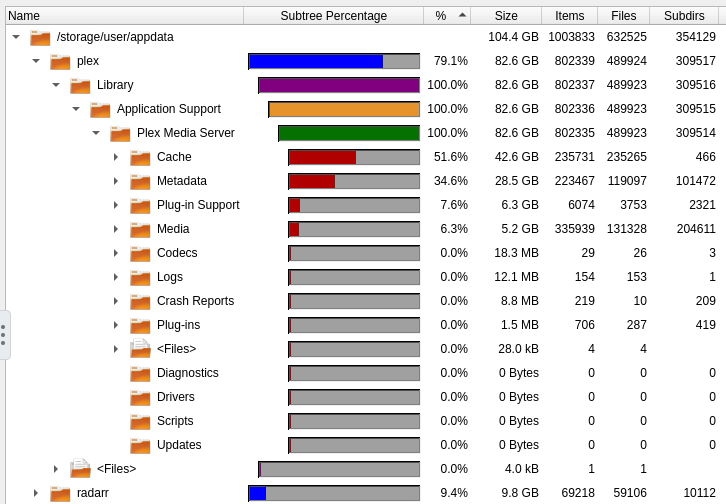
Excellent work. My backups are much, much faster now that plex's and radarr's metadata are excluded: root@Rack:/mnt/user/backups/Community_Applications/Backups/Appdata_Backup# du -h --max-depth=1 && ls -lh 2022-12-05\@09.56/CA_backup_plex.tar.gz && ls -lh 2022-12-05\@11.16/CA_backup_plex.tar.gz 13G ./[email protected] 94G ./[email protected] 105G ./[email protected] 105G ./[email protected] 94G ./[email protected] 409G . -rw-r--r-- 1 root root 77G Dec 5 10:44 2022-12-05\@09.56/CA_backup_plex.tar.gz -rw-r--r-- 1 root root 3.8G Dec 5 11:25 2022-12-05\@11.16/CA_backup_plex.tar.gz root@Rack:/mnt/user/backups/Community_Applications/Backups/Appdata_Backup# The 94G and 105G backups are from me testing the (at the time) broken exclude feature both with (94G) and without (105G) compression. The archive for plex dropped from 77G compressed to just 3.8GB compressed! For anyone interested, I exclude: /mnt/user/appdata/plex/Library/Application Support/Plex Media Server/Cache/, /mnt/user/appdata/plex/Library/Application Support/Plex Media Server/Media/, /mnt/user/appdata/plex/Library/Application Support/Plex Media Server/Metadata/, /mnt/user/appdata/radarr/MediaCover/
-
Dang it, just confirmed the same on my end. I was going off what I had read earlier in this thread. I am sure @KluthR will figure it out.
-
Try changing the exclude paths from /mnt/user/appdata/foo/bar/ to /mnt/cache/appdata/foo/bar/. This isn't a permanent fix in my opinion, but I believe it will work until the developer can figure it out. Speaking of that, @KluthR, you're a rockstar. Thanks for the hard work! I am having the same issue and I wanted to see what you thought about it. Also, what is the best way to buy you a few beers?
-
Done.
-
No luck with a wipe/reinstall of the container. Also killed the appdata directory, made no difference. Both containers are on the same network type (proxy network for SWAG). Interested in some live troubleshooting this week?
-
RE: Cachet When starting Cachet I get the following error: Initializing Cachet container ... Attempting to connect to database ... ........................................................... Could not connect to database server! Aborting... I am using MariaDB in Docker, and it is known to be working prior to Cachet. Login below uses the password via copy/paste from the Cachet Docker config screen in unRAID so there are no typos: root@0c2f1410a349:/# mysql -u cachet -p Warning: World-writable config file '/etc/mysql/conf.d/custom.cnf' is ignored Enter password: Welcome to the MariaDB monitor. Commands end with ; or \g. Your MariaDB connection id is 70 Server version: 10.4.18-MariaDB-1:10.4.18+maria~bionic-log mariadb.org binary distribution Copyright (c) 2000, 2018, Oracle, MariaDB Corporation Ab and others. Type 'help;' or '\h' for help. Type '\c' to clear the current input statement. MariaDB [(none)]> show databases; +--------------------+ | Database | +--------------------+ | cachet | | information_schema | +--------------------+ 2 rows in set (0.001 sec) MariaDB [(none)]> use cachet Database changed MariaDB [cachet]> show tables; Empty set (0.000 sec) MariaDB [cachet]> Here is the relevant data from the Cachet config: Proof that IP and port are correct: Error when starting Cachet: I feel like I am missing something simple here.
-
This might prove useful to those unable to get Big Sur downloaded and running: https://github.com/munki/macadmin-scripts/blob/main/installinstallmacos.py This script can download the Big Sur install image: Product ID Version Build Date Title 001-86606 11.1 20C69 2020-12-14 macOS Big Sur That install file is 12.22 GB when completely downloaded, and you'll need to download a copy and then convert it (the script does this for you) so you'll need about 25GB of free space.
-
Please be more specific. Which plugin? What are your install steps? What error are you getting?
-
Running this container via unRAID. No issues until i upgraded unRAID to latest 6.5 stable release tonight. All docker containers are fine except Lidarr. Starts with : root@localhost:# /usr/local/emhttp/plugins/dynamix.docker.manager/scripts/docker create --name='lidarr' --net='bridge' -e TZ="America/Los_Angeles" -e HOST_OS="unRAID" -e 'UMASK'='000' -e 'PUID'='99' -e 'PGID'='100' -p '8004:8686/tcp' -v '/mnt/user/incoming/complete/music/':'/data':'rw' -v '/mnt/user/media/music/':'/media':'rw' -v '/mnt/user/appdata/lidarr':'/config':'rw' 'binhex/arch-lidarr' Log: 2018-03-17 00:09:17.989262 [info] Host is running unRAID 2018-03-17 00:09:18.026926 [info] System information Linux 561862a36433 4.14.26-unRAID #1 SMP PREEMPT Mon Mar 12 16:21:20 PDT 2018 x86_64 GNU/Linux 2018-03-17 00:09:18.071579 [info] PUID defined as '99' 2018-03-17 00:09:18.118826 [info] PGID defined as '100' 2018-03-17 00:09:18.359515 [info] UMASK defined as '000' 2018-03-17 00:09:18.402730 [info] Permissions already set for volume mappings chown: cannot access '/var/lib/lidarr': No such file or directory Blew away the container twice, including the files in /mnt/user/appdata/lidarr:/config. Anyone else getting this?
-
Can't seem to get around this error: Fri Jan 26 12:25:24 2018 ERROR: Cannot open TUN/TAP dev /dev/net/tun: No such file or directory (errno=2) Fri Jan 26 12:25:24 2018 Exiting due to fatal error I am running this on Ubuntu 17.10 via Docker 17.12.0-ce. I have several other docker containers running without issue, including binhex/arch-sabnzbdvpn w/ working privoxy. One thing I've done out of the ordinary is running sudo /sbin/modprobe iptable_mangle as directed in previous logs however, I don't really understand what that did, or if it persists between reboots. I added the image in question to docker via this command: docker run -d \ --cap-add=NET_ADMIN \ -p 8088:9080 \ -p 8089:9443 \ -p 8090:8118 \ -p 8091:3000 \ --name=rtorrent_vpn \ -v /opt/docker_incoming_downloads:/data \ -v /opt/docker_config_files/rtorrent_vpn:/config \ -v /etc/localtime:/etc/localtime:ro \ -e TZ=America/Los_Angeles \ -e VPN_ENABLED=yes \ -e VPN_USER=p####### \ -e VPN_PASS=shhhhhhhhhhhh_its_a_secret \ -e VPN_PROV=pia \ -e STRICT_PORT_FORWARD=yes \ -e ENABLE_PRIVOXY=yes \ -e ENABLE_FLOOD=yes \ -e ENABLE_AUTODL_IRSSI=yes \ -e LAN_NETWORK=10.0.0.0/24 \ -e NAME_SERVERS=8.8.8.8,8.8.4.4 \ -e DEBUG=true \ -e PHP_TZ=America/Los_Angeles \ -e UMASK=000 \ -e PGID=1000 -e PUID=1000 \ binhex/arch-rtorrentvpn Supervisord.log attached as directed. Thanks for your continued hard work on this and other projects. Hey binhex, might I ask what your day-to-day job is? supervisord.log UPDATE: [SOLVED] Adding the line --device=/dev/net/tun to the run command fixed the problem. Any clue why?


