


geekazoid
Members
-
Joined
-
Last visited
Everything posted by geekazoid
-
It is done. Sorry I forgot about this until I got an update on the thread.
-
PiHole Browser Extension supports multiple PiHoles. For the other stuff: You can run dockers on ESXi. Then you can deploy pihole in docker and use the shared storage to run pihole-sync. There may be licensing requirements from vmware. My last certification was vSphere 5; I don't know. Otherwise you'd need to set up some kind of shared storage (nfs) that your linux pihole VMs can mount. Note: this would not be mounted to the hypervisor but to the VMs directly. Basically a bunch of work and adding points of failure. Then you could fork the project and adapt the pihole-sync scripts to whatever linux you want to run etc.
-
Another configuration nugget for those using pihole's dhcp service. In dnsmasq.d create a file called 99-extra-dns.conf, contents: dhcp-option=6,pihole1_ip,pihole2_ip So your dhcp clients are aware of the primary and secondary dns servers.
-
I built this again from scratch and it went off without a hitch using the procedure I laid out in my comment above. What a delight! I also figured out what causes the root permissions bug. If you create the path manually before installation, it doesn't happen. So I think I will update my guide to move those steps to the beginning and include the symlink steps as well. I also found a little nugget people might appreciate: If you want to set the hostname of your pihole, select Advanced View in the Edit page and append " --hostname=your_hostname" to Extra Parameters.
-
The script didn't work at all for my unraid 6.11.5 host and pihole container. Should it? Thanks for the script. It works great after a reboot!
-
I've fixed the ssh pubkeygen auth issue. Authentication refused: bad ownership or modes for directory /root cd / chown root root chgrp root root I made an issue on github for this, and I submitted an edit to the README. Above I've written a Quick Start Guide which I'll probably build upon later when I get the whole stack dialed. When done I'll bring the final product to github, but I figure being on first page it will be helpful for the next guy here. Have a Happy New Year!
-
I've deleted the verbose detail of my troubleshooting because its not relevant to the community. Instead I'm going to turn my findings into a Quick Start Guide for pihole-sync: Quick Start Guide Environment Primary pihole on the unraid docker host A (unraidA) has it's files typically in /mnt/user/appdata/pihole. There are two important directories there that this app is going to sync: /mnt/user/appdata/pihole/pihole /mnt/user/appdata/pihole/dnsmasq.d The pihole-sync sender is going to reside on the same docker host as the master pihole server as it has direct access to the same filesystem. A sensible path for this would be /mnt/user/appdata/pihole-sync-sender (on unraidA) Secondary pihole on unraid docker host B (unraidB) should probably have a similar filesystem setup for consistency. Of course the path for the receiver should be similarly /mnt/user/appdata/pihole-sync-receiver (on unraidB) NETWORKING: If you use Bridge mode for your containers, the sync will be employing TCP ports 22222. Defaults will work for you. If you use br0 mode for a dedicated IP per container, you can just use the standard ssh port 22 (change 22222 to 22). Remember that your sync hosts are going to be on different IPs than your piholes if you use br0 method, so don't confuse that in your setup. Operations: you should be able to ssh from unraidA to unraidB. Otherwise you can use the clipboard and web terminal. Install the Receiver On unraidB, use Community Apps to install Pihole-Sync-Receiver. In the Add Container dialog you are going to have the following fields to fill: Name: I recommend renaming the docker image to pihole-sync-receiver (lowercase) for consistency (this will make it less tedious in the CLI later) Network: as discussed above in Networking Remote Host IP: as discussed above in Networking Root directory: /mnt/user/appdata/pihole-sync-receiver/root Etc-ssh: /mnt/user/appdata/pihole-sync-receiver/ssh Pi-Hole Path: /mnt/user/appdata/pihole-sync-receiver/pihole (we're going to change this later to a symlink) Pi-Hole DNSmasq path: /mnt/user/appdata/pihole-sync-receiver/dnsmasq.d (we're going to change this later to a symlink) <click Show more settings> Note Type: receiver Remote SSH port: as discussed above in Networking <Apply> Stop the Receiver container for now. Open a Terminal on unraidB cd /mnt/user/appdata/pihole-sync-receiver mkdir root/.ssh later you will be symlinking the pihole and dnsmasq.d directories here to your secondary pihole server's paths one level up. Let's get this working first. Note: We installed the Receiver first because the sender is going to thrash against the receiver trying to connect until we complete the ssh key installation. Install the Sender and copy the ssh key to the Receiver On unraidA, use Community Apps to install Pihole-Sync-Sender. In the Add Container dialog you are going to have the following fields to fill: Name: I recommend renaming the docker image to pihole-sync-sender for consistency (this will make it less tedious in the CLI later) Network: as discussed above in Networking Remote Host IP: as discussed above in Networking Root directory: /mnt/user/appdata/pihole-sync-sender/root Etc-ssh: /mnt/user/appdata/pihole-sync-sender/ssh Pi-Hole Path: /mnt/user/appdata/pihole-sync-sender/pihole (we're going to change this later to a symlink) Pi-Hole DNSmasq path: /mnt/user/appdata/pihole-sync-sender/dnsmasq.d (we're going to change this later to a symlink) <click Show more settings> Note Type: sender Remote SSH port: as discussed above in Networking <Apply> On first startup, the container is going to generate a ssh host key. If you used the paths defined above, it will be located in /mnt/user/appdata/pihole-sync-sender/root/.ssh/ Open Terminal on unraidA docker logs pihole-sync-sender there is a message early on in the logs that mentions the steps to copy the ssh key to the receiver. I'll re-iterate these instructions below. cd /mnt/user/appdata/pihole-sync-sender/root/.ssh/ scp id_ed25519.pub root@unraidB:/mnt/user/appdata/pihole-sync-receiver/root/.ssh/authorized_keys enter the root password for unraidB when prompted to authenticate this secure copy Now start the Receiver on unraidB Open Terminal on unraidB docker exec -it pihole-sync-receiver /bin/bash cd / chown root root chgrp root root exit On unraidA cd /mnt/user/appdata/pihole-sync-sender touch pihole/psynctestfile touch dnsmasq.d/dsynctestfile Now start the Sender on unraidA docker logs pihole-sync-sender On unraidB docker logs pihole-sync-receiver cd /mnt/user/appdata/pihole-sync-receiver ls -a pihole (do you see your psynctestfile ?) ls -a dynsmasq.d (do you see your dsynctestfile ?) Once you know its syncing properly, the setup is ready to be connected to your primary and secondary piholes. stop both the sender and receiver containers delete the sync test files at both ends Use symlinks: on unraidA (sender) it would be something like this: ln -s /mnt/user/appdata/pihole/pihole /mnt/user/appdata/pihole-sync-sender/pihole ln -s /mnt/user/appdata/pihole/dnsmasq.d /mnt/user/appdata/pihole-sync-sender/dnsmasq.d on unraidB (receiver) it would be something like: ln -s /mnt/user/appdata/pihole/pihole /mnt/user/appdata/pihole-sync-receiver/pihole ln -s /mnt/user/appdata/pihole/dnsmasq.d /mnt/user/appdata/pihole-sync-receiver/dnsmasq.d Start the Receiver, then the Sender... check the logs! This is where the more specific pihole configuration begins (beyond scope of this quick start guide)
-
Hi, I'm just wondering how this is supposed to be operable. When I deploy the images they just drop into a reboot loop forever and I can't get a console long enough to set up ssh.
-
I agree with DaKarli. Samba usermap is the right way.
-
Sorry for the late reply. This is an old thread. I can recreate this problem and compare if you still have the issue.
-
Months ago I reported an issue where this plugin stopped working. It would stall while scanning and never refresh the page. If there were no errors, you could never see the plugin page because it would auto-scan (undesirable) and then hang with no feedback. This behavior is gone now. I don't know if you made changes but assuming you didn't there are some environmental changes on my end that could have contributed to this. I recently relocated my machine back to a network I manage (HOME) from the network I was a guest (INLAWS) in. HOME is the same network my server was in for years before the problem with the FCP plugin emerged. It's the same router and same setup. Two differences between these environments: First, at HOME I control the router and I have internal horizon DNS with reverse records for everything. This cleans up a lot of networking. Second, at HOME the unraid server is on a physical connection to the LAN whereas at the INLAWS it was on a wireless bridge due to lack of proper wiring. I hope this contributes something to others' troubleshooting.
-
I'm aware of the /boot/previous and it being available to restore from the https://<unraid_server>/Tools/Update however it really should be implemented so that you can boot from it in grub. I would work on this myself but I really have a full plate this summer and just can't take on any other projects. I am not convinced that file corruption is the issue. Both times this has happened I repaired it with make_bootable.bat. EFI is what was broken.
-
This happened last time I upgraded, to 6.7.1. And it happened exactly the same way this time. I stopped the array, made a backup of /boot, ran update assistant, upgraded the OS, and it kernel panics on boot. From what I can tell, the update is breaking EFI. But I'm sure that comments here will tell me that its normal and not fix it. Going back to 6.6.7.
-
You know what would be smart? If the update script made a backup of the critical files its manipulating, and verified it's work before reporting SUCCESS! It's not that hard to at least make sure you don't corrupt files. Why you guys keep telling users to do a job a script can do for them is beyond me. I was surprised when my 6.7.1 update blew up and the comments were "maybe the update failed". Like, you have a script doing this that didn't check file integrity!? Why suddenly is my storage system unable to write files reliably?? Nothing in 2yrs of running Unraid has made me feel less trusting of it than these recent threads I've seen about corrupted files during upgrades.
-
Kernel Panic - not syncing: VFS: Unable to mount root fs on unknown-block(0,0) after updating to 6.7.1 from 6.6.2 Also not being able to roll back an update and boot the old image is a bug too IMO. Same condition and description as this reddit post.
-
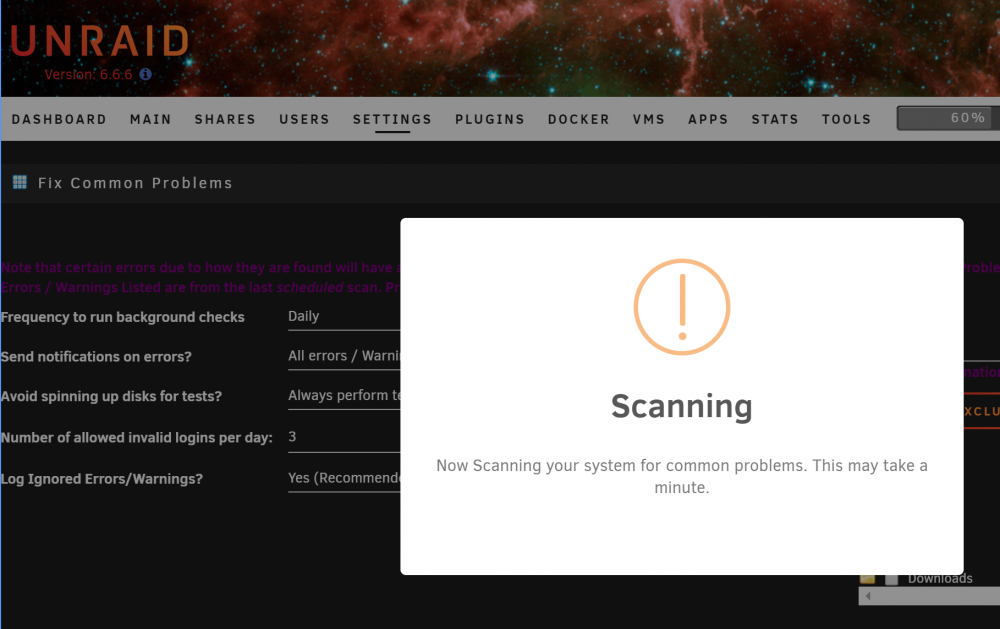
I've reinstalled the plugin. With my data and my configuration, I get this flaw. FCP has updated twice since, no change. If I got to the FCP page it will run the scan.php script, which I can track in the shell and see it quit after the time runs over. If I reload the FCP settings page, it will just do this again. So I can no use FCP as I was before to list my problems and fix them. It should never scan automatically when you open that link. Why would I ever want that? It should provide feedback on a scan's state, and not just leave a floating status with no way for the user to provide input. Some error handling for timeout would be nice too.
-
Just an update on my issue with FCP always running a scan automatically when I load the page (do not want) and the scan never ending or giving any feedback to the user. After reinstalling unraid I still am stuck in a scanning loop. If I reload the page it just scans again.
-
So its a common problem needing fixing? 🤭
-
Tried that, no change. The problem seems to be the scan.php not running in a timely fashion (it used to run for less than a minute) and not refreshing the page by clearing the 'scanning' splash. Other than that it seems to be working. But this behavior is an irritating change from the norm.
-
If there are no errors in the list, the script runs automatically when you access https://<unraid>/Settings/FixProblems. I watch for this process: /usr/bin/php /usr/local/emhttp/plugins/fix.common.problems/scripts/scan.php 1 I moved some files from the cache recently which triggers an error in FCP. This actually helps me see what's going on. In /tmp/fix.common.problems/: errors.txt is generated 3mins after execution. The moderations and templates files timestamps are also updated. Watching process: scan.php closes in 4-5mins however the web page does not update, so the splash remains indefinitely. Refresh page after script is complete and its normal (not scanning again). This is new behavior today. /tmp/fix.common.problems/errors.txt becomes errors.json after execution of the script. See below. Not very exciting. Contents of errors.json: { "errors": [ { "error": "<font color='red'><b>Default docker appdata</b> location is not a cache-only share</font>", "suggestion": "If the appdata share is not set to be cache-only, then the mover program will cause your docker applications to become inoperable when it runs (6.1.x). Under 6.2+, this setting should not affect the operation of the application, but it will definitely impact significantly the performance of the application. Fix it via <input type='button' value='appdata Settings' onclick='window.location.href="/Shares/Share?name=appdata"'>" } ], "warnings": null, "other": null, "ignored": null } Contents of settings.json: { "frequency": "daily", "notifications": "all", "disableSpinUp": "false", "hacksPerDay": "3", "logIgnored": "yes", "excludedPerms": "" }
-
There isn't much in here about FCP. I've tailed every log I could find. fluffy-diagnostics-20190217-1051.zip
-
FCP is still hanging after update. Squid?
-
For the past week, this plugin has been hanging on my system. Sometimes, it eventually times out and no results are found. It appears that the daily background check isn't running either. This behavior persists across reboots. I've also removed the plugin and reinstalled, same condition.
-
If you only have one GPU, and you pass it through directly to a VM, you can no longer use it for unraid console. You can still manage unRAID through the web GUI and ssh, but you won't have any local console. Your question was phrased - here and on reddit - as an actual issue not a hypothetical. Obviously you haven't actually configured this or you would have observed that. The recommended configuration is to install a GPU just for your VM and configure all of the necessary PCI passthrough options in your BIOS so that the GPU's IO is efficiently directed to the VM guest machine.
-
How many video cards do you have? I'm assuming two. Connect the VM's graphics card to your monitor.

