





Ricin
Members
-
Joined
-
Last visited
Everything posted by Ricin
-
I can not help but i get exactly the same error when trying to install it from Apps.
-
Diags attached. kedge2-diagnostics-20230621-1456.zip
-
Re-formateed and it works perfectly now thank you . Thank you so much for your help would have never sorted that by myself lol.
-
Finished rebuild shows as disk is onlne green circle. But can not add any files to it still says Unmountable: Unsupported or no file system. Would it be worth trying a New Config ? if I do that and put the drives in the same spots I loose no data on my array or Cache ? My second thought is I have a 2nd Unraid Server that one will ZFS format on the Array with no problem. Could I not format a drive on there then just add it to my current array ?
-
You mean a Data-Rebuild that will take about 19 hours approx. I can see it is writing to Disk2.
-
No idea OK started fresh did a reboot. Then put fs into ZFS same thing Unsuported or no file system. Did a format same thing. Here is response from zpool import. root@Kedge2:~# zpool import pool: disk2 id: 17715939750724334780 state: ONLINE action: The pool can be imported using its name or numeric identifier. config: disk2 ONLINE md2p1 ONLINE Now I set the fs to Auto and it says Unmountable No Device. I did not format the drive ran zpool import. root@Kedge2:~# zpool import pool: disk2 id: 17715939750724334780 state: ONLINE action: The pool can be imported using its name or numeric identifier. config: disk2 ONLINE md2p1 ONLINE Rebooted says same thing Unmountable No Device ran zpool import. root@Kedge2:~# zpool import pool: disk2 id: 17715939750724334780 state: ONLINE action: The pool can be imported using its name or numeric identifier. config: disk2 ONLINE md2p1 ONLINE DIags attached for after the reboot. I think I lost the Disk2 first time becuse I formated after going to Auto. This time I never formated. kedge2-diagnostics-20230620-0926.zip
-
Also run Zpool import root@Kedge2:~# zpool import no pools available to import root@Kedge2:~#
-
Did as you said put in Auto came up Unmountable: No device. I then formatted the drive still said Unmountable: No device. After the reboot same message Unmountable: No device. Here is the Diags after boot. kedge2-diagnostics-20230619-2147.zip
-
Yes online when array is started. Might take me a while to reply, as I need to go to work but thank you very much for all your help so far. I will reply when home attched at latest Diags. kedge2-diagnostics-20230619-1400.zip
-
If I stop the array I get the following. root@Kedge2:~# zpool export disk2 cannot open 'disk2': no such pool root@Kedge2:~#
-
Lol no problem thought I was doing it wrong root@Kedge2:~# zpool import pool: disk2 id: 806229581894550300 state: ONLINE action: The pool can be imported using its name or numeric identifier. config: disk2 ONLINE md2p1 ONLINE root@Kedge2:~#
-
root@Kedge2:~# zfs import unrecognized command 'import' usage: zfs command args ... where 'command' is one of the following: version create [-Pnpuv] [-o property=value] ... <filesystem> create [-Pnpsv] [-b blocksize] [-o property=value] ... -V <size> <volume> destroy [-fnpRrv] <filesystem|volume> destroy [-dnpRrv] <filesystem|volume>@<snap>[%<snap>][,...] destroy <filesystem|volume>#<bookmark> snapshot [-r] [-o property=value] ... <filesystem|volume>@<snap> ... rollback [-rRf] <snapshot> clone [-p] [-o property=value] ... <snapshot> <filesystem|volume> promote <clone-filesystem> rename [-f] <filesystem|volume|snapshot> <filesystem|volume|snapshot> rename -p [-f] <filesystem|volume> <filesystem|volume> rename -u [-f] <filesystem> <filesystem> rename -r <snapshot> <snapshot> bookmark <snapshot|bookmark> <newbookmark> program [-jn] [-t <instruction limit>] [-m <memory limit (b)>] <pool> <program file> [lua args...] list [-Hp] [-r|-d max] [-o property[,...]] [-s property]... [-S property]... [-t type[,...]] [filesystem|volume|snapshot] ... set <property=value> ... <filesystem|volume|snapshot> ... get [-rHp] [-d max] [-o "all" | field[,...]] [-t type[,...]] [-s source[,...]] <"all" | property[,...]> [filesystem|volume|snapshot|bookmark] ... inherit [-rS] <property> <filesystem|volume|snapshot> ... upgrade [-v] upgrade [-r] [-V version] <-a | filesystem ...> userspace [-Hinp] [-o field[,...]] [-s field] ... [-S field] ... [-t type[,...]] <filesystem|snapshot|path> groupspace [-Hinp] [-o field[,...]] [-s field] ... [-S field] ... [-t type[,...]] <filesystem|snapshot|path> projectspace [-Hp] [-o field[,...]] [-s field] ... [-S field] ... <filesystem|snapshot|path> project [-d|-r] <directory|file ...> project -c [-0] [-d|-r] [-p id] <directory|file ...> project -C [-k] [-r] <directory ...> project [-p id] [-r] [-s] <directory ...> mount mount [-flvO] [-o opts] <-a | filesystem> unmount [-fu] <-a | filesystem|mountpoint> share [-l] <-a [nfs|smb] | filesystem> unshare <-a [nfs|smb] | filesystem|mountpoint> send [-DnPpRVvLecwhb] [-[i|I] snapshot] <snapshot> send [-DnVvPLecw] [-i snapshot|bookmark] <filesystem|volume|snapshot> send [-DnPpVvLec] [-i bookmark|snapshot] --redact <bookmark> <snapshot> send [-nVvPe] -t <receive_resume_token> send [-PnVv] --saved filesystem receive [-vMnsFhu] [-o <property>=<value>] ... [-x <property>] ... <filesystem|volume|snapshot> receive [-vMnsFhu] [-o <property>=<value>] ... [-x <property>] ... [-d | -e] <filesystem> receive -A <filesystem|volume> allow <filesystem|volume> allow [-ldug] <"everyone"|user|group>[,...] <perm|@setname>[,...] <filesystem|volume> allow [-ld] -e <perm|@setname>[,...] <filesystem|volume> allow -c <perm|@setname>[,...] <filesystem|volume> allow -s @setname <perm|@setname>[,...] <filesystem|volume> unallow [-rldug] <"everyone"|user|group>[,...] [<perm|@setname>[,...]] <filesystem|volume> unallow [-rld] -e [<perm|@setname>[,...]] <filesystem|volume> unallow [-r] -c [<perm|@setname>[,...]] <filesystem|volume> unallow [-r] -s @setname [<perm|@setname>[,...]] <filesystem|volume> hold [-r] <tag> <snapshot> ... holds [-rH] <snapshot> ... release [-r] <tag> <snapshot> ... diff [-FHt] <snapshot> [snapshot|filesystem] load-key [-rn] [-L <keylocation>] <-a | filesystem|volume> unload-key [-r] <-a | filesystem|volume> change-key [-l] [-o keyformat=<value>] [-o keylocation=<value>] [-o pbkdf2iters=<value>] <filesystem|volume> change-key -i [-l] <filesystem|volume> redact <snapshot> <bookmark> <redaction_snapshot> ... wait [-t <activity>] <filesystem> Each dataset is of the form: pool/[dataset/]*dataset[@name] For the property list, run: zfs set|get For the delegated permission list, run: zfs allow|unallow root@Kedge2:~#
-
May I ask where I do that is it in Terminal ?
-
Hi I wonder if anyone can please help me. I upgraded to 6.12.0. I would like to format my Array disks to ZFS. I put Disk 2 of my Array from XFS to ZFS clicked format and it comes up Unmountable: unsupported or no file system. It works perfect if I put it into a Pool of 1 disk. Just will not work on the array I have tried a few different hard drives. kedge2-diagnostics-20230619-1104.zip
-
Brilliant thank you so much fixed it perfect
-
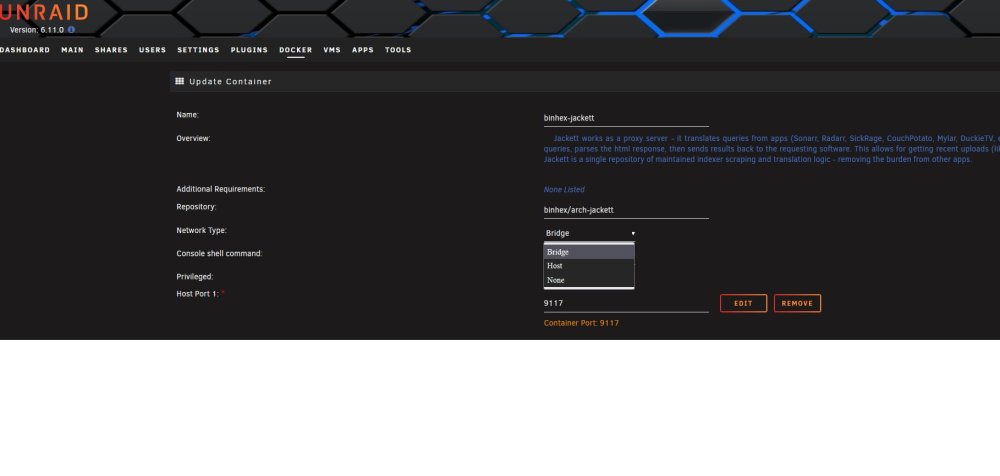
Hi my Backup Unraid Server seems to have a problem. I run it nightly to backup from my Main Server so I rarley actually turn it on. Today I turned it on and found in Docker the Network Type: Custom is missing I have Bridge Host None but no Custom. How do I get that back please ? as I need to give my Docker Containers Static IP addresses. It used to work pefectly. Please see Pic attached and I attached DIagnostics to. Any help would be great I love Unraid used it for many years. backup-diagnostics-20221004-2139.zip
-
Thank you rilles worked perfect
-
Thank you for that Will give it a go if I cant get Letsencrypt working. Spent most of the day getting that very close just keep getting error 521 from cloudflare. Tomorrows another day will have a look when more awake.
-
rilles could you please post your Caddyfile as I am not 100% sure where to put the "tls caddy-selfsigned.key caddy-selfsigned.crt" part. I have the Certs created and in my /mnt/cache/appdata/caddy. Also how did you manage to save the Caddyfile using vi ? When I amended the Caddyfile with vi I could not work out how to save it lol. Pressing Esc did nothing then any combination of the Alt Key seemed to do nothing much as well.
-
Will do wont have chance to try it for a couple of days as I will be working. I do use pfsense to that would be handy. But to be honest not to fused as long as I can open a port for a few hours even a day would be fine. Then close it for the majority of the time.
-
Thanks for the reply. If thats the case and I only need to open the port every 90 days that would be ideal. Guess I can try it either it works it it wont lol.
-
First off thank you SpaceInvaderOne for the amazing videos helped me no end of times. I want to run a Bitwarden internally on Unraid which is fine i can do that no problem. But I also want to use Brave as its based on Chrome. Out of the box it will not work for a home server of Bitwarden. Due to something about how Chrome handles HTTPS. I installed Bitwarden on Unraid works great with Firefox but as I say I use Brave. It will work if I use a Reverse Proxy such as LetsEncrypt in your great video. Thing is I do not want to open any ports on my router I do not need outside access to Bitwarden. I would all be handled internally on the LAN. But I do need to have it working under HTTPS. As far as I can tell I can only use LetsEncrypt if it opens port 443 on my router or have I misunderstood that. Can I can I follow your video for the reverse proxy and leave 443 closed and still have HTTPS on the LAN ? Thanks for any help.

