


diarnu
Members
-
Joined
-
Last visited
Everything posted by diarnu
-
cool, thanks! I figure there is some command to run or something along those lines, but can't find anything myself. the minio website/forums seem very heavily geared towards enterprise users (understandable, but makes it tough to find stuff for us lowly unraid users).
-
okay, decided to try the latest then work my way back thru the tags. latest would not work, nor would the release from a day ago (minio/minio:RELEASE.2021-12-18T04-42-33Z), but the release from 10 days ago (minio/minio:RELEASE.2021-12-10T23-03-39Z) works fine. I skipped most of the hot fixes, and .fips versions (whatever those are).
-
Hey CM. Saw an update to the minio docker earlier today and hit the button to apply the update. Logged into the minio docker a short while later to check some settings and found that all the buckets were missing, add bucket button greyed out, no users, etc. The log file had a warning that the version of minio was 2 days old and advised running the command 'mc admin update'. Attempted to run that command in the console but just got an error that the command mc was not found. Dropped to an older version of the container (minio/minio:RELEASE.2021-11-24T23-19-33Z, I just kinda picked an older version at random) and everything is back to normal. Is there something that needs to be done w/ the latest version of the minio docker to get it to function properly? Or maybe just a problematic update? Thanks again for all your hard work.
-
Holy flipping snots. I was working on merging 2 separate instances of minio (1 each for 2 different users) into a single instance with per-user access to the buckets within, and noticed that the config mapping for the container was set to /mnt/user/appdata instead of /mnt/cache/appdata that I normally use. Fixed that and the constant array reads have gone away. Sheesh. All this time spent troubleshooting, and it was a silly oversight. Ah well, c'est la vie...
-
Okie dokie. Got my minio containers working again. Also got a netdata container up and running. Looking at the data displayed by the netdata container shows almost zero reads coming from the minio container. Digging in a bit deeper, it looks like the continuous reads are coming from cron. But start/stop of the minio containers definitely coincides with start/stop of the continuous array reads from cron. I dunno, maybe this is just how unraid works and I just haven't noticed until now. I think I will leave the minio container running for a while and see if the reads settle down and stop. If they do not, maybe I will ask more questions in a different section of the forums. Thanks for the help!
-
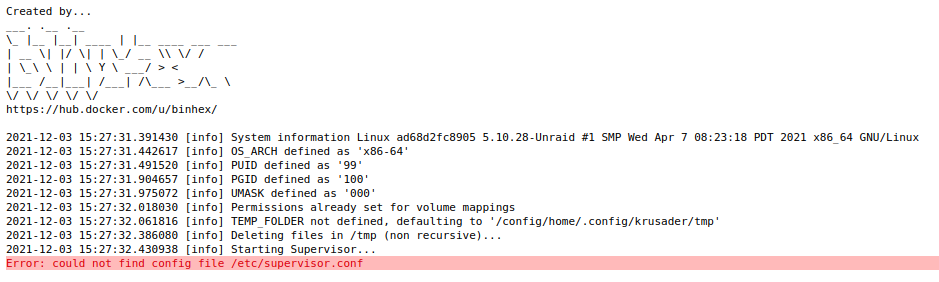
Hey guys. Ran into some trouble with the krusader docker. Had it running just fine a few weeks ago, but now it doesn't start up properly. When the krusader docker is started, the docker tab in the unraid GUI shows the docker as running. But attempting to connect to the webUI gives an unable to connect error, and trying to get into the docker console throws up an error response from the docker daemon that the container is not running. At this point, refreshing the docker tab in the unraid GUI will show the container as stopped. The log for the container shows an error that the /etc/supervisor.conf file could not be found: I have tried removing and rebuilding the container a few times with no luck. No recent changes to the krusader docker, but the docker settings recently changed from btrfs image to docker folder to try to limit cache write amplification. Also, some code was added to the /boot/config/go file per the comment from @mgutt in this thread, also to try to limit cache write amplification. I reverted the changes to the /boot/cofig/go file with no change in behavior. I could move docker back to an image file, but its kind of a pain and not sure that will help. Any ideas what is going on? I can use the terminal to move files around, or a double commander docker from the linuxserver folks for now, but really prefer the binhex krusader docker for the interface and the password feature. Thanks!
-
I am sure its minio. I ended up reinstalling all of my docker containers in the last few days trying to chase down high reads on the array and high writes on the cache. The high cache writes are due to docker/btrfs write amplification in unraid. Reformatting my cache and applying a few other tweaks got the cache writes under control. But the continuous reading from the array persisted. During the container rebuilds I noticed that the continuous array reads start and stop along w/ my 2 minio containers. I took a look at the logs for the minio containers but did not notice any errors/warnings. I did notice something about scanning in there. Seems like scanning could cause constant reads. I looked in the minio settings and found the scanning section, but could not figure out how to disable it... And now for whatever reason the containers will no longer start up at all. I had been keeping them off until the continuous array reads get figured out and dealt with. Each attempt to start the container now only puts this line into the logs: standard_init_linux.go:219: exec user process caused: no such file or directory Once I can get the minio containers started up again, I will try the netdata container and see what it tells me...
-
Just updated the plugin - looks great!
-
Hey CM. Thanks for the great work. I have been using your minio docker for ages, since back in the days when the icon was just the default white question mark in a grey circle. But lately I have noticed that the minio docker is constantly reading from the array. The reads for the disk housing my minio data went up by about 2000 in just 2 minutes of the docker being up and running. Not sure why this is happening, but seems weird. I tried re-building the docker by importing my settings into the latest template, but the behavior did not change. Any ideas? Anyone else seeing this?
-
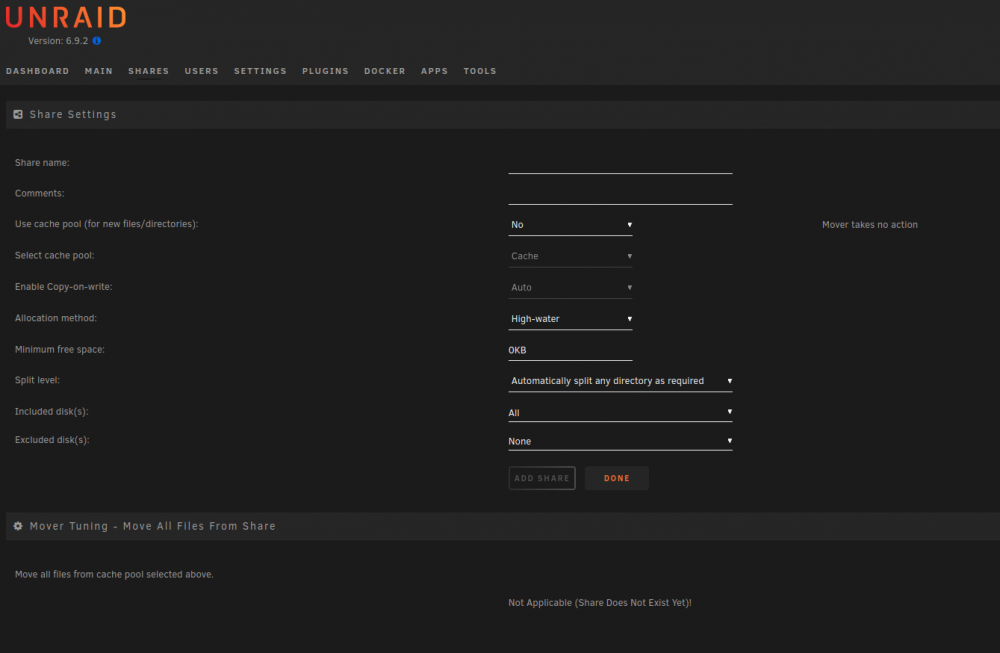
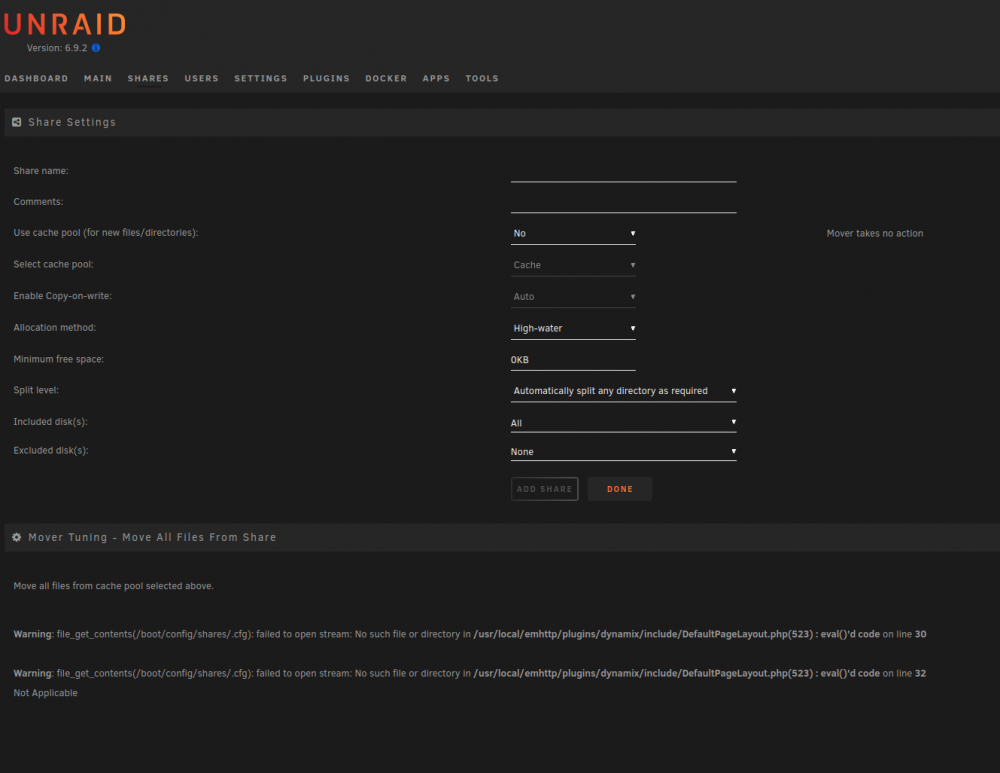
Agreed, great feature. Just happened to be adding a new share today, and noticed that the new feature causes some warning messages on the add share page b/c the new share being created does not exist yet (lol):
-
Even in that crazy long post, I forgot to add something. After first installing the plugin, there were more options listed in the dropdown boxes for CPU temp and MB temp on the settings page. Temps from coretemp and i5500_temp modules in addition to the temps and fan speeds from the w83795adg module. But for some reason those only showed up the first time I ran thru the setup. I'm not really interested in using the temps from those modules, so its not a big deal to loose them, but its weird that they showed up initially and then sort of permanently went away. So I thought it might help to share that info too.
-
Hey guys. I too built my unraid server around a SuperMicro motherboard. In my case, the X8ST3. And I too, had the strange issue with sensors suddenly disappearing from the settings page for this plugin. Installation went fine, sensor detection went fine, loading the modules went fine. I could select sensors for CPU temp, MB temp, and array fans too. But upon clicking the APPLY button, the sensor selections all became "Not used" and the data was no longer displayed along the bottom of the browser window or on the dashboard. Weird. Removing and re-installing the plugin did not change things. Rebooting did not change things. After poking around a bit, I found a conf file edit that will make things work. The first clue was trying to run the sensors command from the unraid terminal, after the sensors all became "Not used" on the settings page for the plugin. That produced the following output: Error: File /etc/sensors.d/sensors.conf, line 2: Undeclared bus id referenced Error: File /etc/sensors.d/sensors.conf, line 4: Undeclared bus id referenced Error: File /etc/sensors.d/sensors.conf, line 6: Undeclared bus id referenced Error: File /etc/sensors.d/sensors.conf, line 8: Undeclared bus id referenced Error: File /etc/sensors.d/sensors.conf, line 10: Undeclared bus id referenced Error: File /etc/sensors.d/sensors.conf, line 12: Undeclared bus id referenced Error: File /etc/sensors.d/sensors.conf, line 14: Undeclared bus id referenced sensors_init: Can't parse bus name Some of you have seen this output too. Okay, so sensors_init seems to be choking on the /etc/sensors.d/sensors.conf file. That file looked like this on my system: # sensors chip "w83795adg-i2c-0-2e" ignore "fan4" chip "w83795adg-i2c-0-2e" label "temp1" "CPU Temp" chip "w83795adg-i2c-0-2e" label "temp6" "MB Temp" chip "w83795adg-i2c-0-2e" label "fan1" "Array Fan" chip "w83795adg-i2c-0-2e" label "fan2" "Array Fan" chip "w83795adg-i2c-0-2e" label "fan3" "Array Fan" chip "w83795adg-i2c-0-2e" label "fan5" "Array Fan" Hmm, nothing seems amiss here. Checking the man page for sensors.conf online, the file seems to be formatted correctly. So what's the fuss Gus? The error is being thrown on all of the even lines, which are all the same chip declaration. I started tinkering w/ that and found that replacing "w83795adg-i2c-0-2e" with "w83795adg-*" would make the sensors command spit out data again. Going a bit further, I replaced different parts of the chip declaration with a wildcard (*) and found that just replacing the 0 (zero) in the chip declaration made things work. The chip declaration w/ the zero in it is correct, so its odd that sensors is choking on it, but that seems to be the problem. At any rate, the edited file that worked looked like this on my system: # sensors chip "w83795adg-i2c-*-2e" ignore "fan4" chip "w83795adg-i2c-*-2e" label "temp1" "CPU Temp" chip "w83795adg-i2c-*-2e" label "temp6" "MB Temp" chip "w83795adg-i2c-*-2e" label "fan1" "Array Fan" chip "w83795adg-i2c-*-2e" label "fan2" "Array Fan" chip "w83795adg-i2c-*-2e" label "fan3" "Array Fan" chip "w83795adg-i2c-*-2e" label "fan5" "Array Fan" So if you are having a similar issue, try editing the sensors.conf file to replace the zeros in the chip declaration lines w/ wildcards (*). You can use an editor like nano in the unraid terminal, or use the nice conf editor plugin. To make the edit persist thru reboots and shutdowns, edit the file /boot/config/plugins/dynamix.system.temp/sensors.conf instead of the /etc/sensors.d/sensors.conf file with the same 0 --> * swaps. Hopefully this helps some folks get their temps and fan speeds displayed again. And hopefully this helps the developers find a fix. Although, for what its worth, it seems to me that the plugin is not doing anything wrong, but the problem is w/ sensors or sensors_init choking on zeros.
-
Hey guys. More recent thread on this topic here. The short version is that Bob1215 had it mostly right. You may or may not need to install syslinux per steps 6 and 7 in Bob1215's instructions, and things work better if the USB is unmounted (NOT ejected) between steps 8 and 9. Or you can just run the script twice back to back as mentioned in step 10. Also, itipmi edited the manaul method instructions in the getting started section of the wiki with slimmed down version of those steps. A few folks above mention getting the script to work by renaming the script with .sh at the end. I tried that and it didn't change things at all. I suspect that what made the script work was not really renaming it, but running it twice, once before renaming it and then again after the rename. Hope that helps.
-
Just to add to the discussion: I was tinkering with this yesterday as well, and ran into issues. After finding this thread, I tried the sequence of steps that jonathanm posted above and itimpi added to the wiki, and those worked fine. 2 notes: I found that if I forget to unmount the USB, then just running the script a 2nd time also did the trick. Seems like the 1st attempt unmounts the drive but then fails, and the 2nd attempt succeeds on the unmounted drive. I got the same results whether running the script as "sudo bash ./make_bootable_linux" or leaving bash out and running "sudo ./make_bootable_linux". That may not be the case for other distros, not sure. But before I found this thread, I stumbled upon a different solution: editing the script slightly. For me the key was in the error that I repeatedly got when running the script: sudo: /tmp/UNRAID/syslinux/make_bootable_linux.sh: command not found JHM got this error at least once, and there are other posts that mention this error. The error seems to be indicating that the script is failing because sudo sees the path /tmp/UNRAID/syslinux/make_bootable_linux.sh without a command, and doesn't know what to do with it. Or at least I think that is what is happening. To fix it, I found the line below, towards then end of the script: sudo /tmp/UNRAID/syslinux/make_bootable_linux.sh $TARGET and added bash before sudo, to make it look like this: sudo bash /tmp/UNRAID/syslinux/make_bootable_linux.sh $TARGET The edited script will now complete without unmounting the USB. When running from the PC either "sudo bash ./make_bootable_linux" or "sudo ./make_bootable_linux" can be used. The script will also now run when launched from the USB itself, but only when using "sudo bash ./make_bootable_linux". Of course, inserting bash into that line in the script assumes that the shell being used is bash, but that is a pretty fair assumption these days. Maybe there is a way to call the shell in the script without specifying bash, but I don't know how to do that. Anywho, hope that helps.
-
Hey jowi. The nest app on "normal" wifi would not be able to communicate with the thermostat on another subnet by default. You could add firewall rules to allow the 2 clients to talk across subnets if you wanted that. But by default, pfsense does not allow traffic between different subnets. For what its worth, I recently went down a path similar to the one you seem to be headed towards. I wanted different subnets for IoT stuff, and for guests when they visit, and maybe for game consoles and set-top boxes to bypass my VPN, etc. It started to get kinda crazy with all the different NIC ports and wifi access points required. Also, using different wifi access points for different subnets would probably be messy, with the APs conflicting with each other if on the same band/channel. But keeping the APs on different bands/channels seemed like a pain... The solution I found was to use VLANs for different subnets, and an ubiquiti unifi switch + ubiquiti unifi AP for wifi. Using VLANs means less physical ports required for the NIC that pfsense uses. On the wifi side, the unifi AP can handle different wifi SSIDs for each VLAN, all in a single AP. For the switch, any old VLAN capable switch could work, but once committed to the unifi AP it made sense to use the unifi switch. In addition, both the unifi switch and unifi AP can be managed from a unifi controller, and that can be run as a docker on unraid. Hope that helps.
-
@Living Legend I stand corrected. Looks very interesting!
-
Hey jowi. So from your diagram, it looks to me like the goal was to keep WIFI and LAN clients separate. If that is not the case, the simplest solution to get the WIFI and LAN clients to talk to each other is probably to move the AP to the switch. This has the added benefit of only needing NAT and firewall rules to route clients thru the VPN on 1 interface (LAN) rather than 2 (LAN + WIFI). You could keep the AP on a separate interface and use firewall rules to pass traffic between the subnets, but that seems way harder than just moving the AP to the switch. My way of thinking about it: the biggest reason to have different clients on different subnets in a small setup is for them to NOT communicate. For example, I have different HOME, GUEST, etc. subnets (via VLANs, not different hardware interfaces, but functionally about the same). Clients connected to the GUEST wifi cannot see my server on the HOME subnet. And I like it that way Hope that helps. P.S. based on your earlier posts, I'm not sure how the iPad on the WIFI subnet ever saw the server on the LAN subnet ...
-
@Living Legend: Hey, I was looking at my server this afternoon and realized I was a bit off in my last post. For my 4 port NIC, each port is actually in its own IOMMU group. So that isn't the issue. However, the method of passing the PCI device to the VM relies on the PCI ID, which is of course the same for all 4 ports of the NIC, since they are all on the same PCI device. So my details were a bit off, but end result is the same: you had it correct, its an all or nothing situation with a multiport PCI NIC.
-
I am a bit confused about how pfsense, the binhex delugevpn docker, and PIA port forwarding all work together. The introductory pfsense video discusses a few PIA VPN connections configured in pfsense, 1 of which (Germany, which was a port-forward enabled PIA server at the time the video was made) is used for downloads and such. However, the slightly older delugevpn docker setup video discusses using the VPN connection built into that docker. So, if all of the VPN connections are made in pfsense, how does the deluge docker know which port is forwarded from the PIA server? Does that all happen automatically? The PIA port forwarding documentation mentions using either the PIA desktop client or an API and scripts to request a forwarded port from the PIA server. But I'm not sure how that would work in pfsense? I know how pfsense could be configured to pass the delugevpn docker straight thru to WAN, and just use the built in VPN connection in that docker, but I would prefer for pfsense to handle all the VPN connections, if possible. Just not sure how the port forwarding fits in.
-
@Living Legend: I think you have it correct. I have a similar setup in my unraid server. I pass the entire 4 port NIC to my pfsense VM. I don't think the 4 ports can be split up very cleanly between VMs and unraid, as all 4 ports are in the same IOMMU group. I suppose you could try to break that IOMMU group up (as spaceinvader1 mentions in video 3, I think) but that may or may not work. In my case, my server has another ethernet port on the motherboard, so I use that for unraid.


