






Januszmirek
Members
-
Joined
-
Last visited
Everything posted by Januszmirek
-
Had exact same issue with my config. Tried to troubleshoot it for hours with no luck. Finally switched to binhex container and it works flawlessly.
-
I am experiencing similar issue with speeds. having said that I am not syncing my local Mac to cache drive on Unraid, but rather to a share set up on one of array discs (hdd). My initial syncing speeds are atrocious (20-100kbps) increasing to 25-100(occasionally) Mbps. Obviously my Mac machine and Unraid are on same 1gbit network. I am using latest 1.22 and 1.23 versions of app on mac and unraid. Both machines show TCP LAN connection type. Where do I start troubleshooting the issue?
-
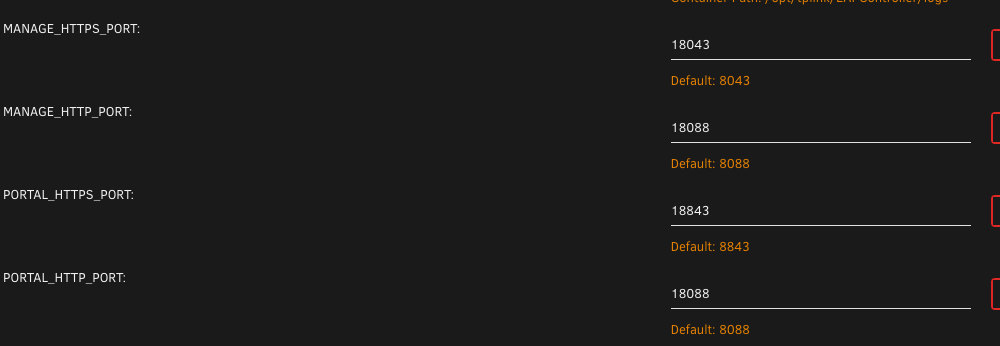
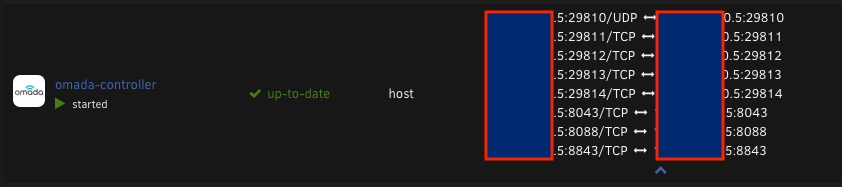
I also have a problem with setting up this container. The problem in my case appears to be with ports not paths. For the world I am unable to change the port settings. Even though the ports in Edit appear to be set properly and don't interfere with other container ports: After saving the config, the container sets the ports on its own regardless of the settings I made: I cant use above ports for omada (8043, 8088, 8043) as I use it for a different container and don't want to mess things up with that other container. This is the first instance I see such behaviour with the container, where editing the ports does not have any effect on actual changes to container. Usually the workaround I used was to change network type from host to bridge, but in bridge mode omada webui mode is not available;( I also tried to delete the default ports in the container which use Variable config type, and set it as Ports (instead of Variable) - still no joy;( Any ideas on how to force the port change? Btw, when I turn off the other container, omada works great, so its not the paths config issue, but ports in my case.
-
You're a star! It worked. I can see my 'c:\' drive on VM2 and the capturing process is now working fine. Thank you once and again!
-
100% correct. Exactly;) See below;) <?xml version='1.0' encoding='UTF-8'?> <domain type='kvm'> <name>Windows 10test1</name> <uuid>c8ab1df9-8dc9-f570-3afc-d40f7e956e84</uuid> <metadata> <vmtemplate xmlns="unraid" name="Windows 10" icon="Windows_10b.png" os="windows10"/> </metadata> <memory unit='KiB'>4194304</memory> <currentMemory unit='KiB'>4194304</currentMemory> <memoryBacking> <nosharepages/> </memoryBacking> <vcpu placement='static'>4</vcpu> <cputune> <vcpupin vcpu='0' cpuset='4'/> <vcpupin vcpu='1' cpuset='10'/> <vcpupin vcpu='2' cpuset='5'/> <vcpupin vcpu='3' cpuset='11'/> </cputune> <os> <type arch='x86_64' machine='pc-i440fx-5.1'>hvm</type> <loader readonly='yes' type='pflash'>/usr/share/qemu/ovmf-x64/OVMF_CODE-pure-efi.fd</loader> <nvram>/etc/libvirt/qemu/nvram/c8ab1df9-8dc9-f570-3afc-d40f7e956e84_VARS-pure-efi.fd</nvram> </os> <features> <acpi/> <apic/> <hyperv> <relaxed state='on'/> <vapic state='on'/> <spinlocks state='on' retries='8191'/> <vendor_id state='on' value='none'/> </hyperv> </features> <cpu mode='host-passthrough' check='none' migratable='on'> <topology sockets='1' dies='1' cores='2' threads='2'/> <cache mode='passthrough'/> </cpu> <clock offset='localtime'> <timer name='hypervclock' present='yes'/> <timer name='hpet' present='no'/> </clock> <on_poweroff>destroy</on_poweroff> <on_reboot>restart</on_reboot> <on_crash>restart</on_crash> <devices> <emulator>/usr/local/sbin/qemu</emulator> <disk type='file' device='disk'> <driver name='qemu' type='raw' cache='writeback'/> <source file='/mnt/user/Dane/Windows/imagetest/Windows 10test1/vdisk1.img'/> <target dev='hdc' bus='virtio'/> <boot order='2'/> <address type='pci' domain='0x0000' bus='0x00' slot='0x04' function='0x0'/> </disk> <disk type='file' device='cdrom'> <driver name='qemu' type='raw'/> <source file='/mnt/user/isos/virtio-win-0.1.190-1.iso'/> <target dev='hdb' bus='ide'/> <readonly/> <address type='drive' controller='0' bus='0' target='0' unit='1'/> </disk> <controller type='pci' index='0' model='pci-root'/> <controller type='ide' index='0'> <address type='pci' domain='0x0000' bus='0x00' slot='0x01' function='0x1'/> </controller> <controller type='virtio-serial' index='0'> <address type='pci' domain='0x0000' bus='0x00' slot='0x05' function='0x0'/> </controller> <controller type='usb' index='0' model='ich9-ehci1'> <address type='pci' domain='0x0000' bus='0x00' slot='0x07' function='0x7'/> </controller> <controller type='usb' index='0' model='ich9-uhci1'> <master startport='0'/> <address type='pci' domain='0x0000' bus='0x00' slot='0x07' function='0x0' multifunction='on'/> </controller> <controller type='usb' index='0' model='ich9-uhci2'> <master startport='2'/> <address type='pci' domain='0x0000' bus='0x00' slot='0x07' function='0x1'/> </controller> <controller type='usb' index='0' model='ich9-uhci3'> <master startport='4'/> <address type='pci' domain='0x0000' bus='0x00' slot='0x07' function='0x2'/> </controller> <interface type='bridge'> <mac address='52:54:00:d9:d5:39'/> <source bridge='br0'/> <model type='e1000-82545em'/> <boot order='1'/> <address type='pci' domain='0x0000' bus='0x00' slot='0x03' function='0x0'/> </interface> <serial type='pty'> <target type='isa-serial' port='0'> <model name='isa-serial'/> </target> </serial> <console type='pty'> <target type='serial' port='0'/> </console> <channel type='unix'> <target type='virtio' name='org.qemu.guest_agent.0'/> <address type='virtio-serial' controller='0' bus='0' port='1'/> </channel> <input type='tablet' bus='usb'> <address type='usb' bus='0' port='1'/> </input> <input type='mouse' bus='ps2'/> <input type='keyboard' bus='ps2'/> <graphics type='vnc' port='-1' autoport='yes' websocket='-1' listen='0.0.0.0' keymap='en-us'> <listen type='address' address='0.0.0.0'/> </graphics> <video> <model type='qxl' ram='65536' vram='65536' vgamem='16384' heads='1' primary='yes'/> <address type='pci' domain='0x0000' bus='0x00' slot='0x02' function='0x0'/> </video> <memballoon model='virtio'> <address type='pci' domain='0x0000' bus='0x00' slot='0x06' function='0x0'/> </memballoon> </devices> </domain>
-
So I don't want to use bare metal as for my needs it is not preferable and have it own issues, that are beside the point. I would want to use VM1 (Server with Windows server 2019 with WDS) and a VM2 (Client with Windows 10). Both of these are currently set up on my unraid as separate VMs. When I set up VM2, I edited the xml to define certain boot order. In my case it is 1. network boot (booting into PXE on VM1), and 2. booting into .img file with VM2. The problem is that when you boot into 1. (PXE), you don't have access to virtual disk of VM2 (.img). And therefore you can't capture that image. To put it into perspective and give you an example: when you use bootable USB drive with say linux distro on your laptop, you still have access not only to files on your USB stick but most importantly to your ssd disk in your laptop and you can install the OS onto the disk. Here I have an issue where I boot from USB but have access to USB only but not to ssd disk. Does that make more sense now? I am afraid this is actually Windows question not linux/unraid related, as once you boot into pxe you are effectively inside WDS environment. I am looking for a command that I could somehow mount/append that virtual disk of VM2 (.img file). Quite frankly I don't even know if this is even possible.
-
Genius, worked like a charm. Thanks!;) Ok, I won't be starting a new topic as I hope you guys can help me out with this one too. So as a part of messing around with WDS I am at the point where I finished setting up a 'windows10' (set up as a VM on unraid) and now I need to capture it into a single .wim file (using dism command) that is then used to create golden Windows 10 image than you can install on number of machines over PXE. You can usually do this using WindowsPE tool or by booting into PXE on WDS server. With bare metal machines this works like a charm. Because when I use a bare metal machine and boot to PXE I still have access to my "C:\" drive on that machine to be able to capture it into an image (.wim file). The issue I an encountering is the way VMs work on Unraid: I was able to edit the windows10 VM .xml to include booting into either PXE (Thanks @ghost82) or into WindowsPE.iso. This works just fine. However the problem is that at this point the actual virtual disk (.img file) with my windows10 is not mounted yet. And therefore I can not capture it;(. So the question is: how do I mount that .img file created in unraid so that PXE or WinPE can have access to it, so I can capture it with dism command? Hope that is roughly clear but if I did not give enough details, just let me know and I will. Thanks again;)
-
Genius, worked like a charm. Thanks!;)
-
So im trying to play with WDS setup. I have successfully set up a WDS server in a VM (lets call it Server1), which can be reached and works no problem on bare metal machines in the same network. Where im stuck is I try to set up another Windows VM which could reach Server1 and install OS from it. Based on the above advice, i have added the below code into the xml file. <interface type='bridge'> <mac address='52:54:00:d9:d5:39'/> <source bridge='br0'/> <model type='virtio'/> <boot order='1'/> </interface> The PXE is is picking up the Server1, and the install process starts.... and then it stops with the following error: "WDSclient: an error occured while trying to obtain an IP address from the DHCP server. Please check to ensure that there is an operational DHCP server on this network segment". Read on interwebs this might be a driver issue. If someone has encountered the same problem and care to share a solution, you're most welcomed. Thanks.
-
Finally got it working;) thank you very much. Just for anyone who stumbles upon this thread, in my case the container needed to be set to Host rather than default Bridge mode. I was no able to make it work in Bridge mode. qbit from other repos worked just fine in bridge, but not linuxserv. Not sure why.
-
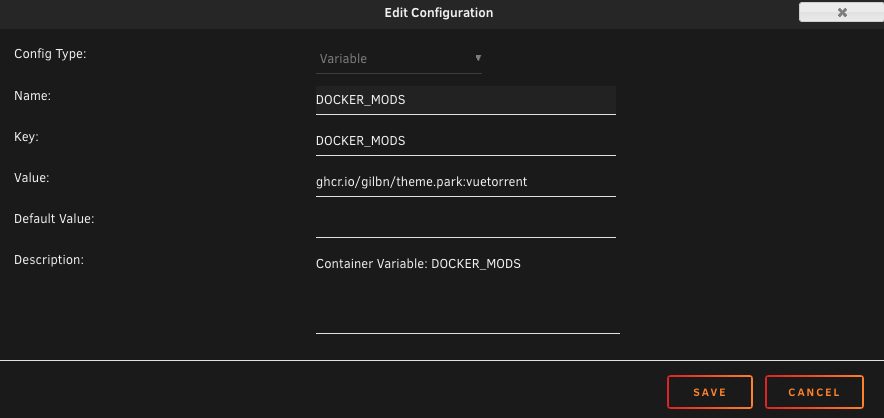
Do you mean environment variable like that?
-
If you don't mind sharing, how did you manage to get vuetorrent to work with linuxserv qbit? I got to the point where I get white screen and vt icon in browser tab but the page is blank;( I don use standard port 8080 for webui, maybe that's why im stuck
-
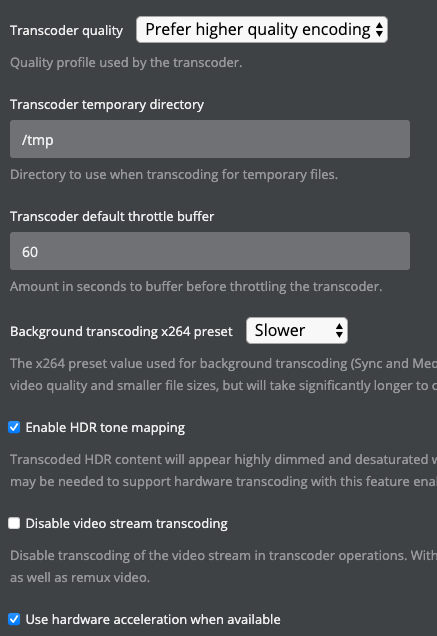
Got it, thank you for pointing me in the right direction. My plex mapping for tmp pasted below: I followed this post when set up transcoding location, maybe ive messed up sth;)

-
I don't understand what make out of it and where to start. Forget about the vm for a minute. I barely use vms. the issue described in original post happen regardless vm use. Yes, if I stop Plex, no memory issues accur.
-
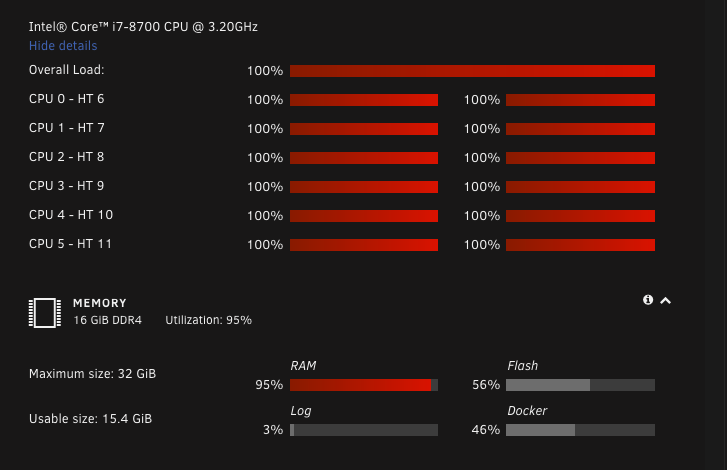
Diagnostics attached. It is hw transcode through internal igpu. It never maxes out cpu without maxing out ram first though, so i thought it is ram not cpu issue. tower-diagnostics-20211231-1536.zip
-
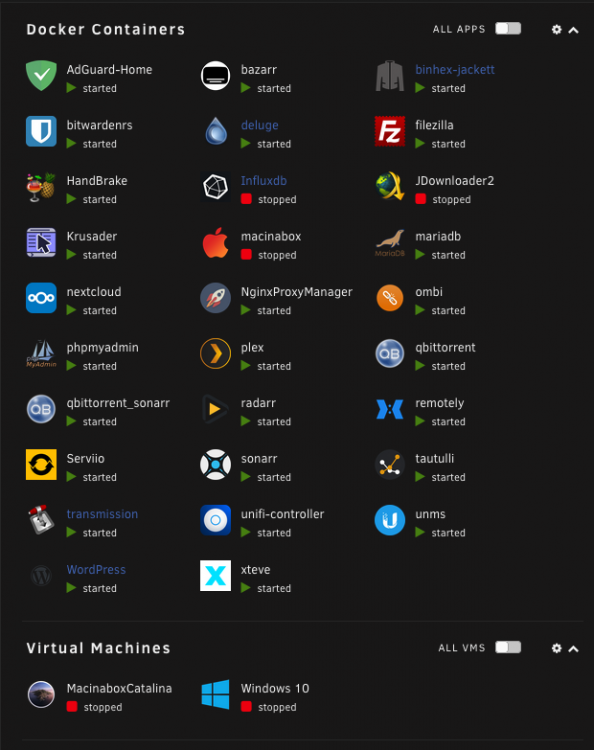
Not sure I picked the right section of the forum for this, if not please move it to the correct one. So I run a rather standard set of docker containers and 2 vms that i very rarely turn on. The issue I have is that even with 16g of ram which I thought would be plenty for my use, I do experience very high memory and cpu cores use and subsequently unraid and all containers not responding. This usually happens with Plex when multiple streams (3-4) are being played with transcoding. I do realize that linux is using all the available Ram and this is fine, I dont need to see free ram;) The issue is that with all these containers runnning, and Plex streaming 3-4 streams my ram is touching 70-80%. If I turn on any vm, the system practically freezes with RAM utilization around 100% and same for all CPU cores. Now, I dont have any issue with upgrading my 16gb to 32gb. But I wonder if this would actually make any difference since Linux would use all available ram anyway, and even with ram upgrade I can get back to square one;(. As far as plex transcoding set up, i guess its also pretty standard - transcode to ram with 60seconds buffer. I would like to keep transcode to ram to save up on disks wear. Turning off transcode is not an option as many clients do not support all formats natively and hence need for transcode. I observed that when I stop the array and start it again the 'idle' ram usage drops to 30% and stays around 50% for a couple of days, then gradually builds up to reach around 70-80% after a week or so when I start to experience issues described above. I also don't get why ram fill up immediately kills cpu utilization which in turn practically freezes the whole unraid server;( Well, not freezes but makes it barely responsive. Ultimately my questions are: 1. Would an upgrade to 32gb from 16gb make a meaningful difference in my case or its a waste of money as its rather configuration issue, not hardware? 2. If not, what easy solutions I can utilise to manage ram more efficiently? Maybe a cron job to release ram every now and then? Or maybe there's a plugin that can handle this job? Thank for help.
-
Thanks! All updated now and works as it should;)
-
Wow;) that did the trick with the permissions Thanks! I don't get what you mean by an old template, though. I use ich777 repository and it is on its latest update. What else can I update to a new 'template'?
-
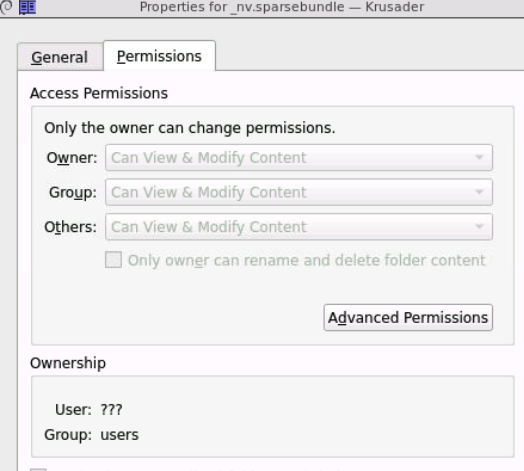
OK, so a bit more context then, I believe this all goes down to permissions. So the folders with subfolders and files that are created by me in krusader can be easily removed. The folders I have issues with are the ones created by other docker containers, for example CA backup plugin, or created on a windows vm and copied across a network share. Some folders permissions tab is greyed out like in the attached screen. But other folders have User: krusader, but are still non-removable with Delete button. I think a setting that would give krusader root access might be the solution but I don't know how to set it up.
-
Potentially a noob query about krusader so bear with me;) Some folders (with files and subfolders inside) when I try to delete them, do not respond to Delete/F8 command, literally nothing happens when I press Delete button. If I however invoke terminal window in Krusader and rm -r the same folder it is deleted immediately every single time. I used to remember Delete button worked with no problems. I did get the warning message that the folder contains files/subfolders inside but confirming these made the folders deleted. Anyone knows what settings should be changed to bring back the functionality to Delete button? Thanks.
-
Good to hear that the back-up process works for you. Just out of curiosity, did you actually try to recover that back-up into freshly new bw install, to make sure the back-up can be restored including all user accounts, and their data?
-
Hello, I am interested in bitwarden backup as well. Does this scrtipt actually back up everything? Included atachements? Did you try to recover your backup? Did it work?
-
Stupic macOS, that worked like a charm! Thanks a bunch;)
-
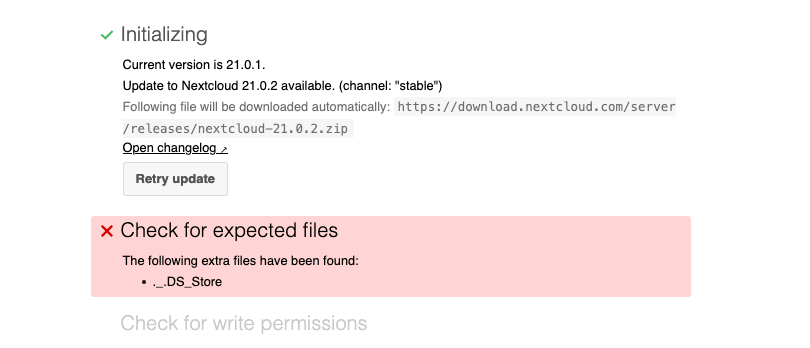
Tried to update to the latest version and below appeared. Anyone can help me fix this? Thanks.
-
I think I have exact same issue with combo of nextcloud v21 and nginx proxy manager. Everything works like a breeze except that every file more than 1gb downloaded remotely stops after 1gb. Can someone please explain me like i'm 4-yr old which files in nextcloud and/or in NPM should I edit to get rid of this limitation once and for all. Many thanks in advance. EDIT: so basically I found the solution myself. No need to edit any files in nextcloud. In order to get rid of 1gb download limitation : 1. go to NPM Proxy Host tab. 2. Click '3 dots' and click 'Edit' in your nextcloud proxy host. 3. Go to advances tab and put the following: proxy_request_buffering off; proxy_buffering off; 4. Click Save That's it. Enjoy no more stupid limitations on the file size downloaded. Tested 13gb file from remote location and it worked like a charm. Hopefully someone finds it useful for their setup.




