


rob_robot
Members
-
Joined
-
Last visited
Everything posted by rob_robot
-
It's not fully clear how re-enabling the bridge using macvlan will solve the problem having 2 same IP with different MAC addresses. In both cases I would need to have "Host access to custom networks: enabled" if I wanted to have docker containers with static IP talking to other docker containers on the bridge. I.e. this would be required if a docker with a static IP as a front end needs to talk to a database on the bridge. In case of bridge mode enabled in network settings, a second interface "shim-br0" is being created, i.e. "route" reports... Destination Gateway Genmask Flags Metric Ref Use Iface 172.17.0.0 0.0.0.0 255.255.0.0 U 0 0 0 docker0 192.168.178.0 0.0.0.0 255.255.255.0 U 0 0 0 shim-br0 192.168.178.0 0.0.0.0 255.255.255.0 U 1 0 0 br0 Before, with bridge mode disabled this was eth0 and vhost0: Destination Gateway Genmask Flags Metric Ref Use Iface 172.17.0.0 0.0.0.0 255.255.0.0 U 0 0 0 docker0 192.168.178.0 0.0.0.0 255.255.255.0 U 0 0 0 vhost0 192.168.178.0 0.0.0.0 255.255.255.0 U 1 0 0 eth0
-
In mongodb können die user in der admin oder der unifi db erzeugt werden. Bei mir waren sie in der unifi db erzeugt, daher konnte ich mit authsource=admin im unifi-network-application docker container nicht drauf zugreifen. Man sieht das im log file, unifi beschwert sich über einen authentication fail. Man kann in diesem Fall entweder auf authsource=unifi umstellen, oder den Nutzer in der admin db neu erzeugen. Evtl. hilft es jemanden, daher hier die Anleitung nachdem ihr in den mongodb docker ein terminal geöffnet habt: #mongo db Shell starten mongosh #admin db benutzen use admin #neuen Nutzer erzeugen db.createUser({ user: "unifi", pwd: "your_password", roles: [ { role: "dbOwner", db: "unifi" }, { role: "readWrite", db: "unifi" }, { role: "dbOwner", db: "unifi_stat" }, { role: "readWrite", db: "unifi_stat" } ] }) #optional, Nutzer in unifi db löschen use unifi db.dropUser("unifi") Nützliche checks: show dbs show users #Einloggen testen db.auth("username", "password")
-
When I apply the macvlan fix as described here https://docs.unraid.net/unraid-os/release-notes/6.12.4/, I get the problem that vhost0 and eth0 are both creating interfaces with the same IP address of the unraid server (192.168.14.15). My unify network is now complaining that there is an IP conflict with 2 clients being assigned to the same IP. While this is not creating functional problems, it throws warnings in the unifi log and prevents me from setting local DNS, so I would be interested if there is a fix for this? route Kernel IP routing table Destination Gateway Genmask Flags Metric Ref Use Iface default unifi.internal 0.0.0.0 UG 0 0 0 eth0 172.17.0.0 0.0.0.0 255.255.0.0 U 0 0 0 docker0 172.18.0.0 0.0.0.0 255.255.0.0 U 0 0 0 br-a4b11a9a27a1 192.168.14.0 0.0.0.0 255.255.255.0 U 0 0 0 vhost0 192.168.14.0 0.0.0.0 255.255.255.0 U 1 0 0 eth0 ifconfig vhost0: flags=4163<UP,BROADCAST,RUNNING,MULTICAST> mtu 1500 inet 192.168.14.15 netmask 255.255.255.0 broadcast 0.0.0.0 ether XX:XX:XX:XX:XX txqueuelen 500 (Ethernet) RX packets 42631 bytes 11758180 (11.2 MiB) RX errors 0 dropped 0 overruns 0 frame 0 TX packets 33271 bytes 66624456 (63.5 MiB) TX errors 0 dropped 0 overruns 0 carrier 0 collisions 0 docker0: flags=4163<UP,BROADCAST,RUNNING,MULTICAST> mtu 1500 inet 172.17.0.1 netmask 255.255.0.0 broadcast 172.17.255.255 ether XX:XX:XX:XX:XX txqueuelen 0 (Ethernet) RX packets 27070 bytes 57222523 (54.5 MiB) RX errors 0 dropped 0 overruns 0 frame 0 TX packets 28877 bytes 7967471 (7.5 MiB) TX errors 0 dropped 0 overruns 0 carrier 0 collisions 0 eth0: flags=4163<UP,BROADCAST,RUNNING,MULTICAST> mtu 1500 inet 192.168.14.15 netmask 255.255.255.0 broadcast 0.0.0.0 ether XX:XX:XX:XX:XX txqueuelen 1000 (Ethernet) RX packets 175318 bytes 186774948 (178.1 MiB) RX errors 0 dropped 40 overruns 0 frame 0 TX packets 66106 bytes 25680102 (24.4 MiB) TX errors 0 dropped 0 overruns 0 carrier 0 collisions 0
-
Below a variant of the shell script creating a lock file, so you can increase the frequency of the cron job (i.e. every 10min) while ensuring at the same time that there won't be overlapping cron jobs in parallel: The script is checking for stale lock files after a threshold of 18 hours. #!/bin/bash # Define a lock file to track the process lock_file="/mnt/user/appdata/photoprism/photoprism_index.lock" # Check if the lock file exists if [ -f "$lock_file" ]; then # Get the timestamp of the lock file lock_timestamp=$(date -r "$lock_file" +%s) current_timestamp=$(date +%s) max_duration=$((1080 * 60)) # Maximum duration in seconds (18 hours) # Calculate the time difference between now and the lock file creation duration=$((current_timestamp - lock_timestamp)) # Check if the process is still running (based on duration) if [ "$duration" -lt "$max_duration" ]; then echo "$(date '+%Y-%m-%d %H:%M:%S') Photoprism index is still running. Skipping." exit 0 else echo "$(date '+%Y-%m-%d %H:%M:%S') Stale lock file found. Proceeding." fi fi # Create the lock file to indicate the process has started touch "$lock_file" # Function to remove the lock file on script exit remove_lock_file() { rm -f "$lock_file" } trap remove_lock_file EXIT docker exec PhotoPrism photoprism index docker exec PhotoPrism photoprism index --cleanup
-
For this you would need to use the --cleanup option as cleanup and index are separate operations. i.e. #!/bin/bash docker exec PhotoPrism photoprism index docker exec PhotoPrism photoprism index --cleanup
-
This can be done using post arguments in the docker && docker exec -u 0 Nextcloud /bin/sh -c 'echo "umask 000" >> /etc/apache2/envvars && echo "memory_limit=2G" >> /usr/local/etc/php/conf.d/php.ini'
-
For me, it worked copying over the sshd_config from /etc/ssh/sshd_config to /boot/config/ssh/sshd_config then uncommenting and setting to "no" the below two entries (PasswordAuthentication and PermitEmptyPasswords) + adding the entry to disable ChallengeResponseAuthentication. # To disable tunneled clear text passwords, change to no here! PasswordAuthentication no PermitEmptyPasswords no ChallengeResponseAuthentication no Then a restart and I was no longer able to login with password. Please note that it is important to generate and test the key based login up front as otherwise, you will lose the capability to login via ssh. For remote client Mac users: You can create a config file in your /Users/<user_name>/.ssh folder like below to be able to use "ssh tower" to access ssh from your remote client Mac instead of typing the server address. Of course "tower" could be replaced with your shortcut / server name: 1.) Go to /Users/<user_name>/.ssh, then touch config nano config Then paste into this file: Host tower Hostname xxx.yyy.zzz user root IdentityFile ~/.ssh/ed25519 Notes: Replace host name with your IP address. The IdentityFile should point to the location of your private key. You can add multiple configs to the config file like, Host name1 Hostname aaa.bbb.ccc.ddd user uname1 IdentityFile ~/.ssh/file1 Host name2 Hostname aaa.bbb.ccc.eee user uname2 IdentityFile ~/.ssh/file2
-
If it is just about backing up Photos from the iPhone / iPad to the Server, then have a look at setting up a Nextcloud instance on your unraid server. While this is a bit of work (Nextcloud + postgres database + redis dockers, potentially elasticsearch too if you want search), it will give you some other benefits including also automated upload of your photos from your phone to the nextcloud instance via the nextcloud client app from the App Store. In addition to this you will also be able to sync data between all your devices and share across multiple users.
-
Thanks a lot for this great script. Found this page after restoring my USB flash drive that recently died and realising that the last backup happened to be 1.5 years old 🙄
-
The same happened to me when restoring a backup of the USB thumb drive on a Mac using the Unraid USB creator tool. To fix it, just go into /boot/config/pools on your USB drive and delete the ._cache file, then reboot.
-
For the above issue, for me it worked to go into the docker container and manually delete “nextcloud-init-sync.lock”, then restart the container. I found this here: https://help.nextcloud.com/t/upgrade-locking-nextcloud-init-sync-lock-another-process-is-initializing-ephemeral-vs-persistent-lock/139412
-
I didn't encounter this issue as far as I remember. Could it be some memory size issue? Is this the only error or are the additional error messages in the log file?
-
I also had the same heap size problem with elasticsearch. It can be solved by editing the docker, then switching to "Advanced view" and edit the EXTRA PARAMETERS line. Here an example to switch from 512MB to 4G of heap size: -e "ES_JAVA_OPTS"="-Xms4g -Xmx4g" --ulimit nofile=262144:262144 Actual heap size can be checked by opening up a console inside the docker and then running following command: curl -sS "localhost:9200/_cat/nodes?h=heap*&v" Heap.max should then show 4GB instead of 512 MB.
-
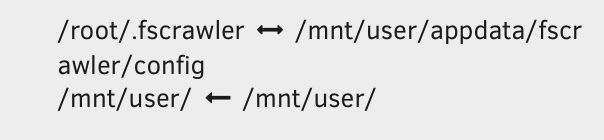
It is a bit like a chicken and egg problem. The file should get created after the first run, but after this time has passed I don't remember if I manually added the file or if I copied it from inside the docker (so not mapping the config file at all and then copying the file outside of the docker via docker command). One way would be to manually create the file: 1.) Go to /mnt/user/appdata/fscrawler/config/ and create the folder "job_name" (permissions 999, root / root) 2.) Inside the new job_name folder, create a file called _settings.yaml and paste the content from my initial post. Please make sure to change the IP. address at the bottom of the file (- url). Later on there will be as well a 2nd file called _status.json, but I don't think this is needed initially.

-
The app is great, but to get my paperless set-up working I would need a feature to specify a unique file name for the output file, i.e. something like: SCAN_YEAR_MONTH_DAY_TIME_ID.pdf The problem I have is that my scanner is not providing unique file name indices with i.e. an increasing index number, but instead will re-start counting up from 1 as soon as there are no more files in the folder. This means that once the files have been processed and deleted in the incoming scans folder, the scanner would restart indexing and provide the same file name as before i.e. SCN_0001.pdf, which then causes the output file to get overwritten. Also keeping the input files is not an option either, as the scanner has a limitation of index number 2000 (SCN_2000.pdf), which would limit the number of possible scans. Is there a way to make a small modification to the ocrmypdf-auto.py phyton script to give a unique file name to the output file?
-
It was an error in the config file. To check syntax I suggest running rsnapshot configtest inside the docker container, as stated on the GitHub page for rsnapshot https://github.com/rsnapshot/rsnapshot/blob/master/README.md#configuration
-
I have edited rsnapshot.conf and crontabs/root in the appdata directory as follows and then restarted the docker, but the cron does not seem to get started. I do not see any snapshots being created so far. Is there anything else that needs to be done? # do daily/weekly/monthly maintenance # min hour day month weekday command */15 * * * * run-parts /etc/periodic/15min 0 * * * * run-parts /etc/periodic/hourly 0 2 * * * run-parts /etc/periodic/daily 0 3 * * 6 run-parts /etc/periodic/weekly 0 5 1 * * run-parts /etc/periodic/monthly # rsnapshot examples 0 */2 * * * rsnapshot alpha 30 4 * * * rsnapshot beta 30 23 * * 0 rsnapshot gamma The configuration should trigger alpha backups every 2h, beta backups daily at 4:30am and gamma backups weekly on Sunday evening (23:30).
-
reserved
-
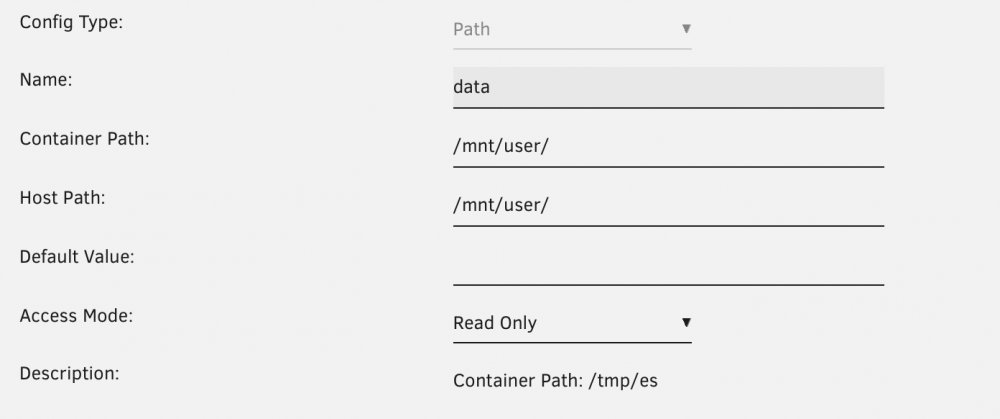
This guide is based on the Samba WIKI Spotlight with Elasticsearch backend: https://wiki.samba.org/index.php/Spotlight_with_Elasticsearch_Backend The goal of this project is to use the Mac finder to search SMB shares from Mac clients. The provided solutions gives us an index based full text search, something that I've been waiting for a long time. Recently added extensions in SAMBA finally made this possible. To begin with I want to say that I'm nether an UNRAID nor docker expert, so please forgive me if there are better ways to solve this, but my solution seems to be working for now: To realise this we need firstly the lastest beta of Unraid (6.9.0-beta25 at time of writing) as we need SAMBA 4.12 to use this feature. This revision of SAMBA is only shipped with unraid 4.12, therefore we need to install the beta first. We as well need an Elasticsearch docker container that will work as the search backend. Then an FSCrawler docker that will crawl the data on a regular basis and feed the results to Elasticsearch that will then create the index. Lastly, enable the SAMBA settings for Spotlight search support. The high-level interaction of the tools looks like this: FSCrawler <-------------- DATA directory (SMB share) | | (sends data periodically and tracks changes in data directory) | Elasticsearch --------------> index <---------- SAMBA (4.12) <--------- Finder Spotlight search Steps: 1.) install Elasticsearch I used 7.9.1 from community applications 2.) Install Elasticsearch ingest plugin to search PDF and doc as described here: Download the user scripts plug-in and define the script as follows: #!/bin/bash # execute command inside container docker exec -i elasticsearch /usr/share/elasticsearch/bin/elasticsearch-plugin install --batch ingest-attachment 3.) Install FSCrawler If you go to Settings in the Community Applications and allow additional search results from DockerHub, you can install a version of FSCrawler (I used toto1319/fscrawler, version 2.7): https://hub.docker.com/r/toto1310/fscrawler/ In the template, you need to set the config and data directories. The data directory mount point in FSCrawler needs to match the real mount point in unraid as this path is written into the Elasticsearch index later on, and then needs to be valid for SAMBA to read it. I used /mnt/user/ to be able to search all shares later on. To start the docker, the following post argument needs to be added (turn on advanced mode in the template): Post Arguments: fscrawler job_name --restart The option "--restart" causes a full re-index of the whole share. This option is only needed for the first execution of the crawler, later on this option can be removed so that the crawler only monitors the data directory for changes and feeds these into the Elasticsearch index. After the first run, FSCrawler creates a _settings.yaml file under /mnt/user/appdata/fscrawler/config/job_name/_settings.yaml This file needs to be edited. I have the following content. Please change the IP for your Elasticsearch interface and add the excludes that you do not want to be crawled. The URL needs to match your mount point as this will serve as the "root" directory. --- name: "job_name" fs: url: "/mnt/user" update_rate: "15m" excludes: - "*/~*" - "/appdata/*" - "/domains/*" - "/isos/*" json_support: false filename_as_id: false add_filesize: true remove_deleted: true add_as_inner_object: false store_source: false index_content: true attributes_support: false raw_metadata: false xml_support: false index_folders: true lang_detect: false continue_on_error: false ocr: language: "eng" enabled: false pdf_strategy: "ocr_and_text" follow_symlinks: false elasticsearch: nodes: - url: "http://192.168.xxx.xxx:9200" bulk_size: 100 flush_interval: "5s" byte_size: "10mb" FSCrawler should now start crawling the data and create 2 indices (one for the folders and one for the files) under: /mnt/user/appdata/elasticsearch/data/nodes/0/indices For more information on FSCrawler, have a look at FSCrawler documentation https://hub.docker.com/r/toto1310/fscrawler/ 4.) Configure SAMBA to enable spotlight. I have inserted this in the unraid Settings > SMB > SMB Extras section: We need to add parameters in the global and individual share section. To do this you can add to the Samba extra configuration file the following. Please replace share with your share name: [global] # Settings to enable spotlight search spotlight backend = elasticsearch elasticsearch:address = 192.168.xxx.xxx elasticsearch:port = 9200 elasticsearch:use tls = 0 #enable spotlight search in share [share] path = /mnt/user/share spotlight = yes Restart SAMBA (or the server) . 5.) Enjoy searching in Finder with Spotlight (share needs to be selected in finder). 6.) Background information: Spotlight is accessing the Index with specific search queries. SAMBA has for this purpose a mapping file that translates Elasticsearch attributes to the Spotlight queries. I have not changed this mapping file, but it can be found here for reference: /usr/share/samba/mdssvc/elasticsearch_mappings.json There is also another mapping file that FSCrawler uses when creating the Elasticsearch index. This mapping can be found here if Elasticsearch 7.x is used. Also this mapping file was not modified by me: /mnt/user/appdata/fscrawler/config/_default/7/_settings.json 7.) Testing: List Elasticsearch indices on server (replace localhost with server IP): curl http://localhost:9200/_aliases?pretty=true List all content of index job_name_folder curl -H 'Content-Type: application/json' -X GET http://192.168.xxx.xxx:9200/job_name_folder/_search?pretty List all content of index job_name curl -H 'Content-Type: application/json' -X GET http://192.168.xxx.xxx:9200/job_name/_search?pretty Test if Samba search is working: (replace your user name with username), IP address and select a search string mdfind -d=8 --user=username 192.168.xxx.xxx share 'kMDItemTextContent=="searchstring"' 8.) References: Samba 4.12 release notes: https://www.samba.org/samba/history/samba-4.12.0.html Samba mdfind https://www.samba.org/samba/docs/4.12/man-html/mdfind.1.html fscrawler docker package: https://hub.docker.com/r/toto1310/fscrawler
-
I would recommend to switch to postgres11 instead of MongoDB. For me this caused a big improvement in upload speeds and also CPU utilisation. I posted how to set it up on the Nextcloud thread.
-
I have been experimenting with different sql databases in nextcloud after installing it based on the instructions in the first post. My recommendation would be to go with Postgres11 instead of MongoDB in general. The main difference is CPU utilisation of the NAS and achievable upload speed. With MongoDB my i3 processor was at 100% utilisation when uploading larger amounts of files. In general the upload was pretty slow and also the web performance of Nextcloud was not great. With MongoDB, on local ethernet with 1 Gbit/s I got a poor 5-15 MB/s of upload speed. With postgres11, I get around 40-100 MB/s, which is pretty good considering the available 1 Gbit/s. CPU usage went down to 50-70%, so looks like postgres is way more performant than MongoDB. Here the instructions how to set up Postgres11 in unraid: 1.) install postgres11 from CA. In the template you need to create a postgres user and password. My user was simply "postgres" 2.) console into the postgres11 docker and run (it will ask you for the password you created): su - postgres createuser --interactive --pwprompt 3.) type "nextcloud" to create the user nextcloud and chooser again a password for the user account. Type no for following questions: super user: No db create: No role create: No 4.) Type in the following commands to create a new database for nextcloud: createdb nextcloud psql GRANT permissions ON DATABASE nextcloud TO nextcloud In the above command the first "nextcloud" is the database name whereas the 2nd "nextcloud" is the name of the user. 5.) Set-up a clean Nextcloud docker container and select postgres for the database. Enter username, database name and password (the one for the nextcloud user) that we previously created. You need to replace localhost by the IP address and port name of the postgres11 docker container (the IP on the right side shown in port mappings next to the postgres docker container inside the unraid docker tab. In general the instructions are quite similar as for MongoDB, so whoever has done the MongoDB set-up will feel that this is very familiar.
-
For those that are stuck like me on the ingest-attachment plugin issue: You need to stop the elasticsearch docker and restart it after you have executed the command to install the plugin so it gets loaded into elasticsearch. Here my steps: 1.) get elasticsearch docker (7.9.1 works) do a clean install (delete old elasticsearch in /mnt/user/appdata/) 2.) Download the full text search packages in nextcloud app store (at least 3 packages) 3.) Configure your Nextcloud search platform to "Elasticsearch" and address of Servlet to: http://YOUR_IP:9200/ It needs to be configured to the port of the REST API 4.) Install the plugin for elasticsearch, by either opening a console inside the elasticsearch docker and type /usr/share/elasticsearch/bin/elasticsearch-plugin install --batch ingest-attachment OR through the User scripts Unraid plugin as stated above. 5.) Restart the elasticsearch container 6.) Test everything by opening a new shell in the nextcloud container then navigate to the occ directory (/var/www/html) and type ./occ fulltextsearch:test If everything is ok, then you can continue with the index: ./occ fulltextsearch:index
-
I got diskover running thanks to this post, so thanks a lot for that. https://forums.unraid.net/topic/75763-support-linuxserverio-diskover/?do=findComment&comment=778389 Now after trying out diskover I was wondering if it also can be used to integrate a full text search on the share i.e. searching .doc and .pdf files? Maybe by using the plugins?


