





mmwilson0
Members
-
Joined
-
Last visited
Everything posted by mmwilson0
-
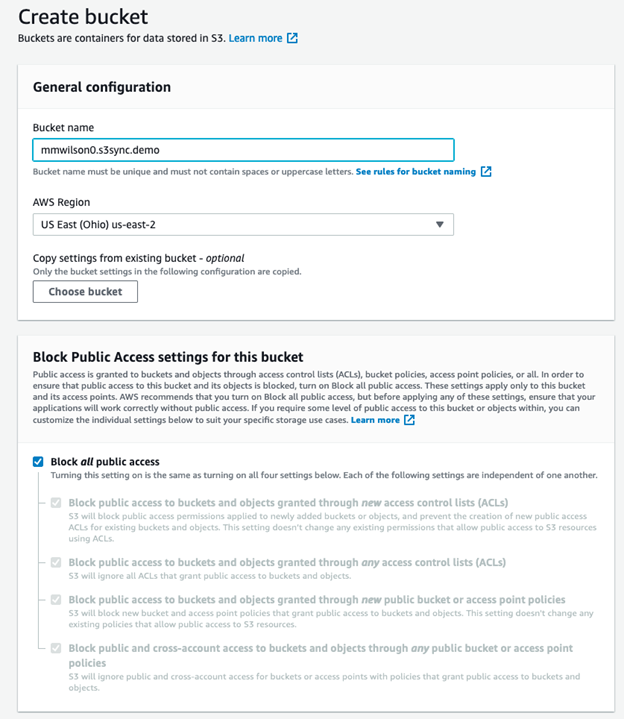
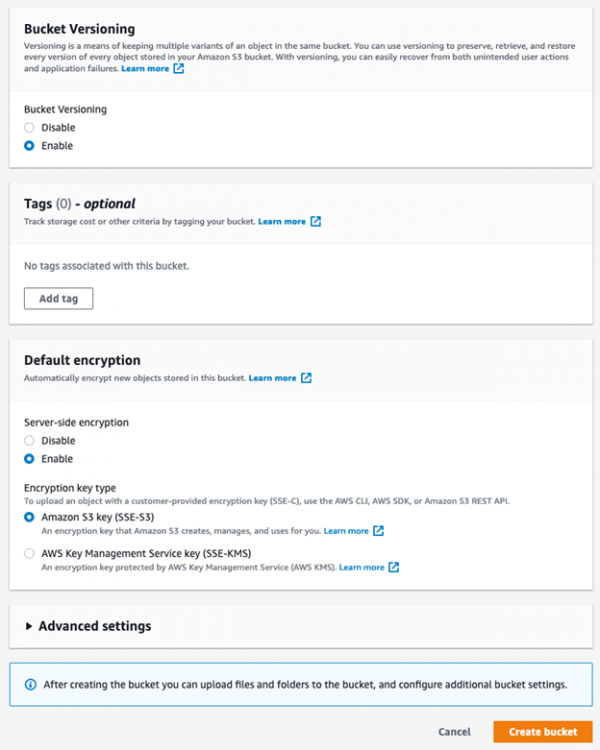
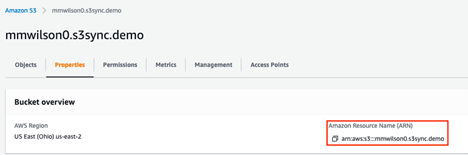
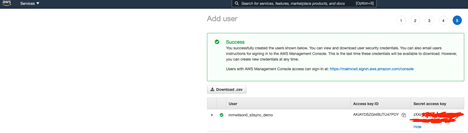
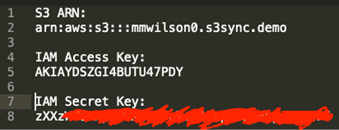
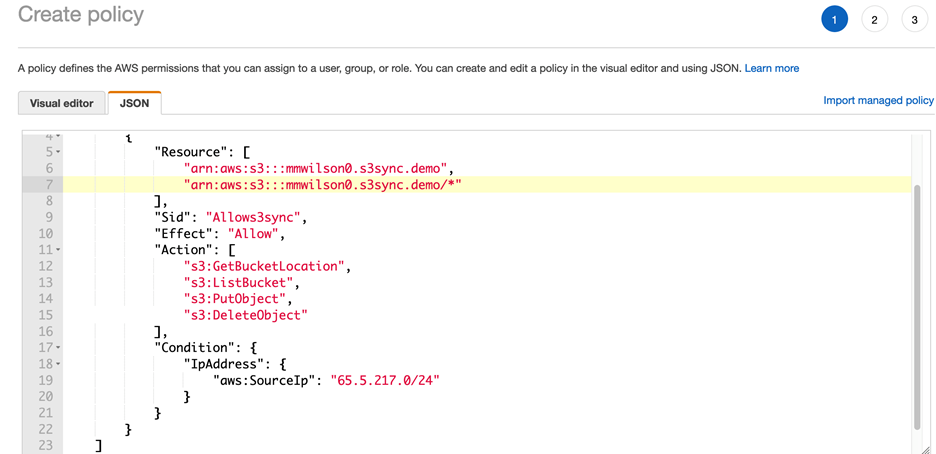
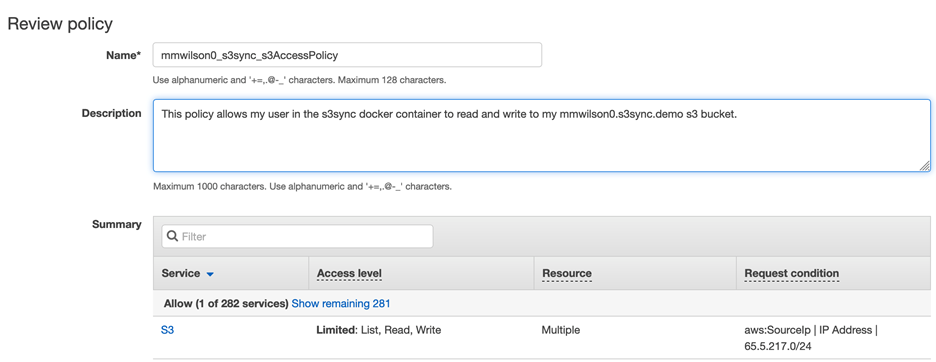
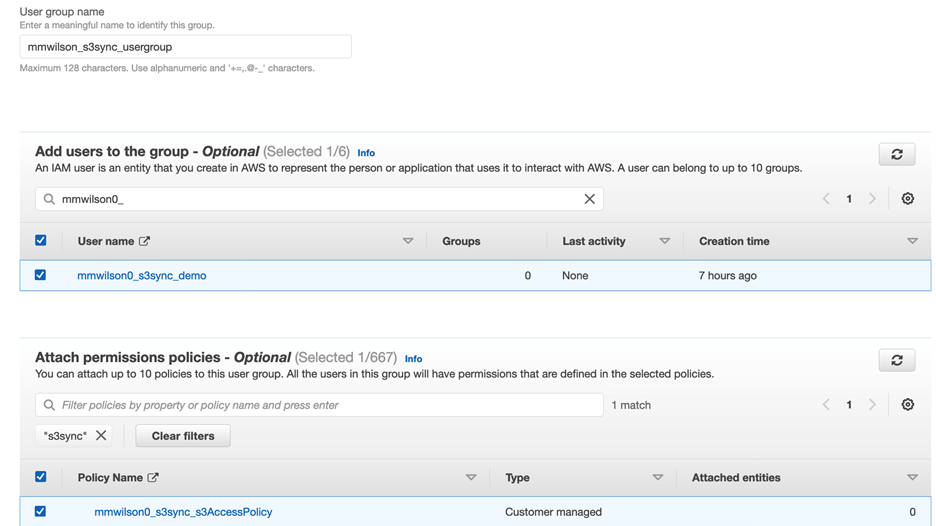
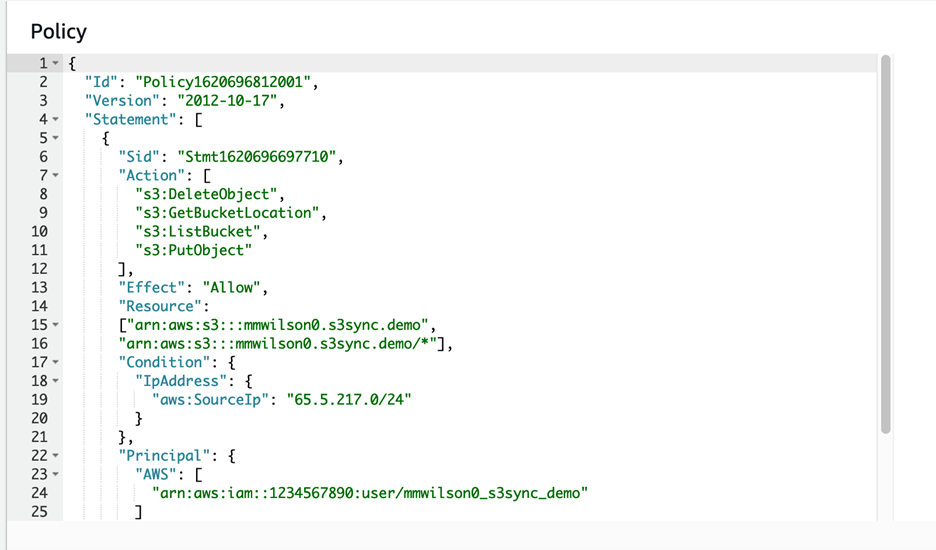
Hey @Jacob Bolooni, I put together this how-to that walks users through setting up an s3 bucket, and creating a separate IAM user and Policy specifically for backups. I had security in mind when i wrote this so I include things such as blocking public access to the bucket, enabling encryption, and restricting access to IP addresses. Let me know if this post is ok for here, otherwise i can certainly remove it. Thanks, Malcolm Some notes before we get started: As a best practice, you should never do anything using your root account. That is the account/email that you used to create your AWS account. This is your “break glass” account, and has unrestricted rights to everything in your AWS account. If it is compromised, you could potentially lose access to your account. If you have set up a new AWS account to use for offsite backups, by default you will only have the “root” user. In an effort to secure your account, use a password manager to generate a long, strong password for this account, and enable MFA, and never use it unless you have a compelling reason to. It is also good to set a strong password policy in the IAM > Account Settings. For example: Minimum password length is 20 characters Require at least one uppercase letter from Latin alphabet (A-Z) Require at least one lowercase letter from Latin alphabet (a-z) Require at least one number Require at least one non-alphanumeric character (! @ # $ % ^ & * ( ) _ + - = [ ] { } | ') Password expires in 90 day(s) Allow users to change their own password Remember last 24 password(s) and prevent reuse 3. Now, lets create an admin user for you to use. After the root account has been secured, navigate to IAM > “Users” > “Add User”. Pick a username that you would like to use Check “AWS Management Console Access” to create username/password to log in to the AWS Administrative Console (Web interface) with. Make a strong password, and after it is created enable MFA for this account as well Check “Programmatic Access” if you would like to interface with your account using the command line interface. This is optional. Later in this guide we will create one more user who will ONLY have programmatic access, specifically to leverage the s3sync docker container. Click next to go to permissions We’ll skip permission for now, click next to go to tags Add tags if you desire Click Next to create user Store your AWS username, password, and access keys somewhere secure, and click close. 4. Now, let’s give this new user some permissions Navigate to IAM > User Groups > Create Group We are going to create a new group that has Admin Rights, as well as access to the billing console so you can track your spend. So give it a fitting name “Admin_And_Billing”, for example. “Add Users To the Group” – Check the box next to the user that you just created in step 3 “Attach Permissions” – There are 3 user groups that we want to add here, you can use the search bar to find them. -- AdministratorAccess – Gives you full admin rights to your AWS Account -- Billing – Gives you access to the billing reports and settings -- IAMUserChangePassword – Allows this user account to change its own password Click "Create Group" Now, log out and log back in using the new account you created. Navigate back to the IAM settings, and look around the different pages there. Make sure you don’t see any permissions or access denied errors. 5. If everything looks ok: In the top right of your browser window, click the dropdown where it says your username @ your account # > My Security Credentials. Enable MFA for your new account. 6. Perfect. Now that we have secured your root account and have a separate admin account with a strong password and MFA, let’s get started prepping your environment for s3sync. First, let us create the s3 bucket Click the dropdown for “Services” in the top left, and navigate to S3 Click “Create Bucket” Give the bucket a name. This name has to be unique across all AWS customers. So something simple like “bob” is probably taken. But “bobs.unraid.s3sync.backup.bucket” is probably available. Region – Choose a region closest to you for increased performance and reduced latency. Avoid US-East-1 if possible (friends don’t let friends us-east-1!) ****Block Public Access – check the box next to BLOCK ALL PUBLIC ACCESS. This will help prevent any joe shmo from accessing your backed up files.**** Bucket Versioning – This will keep previous versions of your files. Say you are backing up a text document. You make changes to the document and sync it to s3 again. S3 will store the previous version, and the new version with the changes. Also, if you delete the text document from s3, it will not be instantly deleted. It will create a marker that says this file is marked for deletion. This helps prevent accidental loss/deletion of files. I recommend enabling this, but it is up to you. I won’t cover it in this guide, but after your bucket is created you can create “Lifecycle policies” to automatically delete previous versions, and files marked for deletion from your bucket after an amount of days that you specify. Default Encryption **Enable** Amazon S3 key (SSE-S3) – AWS S3 manages the encryption keys, it’s simple and keeps your files secure! Create Bucket 7. Easy Enough! Now you have your very own cloud storage! Before we go, after creating the bucket you should now be back at the AWS S3 dashboard. If not, navigate back there using the services tab in the top left, and click s3. Click on the name of the bucket that you just created. Navigate to the “properties” tab and copy down the “Amazon Resource Name (ARN)” for your bucket. Store it in notepad or somewhere similar, we’ll need it coming up. Mine is arn:aws:s3:::mmwilson0.s3sync.demo 8. The next step is to create a new user and give them permission to use s3sync so that they can backup your files to this bucket. Click “Services” in the top left, and click “IAM” “users” > Add User Username – name it something that lets you know this is the account that is doing the backups for you. Mine will be “mmwilson0_s3sync_demo” Check the box for “programmatic access”. You will never need to login with this account, it will only be used by the docker container. There is no need to create a password for AWS Management Console access. Click Next, skipping through permissions, apply tags if you wish, and just get to the end and press Create User. It will present you with your access key and secret access key. Copy these both down in to your notepad 9. Create a new policy. IAM > Policies > Create Policy Switch the tab from “Visual Editor” to JSON, and paste the below text in. Under “resource” you will need to update the s3 ARN so that it has your s3 bucket’s ARN. Additionally, if you want s3sync to DELETE objects from your s3 bucket after they have been deleted from your home device, then you will also need to add "s3:DeleteObject" under the Actions. Make sure to match the formatting by including quotation marks, and commas. { "Version": "2012-10-17", "Statement": [ { "Resource": [ "arn:aws:s3:::yourbucketname", "arn:aws:s3:::yourbucketname/*" ], "Sid": "Allows3sync", "Effect": "Allow", "Action": [ "s3:GetBucketLocation", "s3:ListBucket", "s3:PutObject" ] } ] } Optionally, if you have a static IP at home, know what range your home ip will be in, or are willing to sign in and update this policy periodically as your home ip changes, then you can add a conditional statement to restrict access to your home IP address. This means that if someone has your access keys they will not be able to access the files in your s3 bucket unless their requests are originating from your home IP. Pretty cool huh!? Here is an example below. For demonstration purposed, I’ll include the "s3:DeleteObject" action as well { "Version": "2012-10-17", "Statement": [ { "Resource": [ "arn:aws:s3:::yourbucketname", "arn:aws:s3:::yourbucketname/*" ], "Sid": "Allows3sync", "Effect": "Allow", "Action": [ "s3:GetBucketLocation", "s3:ListBucket", "s3:PutObject", "s3:DeleteObject" ], "Condition": { "IpAddress": { "aws:SourceIp": "65.5.217.0/24" } } } ] } Click “next” Add Tags if you wish. Click “next” Give your policy a name and Description, and click “Create Policy”. 10. Now to bring it all together. Create a new User Group IAM > User Groups > Create Give the user group a relevant name Check the box next to the user you just created Check the box next to the policy you just created Click “Create Group” 11. At this point you now have a new user and a policy that restricts access to only allow that user to read/write in the s3 bucket that you created for your backups. I also recommend adding a policy to your bucket that will restrict who is allowed to access that bucket. First we will need to get the ARN associated with the user that we just created, the one that is allowed to write to the s3 bucket. Navigate to IAM > Users > Click on the username that you just created. At the top of the page, copy the User ARN. The format is similar to: arn:aws:iam::1234567890:user/mmwilson0_s3sync_demo Navigate to S3 > Click on the bucket name that you created earlier in this walk-through. Click on the Permissions tab, scroll down to Bucket Policy, and paste in the following policy. You will need to update: --the resources so that they match the ARN for your s3 bucket --the principal so it matches the ARN for your user that you just created. --If you did not add the “deleteobject” permission in your policy above, then you can remove it from the below statement as well. --If you do not wish to restrict access to a specific ip address, remove the 5 lines, starting with "Condition", ending at }, (delete this line as well) { "Id": "Policy1620696812001", "Version": "2012-10-17", "Statement": [ { "Sid": "Stmt1620696697710", "Action": [ "s3:DeleteObject", "s3:GetBucketLocation", "s3:ListBucket", "s3:PutObject" ], "Effect": "Allow", "Resource": ["arn:aws:s3:::mmwilson0.s3sync.demo", "arn:aws:s3:::mmwilson0.s3sync.demo/*"], "Condition": { "IpAddress": { "aws:SourceIp": "65.5.217.0/24" } }, "Principal": { "AWS": [ "arn:aws:iam::1234567890:user/mmwilson0_s3sync_demo" ] } } ] } Click “Save Changes”, and you are done!
-
There is also Glacier Deep Archive. It is slower to retrieve the data if you do actually need to access it, the thawing time is 12-48 hours depending on what you want to pay. It is a fraction of the price to standard Glacier though. ^^ Do this please. @joch do you have a write-up for users to help them create the IAM user and policy, disable public access, enable encryption etc? Some general ways that the users can harden their buckets?

-
Hi, i'm following IBRACORP's videos on the configuring Authelia, and am hitting an issue similar to that reported by another user in this thread. the file stanza starts on line 217 ##Line 216 file: path: /config/users_database.yml password: algorithm: argon2id iterations: 1 key_length: 32 salt_length: 16 memory: 1024 parallelism: 8 and the obfuscated users_database.yml file cat users_database.yml users: <username>: displayname: "<name>" password: "$argon2i$v=19$m=1024,t=1,p=<hash>" email: <email> groups: - admins - dev Not quite sure whats going wrong. Please let me know if you have any thoughts!
-
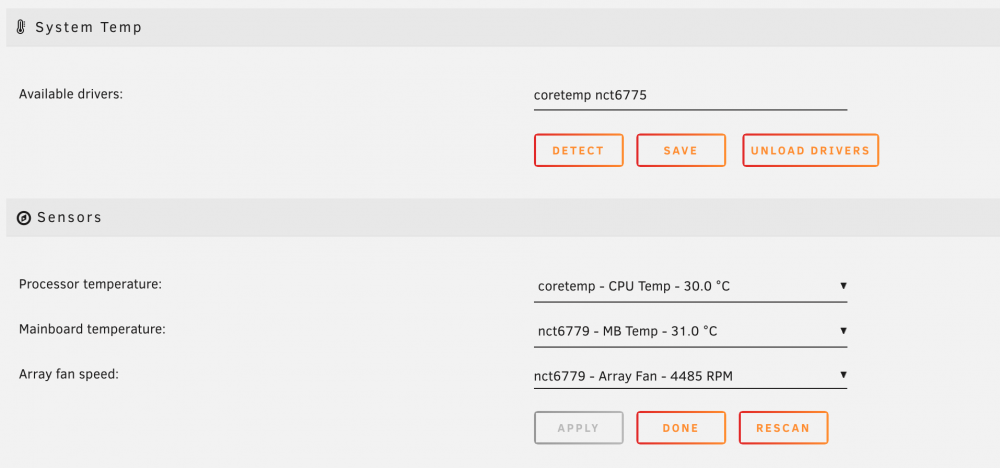
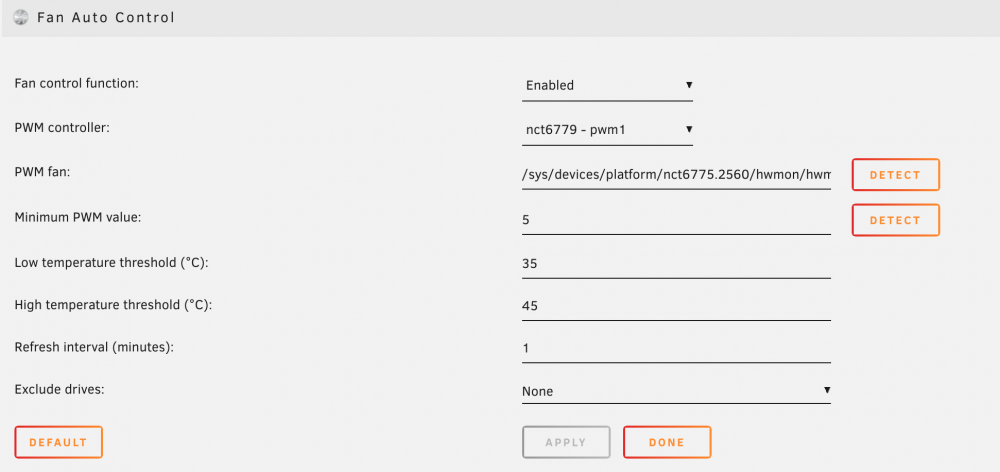
hey tjb, all my settings in there were from detect except the minutes to refresh which i set manually to '1' I opened my rig open and tore all the fan connections apart and started testing things 1 by 1. It seems my issue was: Noctua fans had a 4 pin connector the 1 female to 3 male adapter had 4 pins or holes on each end The 4 pin female end adapter was plugged in to sys_fan3 which only had 3 pins. Under this setup i was trying to adjust the fan profiles in the bios but nothing worked, all the fans were only running at 1 spee: blast off. I've learned for myself that the 4 pin fan's need 4 pins on the mobo or they will not get any directions. I moved both Noctua fans to the splitter with the 4 female holes into sys_fan1 which had 4 pins, and the 3 pin fans that came in the case from fractal are going straight to the 3 pin fans on the mobo. Those noctua fans on full blast are no joke, but I'm finally able to hear myself think
-
Hello, i'm having some issues with my chassis fans on unraid 6.9.2. I installed 2 new fans to my MSI Z97 PC Mate(MS-7850) mobo today. i introduced a 3 male to 1 female splitter with the two fans that came with my chassis and 140mm noctua, going to sys_fan3. I have 1 140mm noctua plugged directly in to sys_fan2 and have a water cooler plugged in to cpu_fan1. Until i installed the two noctua fans today, the two chassis fans and the cpu cooler fans seemed to operate normal. After introducing the 3 to 1 splitter and adding 2 new fans today, my system sounds like it's about to take flight. I've tried installing the SystemTemp plugin 2020.06.20 as well as Autofan 2020.06.21 But i dont seem to have any progress slowing the fans down. Please help! I can't keep my server running at this dB level!
-
I believe that you are correct. It's just strange because when i first set up unraid and loaded the console the font was fine. I only noticed this issue after i installed the nvidia driver plugin. Perhaps it was just a coincidence. But thank you for that post! Yeah, i know. I thought i read at first that docker would not do the GPU passthrough, so i was going to launch a VM to run plex. I was looking at binhex's plex container and saw that it is infact possible so i started following his faq to enabling it which led me to the video plugin. I read somewhere that you can't use gpu passthrough for Docker and VM's? What do people do to reconcile that? Say if they want to use a VM for gaming and run plex with hardware transcoding? I did NOT see the second post in this thread, but i went back and reviewed it. I missed the step on binhex's guide to add the extra parameters --runtime=nvidia. I am transcoding like a boss now, thank you so much!
-
Hello, Let me start off by saying I'm new to unraid, and am doing my best to follow guides on the site and forum to get things set up to my preferences I'm having a few issues with the Nvidia Plugin. I'll start with the (hopefully) easiest, first. Since i installed the nvidia driver plugin and drivers, and rebooted, the resolution in my consoles is to the point where i can barely read it. A few notes -- i was initially trying to configure GPU passthrough for VM's -- i enabled PCIe ACS Ovveride : Multifunction. I have a stopped windows vm whose profile is set up to use my GPU. I then pivoted to using binhex-plex which advised towards installing this plugin, and i followed their steps to enable hardware transcoding (though i'm not sure that is working -- that will be my next question). Please let me know what information i can supply to help troubleshoot the CLI resolution! Thanks! Malcolm







