


wacko37
Members
-
Joined
-
Last visited
Everything posted by wacko37
-
Just reporting back my resolution to this issue to help any others in a similar situation. Basically any attempt to prevent / disable ASPM on the specific device failed to prevent the errors from occurring or being reported in the syslogs. With the help of AI, I tried Masking the specific errors which also failed to have any effect. Finally solution was to create a syslog filter to prevent only the “correctable” error logs from being reported on the syslogs which are only relative to the device in question, this way all other error will get reported. As I know the original error being reported have zero effect on the stability of the server itself apart from filling the logs over time with unwanted errors which made filtering out new errors etc more difficult this seems the cleanest most efficient way of doing so. I created a new syslog filter via userscript for easier management / monitoring. The script runs once after array start, as the filter file that is created does not persist after a reboot. #!/bin/bash # Create the file with your specific AER ignore lines cat <<EOF > /etc/rsyslog.d/02-blocklist-ignore-aqc107-aer-errors.conf :msg,contains,"pcieport 0000:00:1c.4: AER: Correctable error message received from 0000:06:00.0" stop :msg,contains,"atlantic 0000:06:00.0: PCIe Bus Error: severity=Correctable" stop :msg,contains,"atlantic 0000:06:00.0: device [1d6a:d107] error status/mask=" stop EOF # Restart rsyslog to apply the new filter /etc/rc.d/rc.rsyslogd restart echo "Blocklist created and rsyslog restarted."
-
So I needed to run this script again and I can confirm the previous issue remained with all disks constantly being read @ maximum speeds. I managed to dig deeper into this and worked out the issue is not with the script or defrag process. DFI (DYNAMIX FILE INTEGRITY PLUGIN) was causing this issue and once the process was killed the drive stopped being read. So to prevent this from happening again with this script I will disable DFI while the script is active. @mgutt @DoINeedATag Or maybe there is a way to pause DFI while the script is active within the script? Anyhow I hope this help someone in the future
-
WoW, thankyou for this detailed response once again, legend! This method is much more appealing to me personally... I hope this thread helps others who dont want to global edit. Im away at work atm but will set this up remotely over the next day or 2.
-
@bmartino1 sorry to bring up this old topic again, but I an idea pop into my head today, to alternately stop this log spamming without added "pcie_aspm=off" or the likes. Would be possible to stop the NIC from attempting to enter into a ASPM state by creating a scheduled user script to keep the nic active /live?
-
Mate, I wish i had you as my next door neighbour, youd be sick of me asking you questions....🤪 Just donated you a beer! (Transaction ID: 22C69294F8897324B)
-
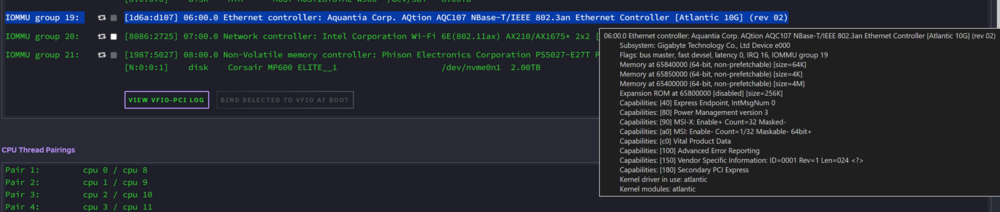
WOW, thankyou kindly for your expert advise and detailed explanation. I Have an onboard 10gbe NIC (AQtion AQC107) that gives an error a few times a day which is related to ASPM. It doesn't cause any problems so its not a major issue, just annoying. Feb 4 06:11:43 Wacko-UNRAID kernel: pcieport 0000:00:1c.4: AER: Multiple Correctable error message received from 0000:06:00.0 Feb 4 06:11:43 Wacko-UNRAID kernel: atlantic 0000:06:00.0: PCIe Bus Error: severity=Correctable, type=Physical Layer, (Receiver ID) Feb 4 06:11:43 Wacko-UNRAID kernel: atlantic 0000:06:00.0: device [1d6a:d107] error status/mask=00000041/0000a000 Feb 4 06:11:43 Wacko-UNRAID kernel: atlantic 0000:06:00.0: [ 0] RxErr (First) Feb 4 06:11:43 Wacko-UNRAID kernel: atlantic 0000:06:00.0: [ 6] BadTLP To help clear the logs for easy "error" finding, I was going to add "pcie_aspm=off" But given your above reply, I feel its not worth implementing in my case as I don't really have a major issue apart from a few random error logs.
-
Hi Community / @bmartino1 Sorry to hijack this thread but I had a relatable question regarding "pcie_aspm=off". If this is enabled would it still effect a GPU's power state that has been passed through / VFIO bond to a windows VM?
-
Thanks so much! Now i can put my mind to rest....... hopefully 😁
-
Thanks for the time and expert advice, much appreciated. I worry if "pcie_aspm=off" will have a negative energy efficiency effect on the other devices in the server, as I have a gpu binded to the VFIO for my VM etc. So my question here would be if "pcie_aspm=off" is applied will it prevent the other PCIe from entering a power saving mode and therefore effecting the overall power efficiency of the server? And if the above is indeed correct, would leaving the server in its current state be ok? (Apart from the few error logs a day, i see not other negative effects that im aware of)
-
Recently updated my UNRAID Server MB to a Gigabyte Aorus Master Z590 so I could utilise the onboard 10Gbe NIC. This has been working flawlessly and without any obvious issues. Sadly though, I now get random errors in my syslog, sometimes multiple in a 24hr period and others a day or 2 apart. Oct 7 06:11:43 Wacko-UNRAID kernel: pcieport 0000:00:1c.4: AER: Multiple Correctable error message received from 0000:06:00.0 Oct 7 06:11:43 Wacko-UNRAID kernel: atlantic 0000:06:00.0: PCIe Bus Error: severity=Correctable, type=Physical Layer, (Receiver ID) Oct 7 06:11:43 Wacko-UNRAID kernel: atlantic 0000:06:00.0: device [1d6a:d107] error status/mask=00000041/0000a000 Oct 7 06:11:43 Wacko-UNRAID kernel: atlantic 0000:06:00.0: [ 0] RxErr (First) Oct 7 06:11:43 Wacko-UNRAID kernel: atlantic 0000:06:00.0: [ 6] BadTLP From what I have researched and my limited understanding this seems to relate to the ASPM of the device (Power Management) I have tried to enable the ASPM features in the BIOS: PEG ASPM, PCH ASPM and also enabled Native ASPM which allows for OS implementation of ASPM. I did not enable DMI ASPM as I heard this caused issue. Enabling these settings had zero effect on the error. I have searched through the forums and have found suggestions to add “ pcie_aspm=off” to the sys config found here https://forums.unraid.net/topic/118286-nvme-drives-throwing-errors-filling-logs-instantly-how-to-resolve/#findComment-1165004 But I am somewhat reluctant to do so as I don’t understand the full implications of doing so. I have attached screenshots to help identify the system device and of the log error found in Syslog. As always any advise or knowledge on how to proceed etc would be greatly appreciated.


-
@mgutt @DoINeedATag Hi community, I have been running this script for a few years now without issue, Thanks so much! Sadly, since upgrading to Unraid 7.1.2 I have ran into a weird issue. The script was scheduled to run each day for 2hrs but after a few days when there was no more improvements to be defragged, after which the disks got stuck into a boot loop so to speak with all disks constantly being read @ maximum speeds (except the parity drive) Only way to stop the disk reads was to stop the array. I can confirm there was no parity checks being run etc. testing this 2 times with the same results Can anyone confirm. #!/bin/bash # ##################################### # Script: XFS Extended Defragmentation v0.3.1 # Description: Defragmentate only HDDs (SSDs will be ignored) if requirements met for a selectable running time. # Author: Marc Gutt, Computron, DoINeedATag # # Changelog: # 0.3.1 # - Fixed regex finding both /dev/mapper/mdxpy and /dev/mdxpy (DoINeedATag) # - Made it so the notification setting actually did something line 68 # - Only for Unraid version 6.12+ # 0.3 # - 6.12.6+ fix for regex finding drive paths (Updated by Computron & DoINeedATag) # 0.2 # - SSD recognition added # 0.1 # - first release # # ######### Settings ################## # defrag_seconds=7200 : Defrag only for a specific time in seconds (default is 7200 seconds = 2 hours) # defrag_only_sleep=1 : Defrag only when parity is not active (set to 0 to disable) # notification=1 : Notify yourself (set to 0 to disable) defrag_seconds=14400 defrag_only_sleep=1 notification=1 # ##################################### # # ######### Script #################### # make script race condition safe if [[ -d "/tmp/${0///}" ]] || ! mkdir "/tmp/${0///}"; then exit 1; fi; trap 'rmdir "/tmp/${0///}"' EXIT; # defrag only if parity is not spinning if [[ $defrag_only_sleep == "1" ]]; then # obtain parity disk's device id parity_id=$(mdcmd status | grep rdevName.0 | cut -d = -f 2) echo "Parity has device id $parity_id" # we defrag only if parity is not spinning parity_state=$(smartctl -n standby "/dev/$parity_id") if [[ $parity_state != "STANDBY" ]]; then echo "Defragmentation has been skipped because of active parity disk" exit fi fi echo "Search for HDDs..." # parse /etc/mtab and check rotational status declare -a mtab while IFS= read -r -d '' line; do disk_mapper_id_regex="^/dev/mapper/md([0-9]+)p([0-9]+)" disk_id_regex="^/dev/md([0-9]+)p([0-9]+)" if [[ "$line" =~ $disk_mapper_id_regex ]] || [[ "$line" =~ $disk_id_regex ]]; then disk_id=${BASH_REMATCH[1]} part_id=${BASH_REMATCH[2]} rotational=$(cat /sys/block/md${disk_id}p${part_id}/queue/rotational) if [[ "$rotational" == "1" ]]; then mtab+=("$line") echo "Found HDD with id md${disk_id}p${part_id} (added)" continue fi echo "Found SSD with id md${disk_id}p${part_id} (skipped)" fi done< <(cat /etc/mtab | grep -E '^/dev/mapper/md|^/dev/md' | tr '\n' '\0') if [ ${#mtab[@]} -eq 0 ]; then if [ $notification == "1" ]; then /usr/local/emhttp/webGui/scripts/notify -i alert -s "XFS Defragmentation failed!" -d "No HDD found!" fi echo "No HDD found exiting" exit fi printf "%s\n" "${mtab[@]}" > /tmp/.xfs_mtab echo "Content of /tmp/.xfs_mtab:" cat /tmp/.xfs_mtab # defrag xfs_fsr -v -m /tmp/.xfs_mtab -t "$defrag_seconds" -f /tmp/.xfs_fsrlast
-
Everything I can help you with is mentioned in my posts above. In short changing the CPU mode to custom from host-passthrough allowed Microsoft version of Roblox to work for me. Is your CPU is AMD? If so I'm sorry I have no knowledge using AMD.
-
Sadly o have no experience with VMware workstation pro, I'm using the default VM manger within Unraid.
-
When you create/edit a VM, the is a option on the top right corner that says "XML View" select that. Sadly it's not a simple as copy and pasting my XML from above. You will need to edit to suit your hardware/setup.
-
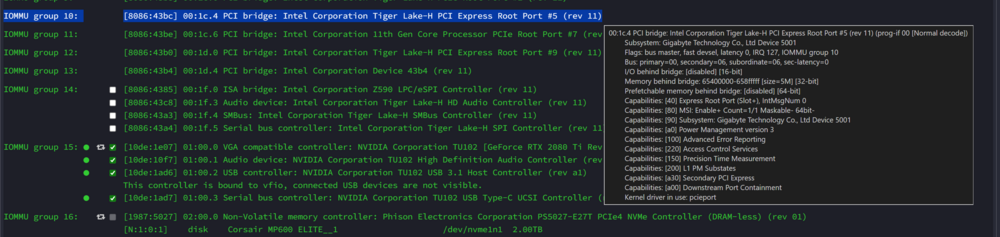
Hi Community, back again but this time it’s very good news. Basically, I’ve gone full circle and now back on (<cpu mode='custom') I’ve been running this setup for 3-4 weeks now and everything is working perfectly with zero instability across all games. When the VM is idle the resource usage almost nothing….. FINALLY a perfect VM!!! Roblox is working via the Windows Store app as mention here: Long story short, “Unraid Share Mode: VirtioFS Mode” was the culprit here and was causing the system to randomly lock up. Once removed all my issues were resolved and as mentioned the VM idle resources are back to near zero. I’m glad in a way, as its forced me to learn more about the XML view by adding necessary features and pinning “emulatorpin” & “iothreadpin” which have also helped drastically with stability. I have attached my XML and will now be marking this thread as resolved. <?xml version='1.0' encoding='UTF-8'?> <domain type='kvm'> <name>Windows 11</name> <uuid>351920c1-41b7-abf6-86a9-df25e7703fa5</uuid> <description>Windows 11 - Gaming VM</description> <metadata> <vmtemplate xmlns="unraid" name="Windows 11" icon="windows11.png" os="windowstpm"/> </metadata> <memory unit='KiB'>10485760</memory> <currentMemory unit='KiB'>10485760</currentMemory> <memoryBacking> <nosharepages/> </memoryBacking> <vcpu placement='static'>6</vcpu> <iothreads>2</iothreads> <cputune> <vcpupin vcpu='0' cpuset='5'/> <vcpupin vcpu='1' cpuset='13'/> <vcpupin vcpu='2' cpuset='6'/> <vcpupin vcpu='3' cpuset='14'/> <vcpupin vcpu='4' cpuset='7'/> <vcpupin vcpu='5' cpuset='15'/> <emulatorpin cpuset='2-4,10-12'/> <iothreadpin iothread='1' cpuset='2-4,10-12'/> <iothreadpin iothread='2' cpuset='2-4,10-12'/> </cputune> <resource> <partition>/machine</partition> </resource> <os> <type arch='x86_64' machine='pc-q35-7.2'>hvm</type> <loader readonly='yes' type='pflash'>/usr/share/qemu/ovmf-x64/OVMF_CODE-pure-efi-tpm.fd</loader> <nvram>/etc/libvirt/qemu/nvram/d566211d-a3fe-da18-b5e2-8ec98fd0e29e_VARS-pure-efi-tpm.fd</nvram> </os> <features> <acpi/> <apic/> <hyperv mode='custom'> <relaxed state='on'/> <vapic state='on'/> <spinlocks state='on' retries='8191'/> <vpindex state='on'/> <synic state='on'/> <stimer state='on'/> <vendor_id state='on' value='none'/> </hyperv> </features> <cpu mode='custom' match='exact' check='full'> <model fallback='allow'>Skylake-Client</model> <topology sockets='1' dies='1' cores='3' threads='2'/> <feature policy='disable' name='hle'/> <feature policy='disable' name='rtm'/> <feature policy='disable' name='mpx'/> <feature policy='require' name='vmx'/> <feature policy='require' name='hypervisor'/> </cpu> <clock offset='localtime'> <timer name='hypervclock' present='yes'/> <timer name='hpet' present='no'/> </clock> <on_poweroff>destroy</on_poweroff> <on_reboot>restart</on_reboot> <on_crash>restart</on_crash> <devices> <emulator>/usr/local/sbin/qemu</emulator> <disk type='file' device='cdrom'> <driver name='qemu' type='raw'/> <source file='/mnt/user/isos/ISOs/Win11_23H2_EnglishInternational_x64v2.iso'/> <target dev='hda' bus='sata'/> <readonly/> <address type='drive' controller='0' bus='0' target='0' unit='0'/> </disk> <disk type='file' device='cdrom'> <driver name='qemu' type='raw'/> <source file='/mnt/user/isos/ISOs/virtio-win-0.1.248-1.iso'/> <target dev='hdb' bus='sata'/> <readonly/> <address type='drive' controller='0' bus='0' target='0' unit='1'/> </disk> <controller type='pci' index='0' model='pcie-root'/> <controller type='pci' index='1' model='pcie-root-port'> <model name='pcie-root-port'/> <target chassis='1' port='0x10'/> <address type='pci' domain='0x0000' bus='0x00' slot='0x02' function='0x0' multifunction='on'/> </controller> <controller type='pci' index='2' model='pcie-root-port'> <model name='pcie-root-port'/> <target chassis='2' port='0x11'/> <address type='pci' domain='0x0000' bus='0x00' slot='0x02' function='0x1'/> </controller> <controller type='pci' index='3' model='pcie-root-port'> <model name='pcie-root-port'/> <target chassis='3' port='0x12'/> <address type='pci' domain='0x0000' bus='0x00' slot='0x02' function='0x2'/> </controller> <controller type='pci' index='4' model='pcie-root-port'> <model name='pcie-root-port'/> <target chassis='4' port='0x13'/> <address type='pci' domain='0x0000' bus='0x00' slot='0x02' function='0x3'/> </controller> <controller type='pci' index='5' model='pcie-root-port'> <model name='pcie-root-port'/> <target chassis='5' port='0x14'/> <address type='pci' domain='0x0000' bus='0x00' slot='0x02' function='0x4'/> </controller> <controller type='pci' index='6' model='pcie-root-port'> <model name='pcie-root-port'/> <target chassis='6' port='0x15'/> <address type='pci' domain='0x0000' bus='0x00' slot='0x02' function='0x5'/> </controller> <controller type='pci' index='7' model='pcie-root-port'> <model name='pcie-root-port'/> <target chassis='7' port='0x16'/> <address type='pci' domain='0x0000' bus='0x00' slot='0x02' function='0x6'/> </controller> <controller type='pci' index='8' model='pcie-root-port'> <model name='pcie-root-port'/> <target chassis='8' port='0x17'/> <address type='pci' domain='0x0000' bus='0x00' slot='0x02' function='0x7'/> </controller> <controller type='pci' index='9' model='pcie-root-port'> <model name='pcie-root-port'/> <target chassis='9' port='0x18'/> <address type='pci' domain='0x0000' bus='0x00' slot='0x03' function='0x0' multifunction='on'/> </controller> <controller type='pci' index='10' model='pcie-root-port'> <model name='pcie-root-port'/> <target chassis='10' port='0x19'/> <address type='pci' domain='0x0000' bus='0x00' slot='0x03' function='0x1'/> </controller> <controller type='pci' index='11' model='pcie-to-pci-bridge'> <model name='pcie-pci-bridge'/> <address type='pci' domain='0x0000' bus='0x01' slot='0x00' function='0x0'/> </controller> <controller type='pci' index='12' model='pcie-root-port'> <model name='pcie-root-port'/> <target chassis='12' port='0x1a'/> <address type='pci' domain='0x0000' bus='0x00' slot='0x03' function='0x2'/> </controller> <controller type='virtio-serial' index='0'> <address type='pci' domain='0x0000' bus='0x03' slot='0x00' function='0x0'/> </controller> <controller type='sata' index='0'> <address type='pci' domain='0x0000' bus='0x00' slot='0x1f' function='0x2'/> </controller> <controller type='usb' index='0' model='qemu-xhci' ports='15'> <address type='pci' domain='0x0000' bus='0x00' slot='0x07' function='0x0'/> </controller> <interface type='bridge'> <mac address='52:54:00:19:a0:d0'/> <source bridge='br0.1'/> <model type='virtio'/> <address type='pci' domain='0x0000' bus='0x02' slot='0x00' function='0x0'/> </interface> <serial type='pty'> <target type='isa-serial' port='0'> <model name='isa-serial'/> </target> </serial> <console type='pty'> <target type='serial' port='0'/> </console> <channel type='unix'> <target type='virtio' name='org.qemu.guest_agent.0'/> <address type='virtio-serial' controller='0' bus='0' port='1'/> </channel> <input type='tablet' bus='usb'> <address type='usb' bus='0' port='1'/> </input> <input type='mouse' bus='ps2'/> <input type='keyboard' bus='ps2'/> <tpm model='tpm-tis'> <backend type='emulator' version='2.0' persistent_state='yes'/> </tpm> <audio id='1' type='none'/> <hostdev mode='subsystem' type='pci' managed='yes'> <driver name='vfio'/> <source> <address domain='0x0000' bus='0x01' slot='0x00' function='0x0'/> </source> <address type='pci' domain='0x0000' bus='0x04' slot='0x00' function='0x0'/> </hostdev> <hostdev mode='subsystem' type='pci' managed='yes'> <driver name='vfio'/> <source> <address domain='0x0000' bus='0x01' slot='0x00' function='0x1'/> </source> <address type='pci' domain='0x0000' bus='0x05' slot='0x00' function='0x0'/> </hostdev> <hostdev mode='subsystem' type='pci' managed='yes'> <driver name='vfio'/> <source> <address domain='0x0000' bus='0x01' slot='0x00' function='0x2'/> </source> <address type='pci' domain='0x0000' bus='0x06' slot='0x00' function='0x0'/> </hostdev> <hostdev mode='subsystem' type='pci' managed='yes'> <driver name='vfio'/> <source> <address domain='0x0000' bus='0x01' slot='0x00' function='0x3'/> </source> <address type='pci' domain='0x0000' bus='0x07' slot='0x00' function='0x0'/> </hostdev> <hostdev mode='subsystem' type='pci' managed='yes'> <driver name='vfio'/> <source> <address domain='0x0000' bus='0x04' slot='0x00' function='0x0'/> </source> <address type='pci' domain='0x0000' bus='0x08' slot='0x00' function='0x0'/> </hostdev> <hostdev mode='subsystem' type='pci' managed='yes'> <driver name='vfio'/> <source> <address domain='0x0000' bus='0x0e' slot='0x00' function='0x0'/> </source> <boot order='1'/> <address type='pci' domain='0x0000' bus='0x09' slot='0x00' function='0x0'/> </hostdev> <memballoon model='none'/> </devices> <seclabel type='dynamic' model='dac' relabel='yes'/> </domain>
-
Hi Community, back again but this time it’s very good news. Basically, I’ve gone full circle and now back on (<cpu mode='custom') I’ve been running this setup for 3-4 weeks now and everything is working perfectly with zero instability across all games. When the VM is idle the resource usage almost nothing….. FINALLY a perfect VM!!! Roblox is working via the Windows Store app as mention above, so the kids are over the moon. Long story short, “Unraid Share Mode: VirtioFS Mode” was the culprit here and was causing the system to randomly lock up. Once removed all my issues were resolved and as mentioned the VM idle resources are back to near zero. I’m glad in a way, as its forced me to learn more about the XML view by adding necessary features and pinning “emulatorpin” & “iothreadpin” which have also helped drastically with stability. I have attached my XML and will now be marking this thread as resolved. <?xml version='1.0' encoding='UTF-8'?> <domain type='kvm'> <name>Windows 11</name> <uuid>351920c1-41b7-abf6-86a9-df25e7703fa5</uuid> <description>Windows 11 - Gaming VM</description> <metadata> <vmtemplate xmlns="unraid" name="Windows 11" icon="windows11.png" os="windowstpm"/> </metadata> <memory unit='KiB'>10485760</memory> <currentMemory unit='KiB'>10485760</currentMemory> <memoryBacking> <nosharepages/> </memoryBacking> <vcpu placement='static'>6</vcpu> <iothreads>2</iothreads> <cputune> <vcpupin vcpu='0' cpuset='5'/> <vcpupin vcpu='1' cpuset='13'/> <vcpupin vcpu='2' cpuset='6'/> <vcpupin vcpu='3' cpuset='14'/> <vcpupin vcpu='4' cpuset='7'/> <vcpupin vcpu='5' cpuset='15'/> <emulatorpin cpuset='2-4,10-12'/> <iothreadpin iothread='1' cpuset='2-4,10-12'/> <iothreadpin iothread='2' cpuset='2-4,10-12'/> </cputune> <resource> <partition>/machine</partition> </resource> <os> <type arch='x86_64' machine='pc-q35-7.2'>hvm</type> <loader readonly='yes' type='pflash'>/usr/share/qemu/ovmf-x64/OVMF_CODE-pure-efi-tpm.fd</loader> <nvram>/etc/libvirt/qemu/nvram/d566211d-a3fe-da18-b5e2-8ec98fd0e29e_VARS-pure-efi-tpm.fd</nvram> </os> <features> <acpi/> <apic/> <hyperv mode='custom'> <relaxed state='on'/> <vapic state='on'/> <spinlocks state='on' retries='8191'/> <vpindex state='on'/> <synic state='on'/> <stimer state='on'/> <vendor_id state='on' value='none'/> </hyperv> </features> <cpu mode='custom' match='exact' check='full'> <model fallback='allow'>Skylake-Client</model> <topology sockets='1' dies='1' cores='3' threads='2'/> <feature policy='disable' name='hle'/> <feature policy='disable' name='rtm'/> <feature policy='disable' name='mpx'/> <feature policy='require' name='vmx'/> <feature policy='require' name='hypervisor'/> </cpu> <clock offset='localtime'> <timer name='hypervclock' present='yes'/> <timer name='hpet' present='no'/> </clock> <on_poweroff>destroy</on_poweroff> <on_reboot>restart</on_reboot> <on_crash>restart</on_crash> <devices> <emulator>/usr/local/sbin/qemu</emulator> <disk type='file' device='cdrom'> <driver name='qemu' type='raw'/> <source file='/mnt/user/isos/ISOs/Win11_23H2_EnglishInternational_x64v2.iso'/> <target dev='hda' bus='sata'/> <readonly/> <address type='drive' controller='0' bus='0' target='0' unit='0'/> </disk> <disk type='file' device='cdrom'> <driver name='qemu' type='raw'/> <source file='/mnt/user/isos/ISOs/virtio-win-0.1.248-1.iso'/> <target dev='hdb' bus='sata'/> <readonly/> <address type='drive' controller='0' bus='0' target='0' unit='1'/> </disk> <controller type='pci' index='0' model='pcie-root'/> <controller type='pci' index='1' model='pcie-root-port'> <model name='pcie-root-port'/> <target chassis='1' port='0x10'/> <address type='pci' domain='0x0000' bus='0x00' slot='0x02' function='0x0' multifunction='on'/> </controller> <controller type='pci' index='2' model='pcie-root-port'> <model name='pcie-root-port'/> <target chassis='2' port='0x11'/> <address type='pci' domain='0x0000' bus='0x00' slot='0x02' function='0x1'/> </controller> <controller type='pci' index='3' model='pcie-root-port'> <model name='pcie-root-port'/> <target chassis='3' port='0x12'/> <address type='pci' domain='0x0000' bus='0x00' slot='0x02' function='0x2'/> </controller> <controller type='pci' index='4' model='pcie-root-port'> <model name='pcie-root-port'/> <target chassis='4' port='0x13'/> <address type='pci' domain='0x0000' bus='0x00' slot='0x02' function='0x3'/> </controller> <controller type='pci' index='5' model='pcie-root-port'> <model name='pcie-root-port'/> <target chassis='5' port='0x14'/> <address type='pci' domain='0x0000' bus='0x00' slot='0x02' function='0x4'/> </controller> <controller type='pci' index='6' model='pcie-root-port'> <model name='pcie-root-port'/> <target chassis='6' port='0x15'/> <address type='pci' domain='0x0000' bus='0x00' slot='0x02' function='0x5'/> </controller> <controller type='pci' index='7' model='pcie-root-port'> <model name='pcie-root-port'/> <target chassis='7' port='0x16'/> <address type='pci' domain='0x0000' bus='0x00' slot='0x02' function='0x6'/> </controller> <controller type='pci' index='8' model='pcie-root-port'> <model name='pcie-root-port'/> <target chassis='8' port='0x17'/> <address type='pci' domain='0x0000' bus='0x00' slot='0x02' function='0x7'/> </controller> <controller type='pci' index='9' model='pcie-root-port'> <model name='pcie-root-port'/> <target chassis='9' port='0x18'/> <address type='pci' domain='0x0000' bus='0x00' slot='0x03' function='0x0' multifunction='on'/> </controller> <controller type='pci' index='10' model='pcie-root-port'> <model name='pcie-root-port'/> <target chassis='10' port='0x19'/> <address type='pci' domain='0x0000' bus='0x00' slot='0x03' function='0x1'/> </controller> <controller type='pci' index='11' model='pcie-to-pci-bridge'> <model name='pcie-pci-bridge'/> <address type='pci' domain='0x0000' bus='0x01' slot='0x00' function='0x0'/> </controller> <controller type='pci' index='12' model='pcie-root-port'> <model name='pcie-root-port'/> <target chassis='12' port='0x1a'/> <address type='pci' domain='0x0000' bus='0x00' slot='0x03' function='0x2'/> </controller> <controller type='virtio-serial' index='0'> <address type='pci' domain='0x0000' bus='0x03' slot='0x00' function='0x0'/> </controller> <controller type='sata' index='0'> <address type='pci' domain='0x0000' bus='0x00' slot='0x1f' function='0x2'/> </controller> <controller type='usb' index='0' model='qemu-xhci' ports='15'> <address type='pci' domain='0x0000' bus='0x00' slot='0x07' function='0x0'/> </controller> <interface type='bridge'> <mac address='52:54:00:19:a0:d0'/> <source bridge='br0.1'/> <model type='virtio'/> <address type='pci' domain='0x0000' bus='0x02' slot='0x00' function='0x0'/> </interface> <serial type='pty'> <target type='isa-serial' port='0'> <model name='isa-serial'/> </target> </serial> <console type='pty'> <target type='serial' port='0'/> </console> <channel type='unix'> <target type='virtio' name='org.qemu.guest_agent.0'/> <address type='virtio-serial' controller='0' bus='0' port='1'/> </channel> <input type='tablet' bus='usb'> <address type='usb' bus='0' port='1'/> </input> <input type='mouse' bus='ps2'/> <input type='keyboard' bus='ps2'/> <tpm model='tpm-tis'> <backend type='emulator' version='2.0' persistent_state='yes'/> </tpm> <audio id='1' type='none'/> <hostdev mode='subsystem' type='pci' managed='yes'> <driver name='vfio'/> <source> <address domain='0x0000' bus='0x01' slot='0x00' function='0x0'/> </source> <address type='pci' domain='0x0000' bus='0x04' slot='0x00' function='0x0'/> </hostdev> <hostdev mode='subsystem' type='pci' managed='yes'> <driver name='vfio'/> <source> <address domain='0x0000' bus='0x01' slot='0x00' function='0x1'/> </source> <address type='pci' domain='0x0000' bus='0x05' slot='0x00' function='0x0'/> </hostdev> <hostdev mode='subsystem' type='pci' managed='yes'> <driver name='vfio'/> <source> <address domain='0x0000' bus='0x01' slot='0x00' function='0x2'/> </source> <address type='pci' domain='0x0000' bus='0x06' slot='0x00' function='0x0'/> </hostdev> <hostdev mode='subsystem' type='pci' managed='yes'> <driver name='vfio'/> <source> <address domain='0x0000' bus='0x01' slot='0x00' function='0x3'/> </source> <address type='pci' domain='0x0000' bus='0x07' slot='0x00' function='0x0'/> </hostdev> <hostdev mode='subsystem' type='pci' managed='yes'> <driver name='vfio'/> <source> <address domain='0x0000' bus='0x04' slot='0x00' function='0x0'/> </source> <address type='pci' domain='0x0000' bus='0x08' slot='0x00' function='0x0'/> </hostdev> <hostdev mode='subsystem' type='pci' managed='yes'> <driver name='vfio'/> <source> <address domain='0x0000' bus='0x0e' slot='0x00' function='0x0'/> </source> <boot order='1'/> <address type='pci' domain='0x0000' bus='0x09' slot='0x00' function='0x0'/> </hostdev> <memballoon model='none'/> </devices> <seclabel type='dynamic' model='dac' relabel='yes'/> </domain>
-
Further testing of this VM setup has brought about other issues as I'm now having severe stability issues on the VM when gaming with this "custom" CPU passthrough method. I have discussed this issue on another thread I'm not exactly sure why but after 20+ mins of solid gaming without any issues the VM starts to lag hard, it never locks up totally but FPS drop to 10 FPS. Sometimes the VM recovers after few minutes but it quickly drops to 10fps again, other times the FPS drop and then starts bouncing between 10 to 60fps ( have set a global limit of 60fps ) but it never fully recovers in any games until a fully shutdown and reboot of the VM. There seems to be no specific reason for it, as the VM was working absolutely perfectly with heavy loads before the FPS drops. Changing settings within the game has zero effect on this outcome or how the VM runs in general. I've mainly been using GTA5 to test but it doesn't matter the game at all. I reverted back to the standard CPU “host-passthrough” mode applied by default in Unraid to test. I can see the moments where the VM starts to struggle but it always recovers quickly and FPS come back up, settings within the game most definitely have an effect on stability in this type of CPU passthrough. I'm stuck in a conundrum, with default CPU mode = host-passthrough my VM is stable and works a treat but Roblox crashes after 20sec without error. On the other hand, with CPU mode = custom Roblox works ok but my VM has delayed stability issues causing lagging in any game. I have very limited understanding of what these CPU modes are actually doing to allow Roblox to work. Is there anyone here with the expertise/knowledge that could help explain or even fix this issue I’m now faced with. I truly believe somehow its possible to retain “host-passthrough” mode and apply some sort of tweak that would appease Roblox.
-
True that, the glue that holds it all together how could I forget. I'm stuck in a conundrum, with default CPU mode = passthrough my VM is stable and works a treat but Roblox crashes after 20sec without error. On the other hand with CPU mode = custom Roblox works ok but my VM has delayed stability issues causing lagging. It's thanks to the info on this thread and also from the last few comments from this GitHub thread (May 10th onwards) that helped me to get Roblox to actually load. https://github.com/zhaodice/qemu-anti-detection/issues/56 For some reason changing the "Model=0" within the added <qemu:commandline> section to the XML allowed Roblox to function. From my limited understanding adding the <qemu:commandline> section to the XML seemed to override the default <CPU> section of the XML, this lead me to this thread and found that I didn't need the <qemu:commandline> section to achieve a working Roblox. Sadly I have very limited understanding of what this is actually doing to allow Roblox to work. Surely there is some kind of tweak that can be applied when using the CPU mode "passthrough" that would appease Roblox. Why can't my kids play something other than ROBLOX!!! 😭
-
Thanks for the time and reply as always. I have really thought long and hard about doing a dual boot system to alleviate all the issues regarding a VM but decided against in the end because the servers primary purpose is to be a Server that's available 24/7, then 2nd to that are the dockers/containers also online 24/7, that's the only reason the system exists. The VM was a added luxury and allows me to get the most out of that hardware thats running 24/7, but I'm sure you already fully understand my reasoning. I have a dedicated/binded NVME drive to the VM, along with a GPU and NIC, lucky my 2080ti has a USB controller built-in so thats passthrough also. It's only really the CPU & Ram being shared. It's like I'm so so close to having my perfect system/Gaming VM but yet so far away 😔 Do you know what's the difference between the default CPU mode "Passthrough" and the "Custom" mode mentioned here in this thread? Whatever that's doing it's appeasing Roblox for some reason.
-
Sadly this seems to be the case, as I'm having severe stability issues on the VM when gaming with this "custom" CPU passthrough method. I'm not exactly sure why but after 20+ mins of solid gaming without any FPS drops / lagging the VM starts to lag hard, it never locks up totally but FPS drop to 10 FPS. Sometimes the VM recovers after 1min but it quickly drops to 10fps again, other times the FPS drop and then starts bouncing between 10 to 60fps ( have set a global limit of 60fps ) but it never fully recovers until a fully shutdown and reboot of the VM. There seems to be no specific reason for it, as the VM was working absolutely perfectly with heavy loads before the FPS drops. Changing settings within the game has zero effect on this outcome or how the VM runs in general. I've mainly been using GTA5 to test but it doesn't matter the game at all. I reverted back to the standard CPU passthrough mode applied by default in Unraid to test. I can see the moments where the VM starts to struggle but it always recovers quickly and FPS come back up, settings within the game most definitely have an effect on stability in this type of CPU passthrough. It's almost as if certain features of the CPU are not being enabled correctly as @mackid1993 has pointed out, but I don't know how to go about proving that theory. The only reason I'm using a custom CPU passthrough is because its the only thing that allows Roblox to be played within a VM as mentioned in my previous comment. Ive exhausted all other avenues to achieve this and I have no idea why the custom CPU passthrough allows Roblox to work but it does. Sadly that brings other no serious issues along with it. Attached are both XMLs in .txt files As always any advice or knowledge is much appreciated. 2024-07-20 - Windows 11 - Gaming VM - Custom CPU passthrough.txt 2024-07-27 - Windows 11 - Gaming VM - XML - Default CPU passthrough.txt
-
I didn't realise that would be an issue for Windows 11, although I really have very limited knowledge as to how this all works under the hood. Your comment has just made me realise my 11700k is Rocket lake not Skylake, I never thought to check as the “virsh capabilities” CMD brought up Skylake. Would it be worth trying the Icelake-client?
-
Hi Team, just wanted to say thankyou for all your efforts here on this thread, as its helped me get UWP version of Roblox to work on my VM, really much appriecated. Info on my fix found here:
-
Ok after much trial and error I have finally got the UWP Roblox version to run on my Win11 VM, running on a Intel 11700k cpu. My 2080ti GPU, NVME SSD & MB NIC are bond to VFIO also. Please understand I am by no means an expect and it’s been the hard work of others that have got me this far, It’s been nothing but guessing and trial and error on my end….lol Basically, when opening UWP Roblox, it starts but then closes after 20secs with no error etc. So, I applied XML edits that removed the “Virtual Machine” flag from Task manger but still same issue. So after scouring through the Unraid forums and google I found information regarding <qemu:commandline> XML commands found here https://github.com/zhaodice/qemu-anti-detection/issues/56 Basically, if the “model=0” was applied to the (added) <qemu:commandline> commands within the XML it allowed Roblox to work but with severe performance losses all round making the VM unusable. Further scouring lead, me to which allowed me to change the “model” without the <qemu:commandline> commands section. So, a big SHOUT!!! out to @mackid1993 who’s hard efforts got me the result I required once again. What I ended up doing was changing the </cpu> section of the xml based on the information provided from running the “virsh capabilities” cmd within the unraid console which revealed “<model>Skylake-Client-noTSX-IBRS</model>” but “-noTSX-IBRS” section resulted in severe VM performance loss also. Changing it to <model fallback='allow'>Skylake-Client</model> has resulted in everything working better than it has ever before in my VM, seriously no joke, everything just works better now, I’m now seeing the AAA games really pushing the GPU now instead of the CPU maxing out. I have no idea why this is the case but it’s working. So, I’m sharing what has worked for me in the hope it helps others @bmartino1 My original ,cpu> xml section was: <cpu mode='host-passthrough' check='none' migratable='on'> <topology sockets='1' dies='1' cores='4' threads='2'/> <cache mode='passthrough'/> </cpu> Which now is the following: <cpu mode='custom' match='exact' check='none'> <model fallback='allow'>Skylake-Client</model> <topology sockets='1' dies='1' cores='4' threads='2'/> <feature policy='disable' name='hypervisor'/> <feature policy='require' name='vmx'/> </cpu> The <feature policy='disable' name='hypervisor'/> from what I understand removed the Virtual Machine Flag seen in Task Manger and is required for Roblox to work <feature policy='require' name='vmx'/> This allows virtualization to be run within the VM, I require this to run “Bluestacks android emulator” Hope this helps others!
-
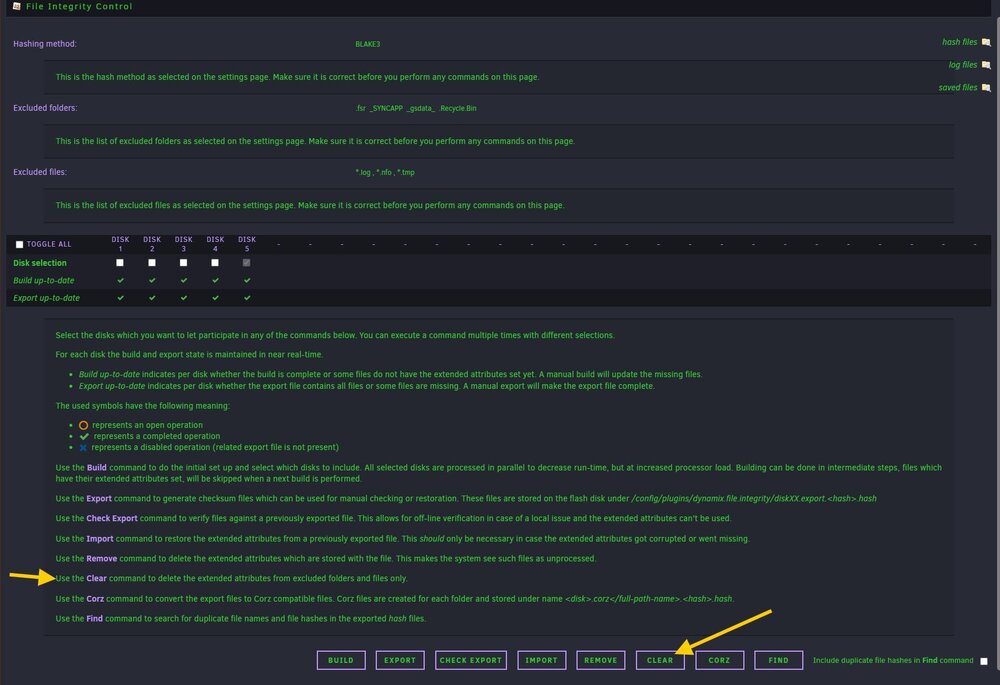
Out of curiosity have to pressed the "CLEAR" button after applying your excluded details?
-
WOW!!! thankyou so so much for this detailed step by step guide, I wish every question I had in life was answered by you.....lol I will be implementing this today, even a noob like me can't mess this up.


