





bobbintb
Members
-
Joined
-
Last visited
Everything posted by bobbintb
-
Word of warning, if you get one of those m2 5 port adapters like this: ...make sure you get one with a heatsink. I've been having issues with my array after have finally traced it back to the chip overheating and causing weird issues. I looked online and plenty have heatsinks included now but mine did not.
-
This deals with Docker and VMs but is mostly general. I have 128GB of RAM, 64 of which is allocated to a VM. I don't have many Dockers but a few times when trying new containers or doing some dev stuff, my VM was stopped Unraid reported it was out of memory. It always shuts off the VM, and not cleanly. That's the last thing I want. Is there some way to set it to never do that? I would have thought it would just allocate the remaining 64GB as needed but it seems to be over allocating.
-
I was reading this issue: but it seems to be different than mine. I have been using 6.11.1 fine as far as I can recall. Yesterday Windows updated and now my VM will crash, leaving the screen frozen on the last image but it shows as stopped in the webui. It doesn't crash Unraid, just the VM. The VM log shows no errors but does have this helpful note: 2022-10-22 23:12:40.554+0000: shutting down, reason=crashed 2022-10-22 23:12:40.554+0000: shutting down, reason=crashed I believe the update was for the new 2h22 Windows update. It will run for probably 15 minutes before it crashes. I am rolling back the update to see if that fixes it. I have attached my diagnostics. Not sure if anyone else has had a similar issue. tower-diagnostics-20221022-1717.zip
-
I've got a few plugins in the works but my main issue is that I'm pretty new to web development. There are just a few things that conceptually, I guess I'm just having an issue with. The biggest issue I'm facing is I have been unable to run shell commands with node.js in several projects and environments. I've spent a few months off and on with this but I keep getting "require not defined". I know what it means, but everything I've read and followed on how to resolve it hasn't worked for some reason. I've been in IT for a LONG time so it's a bit frustrating being stuck on this. I can go into more detail if anyone is interested in giving me a hand.
-
I have 3 Nvidia GPUs installed in one VM. I use Aster to have multiple workstations with the same Windows installation. I don't think that's relevant but mentioning it just in case. I did some reconfiguring with my server and now two of the video cards are showing as other devices in device manager. This isn't a problem per se, as this is the normal state when first setting things up. The issue is that installing the driver so that it works for all the GPUs involves a big song and dance. Additionally, I dare not update the driver and have to go through it all again. Running the Nvidia driver installer fails. I usually have to remove all the drivers, unassign the video cards, assign a VNC as GPU, and reinstall the drivers and it's a long and frustrating process. I don't know if anyone else has had similar issues. Does anyone know of an easier way? My GPUs are GTX 1060, GTX 1050 Ti, and GTX 950.
-
I just finished a lengthy parity swap where my array was unavailable for a few days. It is now rebuilding the data disks and as I was configuring rclone, I tried to mount under /mnt/user and now I am getting the "Transport endpoint is not connected" error. A common issue/mistake. So my data is inaccessible pretty much until I reboot. Is there a way to either pause the rebuild and continue after reboot, or fix the transport error without rebooting? I read that allowing rebuild to continue after reboot was planned but I don't know if it was ever implemented. I'm currently on 6.11.0.
-
Cool, thank you both. Things are moving along now.
-
One of them is probably fine but the other one is over 7 years old so faulty or not, that one's getting replaced. I was hoping to avoid having the array unavailable. tower-diagnostics-20221010-1721.zip
-
Sorry, I just noticed this. Try apt-get install dbus-x11 I'll have to update the docker because I guess they discontinued automatic builds.
-
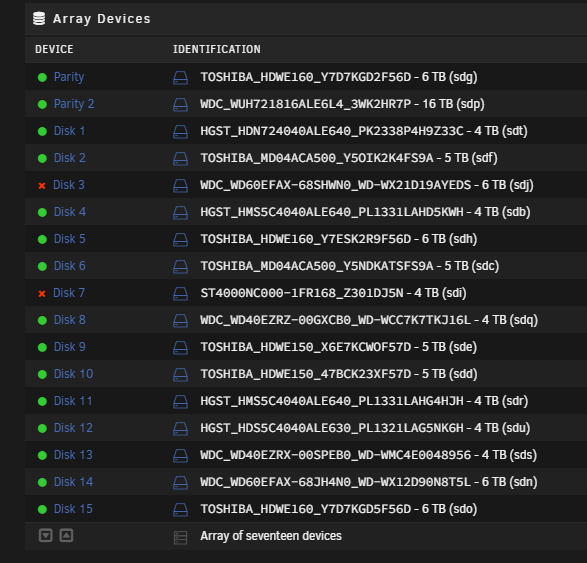
I have two data drives that have been disabled because of errors. I am preclearing two 18tb replacement drives right now but they are both larger than the parity drives so they will have to replace those first. I've replaced drives several times before but this is a little more complicated so I don't want to screw anything up. What's the best procedure for this situation? Will the array still be protected if those two are disabled and I replace a parity drive? I'm probably just being overly paranoid about this.
-
There is a community app for it.
-
When I create a new VM, I usually have to go and download the ISO. I've used tools for making a bootable USB and such for running an OS live from a USB and they frequently have a drop down with the Linux distro and it will automatically download the ISO. Is there a builtin or plugin for something like this in UnRAID when using the Add VM template? I didn't seen anything in my search.
-
I just replaced a flash drive and had this same issue. The renaming trick fixed it. It seems it does not rename the flash drive to UNRAID in some cases. My old drive that was already named UNRAID worked but my new one didn't.
-
There is a plugin in CA for docker compose as well. I use it and the docker folder plugin. They work well together as you can put all the docker images created by compose into a folder to keep things tidy.
-
Very nice. It's really simple to make any tweaks or changes to the script, such as blinking lights, or even to run docker containers. Basically anything you can do in the command line. I was booting over the network as well but this just gives it a bit of polish and ease of use for the rest of the family. Plus they don't bug me to turn it on because they don't remember how to do it. Nice looking enclosure you got too.
-
Just getting around to looking into this again. It does seem to boot faster with less RAM. I'm on 6.10.3 now.
-
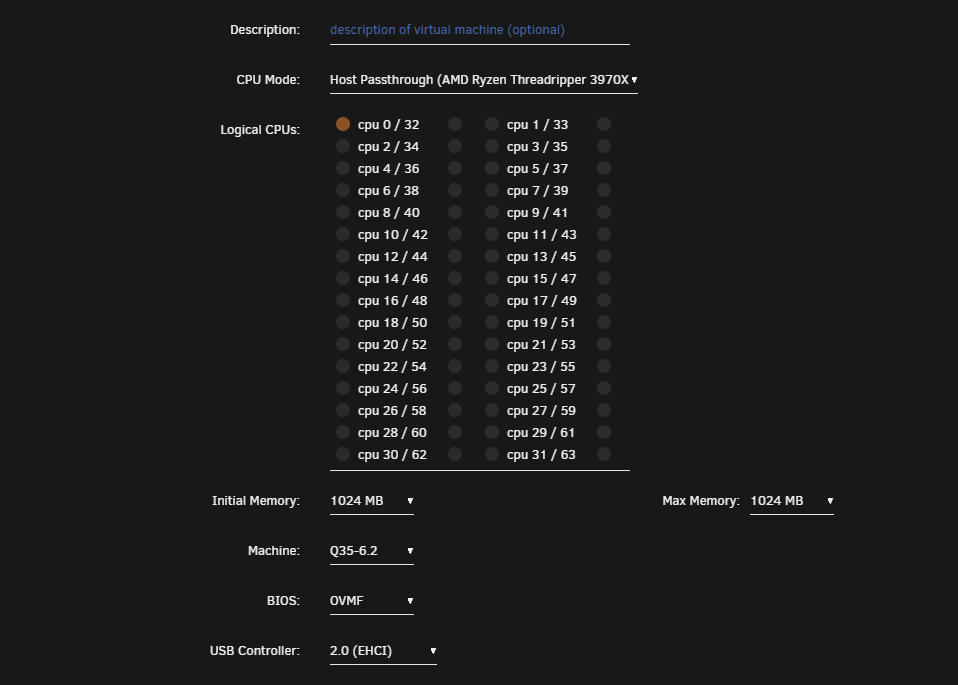
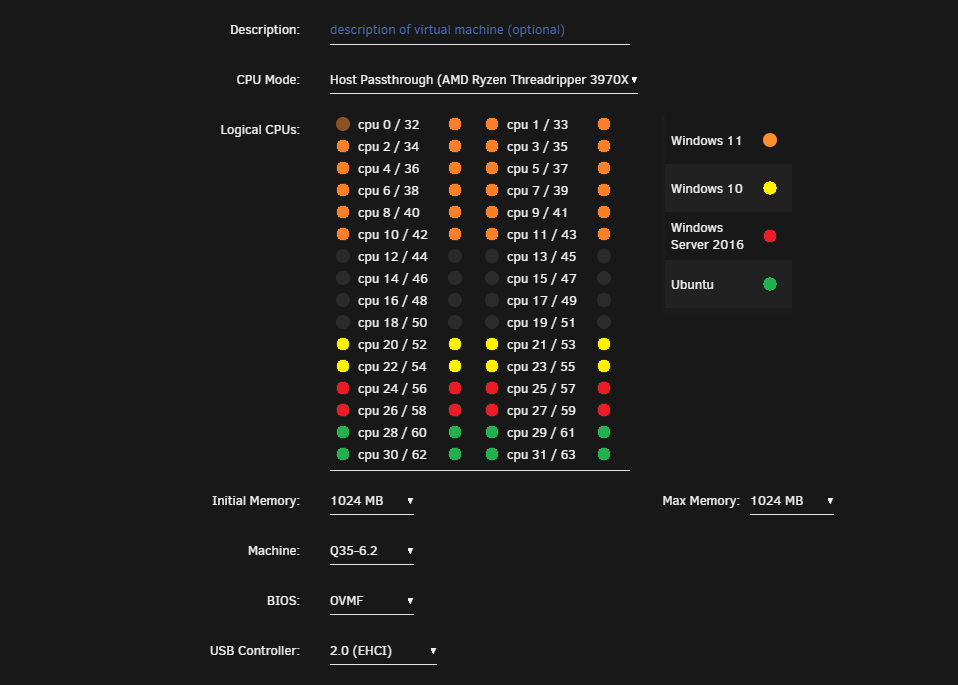
I came here to suggest the same thing. This request is a bit lacking in detail so I'll elaborate. You can see the cpu cores that are mapped/pinned to a vm in settings>system settings>CPU pinning: It would be very helpful if this was displayed somewhere when creating a VM: Perhaps add a color to the radio buttons to indicate they are already assigned (but still allow you to assign). I think that would be the best way, as adding the above image from CPU Pinning would be a lot of clutter. Something like this maybe: At the very least, adding a link to the CPU pinning page to the create VM page would be helpful.

-
I can but it will be a while. Like all the other cases I've read, it boots fine after the initial slow boot. It has to sit for a good long while before it happens again.
-
It's really not. It's about as simple as it can get and only takes a few minutes. I really don't need to invest in a whole home automation setup with all that hardware just for this. That's actually quite a bit complicated and expensive.
-
I'm starting to think I need to submit a bug report. There doesn't seem to be anything I can do on my end. If anyone has any ideas, I'm all ears. Thanks.
-
I don't just yet. I've been busy finishing my masters so I've been pretty slammed. Right now, it's just rudimentary, a wire hanging down with a spare button from some front panel. Just enough for a non-technical user. I have an actual button on the way but it is taking forever to get here. I have an open frame for my server and plan to 3d print a mount. It'll look nice and pretty soon. I've never used an Arduino but know a bit about them. An Uno is kind of overkill for just a button but it should work and you've got a spare so, why not? This is my first experience with any kind of embedded device and it didn't take me long so I'm sure you could do it.
-
Yes, one thing you can do is set your primary video card to VNC. That way it doesn't actually output to a monitor but you can access the video output through the webui. As Mentioned, Spaceinvader One has several videos on VMs and other stuff. It's a great resource, even for experienced users.
-
Ah, that's a new one for me! I didn't realize that was there. Cool.
-
You can change the storage amount, just not through the UnRAID webui. Try this: https://computingforgeeks.com/how-to-extend-increase-kvm-virtual-machine-disk-size/ I don't quite understand what you are asking with the second question.
-
My VM takes 2-3 minutes before it gets to the TianoCore screen. I've read a lot about this being an issue with VMs with a lot of cores and RAM. However, I saw in a changelog for a recent version of UnRAID that it was related to Intel processors and that it had been resolved. Unfortunately, I am still having the issue with my Threadripper on the latest version of UnRAID. I couldn't find anything in the BIOS settings to help the issue and other solutions involve recompiling. Any ideas? Here is my VM XML: <?xml version='1.0' encoding='UTF-8'?> <domain type='kvm' id='37'> <name>Windows 11</name> <uuid>1e48b9f1-0149-65a1-1d9e-06bdfb84bce6</uuid> <metadata> <vmtemplate xmlns="unraid" name="Windows 10" icon="windows.png" os="windows10"/> </metadata> <memory unit='KiB'>67108864</memory> <currentMemory unit='KiB'>67108864</currentMemory> <memoryBacking> <nosharepages/> </memoryBacking> <vcpu placement='static'>8</vcpu> <cputune> <vcpupin vcpu='0' cpuset='0'/> <vcpupin vcpu='1' cpuset='32'/> <vcpupin vcpu='2' cpuset='1'/> <vcpupin vcpu='3' cpuset='33'/> <vcpupin vcpu='4' cpuset='2'/> <vcpupin vcpu='5' cpuset='34'/> <vcpupin vcpu='6' cpuset='3'/> <vcpupin vcpu='7' cpuset='35'/> </cputune> <resource> <partition>/machine</partition> </resource> <os> <type arch='x86_64' machine='pc-q35-5.1'>hvm</type> <loader readonly='yes' type='pflash'>/usr/share/qemu/ovmf-x64/OVMF_CODE-pure-efi.fd</loader> <nvram>/etc/libvirt/qemu/nvram/1e48b9f1-0149-65a1-1d9e-06bdfb84bce6_VARS-pure-efi.fd</nvram> <boot dev='hd'/> </os> <features> <acpi/> <apic/> <hyperv> <relaxed state='on'/> <vapic state='on'/> <spinlocks state='on' retries='8191'/> <vendor_id state='on' value='none'/> </hyperv> </features> <cpu mode='host-passthrough' check='none' migratable='on'> <topology sockets='1' dies='1' cores='4' threads='2'/> <cache mode='passthrough'/> <feature policy='require' name='topoext'/> </cpu> <clock offset='localtime'> <timer name='hypervclock' present='yes'/> <timer name='hpet' present='no'/> </clock> <on_poweroff>destroy</on_poweroff> <on_reboot>restart</on_reboot> <on_crash>restart</on_crash> <devices> <emulator>/usr/local/sbin/qemu</emulator> <disk type='file' device='cdrom'> <driver name='qemu' type='raw'/> <source file='/mnt/user/virtio-win-0.1.215.iso' index='1'/> <backingStore/> <target dev='hdb' bus='sata'/> <readonly/> <alias name='sata0-0-1'/> <address type='drive' controller='0' bus='0' target='0' unit='1'/> </disk> <controller type='sata' index='0'> <alias name='ide'/> <address type='pci' domain='0x0000' bus='0x00' slot='0x1f' function='0x2'/> </controller> <controller type='pci' index='0' model='pcie-root'> <alias name='pcie.0'/> </controller> <controller type='pci' index='1' model='pcie-root-port'> <model name='pcie-root-port'/> <target chassis='1' port='0x8' hotplug='off'/> <alias name='pci.1'/> <address type='pci' domain='0x0000' bus='0x00' slot='0x01' function='0x0' multifunction='on'/> </controller> <controller type='pci' index='2' model='pcie-root-port'> <model name='pcie-root-port'/> <target chassis='2' port='0x9' hotplug='off'/> <alias name='pci.2'/> <address type='pci' domain='0x0000' bus='0x00' slot='0x01' function='0x1'/> </controller> <controller type='pci' index='3' model='pcie-root-port'> <model name='pcie-root-port'/> <target chassis='3' port='0xa' hotplug='off'/> <alias name='pci.3'/> <address type='pci' domain='0x0000' bus='0x00' slot='0x01' function='0x2'/> </controller> <controller type='pci' index='4' model='pcie-root-port'> <model name='pcie-root-port'/> <target chassis='4' port='0xb' hotplug='off'/> <alias name='pci.4'/> <address type='pci' domain='0x0000' bus='0x00' slot='0x01' function='0x3'/> </controller> <controller type='pci' index='5' model='pcie-root-port'> <model name='pcie-root-port'/> <target chassis='5' port='0xc' hotplug='off'/> <alias name='pci.5'/> <address type='pci' domain='0x0000' bus='0x00' slot='0x01' function='0x4'/> </controller> <controller type='pci' index='6' model='pcie-root-port'> <model name='pcie-root-port'/> <target chassis='6' port='0xd' hotplug='off'/> <alias name='pci.6'/> <address type='pci' domain='0x0000' bus='0x00' slot='0x01' function='0x5'/> </controller> <controller type='pci' index='7' model='pcie-root-port'> <model name='pcie-root-port'/> <target chassis='7' port='0xe' hotplug='off'/> <alias name='pci.7'/> <address type='pci' domain='0x0000' bus='0x00' slot='0x01' function='0x6'/> </controller> <controller type='pci' index='8' model='pcie-root-port'> <model name='pcie-root-port'/> <target chassis='8' port='0xf' hotplug='off'/> <alias name='pci.8'/> <address type='pci' domain='0x0000' bus='0x00' slot='0x01' function='0x7'/> </controller> <controller type='pci' index='9' model='pcie-root-port'> <model name='pcie-root-port'/> <target chassis='9' port='0x10' hotplug='off'/> <alias name='pci.9'/> <address type='pci' domain='0x0000' bus='0x00' slot='0x02' function='0x0' multifunction='on'/> </controller> <controller type='pci' index='10' model='pcie-root-port'> <model name='pcie-root-port'/> <target chassis='10' port='0x11' hotplug='off'/> <alias name='pci.10'/> <address type='pci' domain='0x0000' bus='0x00' slot='0x02' function='0x1'/> </controller> <controller type='virtio-serial' index='0'> <alias name='virtio-serial0'/> <address type='pci' domain='0x0000' bus='0x02' slot='0x00' function='0x0'/> </controller> <controller type='usb' index='0' model='qemu-xhci' ports='15'> <alias name='usb'/> <address type='pci' domain='0x0000' bus='0x00' slot='0x07' function='0x0'/> </controller> <interface type='bridge'> <mac address='52:54:00:51:1f:d5'/> <source bridge='br0'/> <target dev='vnet0'/> <model type='virtio-net'/> <alias name='net0'/> <address type='pci' domain='0x0000' bus='0x01' slot='0x00' function='0x0'/> </interface> <serial type='pty'> <source path='/dev/pts/0'/> <target type='isa-serial' port='0'> <model name='isa-serial'/> </target> <alias name='serial0'/> </serial> <console type='pty' tty='/dev/pts/0'> <source path='/dev/pts/0'/> <target type='serial' port='0'/> <alias name='serial0'/> </console> <channel type='unix'> <source mode='bind' path='/var/lib/libvirt/qemu/channel/target/domain-37-Windows 11/org.qemu.guest_agent.0'/> <target type='virtio' name='org.qemu.guest_agent.0' state='disconnected'/> <alias name='channel0'/> <address type='virtio-serial' controller='0' bus='0' port='1'/> </channel> <input type='mouse' bus='ps2'> <alias name='input0'/> </input> <input type='keyboard' bus='ps2'> <alias name='input1'/> </input> <hostdev mode='subsystem' type='pci' managed='yes'> <driver name='vfio'/> <source> <address domain='0x0000' bus='0x02' slot='0x00' function='0x0'/> </source> <alias name='hostdev0'/> <address type='pci' domain='0x0000' bus='0x03' slot='0x00' function='0x0'/> </hostdev> <hostdev mode='subsystem' type='pci' managed='yes'> <driver name='vfio'/> <source> <address domain='0x0000' bus='0x21' slot='0x00' function='0x0'/> </source> <alias name='hostdev1'/> <rom file='/mnt/user/isos/vbios/GP107.rom'/> <address type='pci' domain='0x0000' bus='0x04' slot='0x00' function='0x0'/> </hostdev> <hostdev mode='subsystem' type='pci' managed='yes'> <driver name='vfio'/> <source> <address domain='0x0000' bus='0x02' slot='0x00' function='0x1'/> </source> <alias name='hostdev2'/> <address type='pci' domain='0x0000' bus='0x05' slot='0x00' function='0x0'/> </hostdev> <hostdev mode='subsystem' type='pci' managed='yes'> <driver name='vfio'/> <source> <address domain='0x0000' bus='0x21' slot='0x00' function='0x1'/> </source> <alias name='hostdev3'/> <address type='pci' domain='0x0000' bus='0x06' slot='0x00' function='0x0'/> </hostdev> <hostdev mode='subsystem' type='pci' managed='yes'> <driver name='vfio'/> <source> <address domain='0x0000' bus='0x01' slot='0x00' function='0x0'/> </source> <alias name='hostdev4'/> <address type='pci' domain='0x0000' bus='0x07' slot='0x00' function='0x0'/> </hostdev> <hostdev mode='subsystem' type='pci' managed='yes'> <driver name='vfio'/> <source> <address domain='0x0000' bus='0x04' slot='0x00' function='0x3'/> </source> <alias name='hostdev5'/> <address type='pci' domain='0x0000' bus='0x08' slot='0x00' function='0x0'/> </hostdev> <hostdev mode='subsystem' type='pci' managed='yes'> <driver name='vfio'/> <source> <address domain='0x0000' bus='0x23' slot='0x00' function='0x3'/> </source> <alias name='hostdev6'/> <address type='pci' domain='0x0000' bus='0x09' slot='0x00' function='0x0'/> </hostdev> <memballoon model='none'/> </devices> <seclabel type='dynamic' model='dac' relabel='yes'> <label>+0:+100</label> <imagelabel>+0:+100</imagelabel> </seclabel> </domain>


