





JohnO
Members
-
Joined
-
Last visited
Everything posted by JohnO
-
Neat!
-
Great stuff! Thanks for taking the leap for us all.
-
(I think the Open VM Tools thread has been hijacked - perhaps the discussion of getting 6.4 for work with ESXi should be a separate thread in the Virtualizing UnRAID section). https://lime-technology.com/forums/forum/46-virtualizing-unraid/
-
I, too, upgraded my drives to XFS before moving to 6.x. I'm on ESXi 6.0.0.
-
I do think you are limited to 8. Remember, though, that the underlying resources not assigned to the VM are also used to support the VM processes if they are available and needed.
-
Also looking forward to an update for 6.2.1. Thanks!
-
So just to confirm -- After I download the plopkexec iso image, and put it on my ESXi server, all I need to do is change the particular virtual machine setting for CD/DVD Drive 1 to use the new ISO image, and no longer use the plpbtmycd.iso file, correct? I've got multiple USB memory sticks in my server -- will it give me a chance to find the correct one, or does this use the USB 1 field, as I currently have it defined with the existing PLOP configuration? Thanks, John
-
I too would love to see some more information on switching from plop to plopkexec. Upgrading from 6.1.9 as a VM to 6.2 would be a great time to try this. Thanks, John.
-
Greetings, Just downloaded the update. It looks good except this error in your test display area: Here's what share free space looks like: snmpwalk -v 2c localhost -c public NET-SNMP-EXTEND-MIB::nsExtendOutLine."sharefree" NET-SNMP-EXTEND-MIB::nsExtendOutLine."sharefree".1 = STRING: /usr/local/emhttp/plugins/snmp/share_free_space.sh: line 16: allocator=\"mostfree\" * 1024: syntax error: operand expected (error token is \"\"mostfree\" * 1024\") Thanks!
-
I tried just deleting and re-installing the plug-in, and behavior didn't change. I did check permissions and they were set as you suggested. I then deleted the SNMP plug-in, upgraded from 6.01 to 6.1, and re-installed the plug-in and now it works! +============================================================================== | Testing SNMP by listing mounts +============================================================================== Looks like snmpd is working... Output: HOST-RESOURCES-MIB::hrFSMountPoint.22 = STRING: "/var/log" HOST-RESOURCES-MIB::hrFSMountPoint.25 = STRING: "/boot" Here's what drive temperatures look like: snmpwalk -v 2c localhost -c public NET-SNMP-EXTEND-MIB::nsExtendOutLine."disktemp" NET-SNMP-EXTEND-MIB::nsExtendOutLine."disktemp".1 = STRING: WDC_WD20EFRX-68EUZN0_WD-WCC4M0927675: 28 NET-SNMP-EXTEND-MIB::nsExtendOutLine."disktemp".2 = STRING: WDC_WD20EFRX-68EUZN0_WD-WCC4M4PJF00N: 29 NET-SNMP-EXTEND-MIB::nsExtendOutLine."disktemp".3 = STRING: WDC_WD20EFRX-68EUZN0_WD-WCC4M3PHD4DE: 29 NET-SNMP-EXTEND-MIB::nsExtendOutLine."disktemp".4 = STRING: WDC_WD20EFRX-68EUZN0_WD-WCC4M0072449: 27 Here's what share free space looks like: snmpwalk -v 2c localhost -c public NET-SNMP-EXTEND-MIB::nsExtendOutLine."sharefree" NET-SNMP-EXTEND-MIB::nsExtendOutLine."sharefree".1 = STRING: Thanks, John
-
Working backwards: That seems to work fine: root@OshTank:~# bash /etc/rc.d/rc.snmpd stop Shutting down snmpd: . DONE root@OshTank:~# bash /etc/rc.d/rc.snmpd start Starting snmpd: /usr/sbin/snmpd -LF w /var/log/snmpd.log -LF w /var/log/snmpd.log -A -p /var/run/snmpd -a -c /usr/local/emhttp/plugins/snmp/snmpd.conf root@OshTank:~# It doesn't find the disk temp stuff if I run it manually: root@OshTank:~# !snmpwalk snmpwalk -v 2c localhost -c public 'NET-SNMP-EXTEND-MIB::nsExtendOutLine."disktemp"' NET-SNMP-EXTEND-MIB::nsExtendOutLine."disktemp" = No Such Instance currently exists at this OID root@OshTank:~# It looks like you are trying to execute the whole statement below as a single command, but that didn't work for me: root@OshTank:~# root@OshTank:~# tail -n 1 /usr/local/emhttp/plugins/snmp/snmpd.conf extend disktemp /usr/local/emhttp/plugins/snmp/drive_temps.sh ==> /usr/local/emhttp/plugins/snmp/snmpd.conf <== disk /mnt/cache tail: cannot open ‘extend’ for reading: No such file or directory tail: cannot open ‘disktemp’ for reading: No such file or directory ==> /usr/local/emhttp/plugins/snmp/drive_temps.sh <== exit 0 root@OshTank:~# Here is some other stuff that might be useful: root@OshTank:/usr/local/emhttp/plugins/snmp# more snmpd.conf rocommunity public syslocation Here syscontact root@tower disk /mnt/disk1 disk /mnt/disk2 disk /mnt/disk3 disk /mnt/disk4 disk /mnt/disk5 disk /mnt/disk6 disk /mnt/disk7 disk /mnt/disk8 disk /mnt/disk9 disk /mnt/disk10 disk /mnt/disk11 disk /mnt/disk12 disk /mnt/disk13 disk /mnt/disk14 disk /mnt/disk15 disk /mnt/disk16 disk /mnt/disk17 disk /mnt/disk18 disk /mnt/disk19 disk /mnt/disk20 disk /mnt/cache root@OshTank:/usr/local/emhttp/plugins/snmp# root@OshTank:/usr/local/emhttp/plugins/snmp# root@OshTank:/usr/local/emhttp/plugins/snmp# cat drive_temps.sh #!/usr/bin/bash MDCMD=/root/mdcmd AWK=/usr/bin/awk CAT=/usr/bin/cat FIND=/usr/bin/find GREP=/usr/bin/grep RM=/usr/bin/rm SED=/usr/bin/sed HDPARM=/usr/sbin/hdparm SMARTCTL=/usr/sbin/smartctl CACHE=/tmp/plugins/snmp/drive_temps.txt mkdir -p $(dirname $CACHE) # Cache the results for 5 minutes at a time, to speed up queries if $FIND $(dirname $CACHE) -mmin -5 -name drive_temps.txt | $GREP -q drive_temps.txt then $CAT $CACHE exit 0 fi $RM -f $CACHE $MDCMD status | $GREP '\(rdevId\|rdevName\).*=.' | while read -r device do read -r name # Double-check the data to make sure it's in sync device_num=$(echo $device | $SED 's#.*\.\(.*\)=.*#\1#') name_num=$(echo $name | $SED 's#.*\.\(.*\)=.*#\1#') if [[ "$device_num" != "$name_num" ]] then echo 'ERROR! Couldn'"'"'t parse mdcmd output. Command was:' echo 'mdcmd status | $GREP '"'"'\(rdevId\|rdevName\).*=.'"'"' | while read -r device' fi device=$(echo $device | $SED 's#.*=#/dev/#') name=$(echo $name | $SED 's/.*=//') if ! $HDPARM -C $device 2>&1 | $GREP -cq standby then temp=$($SMARTCTL -A $device | $GREP -m 1 -i Temperature_Celsius | $AWK '{print $10}') fi # For debugging # echo "$name = $device, $temp" echo "$name: $temp" >> $CACHE done $CAT $CACHE exit 0 root@OshTank:/usr/local/emhttp/plugins/snmp# Thanks for your help! John
-
That worked: root@OshTank:~# /usr/local/emhttp/plugins/snmp/drive_temps.sh WDC_WD20EFRX-68EUZN0_WD-WCC4M0927675: 28 WDC_WD20EFRX-68EUZN0_WD-WCC4M4PJF00N: 28 WDC_WD20EFRX-68EUZN0_WD-WCC4M3PHD4DE: 29 WDC_WD20EFRX-68EUZN0_WD-WCC4M0072449: 27 root@OshTank:~#
-
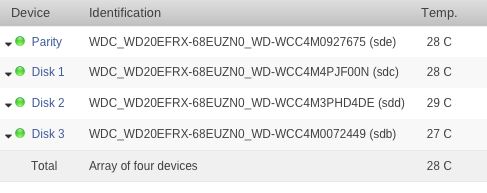
Hmm... On the plus side, this plug-in architecture works great! Here's the fresh output - no real change: +============================================================================== | Testing SNMP by listing mounts +============================================================================== Looks like snmpd is working... Output: HOST-RESOURCES-MIB::hrFSMountPoint.1 = STRING: "/mnt/disk1" HOST-RESOURCES-MIB::hrFSMountPoint.2 = STRING: "/mnt/disk2" HOST-RESOURCES-MIB::hrFSMountPoint.3 = STRING: "/mnt/disk3" HOST-RESOURCES-MIB::hrFSMountPoint.22 = STRING: "/var/log" HOST-RESOURCES-MIB::hrFSMountPoint.25 = STRING: "/boot" Here's what drive temperatures look like: NET-SNMP-EXTEND-MIB::nsExtendOutLine."disktemp" = No Such Instance currently exists at this OID ----------------------------------------------------------- snmp has been installed. Copyright 2015, David Coppit Version: 2015.08.25 ----------------------------------------------------------- plugin: updated unRAID can see the temps - as shown in the screen shot below. To complicate things - My unRAID system is a virtual guest on VMware ESXi. The disk controller is "passed through" to the VM, and is dedicated to the VM, as are all the attached disks. Thanks, John
-
Nice. I just updated the plug-in, but I'm not seeing temperatures, either in your installation test, or from my SNMP monitoring server. Here's the snippet from your installation: +============================================================================== | Testing SNMP by listing mounts +============================================================================== Looks like snmpd is working... Output: HOST-RESOURCES-MIB::hrFSMountPoint.1 = STRING: "/mnt/disk1" HOST-RESOURCES-MIB::hrFSMountPoint.2 = STRING: "/mnt/disk2" HOST-RESOURCES-MIB::hrFSMountPoint.3 = STRING: "/mnt/disk3" HOST-RESOURCES-MIB::hrFSMountPoint.22 = STRING: "/var/log" HOST-RESOURCES-MIB::hrFSMountPoint.25 = STRING: "/boot" Here's what drive temperatures look like: NET-SNMP-EXTEND-MIB::nsExtendOutLine."disktemp" = No Such Instance currently exists at this OID ----------------------------------------------------------- snmp has been installed. Copyright 2015, David Coppit Version: 2015.08.24 ----------------------------------------------------------- Thanks, John
-
On installation it does a self-test. Uninstall and reinstall to double-check it. Installed and feeding data to MRTG (old school, I know). Now to see what OIDs are good to watch!
-
Ooooh! Can't wait to try this. I've been using SNMP to manage network-attached devices since the early 90's. I've been using SNMP to at least watch the reachability of my unRAID VM, but now I get get some other useful stuff. Sweet. Now to figure out which OIDs are interesting... So as a v6 plug-in, will this be installable/updatable/deletable all through the unRAID GUI? Thanks, John
-
This is the part that took me a few days to get through my head. I had come up with great ways to empty a disk, thinking it would save time, but it really doesn't fit. Thankfully, the steps can be separated, and many can be (have to be) completed with the array up and available, so there is no reason to force it into a single outage window.
-
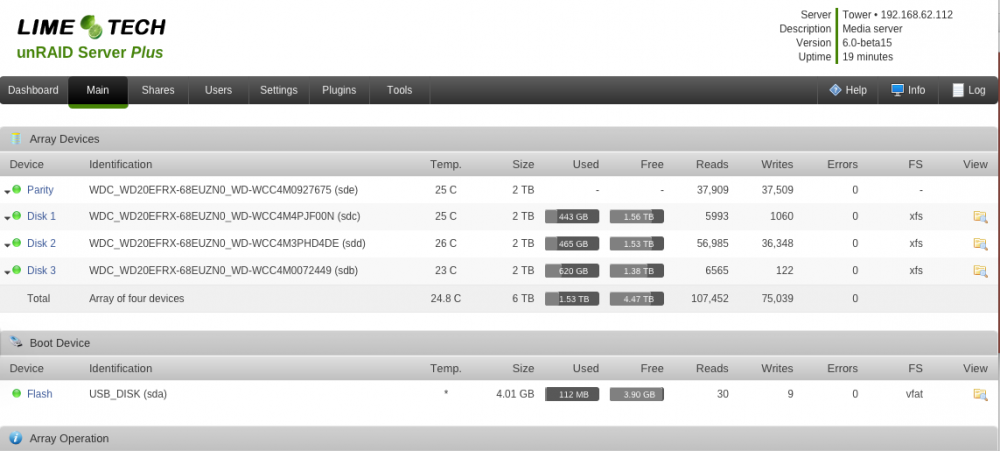
Thanks to all the help, I replaced two drives and re-formatted my array to XFS successfully! John
-
Wow. No. I get it now! Thanks to you and gundamguy for taking the time to re-pour the words back into one ear, because clearly, they had gone in one ear, and drained out the other! I see now it'll be a bit longer process than I had thought, but that's OK. I really appreciate it. Thanks, guys. John
-
I think this is finally starting to sink in... So you are suggesting that I should just stop the array, and replace both 1 TB drives for 2 TB drives, and have the unRAID parity system "magically" rebuild them on to the new 2 TB drives. These would then be RFS drives at this point. If I take this approach, I'm not sure the best way to get to XFS. I only have 4 slots on this controller card, and all are full (three data drives, one parity drive), thus the discussion of consolidating data from three data drives down to two as my first step. Sorry for the basic questions, but as these are fairly lengthy processes, I figure I'd better get it right to try to minimize down time. Thanks, John
-
Just to clarify -- maybe I should not use the word "replace" but instead, I'll be add new drives to the array, and remove old drives from the array (with one removed/re-added drive being the same physical mechanism).
-
Hmm... Maybe I'm missing something. I was not planning on rebuilding a drive from parity. My thought was to empty out one drive by moving it's contents to another existing drive, remove the empty drive and replace it with a larger drive, pre-clear the new larger drive, format it with XFS, and then move data to it from another existing drive. Once that is done, I would continue a similar process until the data has been migrated to drives formatted with XFS. In particular here is the layout: Current state: Future State: Parity: 2 TB (keep drive) Parity: 2 TB Disk1: 1 TB RFS (60% full) (replace drive) Disk1: 2 TB XFS Disk2: 1 TB RFS (40% full) (replace drive) Disk2: 2 TB XFS Disk3: 2 TB RFS (20% full) (keep drive) Disk3: 2 TB XFS My thought process is as follows: Move all data from Disk1 to Disk3, remove current Disk1. Install replacement for Disk 1 Move all data from Disk2 to new Disk 1, remove Disk2. Install replacement for Disk 2 Move all data from Disk3 to new Disk 2, re-format Disk3. Move some data from Disks 1 and 2 to Disk 3 to even out the disks somewhat. Does that make sense? Thanks, John
-
Greetings, I've been reading and re-reading this thread over the last couple of weeks. I have two questions: 1) Before I can add a new, larger drive, I need to move data around so that I can remove a drive. I figure it's about about 600 GB of data. Would it be best to shut down the array to move that data? I assume in that case I'm safe to just telnet to the unRAID server and use the following rsync commands to move the data into the existing hierarchy, without having to create a temporary subdirectory that isn't part of the user share, correct? rsync -av --progress --remove-source-files /mnt/diskX/ /mnt/diskY/ At that point, I should be able to start following the guide, I think. 2) Where does pre-clear of the new drive get done? Is it before the steps in bjp999's guide? It is mentioned, but it is above the steps, so i wasn't sure. 3) Also - in the steps above, as the array is running, are you at risk of duplicate files, and confusing things between steps 10 and 11? Thanks, John
-
I want to pass along my thanks for your guide. I upgraded my 1 year old unRAID 5.0.5 NAS (which is a VM in a VMWare ESXi 5.5 server with a passed-through disk controller). The process went very smoothly. I did not have to modify the PLOP settings at all -- I just followed your guide to re-format the USB boot drive and update with software and configs as you indicated. One question/comment. In following the guide to copy over the files from the version 5 config directory, I note that it copies my older cache-dirs file. Should that copy be excluded from the copy, or deleted afterwards? It appears it is not active, but it might cause confusion. I run a very bare-bones system, with no plugins. I was configured with 1 GB of RAM, but since I had been reading in other places to go with 2 GB RAM, I did that. Of course, in a VM environment, the RAM allocated is somewhat smoke and mirrors, as you can over allocate. John
-
1 GB of ram assigned to my 5.05 VM guest running unRAID. Swap hasn't been touched, and the system is not breathing hard (I've got two main directories, with 3-8 subdirectories each -- a very small set up.
