





jbartlett
Community Developer
-
Joined
-
Last visited
Everything posted by jbartlett
-
http://strangejourney.net/hddb/index.cfm?View=Drives&Vendor=Western Digital&Model=WD120EFBX The tail end of the drive is kinda slow IMHO but the overall average is around 170mb/sec. Compare your graph to the ones in the link, the data sample is still small but out of 7 unique drives uploaded, the spread is pretty tight.
-
Looks to be harmless, related to Java 11. https://dev.lucee.org/t/illegal-reflective-access/7052 https://issues.apache.org/jira/browse/FELIX-5765
-
This is something I've been wanting to investigate too. But after you edit a drive image, click the "Submit Drive" button that shows up after you save the update (or viewing the drive after updating). Click the button again to confirm. You only need to do this step once per drive model. Next update, it should restore your drive image & overlay from what you uploaded. This is a per-machine setting.
-
Remove the DiskSpeed directory, edit the Docker image, and save it. Check to see if the DiskSpeed directory has been recreated.
-
What kind of upload? Drive image upload or Drive & Benchmark data? And please try again, I tested both and got back successful messages for both. If it does fail, note the time & time zone that you tried and I'll check the logs.
-
It looks like the permissions on the new directory aren't correct and the application can't write to it. While the Docker config is set to R/W, that doesn't mean squat if the directory itself is not writeable by Docker. Open a shell prompt to the unraid server itself (not the Docker) and enter in the following lines. This is the same code when you run Unraid tool to apply new permissions. chmod -R u-x,go-rwx,go+u,ugo+X '/mnt/arraycache/appdata/DiskSpeed' chown -R nobody:users '/mnt/arraycache/appdata/DiskSpeed' sync
-
In version 2.9.5, I had taken out the "apt update" command in favor of keeping the docker size smaller since this Docker relies on another Docker (Lucee) and they had the same command. I put it back in to ensure that when *I* build, the my DiskSpeed docker is current. Any other subsequent updates will rely on other teams implementing such as Lucee then Apache Tomcat and I think Tomcat is build off of Debian.
-
Version 3 (in dev) will have write testing for solid state media because it's required to read an existing file on some drives vs reading a location on the drive. I'm contemplating adding write testing for spinners but if I do, it'll likely be ONLY on a drive with no partitions. I was able to duplicate this and implemented a fix including some other oddities I found from the newer version of Lucee and the base OS. Version 2.9.6 pushed.
-
Pushed version 2.9.5 to the docker hub. @Howboys - let me know if it resolves your issues with the EOL notice. It's using the latest build of the Lucee app server. I'm starting to use tagged versions. 2.9.5/latest resolves issues with funky partition output from the "parted" utility. Well, hopefully resolves it as I couldn't duplicate. If you have issues with the version 2.9.5, change the repository to "jbartlett777/diskspeed:2.9.4" to roll back to the previous version.
-
I plan on pushing an update soon<tm> with the latest version of Lucee which will resolve this.
-
Renaming the "Instances" directory under "/appdata/DiskSpeed" will do the same without needing to install. If you do get this issue again and it's resolved by renaming the directory, let me know so I can get a copy of your "bad" data so I can duplicate and fix the issue.
-
I've verified that it's not a problem with having more than 26 drives, I added two 10 port hubs and filled them with USB drives to push my sdx counts over sdaa and benchmarked sdab and sdac, no issues and it benchmarked the correct drive. Does it report something like "SpeedGap detected"? If so, you'll need to disable that when starting a benchmark from the main page, not from the drive itself. Also, if you select 2 or more drives to benchmark, you'll see the text "Click on a drive label to hide or show it." - that period on the end is a hidden hyperlink, clicking on it will reveal the hidden iframes that perform the actual work and you can see what's happening and if there's an issue.
-
The error happens on the sdc, it's partition output isn't standard with extra blank lines, some padded with spaces. I've added code to handle the extra lines and code to catch other gotcha's so it'll continue.
-
I've changed my default file system to "btrfs" under "Settings > Disk Settings" on my backup/development NAS system. If I run the new config option via "Tools > New Config", it does more than just reset the drive slots, it resets at least the default file system in Disk Settings as it gets changed to "xfs". I discovered this issue after taking a drive out of the Drive 2 slot, resetting the config so I can wipe the partitions and re-add as btrfs, and it was added & formatted with xfs. I was able to repeat the steps to duplicate. 1. Set default file system to btrfs 2. Run "New Config", preserve all drive settings. 3. View Disk Settings, default file system is now xfs nasbackup-diagnostics-20220821-1857.zip
-
It looks like you have more than 26 drives attached. Can you submit a debug file using the "Create Debug File" at the bottom of the page? You do not need the Controller Info item.
-
When you first pull up the app or click on the "DiskSpeed" label at the top of any page, it should display a "Benchmark Drives" button. That in turn will display a Benchmark page where you can optionally select which drives you want to test. By default, it starts with all drives but if you uncheck the "Check all drives" checkbox, all your drives will be listed for individual selection.
-
What's the drive manufacturer & model?
-
In short, yes, but you'll still have to jump through a few hoops. I spent some time trying to create a UniFi Protect VM to do the conversion but it didn't pan out. I ended up using my Dream Machine SE as a conversion host after finding out Ubiquity added a MP4 export tool to their OS. After using the Ubuntu VM to copy the UBV files off to an unraid share, I used Putty to SSH to the DM and then from there I SFTP'ed the files to the DM, converted them, and SFTP'ed them back to unraid. More detailed instructions Enable SSH on UniFi OS - > System > SSH > Enable Telnet into the UniFi Protect server. Local video is hosted under "/srv/unifi-protect/video" by year, month, day. July 20, 2022 will be located in "/srv/unifi-protect/video/2022/07/20" If you don't have much space available, you'll need to edit the UniFi Protect settings to only archive x number of days (take how much you have and subtract a day or two) so it can free up space. Create directory for hosting conversions: /srv/video CD into /srv/video SFTP to remote server to download ubv files The video files start with the Mac ID of the camera. D021F991680A_0_rotating_1658291482261.ubv Mac ID |Q| Type | Epoch Q is video quality. "0" is full, each number higher is lower in quality. Transfer all the files for the day & camera in question from your remote host to your UniFi system. "mget D021F9924ABB_0_rotating_*" Quit SFTP. Create a single MP4 file. Use a different -d option for each file you're converting. "vid0", "vid1" for example. Use multiple -s options to specify the files in sequence. Using Putty makes it easy as you can double-click on the file name and then right-click to paste it. /usr/share/unifi-protect/app/node_modules/.bin/ubnt_ubvexport -d ./vid0 -s f1.ubv -s f2.ubv -s f3.ubv It'll also create one zero-byte MP4, you can delete it. SFTP back to the remote server and upload the mp4 files. The files will be owned by root on the remote server. You will need to "chmod 666 *.mp4" the files to be able to view them over the network. Don't forget to delete your working files in /srv/video.
-
I had trouble duplicating these mounting steps today but I passed through the /dev/sdx ID as a drive to a Ubuntu VM and then used the "Disks" app to mount the "RAID-1 Array" under /dev/md These steps assume you will not be mounting the drive back into your UniFi Protect system without formatting it. Launch the "Disks" app and locate the UniFi OS video partition. For my 8TB drive, it was displayed as "8 TB RAID 1 Array" under /dev/md/3 (your last digit may differ). Select the drive "8 TB RAID 1 Array" and click on the Gear icon under the "Filesystem" bar and select "Edit mount options" Disable "User Session Defaults" and change the mount point to where you want it. For me, it's "/home/john/UniFi" and ensure "Mount at system startup" and "Show in user interface" are checked and click "OK" Click on the "Play" icon to mount (or reboot) Open a Terminal window. Change to "~" directory if not already there. "cd ~" Enter "ls -l" to see what user/group you're logged in as. For me, it was "john:john" CD to the UniFi drive mount location. Since I mounted it in my user directory, I just need to type "cd UniFi" You will need to update the owners of the UniFi Protect files. Enter in "sudo chown -R john:john .srv" - replace your user/group you're logged in as. Now if you use the File Manager to navigate to the UniFi directory with hidden directories enabled, you can navigate the directory tree and copy the files to another system.
-
The controller benchmark doesn't check for abnormal reads but does warn of a potentially invalid test result where single-drive read over 15 seconds was quite a bit less than the all-drive benchmark for 15 seconds. The benchmark checks the min & max data read per second looking for a gap over a given MB/sec which is a sign of other processes accessing the drive during the test. If you're sure no other processes are accessing the drives (watching the Main tab in Unraid looking for read/write counter increments while not benchmarking will indicate if there is or not), how is your system laid out? A screen shot of the System Bus Tree from the app will suffice. Another thing you can try is to kick off a manual benchmark of 2 or more drives and then click the hidden link on the period at the end of "Click on a drive label to hide or show it." This will make visible the hidden iframes that are performing all the work behind the scenes and you can see additional information in the logs displayed that might give a hint.
-
On the UniFi OS, the drive is mounted under /volume1/.srv Using the web based Debug telent window from UniFi, the sftp command is available, looks like it might be possible to connect to the unraid box to get the video files
-
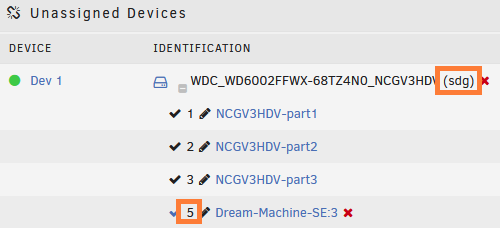
Figured out how to access the files. SSH into your Unraid server with the UniFi Protect drive attached. I would recommend not using the browser based shell option. Connect to the DiskSpeed docker - enter in docker exec -it DiskSpeed bash You should see something like root@64648c9d4f98:/usr/local/tomcat Install the mdadm and mc tools apt install mdadm mc From the UNRAID GUI, identify the sdx of your UniFi drive. This is easy if you have Unassigned Devices installed If you do not have Unassigned Devices installed, you can enter "fdisk -l" and look for a drive with 4 partitions under type "Linux filesystem" and take note of the last/largest partition. Disk /dev/sdg: 5.5 TiB, 6001175126016 bytes, 11721045168 sectors Units: sectors of 1 * 512 = 512 bytes Sector size (logical/physical): 512 bytes / 4096 bytes I/O size (minimum/optimal): 4096 bytes / 4096 bytes Disklabel type: gpt Disk identifier: 54DBDD5B-2319-43A8-9507-45FDBF81FDE7 Device Start End Sectors Size Type /dev/sdg1 2048 1050623 1048576 512M Linux filesystem /dev/sdg2 2097152 6291455 4194304 2G Linux filesystem /dev/sdg3 6291456 8388607 2097152 1G Linux filesystem /dev/sdg5 16777216 11721045134 11704267919 5.5T Linux filesystem Based on the "5" from Unassigned Devices and the "sdg" drive ID, (or shown from fdisk), the video partition location is /dev/sdg5 Verify the partition's RAID status mdadm --examine /dev/sdg5 /dev/sdg5: Magic : a92b4efc Version : 1.2 Feature Map : 0x1 Array UUID : 069a3dee:c842797d:ada2dca8:4f1f206a Name : Dream-Machine-SE:3 Creation Time : Tue Jun 7 13:22:55 2022 Raid Level : raid1 Raid Devices : 2 Avail Dev Size : 11704005775 (5580.90 GiB 5992.45 GB) Array Size : 5852002304 (5580.90 GiB 5992.45 GB) Used Dev Size : 11704004608 (5580.90 GiB 5992.45 GB) Data Offset : 262144 sectors Super Offset : 8 sectors Unused Space : before=262056 sectors, after=1167 sectors State : clean Device UUID : 96a0229f:8b61ec1f:166c0bd3:3f28ac1c Internal Bitmap : 8 sectors from superblock Update Time : Fri Jul 8 09:27:22 2022 Bad Block Log : 512 entries available at offset 72 sectors Checksum : 85d860a0 - correct Events : 1474479 Device Role : Active device 0 Array State : A. ('A' == active, '.' == missing, 'R' == replacing) Take note of the "Data Offset" value. Create a directory to mount the partition mkdir /mnt/unifi Mount the partition mount -o ro,loop,offset=$((<data offset value>*512)) /dev/sdg5 /mnt/unifi/ Now you can use MC to browse the directory tree /mnt/unifi/.srv and optionally copy files to one of your UNRAID shares/drives on path /mnt/UNRAID Directories of note: .srv/unifi-protect/video .srv/unifi-protect/cv/analytics-v1 Based on the backup directory dump files, UniFi does have some kind of database it uses. I don't know at this time if simply copying the video files to another UniFi protect HD will bring it online on the new drive with its existing files.
-
UniFi seems to use a non-standard partition format. It creates 3 partitions of varying small sizes and then 1 large partition to fill up the drive. This partition layout is similar to other Unix based OS's but neither unraid or my DiskSpeed 3 beta could identify them. I tried mounting the large partition as different partition types but none of them were successful. It is marked as a RAID member but with only 1 drive in the system, that shouldn't have been an issue mounting known types.
-
I'll be swapping out my 6TB WD Red Pro drive that I used as a placeholder with a Seagate AI Surveillance drive after I preclear it on Thursday. I'll let you know what I find out.
-
I have the UDM SE but while I've been tempted to pull the drive to look at the files via Unraid, I haven't done so yet. The problem I can see happening is if there is a database that keeps track of the recordings, if so, there's not much you can do without reverse engineering that DB if it's not in some standard DB. If it's a file based DB where it just uses the file names, you might be in luck. Plug in a drive in SE and have it start recording, then pull it to see how the directory & file structure compares to the one from Pro. If it's the same, just copying the files over might work. In theory.


