





ghost82
Members
-
Joined
-
Last visited
Everything posted by ghost82
-
Last chance..try to put the audio on bus 0 slot 1f: qemu should already had that defined as multifunction: <domain type='kvm'> <name>Libreelec</name> <uuid>95170484-4711-898d-d1da-8da9fe928b9d</uuid> <metadata> <vmtemplate xmlns="unraid" name="Linux" icon="linux.png" os="linux"/> </metadata> <memory unit='KiB'>1048576</memory> <currentMemory unit='KiB'>1048576</currentMemory> <memoryBacking> <nosharepages/> </memoryBacking> <vcpu placement='static'>4</vcpu> <cputune> <vcpupin vcpu='0' cpuset='0'/> <vcpupin vcpu='1' cpuset='8'/> <vcpupin vcpu='2' cpuset='2'/> <vcpupin vcpu='3' cpuset='10'/> </cputune> <os> <type arch='x86_64' machine='pc-q35-7.1'>hvm</type> <loader readonly='yes' type='pflash'>/usr/share/qemu/ovmf-x64/OVMF_CODE-pure-efi.fd</loader> <nvram>/etc/libvirt/qemu/nvram/95170484-4711-898d-d1da-8da9fe928b9d_VARS-pure-efi.fd</nvram> <boot dev='hd'/> </os> <features> <acpi/> <apic/> </features> <cpu mode='host-passthrough' check='none' migratable='on'> <topology sockets='1' dies='1' cores='2' threads='2'/> <cache mode='passthrough'/> </cpu> <clock offset='utc'> <timer name='rtc' tickpolicy='catchup'/> <timer name='pit' tickpolicy='delay'/> <timer name='hpet' present='no'/> </clock> <on_poweroff>destroy</on_poweroff> <on_reboot>restart</on_reboot> <on_crash>restart</on_crash> <devices> <emulator>/usr/local/sbin/qemu</emulator> <disk type='file' device='disk'> <driver name='qemu' type='raw' cache='writeback'/> <source file='/mnt/user/domains/Libreelec/vdisk2.img'/> <target dev='hdc' bus='sata'/> <address type='drive' controller='0' bus='0' target='0' unit='2'/> </disk> <controller type='usb' index='0' model='ich9-ehci1'> <address type='pci' domain='0x0000' bus='0x00' slot='0x07' function='0x7'/> </controller> <controller type='usb' index='0' model='ich9-uhci1'> <master startport='0'/> <address type='pci' domain='0x0000' bus='0x00' slot='0x07' function='0x0' multifunction='on'/> </controller> <controller type='usb' index='0' model='ich9-uhci2'> <master startport='2'/> <address type='pci' domain='0x0000' bus='0x00' slot='0x07' function='0x1'/> </controller> <controller type='usb' index='0' model='ich9-uhci3'> <master startport='4'/> <address type='pci' domain='0x0000' bus='0x00' slot='0x07' function='0x2'/> </controller> <controller type='pci' index='4' model='pcie-to-pci-bridge'> <model name='pcie-pci-bridge'/> <address type='pci' domain='0x0000' bus='0x01' slot='0x00' function='0x0'/> </controller> <controller type='pci' index='5' model='pcie-root-port'> <model name='pcie-root-port'/> <target chassis='5' port='0xb'/> <address type='pci' domain='0x0000' bus='0x00' slot='0x01' function='0x3'/> </controller> <controller type='virtio-serial' index='0'> <address type='pci' domain='0x0000' bus='0x03' slot='0x00' function='0x0'/> </controller> <controller type='sata' index='0'> <address type='pci' domain='0x0000' bus='0x00' slot='0x1f' function='0x2'/> </controller> <controller type='pci' index='0' model='pcie-root'/> <controller type='pci' index='1' model='pcie-root-port'> <model name='pcie-root-port'/> <target chassis='1' port='0x8'/> <address type='pci' domain='0x0000' bus='0x00' slot='0x01' function='0x0' multifunction='on'/> </controller> <controller type='pci' index='2' model='pcie-root-port'> <model name='pcie-root-port'/> <target chassis='2' port='0x9'/> <address type='pci' domain='0x0000' bus='0x00' slot='0x01' function='0x1'/> </controller> <controller type='pci' index='3' model='pcie-root-port'> <model name='pcie-root-port'/> <target chassis='3' port='0xa'/> <address type='pci' domain='0x0000' bus='0x00' slot='0x01' function='0x2'/> </controller> <interface type='bridge'> <mac address='52:54:00:d6:d9:4f'/> <source bridge='br0'/> <model type='virtio-net'/> <address type='pci' domain='0x0000' bus='0x02' slot='0x00' function='0x0'/> </interface> <serial type='pty'> <target type='isa-serial' port='0'> <model name='isa-serial'/> </target> </serial> <console type='pty'> <target type='serial' port='0'/> </console> <channel type='unix'> <target type='virtio' name='org.qemu.guest_agent.0'/> <address type='virtio-serial' controller='0' bus='0' port='1'/> </channel> <input type='mouse' bus='ps2'/> <input type='keyboard' bus='ps2'/> <audio id='1' type='none'/> <hostdev mode='subsystem' type='pci' managed='yes'> <driver name='vfio'/> <source> <address domain='0x0000' bus='0x00' slot='0x02' function='0x0'/> </source> <address type='pci' domain='0x0000' bus='0x00' slot='0x02' function='0x0'/> </hostdev> <hostdev mode='subsystem' type='pci' managed='yes'> <driver name='vfio'/> <source> <address domain='0x0000' bus='0x00' slot='0x1f' function='0x3'/> </source> <address type='pci' domain='0x0000' bus='0x00' slot='0x1f' function='0x5'/> </hostdev> <hostdev mode='subsystem' type='usb' managed='no'> <source> <vendor id='0x046d'/> <product id='0xc52b'/> </source> <address type='usb' bus='0' port='1'/> </hostdev> <memballoon model='none'/> </devices> </domain> If you can save this xml without error and if you are able to boot the vm check with lspci -v in the vm that the audio is on bus 0, slot 1f function 5. However in all the other cases the audio controller is recognized by the linux kernel and the correct driver for it is loaded, snd_hda_intel. I would blame (if I have to blame something) libreelec implementation for this issue, since both qemu and libvirt are passing through correctly the audio device and the linux kernel is loading properly the audio driver. You could try also this: https://forum.libreelec.tv/thread/5555-audio-issues/ ..if you can understand what they mean at the end of the discussion... You could also try, without restarting the vm, to exit kodi and start again and see if the audio shows: https://www.getdroidtips.com/how-to-fix-kodi-no-sound-error-in-2-minutes/#Method-2-8211-Restart-Kodi Check the paragraph "use the exit command"
-
Yes, there is, but it's on bus 2 slot 1, instead of bus 0 slot 3.. did you apply my changes to the xml?Recheck xml
-
Can you check in the vm if the hdmi is detected at all from command line? Run this in the libreelec terminal: lspci -v Don't know, I think no. There was a report here: https://forums.unraid.net/bug-reports/prereleases/hardware-error-r1676/
-
Correct, efifb is a must to have video output in your case.
-
Can you try to add these to your syslinux configuration to blacklist i2c? modprobe.blacklist=i2c_i801,i2c_smbus It should be something like this for the append line: append modprobe.blacklist=i2c_i801,i2c_smbus video=efifb:off initrd=/bzroot Reboot the server after changes
-
Sorry, my error, yes it's on .3. Currently your hdmi is on bus 4, connected to a pcie-to-pci-bridge, which doesn't sound correct to me. Without changing anything else, try this: <!-- WARNING: THIS IS AN AUTO-GENERATED FILE. CHANGES TO IT ARE LIKELY TO BE OVERWRITTEN AND LOST. Changes to this xml configuration should be made using: virsh edit Libreelec or other application using the libvirt API. --> <domain type='kvm'> <name>Libreelec</name> <uuid>95170484-4711-898d-d1da-8da9fe928b9d</uuid> <metadata> <vmtemplate xmlns="unraid" name="Linux" icon="linux.png" os="linux"/> </metadata> <memory unit='KiB'>1048576</memory> <currentMemory unit='KiB'>1048576</currentMemory> <memoryBacking> <nosharepages/> </memoryBacking> <vcpu placement='static'>4</vcpu> <cputune> <vcpupin vcpu='0' cpuset='0'/> <vcpupin vcpu='1' cpuset='8'/> <vcpupin vcpu='2' cpuset='2'/> <vcpupin vcpu='3' cpuset='10'/> </cputune> <os> <type arch='x86_64' machine='pc-q35-7.1'>hvm</type> <loader readonly='yes' type='pflash'>/usr/share/qemu/ovmf-x64/OVMF_CODE-pure-efi.fd</loader> <nvram>/etc/libvirt/qemu/nvram/95170484-4711-898d-d1da-8da9fe928b9d_VARS-pure-efi.fd</nvram> <boot dev='hd'/> </os> <features> <acpi/> <apic/> </features> <cpu mode='host-passthrough' check='none' migratable='on'> <topology sockets='1' dies='1' cores='2' threads='2'/> <cache mode='passthrough'/> </cpu> <clock offset='utc'> <timer name='rtc' tickpolicy='catchup'/> <timer name='pit' tickpolicy='delay'/> <timer name='hpet' present='no'/> </clock> <on_poweroff>destroy</on_poweroff> <on_reboot>restart</on_reboot> <on_crash>restart</on_crash> <devices> <emulator>/usr/local/sbin/qemu</emulator> <disk type='file' device='disk'> <driver name='qemu' type='raw' cache='writeback'/> <source file='/mnt/user/domains/Libreelec/vdisk2.img'/> <target dev='hdc' bus='sata'/> <address type='drive' controller='0' bus='0' target='0' unit='2'/> </disk> <controller type='usb' index='0' model='ich9-ehci1'> <address type='pci' domain='0x0000' bus='0x00' slot='0x07' function='0x7'/> </controller> <controller type='usb' index='0' model='ich9-uhci1'> <master startport='0'/> <address type='pci' domain='0x0000' bus='0x00' slot='0x07' function='0x0' multifunction='on'/> </controller> <controller type='usb' index='0' model='ich9-uhci2'> <master startport='2'/> <address type='pci' domain='0x0000' bus='0x00' slot='0x07' function='0x1'/> </controller> <controller type='usb' index='0' model='ich9-uhci3'> <master startport='4'/> <address type='pci' domain='0x0000' bus='0x00' slot='0x07' function='0x2'/> </controller> <controller type='pci' index='4' model='pcie-to-pci-bridge'> <model name='pcie-pci-bridge'/> <address type='pci' domain='0x0000' bus='0x01' slot='0x00' function='0x0'/> </controller> <controller type='pci' index='5' model='pcie-root-port'> <model name='pcie-root-port'/> <target chassis='5' port='0xb'/> <address type='pci' domain='0x0000' bus='0x00' slot='0x01' function='0x3'/> </controller> <controller type='virtio-serial' index='0'> <address type='pci' domain='0x0000' bus='0x03' slot='0x00' function='0x0'/> </controller> <controller type='sata' index='0'> <address type='pci' domain='0x0000' bus='0x00' slot='0x1f' function='0x2'/> </controller> <controller type='pci' index='0' model='pcie-root'/> <controller type='pci' index='1' model='pcie-root-port'> <model name='pcie-root-port'/> <target chassis='1' port='0x8'/> <address type='pci' domain='0x0000' bus='0x00' slot='0x01' function='0x0' multifunction='on'/> </controller> <controller type='pci' index='2' model='pcie-root-port'> <model name='pcie-root-port'/> <target chassis='2' port='0x9'/> <address type='pci' domain='0x0000' bus='0x00' slot='0x01' function='0x1'/> </controller> <controller type='pci' index='3' model='pcie-root-port'> <model name='pcie-root-port'/> <target chassis='3' port='0xa'/> <address type='pci' domain='0x0000' bus='0x00' slot='0x01' function='0x2'/> </controller> <interface type='bridge'> <mac address='52:54:00:d6:d9:4f'/> <source bridge='br0'/> <model type='virtio-net'/> <address type='pci' domain='0x0000' bus='0x02' slot='0x00' function='0x0'/> </interface> <serial type='pty'> <target type='isa-serial' port='0'> <model name='isa-serial'/> </target> </serial> <console type='pty'> <target type='serial' port='0'/> </console> <channel type='unix'> <target type='virtio' name='org.qemu.guest_agent.0'/> <address type='virtio-serial' controller='0' bus='0' port='1'/> </channel> <input type='mouse' bus='ps2'/> <input type='keyboard' bus='ps2'/> <audio id='1' type='none'/> <hostdev mode='subsystem' type='pci' managed='yes'> <driver name='vfio'/> <source> <address domain='0x0000' bus='0x00' slot='0x02' function='0x0'/> </source> <address type='pci' domain='0x0000' bus='0x00' slot='0x02' function='0x0'/> </hostdev> <hostdev mode='subsystem' type='pci' managed='yes'> <driver name='vfio'/> <source> <address domain='0x0000' bus='0x00' slot='0x1f' function='0x3'/> </source> <address type='pci' domain='0x0000' bus='0x00' slot='0x03' function='0x0'/> </hostdev> <hostdev mode='subsystem' type='usb' managed='no'> <source> <vendor id='0x046d'/> <product id='0xc52b'/> </source> <address type='usb' bus='0' port='1'/> </hostdev> <memballoon model='none'/> </devices> </domain> Do not pass to the vm the serial bus controller, but keep it bound to vfio, as it is now. Let me know if something changes.
-
Post a diagnostics file so I can check the vm configuration. q35 machine type should be a better option. It could depend on the layout you set for the video and audio and how the driver interacts: in a bare metal machine you have the video at 00:02.0, so vga is on bus 0, slot 2, this is specific for built-in gpu, and audio is on 00:1f.5, so also the audio is built-in. If the target addresses of both video and audio are wrong in the vm, the driver could not work properly.
-
Search in the log for "boot vga" (there could be several entries): if you read 01:00.0 next to it you need vbios, otherwise not.
-
1. Feb 8 01:37:18 WoNas kernel: pci 0000:01:00.0: BAR 1: assigned to efifb You need video=efifb:off in your syslinux config. 2. Since your nvidia is marked as boot vga: Feb 8 01:37:18 WoNas kernel: pci 0000:01:00.0: vgaarb: setting as boot VGA device (overriding previous) you need a vbios to pass 3. multifunction for gpu: <hostdev mode='subsystem' type='pci' managed='yes'> <driver name='vfio'/> <source> <address domain='0x0000' bus='0x01' slot='0x00' function='0x0'/> </source> <rom file='/PATH/TO/YOUR/VBIOS.rom'/> <address type='pci' domain='0x0000' bus='0x04' slot='0x00' function='0x0' multifunction='on'/> </hostdev> <hostdev mode='subsystem' type='pci' managed='yes'> <driver name='vfio'/> <source> <address domain='0x0000' bus='0x01' slot='0x00' function='0x1'/> </source> <address type='pci' domain='0x0000' bus='0x04' slot='0x00' function='0x1'/> </hostdev>
-
I think no, we are speaking for intel with vmx and it should be equivalent to vt-x, so it doesn't include vt-d, needed for passthrough of devices.
-
Windows doesn't support natively xfs, you should be better to format the disk with a windows supported format, i.e. ntfs. XFS partitions can be accessed from windows with third party softwares, for example paradox, linux reader, etc.
-
I'm using virtio on a mac vm with an emulated controller bridged to an old 82574L Gigabit Network Connection (1 GbE), and I have 14+ Gbs/s, approaching 20 Gbs/s from host to guest: iperf3 -s ----------------------------------------------------------- Server listening on 5201 (test #1) ----------------------------------------------------------- Accepted connection from 192.168.2.2, port 49359 [ 5] local 192.168.2.1 port 5201 connected to 192.168.2.2 port 49360 [ ID] Interval Transfer Bitrate [ 5] 0.00-1.00 sec 1.66 GBytes 14.3 Gbits/sec [ 5] 1.00-2.00 sec 1.61 GBytes 13.8 Gbits/sec [ 5] 2.00-3.00 sec 1.68 GBytes 14.4 Gbits/sec [ 5] 3.00-4.00 sec 1.70 GBytes 14.6 Gbits/sec [ 5] 4.00-5.00 sec 1.71 GBytes 14.7 Gbits/sec [ 5] 5.00-6.00 sec 1.72 GBytes 14.8 Gbits/sec [ 5] 6.00-7.00 sec 1.71 GBytes 14.7 Gbits/sec [ 5] 7.00-8.00 sec 1.72 GBytes 14.8 Gbits/sec [ 5] 8.00-9.00 sec 1.72 GBytes 14.8 Gbits/sec [ 5] 9.00-10.00 sec 1.67 GBytes 14.4 Gbits/sec [ 5] 10.00-10.00 sec 2.35 MBytes 14.7 Gbits/sec - - - - - - - - - - - - - - - - - - - - - - - - - [ ID] Interval Transfer Bitrate [ 5] 0.00-10.00 sec 16.9 GBytes 14.5 Gbits/sec receiver ----------------------------------------------------------- Server listening on 5201 (test #2) ----------------------------------------------------------- iperf3 -c 192.168.2.2 Connecting to host 192.168.2.2, port 5201 [ 5] local 192.168.2.1 port 38408 connected to 192.168.2.2 port 5201 [ ID] Interval Transfer Bitrate Retr Cwnd [ 5] 0.00-1.00 sec 2.31 GBytes 19.8 Gbits/sec 0 3.93 MBytes [ 5] 1.00-2.00 sec 2.08 GBytes 17.8 Gbits/sec 0 3.93 MBytes [ 5] 2.00-3.00 sec 2.07 GBytes 17.8 Gbits/sec 0 3.93 MBytes [ 5] 3.00-4.00 sec 2.04 GBytes 17.5 Gbits/sec 0 3.93 MBytes [ 5] 4.00-5.00 sec 2.20 GBytes 18.9 Gbits/sec 0 3.93 MBytes [ 5] 5.00-6.00 sec 2.28 GBytes 19.6 Gbits/sec 0 3.93 MBytes [ 5] 6.00-7.00 sec 2.28 GBytes 19.6 Gbits/sec 0 3.93 MBytes [ 5] 7.00-8.00 sec 2.29 GBytes 19.6 Gbits/sec 0 3.93 MBytes [ 5] 8.00-9.00 sec 2.31 GBytes 19.8 Gbits/sec 0 3.93 MBytes [ 5] 9.00-10.00 sec 2.28 GBytes 19.6 Gbits/sec 0 3.93 MBytes - - - - - - - - - - - - - - - - - - - - - - - - - [ ID] Interval Transfer Bitrate Retr [ 5] 0.00-10.00 sec 22.1 GBytes 19.0 Gbits/sec 0 sender [ 5] 0.00-10.00 sec 22.1 GBytes 19.0 Gbits/sec receiver iperf Done.
-
Are you using virtio or virtio-net for the emulated controller? I don't remember which is faster, I think I remember it's virtio, try to switch to it and retest. Unraid default virtio-net, if I remember well, should be because of some issues with vms and dokers, if you use them.
-
I think the issue is in the vdisk, somehow corrupted. If I were you I would backup the vdisk image to store an original copy of it and then create a new vm with that vdisk and the gparted iso: you will boot from the gparted live iso and you could check disk and partitions of vdisk and maybe you could repair it.
-
ahah no need to send anything!I'm happy you got it working. Just do a good action to another person and maybe the world will be better
-
Not of much help unfortunately, we already know that the vm should work without the passed through gpu..Try to proceed with other steps, but I think you will stop at step 6.. I have a doubt that it could be the vbios..if this is the case you need to find a way to dump it from your gpu..
-
It seems all is ok now. Can you try the following and report back: 1. Let the syslinux config as it is 2. modify your vm to not pass through the gpu (video and audio), replace it with vnc: check if it boots 3. boot the vm and connect with novnc (directly in unraid) (from your laptop) 4. enable remote desktop inside the vm or install any other vnc server inside windows 5. disable vnc in your vm and passthrough the gpu, check multifunction for gpu is applied 6. start the vm and try to connect to the vm ip from your laptop, so you are connecting directly to the vm 7. if it boots check device manager to see if the gpu is there 8. if it's there, download nvidia drivers and install them
-
Do not boot the gui mode, but unraid os, as said gpu is isolated from unraid and it cannot be used by the host (unraid), but it will be reserved for the vm. If you look at what you modified in the syslinux config you can see that you modified the "unraid os", not the "unraid os gui mode", so the efifb:off is applied when you boot "unraid os" (command line). Boot unraid os, then connect from the laptop on the lan, then start the vm. Your screenshot shows a kernel panic, system wasn't able to find root partition, this may depend on the unraid usb, try to boot again.
-
You should be able to do it just by following this video: https://www.youtube.com/watch?v=QaB9HhpbDAI Start from minute 8, 27th second Just type from unraid terminal: ls /dev/disk/by-id to identify your nvme disk (spaceinvadersone uses a sata disk with prefix "ata-", yours will probably be "nvme-")
-
Because it's in use by the host, as said. There are different scenarios: 1. by phisically attaching the nvme to a dedicated controller you are able to isolate it, no other disks in use by the host are connected to this controller --> bind this controller to vfio and use it in a vm; this will pass through both the controller and the disk (and everything that it's attached to this controller, if not in use by the host) (preferred solution) 2. you are not able to isolate the nvme, the nvme is attached to a controller with something else in use by the host --> pass the disk with by-id, this will create an emulated controller and use the nvme disk (2nd choice) 3. you are not able to isolate the nvme, the nvme is attached to a controller with something else in use by the host --> create a vdisk on the nvme, this will create an emulated controller and use the vdisk on the nvme disk (3rd choice)
-
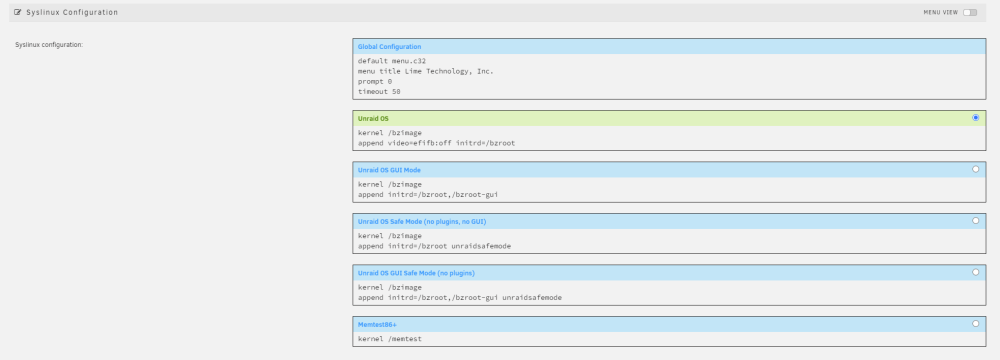
xml is ok, make sure that it wont change the gpu part you highlighted after making modifications. As you can see in your logs: Feb 4 10:44:34 Akashic-Records kernel: pci 0000:06:00.0: BAR 1: assigned to efifb ... ... Feb 4 10:59:41 Akashic-Records kernel: vfio-pci 0000:06:00.0: BAR 1: can't reserve [mem 0xd0000000-0xdfffffff 64bit pref] you need to modify your syslinux config (main > flash > syslinux configuration) and add in the append line video=efifb:off, like in this picture taken from the web: Note that since this gpu is marked as boot gpu the screen on boot will seem frozen, because the gpu will attach to vfio, but unraid will boot, so connect to unraid from another device on the lan. Reboot the server. It seems also that you are using a wrong vbios. From what I found the vbios you attached is for a 3060 Ti, device/vendor id 10de:2489, subsystem 1043:8829. From your lspci your device is 10de:2489, subsystem 1043:884f. It is always better to dump the vbios directly from YOUR gpu, in extreme cases you could download a vbios from techpowerup: this will prevent you from using a wrong vbios, as it seems the case. So, dump the vbios from your gpu and use it (check if hex editing is needed, i.e. if dumped from windows with gpu-z), or if you have no alternatives and it doesn't work with your vbios try the attached one (already hex edited). 241689.rom
-
https://github.com/SpaceinvaderOne/Macinabox/blob/master/xml/Macinabox BigSur.xml#L132-L142
-
Hi, it's described here: So, you created a raw disk and formatted fat32. Then you mount this disk somewhere, like: mount /path/to/vdisk.img /path/to/mount/ And you copy all the files into it, like: cp /path/to/file.ext /path/to/mount/ And finally you can unmount the vdisk: umount /path/to/mount/ When you add the vdisk to the vm use a virtual sata controller for maximum compatibility.
-
Basically copy xml in a text file, copy vdisk.img, copy the ovmf_vars.fd. Create a new empty vm and do not start it. Replace the new xml code with the one from the xml backup. Check the paths in the code of the xml for the vdisk.img and for the ovmf_vars.fd and change them pointing to that of your backup files. If the vm fails to start because of the uuid, meaning it's duplicated, delete the uuid line in the xml, libvirt will automatically create a new one.
-
there are 2 fd file, one is the ovmf bios, which can be created new, they all are the same. The other is the var fd which contains the efi variables, you can use the backup (by pointing in the xml to the backup vars fd file) if you want to backup the efi variables or you can use a new one, in this case it's like as you do a nvram reset.



