





Derek_
Members
-
Joined
-
Last visited
-
Do you put this on one line, or on two? e.g. Key: --dns= Value: xxx.xxx.xxx.xxx or Key: --dns=xxx.xxx.xxx.xxx
-
Hiya, this video from SpaceInvaderOne may well answer your questions... https://www.youtube.com/watch?v=hgcFdUIOf5M
-
I'm not using Proton, but when i tried to open Firefox with a VPN WireGuard config in unRAID, it wouldn't let me via http - i had to use the https IP provided in the docker info. Strangely, i did not have this issue with LibreWolf. May not be the same problem, but i thought i'd put it out there.
-
My SSH was turned off, so after reboot nothing new appeared. I started SSH and it plonked a bunch of keypairs. Looks like default to me 🙂 Thanks!
-
A few years ago, i was mucking around with ssh on unRAID (not via a VM). I knew enough to be dangerous, not enough to be smart. I'm not so dangerous now, but also not so smart still 😁 I'm doing a little maintenance and i've noticed that i have some legacy ssh configs that were manually modified (not via the gui), i was also using the "SSH and Denyhosts" plugin to enable multi-user ssh entry (disable root, enable a different user). I'd like to reset everything so it was like it was ootb. I think i deleted the keypair some time ago, but i didn't "reset" the configs and now i wouldn't know what the defaults be - so i don't know what exactly to 'fix'. Are these the only places to look/cleanup? /boot/config/ssh (ssh_config, and ssh keypairs) /etc/ssh/ (sshd_config manually edited. And keypairs) /root/.ssh/known_hosts (symlink > `/boot/config/ssh/root/.ssh` pretty sure i can just delete this file) Can i just delete sshd_config and keypairs? Will re-generate if i re/start ssh via the gui? Thanks 🙂
-
Update: i suspect my fstabbing had nothing at all to do with it. It's something to do with OpenSnitch's settings. I've had to disable OpenSnitch - at least temporarily to establish the connection. Whereupon i can re-enable it. I think it's time to replace my desktop, it's gotten glitchy... too much fiddling on my part.
-
Alrighty! So i think i might've had more than one issue. I was trying things for about 1.5 hrs before i posted, and about 1hr after - and by fluke or by brilliance, i think i've solved it. Updates for both Nobara and unRAID confused where the issue might lie I use OpenSnitch (something that blocks/allows stuff). OpenSnitch has not previously caused this issue, so at first i forgot about it. It appears it was a contributing factor. fstab was 'dated' and needed some tweaking. It appears i needed a combination of: Explicit OpenSnitch SMB "allow" rules; and Updated fstab. Here's my updated fstab: //192.168.1.10/Apps /mnt/NAS/Apps cifs credentials=/home/derek/bits'n'bobs/smbcredentials,uid=1000,gid=1001,iocharset=utf8,noperm,vers=3.1.1,rw,noserverino,x-systemd.automount,x-systemd.idle-timeout=3600 0 0 The change that made the actual difference, i think, was replacing: uid=nobody,gid=users,file_mode=0777,dir_mode=0777 With my desktop user's id numbers: uid=1000,gid=1001 But that alone didn't work. I found that communication worked if i disabled OpenSnitch (but this didn't work before i updated fstab). So i created explicit rules to allow SMB (this wasn't needed pre-updates).
-
Hiya, Everything was fine until a couple of days ago, and i've had the same settings for at least a couple of years now. But now my drives don't map. I'm using Nobara Linux (Fedora-based, doesn't use SELinux) for a while, and my drive mounts have been fine. But i think a recent update to Nobara 43, and perhaps coupled with unRAID to 7.2.2 (i only just updated to 7.x). I've been using the same fstab for a long time. Here's a line from the fstab that has worked for years: //192.168.1.10/Apps /mnt/NAS/Apps cifs username=derek,password=mysupersecretpassword,uid=nobody,gid=users,file_mode=0777,dir_mode=0777,nofail,noperm,vers=3.0,rw,noserverino,x-systemd.automount 0 0 I re-entered my password in unRAID 'users' tab, and then manually navigated via Dolphin > Network > SMB > NAS > Apps. I entered my username/password and it accepted it. Not only that, it accepted it for all the other visible shares (some shares are hidden). Any hidden share did not accept the credentials. Also, even though i could access "Photos" via the manual method described in this paragraph, i couldn't then navigate there via the terminal (/mnt/NAS/Photos). In Dolphin, i get: In Terminal, i get: derek@Nobara-PC:/mnt/NAS$ cd Apps bash: cd: Apps: No such deviceSo, i'm guessing something in the universe of Linux has changed? I did see someone mention that Nobara "now uses systemd mounting" but no more information than that. Perhaps the entry above is not properly compatible with systemd mounting methods? I'm a confused monkey. I'd appreciate any assistance (even if it's just suggestions to improve the fstab entry regardless of fixing the issue).

-
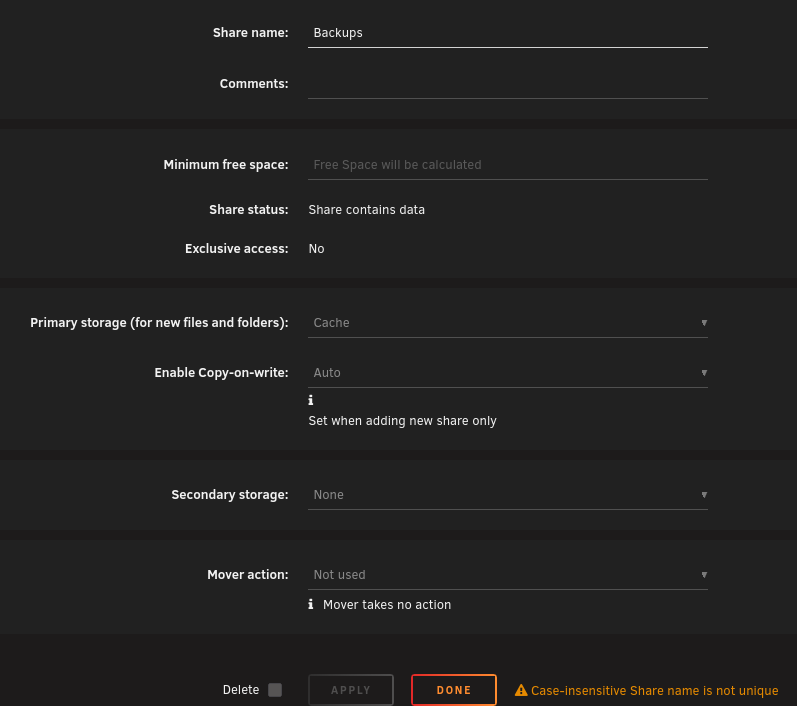
Hi there, I have a share: Backups. A while ago i was experimenting, and i made another share: backups (lowercase b). This proved to cause some issues, so i removed that lower-case backups share. Everything seemed to be fine after that, so I didn't think anything more of it. I recently upgraded to 7.2.2 (from 7.1.4), and FixCommonProblems found a problem it hadn't previously identified: I had a look at the share, and it there it was - it was actually set to only use the cache, and i can't change it. It looks like there might be some linkage to the "duplicate" backups share (as Linux is case sensitive, i didn't think it would be an issue at the time). It thinks it's not unique (according to the message at the bottom), but there is no longer another share, or directory in /mnt called backups. There hasn't been for several months. And weirdly, most of the data is actually on 'Disk2': So i'm unsure how to best resolve the issue. Of course, i don't want to lose those backups. I was thinking, temporarily rename the directory whatever, say: backups2 and attempt to modify the settings and then rename back to Backups. I'm not sure if that's a 'safe' thing to do in terms of broader unRAID settings, so i'd appreciate your suggestions or assurances. Cheers.

-
Thanks, and yes, i had to restore/fix my containers.
-
Oh ok. Makes sense. One must wonder why the original (?) is still implemented the way it is. It includes text for people upgrading from version 5.x which i think implies it hasn't been looked at for many years.
-
I think it's for the best. The way it handled SSH was really weird (i thought, but i'm not an expert). I think if you want to push things via SSH to unRAID it might be better to utilise a Docker or even VM. Depends what you want, of course, but i've moved away from ssh'ing to unRAID and i've not missed it
-
Thanks for your post, i too have folder rather than file for my dockers. I followed your procedure successfully with the addition of manually recreating my 'dockernet' custom docker network (which needs to be done before restoring dockers that might use it). I screwed my permissions because i was tired and used the wrong tool ("New Permissions") instead of the right tool ("fix common problems"). In future, an option might be to use Duplicacy to run as root, and backup the whole appdata/docker directories for full restore (including the parent directory). My Duplicacy doesn't run as root, so this isn't currently an option for me but i might change that. 🤔
-
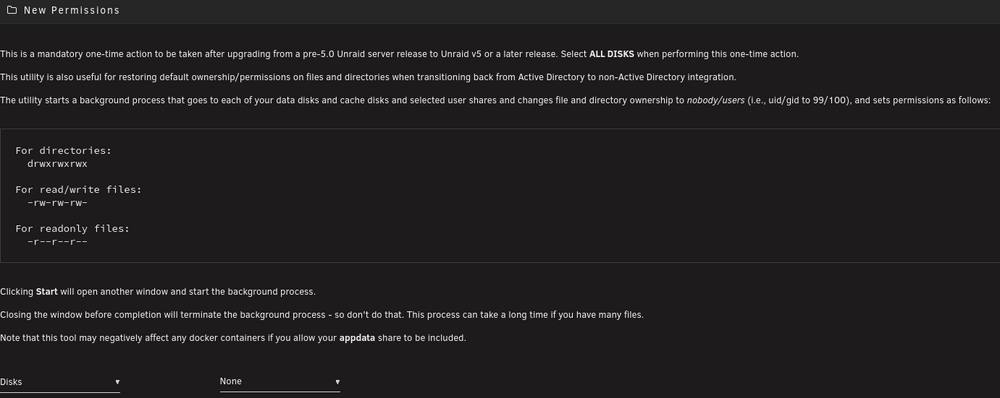
Sigh. I ran the "New Permissions" tool in unRAID and of course i ran it across all the disks, as it suggests. I neglected to read carefully enough. ☹️ I restored my Dockers thanks to this post: https://forums.unraid.net/topic/177037-completely-screwed-up-ran-new-permissions-on-every-share-including-appdata-now-no-containers-work-with-execution-error-bad-parameter-message/#findComment-1544109 I have also run Fix Common Problems which tells me there's nothing for me to fix. Is there anything anywhere else that might be screwed that i need to attend to? system or domains ? Thanks for any advice offered. EDIT: If you use "search" to find "permissions" it comes up with some OLD tool! If you manually go to Tools > Docker Safe New Permissions - then you're better protected! How should this be reported to devs? "New Permissions" via search:
-
+1


