


exist2resist
Members
-
Joined
-
Last visited
Everything posted by exist2resist
-
This will steer you in the right direction. https://github.com/Exist2Resist/docker-templates/blob/master/exist2resist/Onlyoffice.xml I created the template and am using it successfully.
-
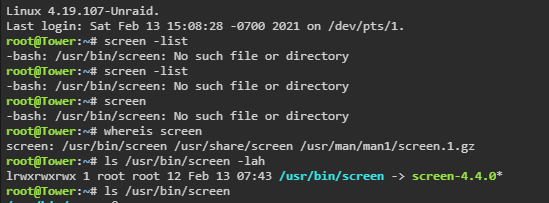
Having issues with screen, did a reinstall still can not start it. As you can see it exists on my system looks like the right permissions as well. Any ideas?
-
It was the preview folder and database file locations that didn't add up. I purged the appdata_xxxxxxxxx/preview folder, ran file scan and regenerated the previews from scratch. Ran a bunch of occ repairs on the file system, database stuff, etc. Realistically I just need to migrate to a new and clean instance. All these upgrades from version 15 left too much stuff behind.
-
I believe that my upgrade broke something with the Photo viewer and I am getting error 404 for previews. The photo tab intermittently displays the photos. I tried all kinds of occ commands. What table do I look in to find fileID and corresponding file loaction? Also can someone shine some light on how to clear the file cache and the file cache table, is this recommended?

-
Actually there is a file you need to purge as per their github.

-
Looks like your overwrite.cli.url might be wrong. <?php $CONFIG = array ( 'memcache.local' => '\\OC\\Memcache\\APCu', 'datadirectory' => '/data', 'instanceid' => 'something', 'passwordsalt' => 'klsjsadhflkasjdhflakshf', 'secret' => 'lkashdjflaskjhdflakshdflka', 'trusted_domains' => array ( 0 => '192.168.1.151:444', 1 => 'something.something.duckdns.org', ), 'dbtype' => 'mysql', 'version' => '20.0.7.1', 'overwrite.cli.url' => 'https://something.something.duckdns.org:443', 'dbname' => 'nextcloud', 'dbhost' => '192.168.1.151:3306', 'dbport' => '', 'dbtableprefix' => 'oc_', 'mysql.utf8mb4' => true, 'dbuser' => 'oc_admin', 'dbpassword' => 'klasdhgflkashflashf', 'installed' => true, 'theme' => '', 'loglevel' => 2, 'maintenance' => false, 'twofactor_enforced' => 'false', 'twofactor_enforced_groups' => array ( ), 'twofactor_enforced_excluded_groups' => array ( ), 'mail_from_address' => 'myuser', 'mail_smtpmode' => 'smtp', 'mail_smtphost' => 'mail.server.ca', 'mail_smtpport' => '25', 'mail_sendmailmode' => 'smtp', 'mail_domain' => 'server.ca', 'preview_max_x' => '2048', 'preview_max_y' => '2048', 'jpeg_quality' => '60', 'updater.release.channel' => 'stable', 'has_rebuilt_cache' => true, 'app_install_overwrite' => array ( 0 => 'passman', ), ); Subdomain conf: server { listen 443 ssl; listen [::]:443 ssl; #HTTP Strict Transport Security for NextCloud add_header Strict-Transport-Security "max-age=15552000; includeSubDomains" always; server_name cloud.*; include /config/nginx/ssl.conf; client_max_body_size 0; location / { include /config/nginx/proxy.conf; resolver 127.0.0.11 valid=30s; set $upstream_nextcloud 192.168.1.151; proxy_max_temp_file_size 2048m; proxy_pass https://$upstream_nextcloud:444; } } Note I use the static ip of my server not the internal docker names or IPs, I find those rarely work. Then you make sure that in your nginx.conf the following line... include /config/nginx/site-confs/*; ...is not commented.
-
What is the file I need to delete after each update again? There is a file in the configuration folder.
-
Yes you need to reboot so the BIOS can take control of the fans again.
-
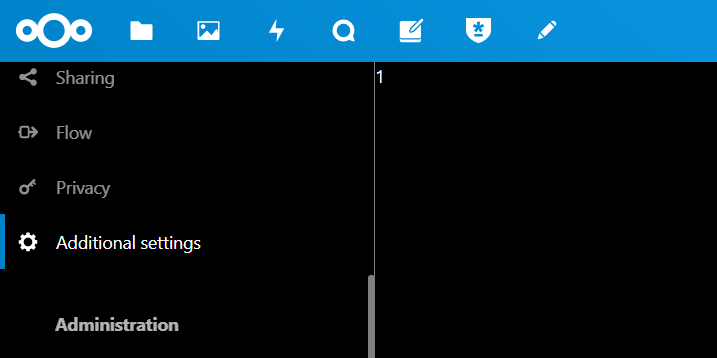
Upgraded from NC 15 to 19 today, yeah I know, long overdue. When I go to help I have Nextcloud 15 support documentation, how to I purge the old version of this page? Secondary issue I'm having is the Additionaly Settings page is missing under Settings. Prints a '1' on the page. This is not the Additional Settings that is under Administration.
-
Where can I find a full version or example of supported tags in v2 xml... I'm trying to figure out if this is a valid tag, or if one exists like this...
-
Auto Update doesn't spin up new instances of a few containers I have after an update attempt. The image is updated, but then they just disappear and aren't spun back up again. I can bring them back up manually by using the User Templates section in the Templates drop down. So not quite sure why Auto Update wouldn't spin them up again even though the template still exists for the containers. If I update the containers manually it works just fine. Also note worthy these are my own unraid templates, https://github.com/Exist2Resist/docker-templates/tree/master/exist2resist The containers that don't spin back up are Collabora, and Gitlab-CE after updates, all the other ones update fine.
-
It's not broken mine has been working without hiccup for over a year now. You need to create a chatid file under /boot/config/telegram. From the command line run the following; touch /boot/config/telegram/chatid In that file you need to input the chatid of your user not your bot. You can obtain this by going to the following url; https://api.telegram.org/bot{bot token}/getUpdates Or running a curl command from the command line; curl https://api.telegram.org/bot{bot token}/getUpdates Where {bot token} is your bot api token... in the format of 1111111111:AAasdflakjhsflaskdhalskdjyYo You will see json formated text spit out. Look for the first instance of a chat id that belongs to your user name and not the bot. "chat":{"id":206646491,"first_name":"Max","last_name":"Power","username":"MPower" The above is the chat id you insert into your chatid file on the server. Just the number nothing else. Run this in command line; echo "206646491" > /boot/config/telegram/chatid
-
I did several times. I think something was being cached in the browser, reason I say that it wasn't till I got home and opened my laptop that the log stopped showing all red. It's fine now. Odd behavior, working now though.
-
Had a bit of an issue with both the mentioned the plugins not updating and giving me wrong csrf_token error. I purged the Advanced Buttons.plg manually and had to update the Unassigned devices plugin manually as well. Now I get the above.
-
So it looks like there is a bug with the telegram notifications in unRAID. Once you input the TOKEN it's supposed to fetch the CHATID, this did not happen to me when I upgraded to 6.7. It sat there for 24 hours, doing nothing. Not until i created a "/boot/config/telegram/chatid" file manually and populated it with the 9 digit chat id, did it work.
-
Yeah figured it out. I'm on 6.7 and it wasn't working for me at all. I had to create a chatid file and once I did the test was successful. Prior to that it went nowhere with just the BOT token.
-
It's not working for me at all, chatid file is not being created. Do I just create a chatid file in the same directory as the tokenid file, and paste the chatid in there? EDIT: Nevermind, figured out that creating a "chatid" file and just putting it in the same folder as the token file makes this work. I don't understand why this doesn't have a Chat ID file and when it's populated unraid generates a chatid file and inside it it appends the 9 digit ID. It's not that difficult.
-
@realies Thanks for this, really appreciate the work you have done on this.
-
What's up with the memory usage on this docker, it's eating it all up and keeps growing out of control.
-
Probably a good idea to remove Notify my Android as well as it's no longer supported and the servers are gone.
-
I've been using Notify My Android for any server events that happen. This app just went down a few weeks ago, so I moved all my applications to use a custom Telegram Bot Would it be possible to add a Telegram Bot to Settings - Notification Settings?
-
I figured it out, but I had to do 1 and 3 in dos, and 5 and 6 in UEFI shell. So weird.
-
Can you update the "See here how to use UEFI shell" link, it's not working. I have 3 h310 cards I need to flash to IT mode however I am not able to do this in DOS. Thanks
-
Any word on updates for the OpenELEC or LibreELEC VM templates? Looking to run Krypton in a VM for my database updates. I've been trying to create my own but it fails at boot.
-
I get this from a couple templates. Any ideas? You've added a /config mapping. There's probably already one there if you hit show advanced That was it thanks. Finally got all my stuff up and running again. Luckily my MariaDB instance was still intact. This has my entire KODI database. 24 Months old and still running like a champ.


