





W0nderW0lf
Members
-
Joined
-
Last visited
Everything posted by W0nderW0lf
-
So I've finally managed to set it up with the provided extra "spotizerr-auth" container. At first I tried to run the auth container on unraid, but had to do it on my notebook instead (because I am in a different network) When I now try to download a track, it get's queued, but receives an error in the end and disappears from history. There is nothing in the logs that inidcate's an connection issue. I've only seen this message once: 2025-12-10 07:03:16 [WARNING] Couldn't decode JSON from cache at: .cache edit: so I've restarted the container and checked the logs (no warning or error) Tried the same.. downloading a track, now I finally received some more info: { "callback_type": "track", "parent": null, "current_track": null, "total_tracks": null, "album": { "type": "albumTrack", "album_type": "album", "title": "SONIC TRASH", "release_date": { "year": 2025, "month": 11, "day": 14 }, "total_tracks": 16, "total_discs": 1, "genres": [], "images": [ { "url": "https://i.scdn.co/image/ab67616d00001e02de99fccc2376c6045b5ca098", "width": 300, "height": 300 }, { "url": "https://i.scdn.co/image/ab67616d00004851de99fccc2376c6045b5ca098", "width": 64, "height": 64 }, { "url": "https://i.scdn.co/image/ab67616d0000b273de99fccc2376c6045b5ca098", "width": 640, "height": 640 } ], "ids": { "spotify": "65DiMasUEEVfLXwNgeoYok", "upc": "199538391466" }, "artists": [ { "type": "artistAlbumTrack", "name": "ROMES", "ids": { "spotify": "4b3MzzOReTrle64Pxc1r9g" } } ] }, "status_info": { "ids": { "spotify": "4k7xlAymPBgxqJSdMgHfJX", "isrc": "QMDA72520349" }, "status": "error", "error": "Download failed for 'BLACK HONEY' by 'ROMES' (URL: https://open.spotify.com/track/4k7xlAymPBgxqJSdMgHfJX). Original error: Maximum retry limit reached for 'BLACK HONEY' by 'ROMES' (local: 3, global: 100). Last error: Failed fetching audio key! gid: <redacted>, fileId: <redacted>" } }There is nothing shown in the container logs. Maybe it would be helpful to have a debugging option?
-
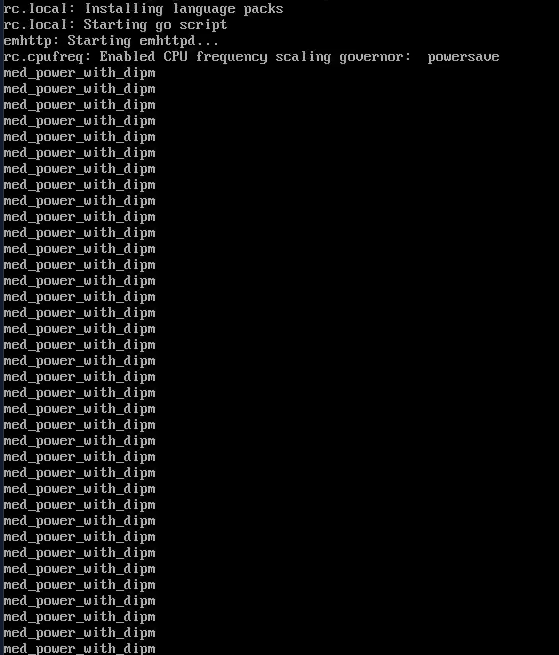
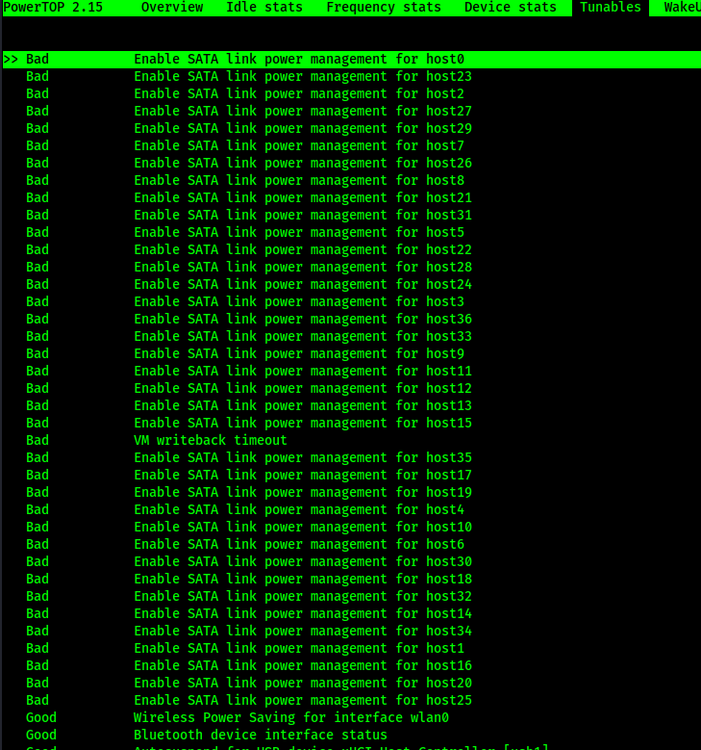
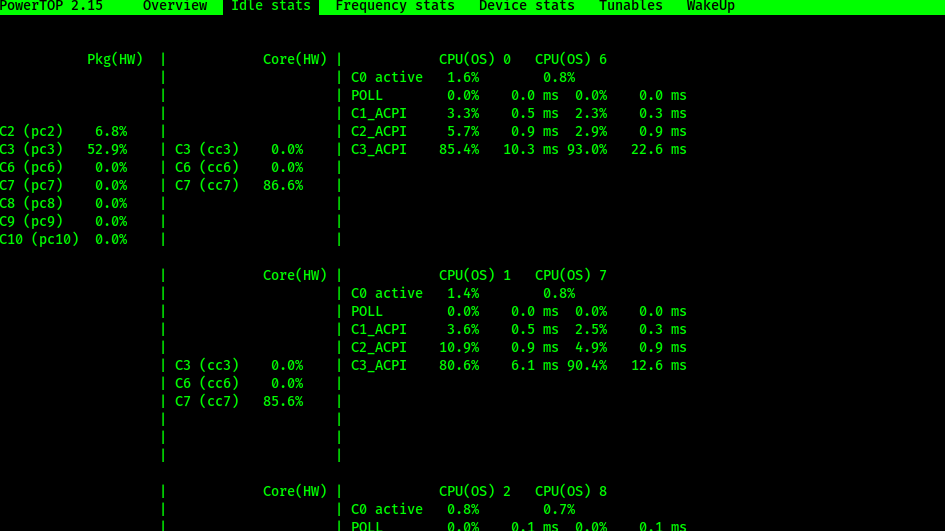
gut zu wissen! Nein, der Server war ausgeschalten. War neu hochgefahren. Hab vorher noch Audio Controller im Bios deaktiviert. Im Prinzip war es ein normaler start. Array war hochgefahren. Neue Festplatte im unassigned devices formatiert (hätte ich glaub ich überspringen können und einfach an das array anhängen können.. jetzt braucht der 5h um einen disk clean durch laufen zu lassen) .. Jedenfalls nachdem ich händisch den Array gestoppt habe, um die Disk ans Array zu hängen, ist nichts passiert. Der Start Button hat nichts getan. Die Seite immer nur neu geladen und im Log immer die gleiche Meldung geworfen " emhttpd: cmdStart: already starting" De facto hat das erst nach einem Systemneustart geklappt... Was aber vermutlich auch zum Problem beigetragen hat. Ich hatte vorher nochmal mit powertop geguckt, ob mein "go" file für Powertop die neuen Regeln angewandt hat. Ich bin mir nicht sicher ob die tatsächlich greifen. Einstellungen in meinem "go" file: .... # ------------------------------------------------- # powertop tweaks # ------------------------------------------------- # Enable SATA link power management echo med_power_with_dipm | tee /sys/class/scsi_host/host0/link_power_management_policy echo med_power_with_dipm | tee /sys/class/scsi_host/host1/link_power_management_policy echo med_power_with_dipm | tee /sys/class/scsi_host/host2/link_power_management_policy echo med_power_with_dipm | tee /sys/class/scsi_host/host3/link_power_management_policy echo med_power_with_dipm | tee /sys/class/scsi_host/host4/link_power_management_policy echo med_power_with_dipm | tee /sys/class/scsi_host/host5/link_power_management_policy echo med_power_with_dipm | tee /sys/class/scsi_host/host6/link_power_management_policy echo med_power_with_dipm | tee /sys/class/scsi_host/host7/link_power_management_policy echo med_power_with_dipm | tee /sys/class/scsi_host/host8/link_power_management_policy echo med_power_with_dipm | tee /sys/class/scsi_host/host9/link_power_management_policy echo med_power_with_dipm | tee /sys/class/scsi_host/host10/link_power_management_policy echo med_power_with_dipm | tee /sys/class/scsi_host/host11/link_power_management_policy echo med_power_with_dipm | tee /sys/class/scsi_host/host12/link_power_management_policy echo med_power_with_dipm | tee /sys/class/scsi_host/host13/link_power_management_policy echo med_power_with_dipm | tee /sys/class/scsi_host/host14/link_power_management_policy echo med_power_with_dipm | tee /sys/class/scsi_host/host15/link_power_management_policy echo med_power_with_dipm | tee /sys/class/scsi_host/host16/link_power_management_policy echo med_power_with_dipm | tee /sys/class/scsi_host/host17/link_power_management_policy echo med_power_with_dipm | tee /sys/class/scsi_host/host18/link_power_management_policy echo med_power_with_dipm | tee /sys/class/scsi_host/host19/link_power_management_policy echo med_power_with_dipm | tee /sys/class/scsi_host/host20/link_power_management_policy echo med_power_with_dipm | tee /sys/class/scsi_host/host21/link_power_management_policy echo med_power_with_dipm | tee /sys/class/scsi_host/host22/link_power_management_policy echo med_power_with_dipm | tee /sys/class/scsi_host/host23/link_power_management_policy echo med_power_with_dipm | tee /sys/class/scsi_host/host24/link_power_management_policy echo med_power_with_dipm | tee /sys/class/scsi_host/host25/link_power_management_policy echo med_power_with_dipm | tee /sys/class/scsi_host/host26/link_power_management_policy echo med_power_with_dipm | tee /sys/class/scsi_host/host27/link_power_management_policy echo med_power_with_dipm | tee /sys/class/scsi_host/host28/link_power_management_policy echo med_power_with_dipm | tee /sys/class/scsi_host/host29/link_power_management_policy echo med_power_with_dipm | tee /sys/class/scsi_host/host30/link_power_management_policy echo med_power_with_dipm | tee /sys/class/scsi_host/host31/link_power_management_policy echo med_power_with_dipm | tee /sys/class/scsi_host/host32/link_power_management_policy echo med_power_with_dipm | tee /sys/class/scsi_host/host33/link_power_management_policy echo med_power_with_dipm | tee /sys/class/scsi_host/host34/link_power_management_policy echo med_power_with_dipm | tee /sys/class/scsi_host/host35/link_power_management_policy echo med_power_with_dipm | tee /sys/class/scsi_host/host36/link_power_management_policy ....Wenn das System hochfährt, sehe ich folgende Meldungen: Im Powertop sehe ich dann aber wieder: Ich vermute wenn ich mit powertop --auto-tune drüber gehe, bekomme ich das array nicht mehr online nach einem stop.. Ist jetzt meine Vermutung.
-
Eine letzte Sache noch... Ich habe soeben eine neue HDD eingebaut und wollte sie dem Array hinzufügen. Allerdings bekomme ich das Array nicht gestartet. Unraid scheint auch die Laufwerksbuchstaben geändert zu haben. Ich bin mir nun nicht sicher, ob das mit meinem ursprünglichen Problem zusammenhängt wo ich das Array nicht online bekommen habe, weil ASPM nicht 100% greift, oder weil Unraid den Laufwerksbuchstaben von 2 Platten vertauscht hat. Nun ist (f) mit (h) vertauscht. Wisst ihr woran das liegen könnte? edit: kurzes Update, ich habe den Server neugestartet und konnte erst danach den Array starten. Merkwürdig finde ich es schon, dass das nicht vorher geklappt hat. Nov 24 12:38:44 NASty unassigned.devices: Mounting partition 'sdf1' at mountpoint '/mnt/disks/WW678MCL'... Nov 24 12:38:44 NASty unassigned.devices: Mount cmd: /sbin/mount -t 'xfs' -o rw,relatime '/dev/sdf1' '/mnt/disks/WW678MCL' Nov 24 12:38:44 NASty kernel: XFS (sdf1): Mounting V5 Filesystem 9709f907-18d2-4f43-a188-599cf0511824 Nov 24 12:38:44 NASty kernel: XFS (sdf1): Ending clean mount Nov 24 12:38:45 NASty unassigned.devices: Successfully mounted '/dev/sdf1' on '/mnt/disks/WW678MCL'. Nov 24 12:38:45 NASty unassigned.devices: Device '/dev/sdf1' is not set to be shared. Nov 24 12:38:50 NASty kernel: md: unRAID driver removed Nov 24 12:38:50 NASty emhttpd: shcmd (604): /sbin/modprobe md-mod super=/boot/config/super.dat Nov 24 12:38:50 NASty kernel: md: unRAID driver 2.9.35 installed Nov 24 12:38:51 NASty kernel: mdcmd (1): import 0 sdb 64 3907018532 0 ST4000VN008-2DR166_ZDHA5NBY Nov 24 12:38:51 NASty kernel: md: import disk0: (sdb) ST4000VN008-2DR166_ZDHA5NBY size: 3907018532 Nov 24 12:38:51 NASty kernel: mdcmd (2): import 29 sde 64 3907018532 0 ST4000VN006-3CW104_WW669DQT Nov 24 12:38:51 NASty kernel: md: import disk29: (sde) ST4000VN006-3CW104_WW669DQT size: 3907018532 Nov 24 12:38:51 NASty kernel: mdcmd (3): import 1 sdc 64 3907018532 0 ST4000VN008-2DR166_ZGY969VM Nov 24 12:38:51 NASty kernel: md: import disk1: (sdc) ST4000VN008-2DR166_ZGY969VM size: 3907018532 Nov 24 12:38:51 NASty kernel: mdcmd (4): import 2 sdg 64 3907018532 0 ST4000VN008-2DR166_ZGY9926E Nov 24 12:38:51 NASty kernel: md: import disk2: (sdg) ST4000VN008-2DR166_ZGY9926E size: 3907018532 Nov 24 12:38:51 NASty kernel: mdcmd (5): import 3 sdh 64 3907018532 0 ST4000VN008-2DR166_ZGY98XD1 Nov 24 12:38:51 NASty kernel: md: import disk3: (sdh) ST4000VN008-2DR166_ZGY98XD1 size: 3907018532 Nov 24 12:38:51 NASty kernel: mdcmd (6): import 4 sdd 64 3907018532 0 ST4000VN006-3CW104_WW669FY9 Nov 24 12:38:51 NASty kernel: md: import disk4: (sdd) ST4000VN006-3CW104_WW669FY9 size: 3907018532 Nov 24 12:38:51 NASty kernel: mdcmd (7): import 5 sdf 64 3907018532 0 ST4000VN006-3CW104_WW678MCL Nov 24 12:38:51 NASty kernel: md: import disk5: (sdf) ST4000VN006-3CW104_WW678MCL size: 3907018532 Nov 24 12:38:51 NASty kernel: md: disk5 new disk Nov 24 12:38:51 NASty kernel: mdcmd (8): import 6 Nov 24 12:38:51 NASty kernel: mdcmd (9): import 7 Nov 24 12:38:51 NASty kernel: mdcmd (10): import 8 Nov 24 12:38:51 NASty kernel: mdcmd (11): import 9 Nov 24 12:38:51 NASty kernel: mdcmd (12): import 10 Nov 24 12:38:51 NASty kernel: mdcmd (13): import 11 Nov 24 12:38:51 NASty kernel: mdcmd (14): import 12 Nov 24 12:38:51 NASty kernel: mdcmd (15): import 13 Nov 24 12:38:51 NASty kernel: mdcmd (16): import 14 Nov 24 12:38:51 NASty kernel: mdcmd (17): import 15 Nov 24 12:38:51 NASty kernel: mdcmd (18): import 16 Nov 24 12:38:51 NASty kernel: mdcmd (19): import 17 Nov 24 12:38:51 NASty kernel: mdcmd (20): import 18 Nov 24 12:38:51 NASty kernel: mdcmd (21): import 19 Nov 24 12:38:51 NASty kernel: mdcmd (22): import 20 Nov 24 12:38:51 NASty kernel: mdcmd (23): import 21 Nov 24 12:38:51 NASty kernel: mdcmd (24): import 22 Nov 24 12:38:51 NASty kernel: mdcmd (25): import 23 Nov 24 12:38:51 NASty kernel: mdcmd (26): import 24 Nov 24 12:38:51 NASty kernel: mdcmd (27): import 25 Nov 24 12:38:51 NASty kernel: mdcmd (28): import 26 Nov 24 12:38:51 NASty kernel: mdcmd (29): import 27 Nov 24 12:38:51 NASty kernel: mdcmd (30): import 28 Nov 24 12:38:51 NASty emhttpd: import 30 pool device: (nvme0n1) SanDisk_Extreme_Pro_500GB_21186C800316 Nov 24 12:38:51 NASty emhttpd: /sbin/blkid /dev/sda1 2>&1 Nov 24 12:38:51 NASty emhttpd: /dev/sda1: LABEL_FATBOOT="UNRAID" LABEL="UNRAID" UUID="ABA1-EF6C" BLOCK_SIZE="512" TYPE="vfat" PARTUUID="b0a43bfd-01" Nov 24 12:38:51 NASty emhttpd: import 31 flash device: (sda) Nov 24 12:38:51 NASty emhttpd: update_pool_cfg: 30 cache 0 Nov 24 12:38:51 NASty SysDriversBuild: Submitting SysDrivers Build Nov 24 12:38:51 NASty sysDrivers: SysDrivers Build Starting Nov 24 12:38:59 NASty emhttpd: cmdStart: already starting Nov 24 12:39:08 NASty sysDrivers: SysDrivers Build Complete

-
Wenn @DataCollector einen "Spenden-Coffee-Pot" hat, würde ich auch freiwillig einzahlen. :D Das waren wirklich lange und aufwendige Beiträge.
-
Ich gebe mir wirklich mühe, aber mein ADHS macht es mir leider gottes nicht einfach. Ich kann über 4x einen Post lesen und überlese trotzdem die hälfte. Ist keine Absicht. In meinem Kopf war das problem vorhanden: "Ich mach einen manuellen spindown, aber kann die nicht wieder starten" Tut mir Leid wenn ich dir/euch unnötig Zeit geraubt habe, aber es war wenigstens nicht ganz umsonst. Ich würde mich auch mit einem café für jeden revanchieren.
-
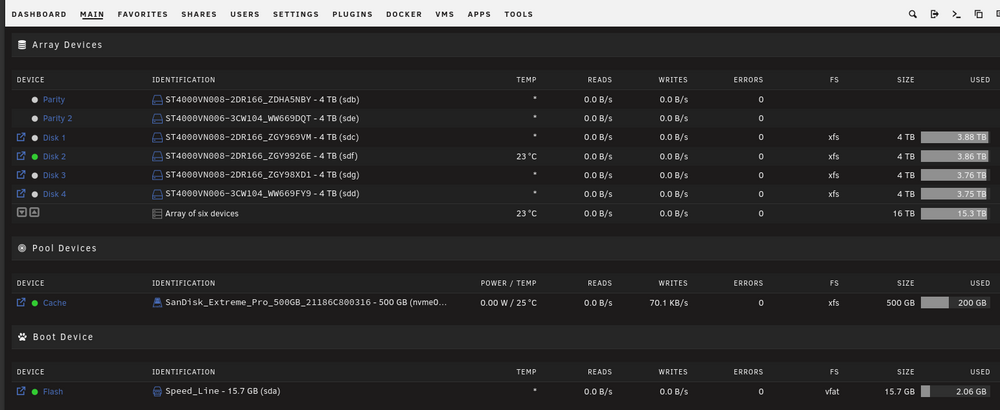
Also ich habe mal nachgesehen. Die Container laufen und 5 von 6 Platten sind runtergefahren. Warum da jetzt der eine nicht runter fährt ist mir ein rätsel. Dabei ist da keine offensichtliche aktivität zu erkennen. Vllt ändert sich das auch in ein paar minuten wieder, aber alles im allem bin ich doch schon sehr zufrieden mit dem vorläufigen Ergebnis. Ich hatte eigentlich vermutet die parities bleiben oben solange eine disk "aktiv" ist. Kann ich hier über das Menü sehen welche Container da eventuell noch einen aktiven zugriff haben? Ich habe vorhin mal eine Folge von einer Serie angefangen, die vermutlich da drauf liegt. Keine Ahnung ob es damit zusammenhängt, aber den Stream habe ich wieder beendet.
-
Sehr erfreuliche Neuigkeiten. ☺️ Ich habe gar nicht gerafft das man den spindown delay auch über die disk settings steuern muss. Dachte das geschieht per default automatisch. Ich habe es auf 15 Minuten gesetzt und siehe da, die Platten (bis auf NVME) fahren runter. Jetzt bin ich im idle bei 17,5-18,9Watt!! (Dafür habe ich aber alle Container gestoppt) Wenn bei mir plex + 2 weitere Container laufen, bekomme ich Disk 1 und die Parities (is ja logisch wenn eine disk noch läuft) nicht down. Ich habe nochmal alle Container gestartet und versuche mich gerade stück für stück durch zu hangeln. Ich werde heute auch mal versuchen die WD/Sandisk zu updaten falls möglich. Ich gucke auch ob ich noch ein BIOS update finde, wobei ich das erst vor 5 monaten gemacht habe... denke also nicht das ich damit noch was verbesser. Meine shares sind nicht mehr exportiert. Ich weiß nicht ob die bloße existenz des shares auch Auswirkungen darauf hat. Ich muss auch gucken, dass ich Tasks innerhalb der container auf eine feste Uhrzeit und nicht auf zufällige Zeiten setze. Ich habe mal alle relevanten Container gestartet und gucke mal welche von denen einen spindown verhindern. Dauert nur leider immer 15 minuten bis sich evtl. was tut
-
Ich bin aktuell noch ein bisschen am forschen und testen. Ich habe es auch geschafft die Platten runter und wieder hoch zu fahren ohne den Server zu rebooten. Im Spindown zustand verbraucht der Server 20Watt!! Wenn ich die platten aber selber nicht runter fahre, dann tun die auch nichts und drehen weiter... Was mir im Log allerdings auffällt... Ich weiß nicht ob das damit zusammenhängt, dass ich im autotweak den power save für nvme aktiviert habe, aber ich vermute mal, dass nach ein paar minuten inaktivität der Server versucht die NVME in einen anderen Zustand zu versetzen. Nov 23 12:14:17 NASty kernel: pcieport 0000:00:1d.0: AER: Correctable error message received from 0000:07:00.0 Nov 23 12:14:17 NASty kernel: nvme 0000:07:00.0: PCIe Bus Error: severity=Correctable, type=Physical Layer, (Receiver ID) Nov 23 12:14:17 NASty kernel: nvme 0000:07:00.0: device [15b7:5002] error status/mask=00000001/0000e000 Nov 23 12:14:17 NASty kernel: nvme 0000:07:00.0: [ 0] RxErr (First) Danke dafür! Muss ich mir morgen mal ansehen. :)
-
Ne.. die VM ist auf das Jahr runter gebrochen nur 5% der Zeit an. Ich brauche das nur um ein paar Lieder über windows aufzunehmen, weil es dafür keine Linux Anwendung gibt. Manchmal nutze ich die VM auch um nen 3D-Scan zu machen, wofür ich manchmal spontan auch nen USB port brauche. Klar könnte ich für diese Fälle den Audio Port auch immer ein/ausschalten, aber macht der wirklich 10 Watt aus? wenn ja, dann werde ich das definitiv abschalten. Aber wenn es sich nur um 1 Watt handelt, macht es die Stute auch nicht wirklich schlanker.
-
Ne lokal mit vnc. Ich habe da nen audio recorder. Leider kann ich kein audio über vnc schleifen und das alles mit RDP auf linux ist mir zu umständlich..
-
Ich brauche den audio port leider, weil ich sonst den audio treiber in einer windows VM nicht zum laufen bekomme... Die USB ports kann ich leider nicht abstellen. Mir werden nur die Ports in Verwendung angezeigt.
-
Ich habe mir nochmal ASPM Helper und Tips and Tweaks angesehen. ASPM Helper zeigt mir scheinbar nicht alle Geräte an. Was ich in ASPM Helper sehe: 00:01.0 PCI bridge: Intel Corporation 6th-10th Gen Core Processor PCIe Controller (x16) (rev 03) (prog-if 00 [Normal decode]) LnkCap: Port #2, Speed 8GT/s, Width x16, ASPM L0s L1, Exit Latency L0s <256ns, L1 <8us LnkCtl: ASPM L0s L1 Enabled; RCB 64 bytes, LnkDisable- CommClk+ 00:1b.0 PCI bridge: Intel Corporation Tiger Lake-H PCIe Root Port #17 (rev 11) (prog-if 00 [Normal decode]) LnkCap: Port #17, Speed 8GT/s, Width x1, ASPM L0s L1, Exit Latency L0s <1us, L1 <4us LnkCtl: ASPM L0s L1 Enabled; RCB 64 bytes, LnkDisable- CommClk- 00:1b.4 PCI bridge: Intel Corporation Device 43c4 (rev 11) (prog-if 00 [Normal decode]) LnkCap: Port #21, Speed 8GT/s, Width x1, ASPM L0s L1, Exit Latency L0s <1us, L1 <4us LnkCtl: ASPM L0s L1 Enabled; RCB 64 bytes, LnkDisable- CommClk- 00:1c.0 PCI bridge: Intel Corporation Tiger Lake-H PCIe Root Port #1 (rev 11) (prog-if 00 [Normal decode]) LnkCap: Port #1, Speed 8GT/s, Width x1, ASPM L0s L1, Exit Latency L0s <1us, L1 <4us LnkCtl: ASPM L0s L1 Enabled; RCB 64 bytes, LnkDisable- CommClk- 00:1c.4 PCI bridge: Intel Corporation Tiger Lake-H PCI Express Root Port #5 (rev 11) (prog-if 00 [Normal decode]) LnkCap: Port #5, Speed 8GT/s, Width x1, ASPM L0s L1, Exit Latency L0s <1us, L1 <16us LnkCtl: ASPM L1 Enabled; RCB 64 bytes, LnkDisable- CommClk+ 00:1c.7 PCI bridge: Intel Corporation Device 43bf (rev 11) (prog-if 00 [Normal decode]) LnkCap: Port #8, Speed 8GT/s, Width x1, ASPM L0s L1, Exit Latency L0s <1us, L1 <16us LnkCtl: ASPM L1 Enabled; RCB 64 bytes, LnkDisable- CommClk+ 00:1d.0 PCI bridge: Intel Corporation Tiger Lake-H PCI Express Root Port #9 (rev 11) (prog-if 00 [Normal decode]) LnkCap: Port #9, Speed 8GT/s, Width x4, ASPM L1, Exit Latency L1 <16us LnkCtl: ASPM L1 Enabled; RCB 64 bytes, LnkDisable- CommClk+ 00:1d.4 PCI bridge: Intel Corporation Device 43b4 (rev 11) (prog-if 00 [Normal decode]) LnkCap: Port #13, Speed 8GT/s, Width x1, ASPM L0s L1, Exit Latency L0s <1us, L1 <4us LnkCtl: ASPM L0s L1 Enabled; RCB 64 bytes, LnkDisable- CommClk- 01:00.0 SATA controller: ASMedia Technology Inc. ASM1166 Serial ATA Controller (rev 02) (prog-if 01 [AHCI 1.0]) LnkCap: Port #0, Speed 8GT/s, Width x2, ASPM L0s L1, Exit Latency L0s <4us, L1 <64us LnkCtl: ASPM L0s L1 Enabled; RCB 64 bytes, LnkDisable- CommClk+ 05:00.0 Ethernet controller: Intel Corporation Ethernet Controller I225-V (rev 03) LnkCap: Port #0, Speed 5GT/s, Width x1, ASPM L1, Exit Latency L1 <4us LnkCtl: ASPM L1 Enabled; RCB 64 bytes, LnkDisable- CommClk+ 06:00.0 Network controller: Intel Corporation Wi-Fi 6 AX200 (rev 1a) LnkCap: Port #0, Speed 5GT/s, Width x1, ASPM L1, Exit Latency L1 <8us LnkCtl: ASPM L1 Enabled; RCB 64 bytes, LnkDisable- CommClk+ 07:00.0 Non-Volatile memory controller: Sandisk Corp SanDisk Extreme Pro / WD Black 2018/SN750/PC SN720 NVMe SSD (prog-if 02 [NVM Express]) LnkCap: Port #0, Speed 8GT/s, Width x4, ASPM L1, Exit Latency L1 <8us LnkCtl: ASPM L1 Enabled; RCB 64 bytes, LnkDisable- CommClk+Was fehlt: 00:1f.3 Audio device: Intel Corporation Device f0c8 (rev 11) (prog-if 00 [HDA compatible]) Flags: PMEClk- DSI- D1- D2- AuxCurrent=55mA PME(D0-,D1-,D2-,D3hot+,D3cold+) 00:14.0 USB controller: Intel Corporation Tiger Lake-H USB 3.2 Gen 2x1 xHCI Host Controller (rev 11) (prog-if 30 [XHCI]) Flags: PMEClk- DSI- D1- D2- AuxCurrent=375mA PME(D0-,D1-,D2-,D3hot+,D3cold+) Status: D0 NoSoftRst+ PME-Enable- DSel=0 DScale=0 PME- 00:16.0 Communication controller: Intel Corporation Tiger Lake-H Management Engine Interface (rev 11) Flags: PMEClk- DSI- D1- D2- AuxCurrent=0mA PME(D0-,D1-,D2-,D3hot+,D3cold-) Status: D0 NoSoftRst+ PME-Enable- DSel=0 DScale=0 PME- 00:17.0 SATA controller: Intel Corporation Device 43d2 (rev 11) (prog-if 01 [AHCI 1.0]) Flags: PMEClk- DSI- D1- D2- AuxCurrent=0mA PME(D0-,D1-,D2-,D3hot+,D3cold-) Status: D0 NoSoftRst+ PME-Enable- DSel=0 DScale=0 PME-Wie bekomme ich nun die korrekten Pfade heraus?
-
Ups. :( Das war das typische ADHS überlesen was mich manchmal plagt. Dann ginge der Punkt zuerst an dich. ^^ Es ist übrigens keine NVMe von WD, sondern eine Sandisk Extreme pro 500GB.. Vermute weil das als Gaming SSD vermarktet wird, wird die dementsprechend auch höhere Leistung haben. Leider ist das ein umständliches unterfangen, weil das genau zwischen MB und PSU sitzt und somit hinten alles ausbauen muss... die Kraft habe ich heute nicht. Ich müsste mal gucken ob es von Sandisk dazu noch hinweise oder firmware gibt die ASPM besser supported.
-
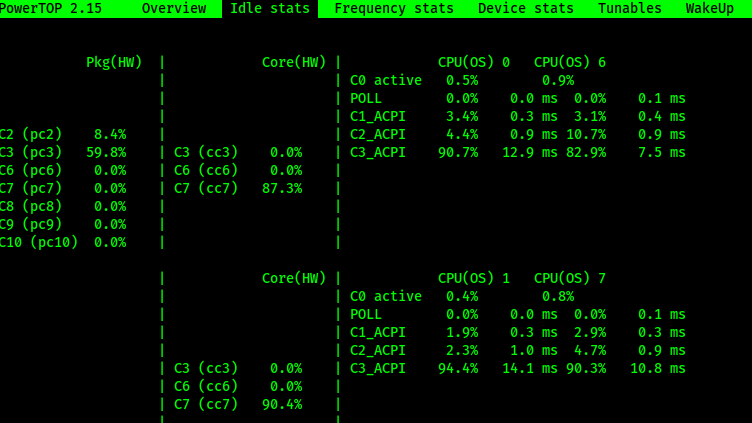
Ich habe von mgutt auch einen wertvollen Hinweis erhalten. Scheinbar waren meine C-States im BIOS noch deaktiviert.. Ich erreiche jetzt 37-41W Jetzt sieht das bei mir so aus: Uploading Attachment...
-
@mgutt Thank you very much for taking a look and ur detailed guide on this specific topic. As you suggested "auto" really meaned "disabled" in this case. I still need to check out why the array won't come online if I spin it down. I will try that later.
-
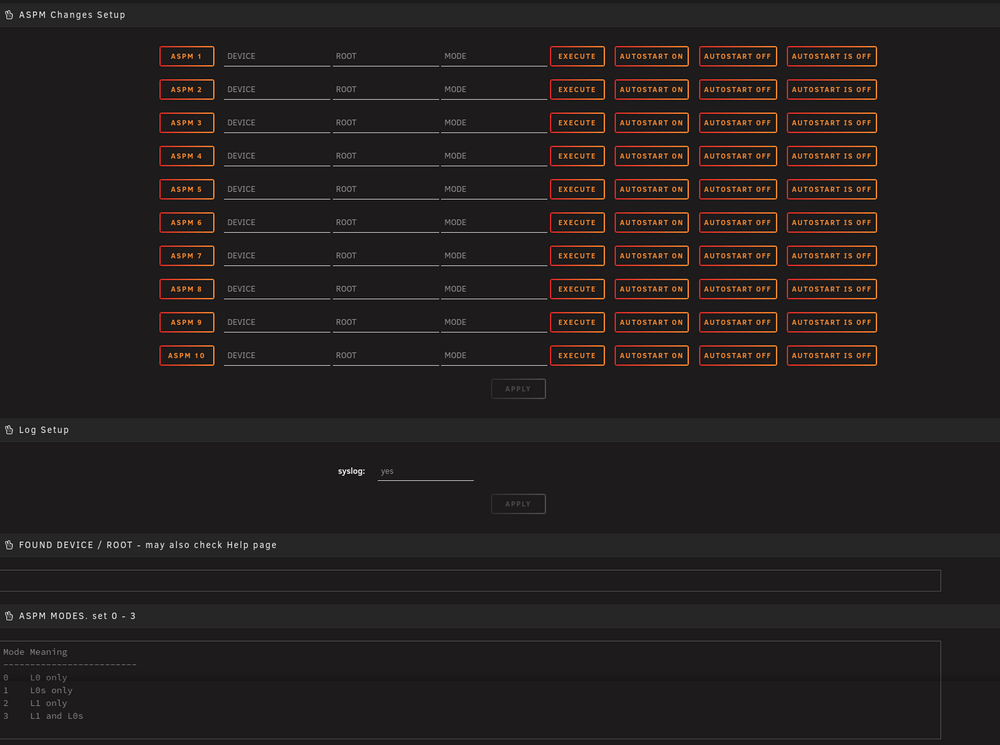
Sorry wollte sagen im BIOS disabled. :D Sorry nochmal. Hab vergessen den Code block zu benutzen.. :/ Ja ich hab mich auch aufgeregt als ich feststellen musste das ich die NVME nicht vorne verbauen kann... Eine IMO schlechte Designentscheidung .. wobei das bestimmt mit Intel verkäufen in Verbindung stehen würde... Ich bin gerade am gucken und verstehen vom ASPM Helper. Leider ist es nicht ganz selbsterklärend, weil bei mir keine Geräte vorgeschlagen werden Muss ich noch was aktivieren oder ist da was bei mir verbuggt? Weiß nämlich nicht wie die Geräte/Pfade/Modi angegeben werden müssten. Rein klicken in die Felder bringt nichts. Also kein Drop-Down falls das erwartet wäre. Zum glück mangelt es nicht an USB Backups von unraid. Das habe ich zum Glück bereits gemacht. Die wichtigsten Daten sind mir meine aktuell nur vorhandenen Medien auf dem Server . Für die 12TB habe ich leider keine adäquate backup solution... Ja das ausbauen der Blende ist echt ätzend. Das habe ich schon mal beim Vorgänger Board gemacht... Das würde ich ungern versuchen. Ich denke da nehme ich die 1-2W die es verbraucht in Kauf. Echt tricky... Sollte ich ein CPU Upgrade in Erwägung ziehen, muss ich mich trotzdem zwischen 2. SSD oder ASM1166 m.2 SATA entscheiden. Heißt wahrscheinlich auch, würde ich eine ASM1166 m.2 karte holen und mir eine PCIe m.2 steckkarte einsetzen, bekäme ich das gleiche problem. Vielleicht muss ich mich auch einfach für ein anderes Board entscheiden, aber das würde noch mehr Geld kosten...
-
Danke @MPC561 für den Hinweis. Aaalso, ich habe mal wie vorgeschlagen native ASPM deaktiviert. Folgende Ausgabe habe ich erhalten: ASPM root@NASty:~# lspci -vv | awk '/ASPM/{print $0}' RS= | grep --color -P '(^[a-z0-9:.]+|ASPM )' 00:01.0 PCI bridge: Intel Corporation 6th-10th Gen Core Processor PCIe Controller (x16) (rev 03) (prog-if 00 [Normal decode]) LnkCap: Port #2, Speed 8GT/s, Width x16, ASPM L0s L1, Exit Latency L0s <256ns, L1 <8us LnkCtl: ASPM L0s L1 Enabled; RCB 64 bytes, LnkDisable- CommClk+ 00:1b.0 PCI bridge: Intel Corporation Tiger Lake-H PCIe Root Port #17 (rev 11) (prog-if 00 [Normal decode]) LnkCap: Port #17, Speed 8GT/s, Width x1, ASPM L0s L1, Exit Latency L0s <1us, L1 <4us LnkCtl: ASPM L0s L1 Enabled; RCB 64 bytes, LnkDisable- CommClk- 00:1b.4 PCI bridge: Intel Corporation Device 43c4 (rev 11) (prog-if 00 [Normal decode]) LnkCap: Port #21, Speed 8GT/s, Width x1, ASPM L0s L1, Exit Latency L0s <1us, L1 <4us LnkCtl: ASPM L0s L1 Enabled; RCB 64 bytes, LnkDisable- CommClk- 00:1c.0 PCI bridge: Intel Corporation Tiger Lake-H PCIe Root Port #1 (rev 11) (prog-if 00 [Normal decode]) LnkCap: Port #1, Speed 8GT/s, Width x1, ASPM L0s L1, Exit Latency L0s <1us, L1 <4us LnkCtl: ASPM L0s L1 Enabled; RCB 64 bytes, LnkDisable- CommClk- 00:1c.4 PCI bridge: Intel Corporation Tiger Lake-H PCI Express Root Port #5 (rev 11) (prog-if 00 [Normal decode]) LnkCap: Port #5, Speed 8GT/s, Width x1, ASPM L0s L1, Exit Latency L0s <1us, L1 <16us LnkCtl: ASPM L1 Enabled; RCB 64 bytes, LnkDisable- CommClk+ 00:1c.7 PCI bridge: Intel Corporation Device 43bf (rev 11) (prog-if 00 [Normal decode]) LnkCap: Port #8, Speed 8GT/s, Width x1, ASPM L0s L1, Exit Latency L0s <1us, L1 <16us LnkCtl: ASPM L1 Enabled; RCB 64 bytes, LnkDisable- CommClk+ 00:1d.0 PCI bridge: Intel Corporation Tiger Lake-H PCI Express Root Port #9 (rev 11) (prog-if 00 [Normal decode]) LnkCap: Port #9, Speed 8GT/s, Width x4, ASPM L1, Exit Latency L1 <16us LnkCtl: ASPM L1 Enabled; RCB 64 bytes, LnkDisable- CommClk+ 00:1d.4 PCI bridge: Intel Corporation Device 43b4 (rev 11) (prog-if 00 [Normal decode]) LnkCap: Port #13, Speed 8GT/s, Width x1, ASPM L0s L1, Exit Latency L0s <1us, L1 <4us LnkCtl: ASPM L0s L1 Enabled; RCB 64 bytes, LnkDisable- CommClk- 01:00.0 SATA controller: ASMedia Technology Inc. ASM1166 Serial ATA Controller (rev 02) (prog-if 01 [AHCI 1.0]) LnkCap: Port #0, Speed 8GT/s, Width x2, ASPM L0s L1, Exit Latency L0s <4us, L1 <64us LnkCtl: ASPM L0s L1 Enabled; RCB 64 bytes, LnkDisable- CommClk+ 05:00.0 Ethernet controller: Intel Corporation Ethernet Controller I225-V (rev 03) LnkCap: Port #0, Speed 5GT/s, Width x1, ASPM L1, Exit Latency L1 <4us LnkCtl: ASPM L1 Enabled; RCB 64 bytes, LnkDisable- CommClk+ 06:00.0 Network controller: Intel Corporation Wi-Fi 6 AX200 (rev 1a) LnkCap: Port #0, Speed 5GT/s, Width x1, ASPM L1, Exit Latency L1 <8us LnkCtl: ASPM L1 Enabled; RCB 64 bytes, LnkDisable- CommClk+ 07:00.0 Non-Volatile memory controller: Sandisk Corp SanDisk Extreme Pro / WD Black 2018/SN750/PC SN720 NVMe SSD (prog-if 02 [NVM Express]) LnkCap: Port #0, Speed 8GT/s, Width x4, ASPM L1, Exit Latency L1 <8us LnkCtl: ASPM L1 Enabled; RCB 64 bytes, LnkDisable- CommClk+ @DataCollector Ich habe im BIOS auch das XMP Profil profil deaktiviert und auf 2666 gesetzt. Jetzt bin ich auf fast konstanten 41 Watt ... Ich war aber schonmal bei 39 ^^ .. Keine Ahnung was ich falsch gemacht habe.
-
Hi und Danke erstmal für die Rückmeldungen! Den ASPM Helper habe ich installiert. Habe aber gesehen, dass das autotweak plugin ebenfalls so eine Ausgabe produziert (da habe ich das auch raus kopiert). Dachte die Ausgabe wäre identisch.. Wie bekomme ich dort ASPM enabled? Mache ich das auch über powertool autotune? Ich müsste mal gucken ob ich die Ports einzeln ausschalten kann. Die SSD fungiert als cache und appdata für die container. Leider kann ich diese nur auf der Rückseite nutzen... gigabyte fand es ist eine gute idee den vorderen Port für die 10. Intel generation zu sperren... 🙄 Somit kann ich leider nur den hinteren Port nutzen. Yep. Kann auch keinen anderen Slot nutzen. Bleibt leider konstant nachdem ich alle Container gestoppt und die WebUI geschlossen habe. Scheinbar doch nicht alle enabled, aber versuche gerade herauszufinden wie ich die enable. Ich kenne leider keine Konsolen Befehle für ASPM. Der Server ist aktuell aus, aber ich muss gucken ob der ASPM helper einstellungs möglichkeiten hat. Ich muss mal gucken ob ich das über bios komplett disablen kann. Ausbauen geht leider nicht. Oh, gut zu wissen. Wenn die SSD als cache fungiert und eigentlich nie 100% zur ruhe kommt wegen cache/appdata für die container, wird die sowieso nie richtig schlafen, richtig? Gut zu wissen. Ich werde es gleich mal disablen. Hab die Dinger noch rum liegen gehabt und wollte diese verwenden. Wusste nicht das die overclocken. Probiere ich gleich mal aus! Da war ich mir auch nicht sicher. Ich schalte es mal ein und teste mal. Für dieses unterfangen müsste ich leider wieder gut Geld in die Hand nehmen. Eigentlich hatte ich vorgehabt 2 NVME SSD's zu verwenden. Eine vorne eine hinten. Ich muss nämlich mein nextcloud von nem Raspberry Pi mit NVME slot auf unraid umziehen... Leider verhindert das MB die Verwendung des vorderen slots. Ich müsste leider nochmal Geld in die Hand nehmen und mir nen i5 11600 besorgen... -.-
-
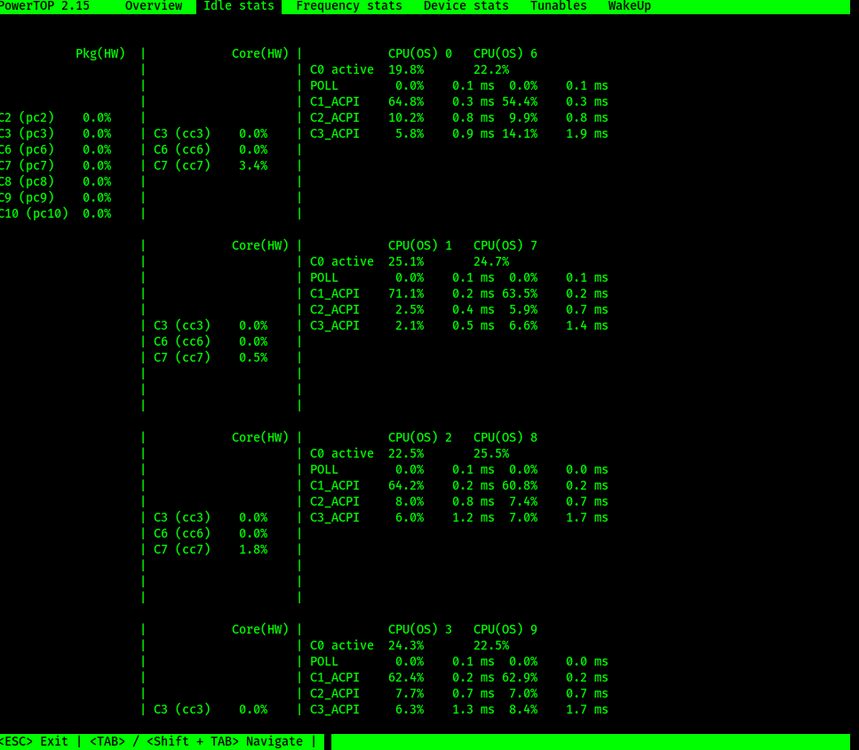
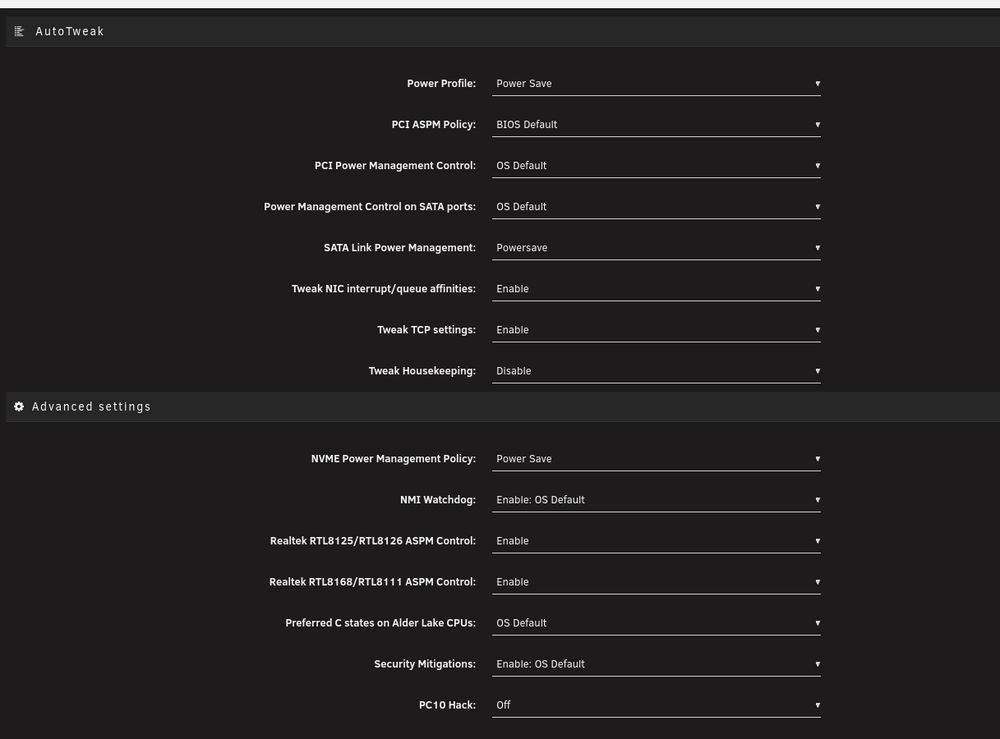
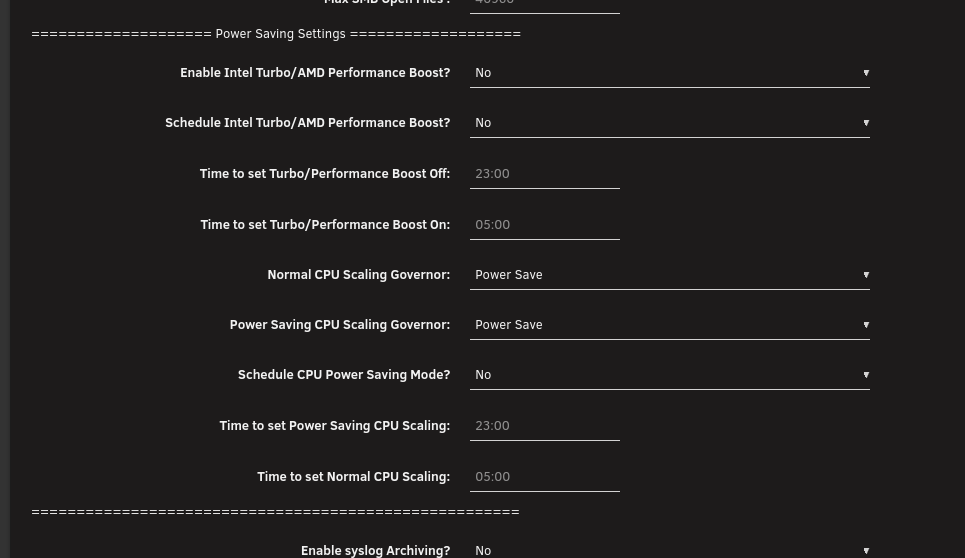
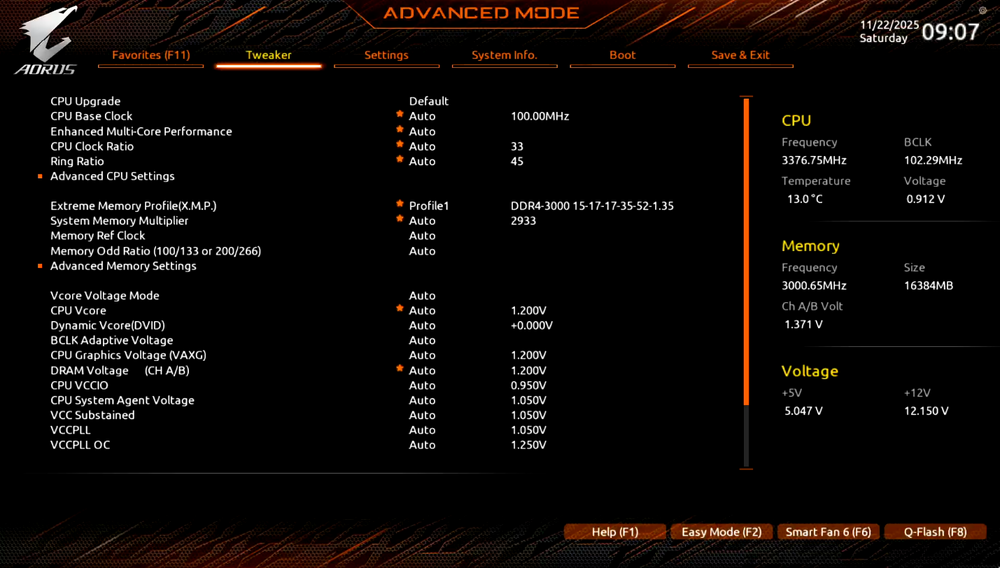
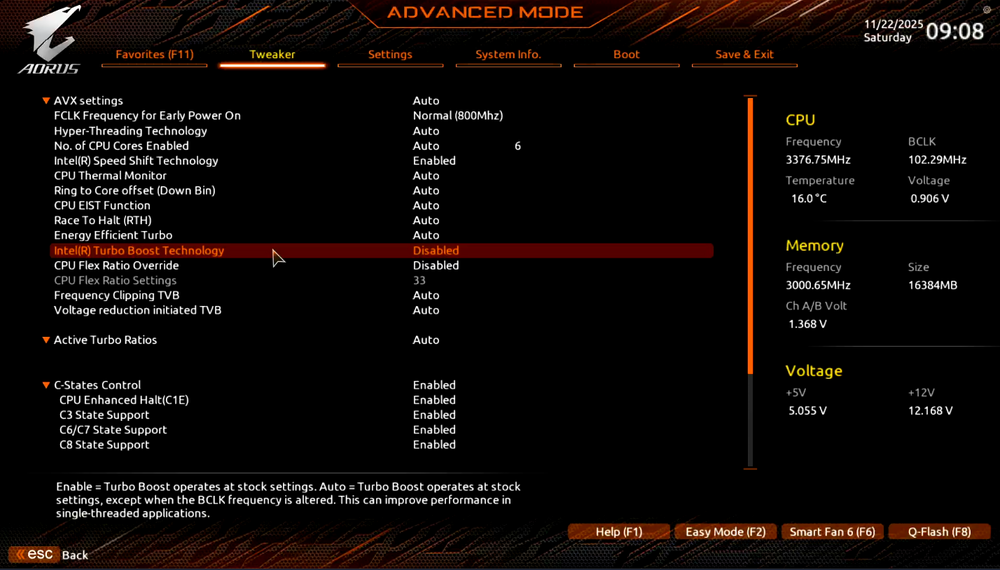
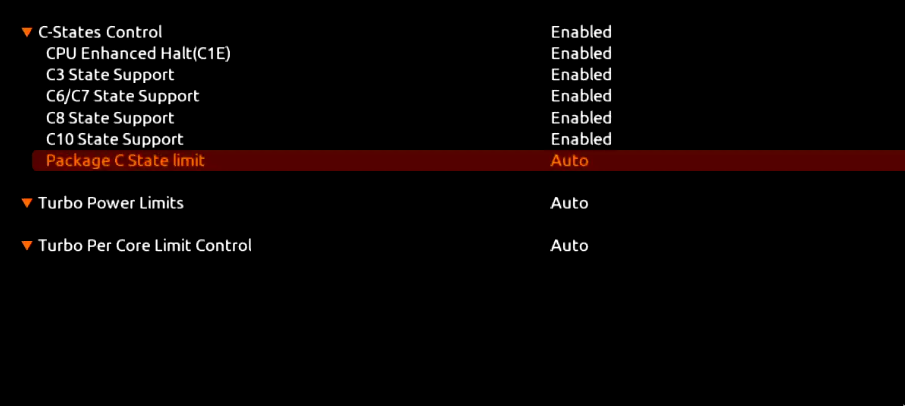
Hi @ll, ich tüftel nun seit einer weile mit meinem Server in der Hoffnung die Stromkosten für das Teil drastisch zu senken damit ich es auch 24/7 betreiben könnte, falls ich wollte. Es tut mir jetzt schon leid wenn dieser Thread etwas zu lang für den ein oder anderen wird. Ich habe ein bisschen mit powertop, Autotweak und dem Tips and Tweaks plugins gespielt. Die Ergebnisse sind leider etwas ernüchternd. Ich vermute auch ich habe etwas zu viel konfiguriert und bin mir nicht sicher welche Einstellung wirklich sinn macht. Kurz zu meinem Setup: mini-ITX Z590I AORUS ULTRA Platinum certified PSU Intel® Core™ i5-10600 CPU @ 3.30GHz 16GB DDR4 RAM 6xHDD 1xSSD MZHOU PCI-E 4x 6Port ASM1166 Aktuell erreiche ich bei niedriger CPU aktivität 43 Watt. Gestern war ich noch bei 39-42 Watt. ^^ Ich hab einfach zu viel rum geklickt... Meine MZHOU SATA Erweiterungskarte habe ich wie es bereits in einem anderen Thread empfohlen wurde geflashed. Eigentlich hatte ich gehofft mit powertop --auto-tune die Karte und die Platten in ein anderes C-State zu versetzen, aber das will es bei meinem Server gerade nicht. Wenn ich den auto-tune ausführe und die Platten zum test herunterfahre, kommt das Array nicht mehr online. Da hilft dann nur noch der server reboot. Hättet ihr vielleicht eine idee? Ich wäre dankbar für jede Hilfe. Bei mir im idle sieht das so aus: powertop stats Plugins und info's 00:01.0 PCI bridge: Intel Corporation 6th-10th Gen Core Processor PCIe Controller (x16) (rev 03) (prog-if 00 [Normal decode]) Flags: PMEClk- DSI- D1- D2- AuxCurrent=0mA PME(D0+,D1-,D2-,D3hot+,D3cold+) Status: D0 NoSoftRst+ PME-Enable- DSel=0 DScale=0 PME- Capabilities: Port #2, Speed 8GT/s, Width x16, ASPM L0s L1, Exit Latency L0s <256ns, L1 <8us Settings: ASPM L0s L1 Enabled; RCB 64 bytes, LnkDisable- CommClk+ Status: Speed 8GT/s, Width x2 00:14.0 USB controller: Intel Corporation Tiger Lake-H USB 3.2 Gen 2x1 xHCI Host Controller (rev 11) (prog-if 30 [XHCI]) Flags: PMEClk- DSI- D1- D2- AuxCurrent=375mA PME(D0-,D1-,D2-,D3hot+,D3cold+) Status: D0 NoSoftRst+ PME-Enable- DSel=0 DScale=0 PME- 00:16.0 Communication controller: Intel Corporation Tiger Lake-H Management Engine Interface (rev 11) Flags: PMEClk- DSI- D1- D2- AuxCurrent=0mA PME(D0-,D1-,D2-,D3hot+,D3cold-) Status: D0 NoSoftRst+ PME-Enable- DSel=0 DScale=0 PME- 00:17.0 SATA controller: Intel Corporation Device 43d2 (rev 11) (prog-if 01 [AHCI 1.0]) Flags: PMEClk- DSI- D1- D2- AuxCurrent=0mA PME(D0-,D1-,D2-,D3hot+,D3cold-) Status: D0 NoSoftRst+ PME-Enable- DSel=0 DScale=0 PME- 00:1b.0 PCI bridge: Intel Corporation Tiger Lake-H PCIe Root Port #17 (rev 11) (prog-if 00 [Normal decode]) Capabilities: Port #17, Speed 8GT/s, Width x1, ASPM L0s L1, Exit Latency L0s <1us, L1 <4us Settings: ASPM L0s L1 Enabled; RCB 64 bytes, LnkDisable- CommClk- Status: Speed 2.5GT/s, Width x0 Flags: PMEClk- DSI- D1- D2- AuxCurrent=0mA PME(D0+,D1-,D2-,D3hot+,D3cold+) Status: D3 NoSoftRst- PME-Enable+ DSel=0 DScale=0 PME- 00:1b.4 PCI bridge: Intel Corporation Device 43c4 (rev 11) (prog-if 00 [Normal decode]) Capabilities: Port #21, Speed 8GT/s, Width x1, ASPM L0s L1, Exit Latency L0s <1us, L1 <4us Settings: ASPM L0s L1 Enabled; RCB 64 bytes, LnkDisable- CommClk- Status: Speed 2.5GT/s, Width x0 Flags: PMEClk- DSI- D1- D2- AuxCurrent=0mA PME(D0+,D1-,D2-,D3hot+,D3cold+) Status: D0 NoSoftRst- PME-Enable- DSel=0 DScale=0 PME- 00:1c.0 PCI bridge: Intel Corporation Tiger Lake-H PCIe Root Port #1 (rev 11) (prog-if 00 [Normal decode]) Capabilities: Port #1, Speed 8GT/s, Width x1, ASPM L0s L1, Exit Latency L0s <1us, L1 <4us Settings: ASPM L0s L1 Enabled; RCB 64 bytes, LnkDisable- CommClk- Status: Speed 2.5GT/s, Width x0 Flags: PMEClk- DSI- D1- D2- AuxCurrent=0mA PME(D0+,D1-,D2-,D3hot+,D3cold+) Status: D3 NoSoftRst- PME-Enable+ DSel=0 DScale=0 PME- 00:1c.4 PCI bridge: Intel Corporation Tiger Lake-H PCI Express Root Port #5 (rev 11) (prog-if 00 [Normal decode]) Capabilities: Port #5, Speed 8GT/s, Width x1, ASPM L0s L1, Exit Latency L0s <1us, L1 <16us Settings: ASPM L1 Enabled; RCB 64 bytes, LnkDisable- CommClk+ Status: Speed 5GT/s, Width x1 Flags: PMEClk- DSI- D1- D2- AuxCurrent=0mA PME(D0+,D1-,D2-,D3hot+,D3cold+) Status: D0 NoSoftRst- PME-Enable- DSel=0 DScale=0 PME- ASPM Capabilities: PCI-PM_L1.2+ PCI-PM_L1.1+ ASPM_L1.2+ ASPM_L1.1+ L1_PM_Substates+ ASPM Settings: PCI-PM_L1.2- PCI-PM_L1.1+ ASPM_L1.2- ASPM_L1.1+ 00:1c.7 PCI bridge: Intel Corporation Device 43bf (rev 11) (prog-if 00 [Normal decode]) Capabilities: Port #8, Speed 8GT/s, Width x1, ASPM L0s L1, Exit Latency L0s <1us, L1 <16us Settings: ASPM L1 Enabled; RCB 64 bytes, LnkDisable- CommClk+ Status: Speed 5GT/s, Width x1 Flags: PMEClk- DSI- D1- D2- AuxCurrent=0mA PME(D0+,D1-,D2-,D3hot+,D3cold+) Status: D0 NoSoftRst- PME-Enable- DSel=0 DScale=0 PME- ASPM Capabilities: PCI-PM_L1.2+ PCI-PM_L1.1+ ASPM_L1.2+ ASPM_L1.1+ L1_PM_Substates+ ASPM Settings: PCI-PM_L1.2+ PCI-PM_L1.1+ ASPM_L1.2+ ASPM_L1.1+ 00:1d.0 PCI bridge: Intel Corporation Tiger Lake-H PCI Express Root Port #9 (rev 11) (prog-if 00 [Normal decode]) Capabilities: Port #9, Speed 8GT/s, Width x4, ASPM L1, Exit Latency L1 <16us Settings: ASPM L1 Enabled; RCB 64 bytes, LnkDisable- CommClk+ Status: Speed 8GT/s, Width x4 Flags: PMEClk- DSI- D1- D2- AuxCurrent=0mA PME(D0+,D1-,D2-,D3hot+,D3cold+) Status: D0 NoSoftRst- PME-Enable- DSel=0 DScale=0 PME- ASPM Capabilities: PCI-PM_L1.2+ PCI-PM_L1.1+ ASPM_L1.2+ ASPM_L1.1+ L1_PM_Substates+ ASPM Settings: PCI-PM_L1.2- PCI-PM_L1.1- ASPM_L1.2+ ASPM_L1.1- 00:1d.4 PCI bridge: Intel Corporation Device 43b4 (rev 11) (prog-if 00 [Normal decode]) Capabilities: Port #13, Speed 8GT/s, Width x1, ASPM L0s L1, Exit Latency L0s <1us, L1 <4us Settings: ASPM L0s L1 Enabled; RCB 64 bytes, LnkDisable- CommClk- Status: Speed 2.5GT/s, Width x0 Flags: PMEClk- DSI- D1- D2- AuxCurrent=0mA PME(D0+,D1-,D2-,D3hot+,D3cold+) Status: D3 NoSoftRst- PME-Enable+ DSel=0 DScale=0 PME- 00:1f.3 Audio device: Intel Corporation Device f0c8 (rev 11) (prog-if 00 [HDA compatible]) Flags: PMEClk- DSI- D1- D2- AuxCurrent=55mA PME(D0-,D1-,D2-,D3hot+,D3cold+) Status: D3 NoSoftRst+ PME-Enable+ DSel=0 DScale=0 PME- 01:00.0 SATA controller: ASMedia Technology Inc. ASM1166 Serial ATA Controller (rev 02) (prog-if 01 [AHCI 1.0]) Flags: PMEClk- DSI+ D1- D2- AuxCurrent=0mA PME(D0+,D1-,D2-,D3hot+,D3cold+) Status: D0 NoSoftRst- PME-Enable- DSel=0 DScale=0 PME- Capabilities: Port #0, Speed 8GT/s, Width x2, ASPM L0s L1, Exit Latency L0s <4us, L1 <64us Settings: ASPM L0s L1 Enabled; RCB 64 bytes, LnkDisable- CommClk+ Status: Speed 8GT/s, Width x2 05:00.0 Ethernet controller: Intel Corporation Ethernet Controller I225-V (rev 03) Flags: PMEClk- DSI+ D1- D2- AuxCurrent=0mA PME(D0+,D1-,D2-,D3hot+,D3cold+) Status: D0 NoSoftRst+ PME-Enable- DSel=0 DScale=1 PME- Capabilities: Port #0, Speed 5GT/s, Width x1, ASPM L1, Exit Latency L1 <4us Settings: ASPM L1 Enabled; RCB 64 bytes, LnkDisable- CommClk+ Status: Speed 5GT/s, Width x1 ASPM Capabilities: PCI-PM_L1.2- PCI-PM_L1.1+ ASPM_L1.2- ASPM_L1.1+ L1_PM_Substates+ ASPM Settings: PCI-PM_L1.2- PCI-PM_L1.1+ ASPM_L1.2- ASPM_L1.1+ 06:00.0 Network controller: Intel Corporation Wi-Fi 6 AX200 (rev 1a) Flags: PMEClk- DSI+ D1- D2- AuxCurrent=0mA PME(D0+,D1-,D2-,D3hot+,D3cold+) Status: D0 NoSoftRst+ PME-Enable- DSel=0 DScale=0 PME- Capabilities: Port #0, Speed 5GT/s, Width x1, ASPM L1, Exit Latency L1 <8us Settings: ASPM L1 Enabled; RCB 64 bytes, LnkDisable- CommClk+ Status: Speed 5GT/s, Width x1 ASPM Capabilities: PCI-PM_L1.2+ PCI-PM_L1.1+ ASPM_L1.2+ ASPM_L1.1+ L1_PM_Substates+ ASPM Settings: PCI-PM_L1.2+ PCI-PM_L1.1+ ASPM_L1.2+ ASPM_L1.1+ 07:00.0 Non-Volatile memory controller: Sandisk Corp SanDisk Extreme Pro / WD Black 2018/SN750/PC SN720 NVMe SSD (prog-if 02 [NVM Express]) Flags: PMEClk- DSI- D1- D2- AuxCurrent=0mA PME(D0-,D1-,D2-,D3hot-,D3cold-) Status: D0 NoSoftRst+ PME-Enable- DSel=0 DScale=0 PME- Capabilities: Port #0, Speed 8GT/s, Width x4, ASPM L1, Exit Latency L1 <8us Settings: ASPM L1 Enabled; RCB 64 bytes, LnkDisable- CommClk+ Status: Speed 8GT/s, Width x4 ASPM Capabilities: PCI-PM_L1.2- PCI-PM_L1.1- ASPM_L1.2+ ASPM_L1.1- L1_PM_Substates+ ASPM Settings: PCI-PM_L1.2- PCI-PM_L1.1- ASPM_L1.2+ ASPM_L1.1- "Tips and Tweaks" Plugin Meine BIOS settings
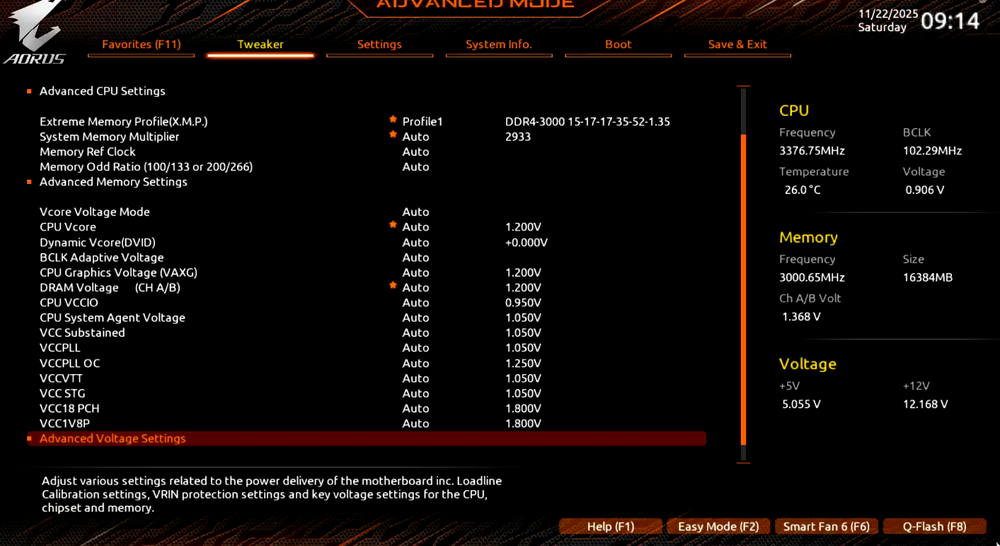
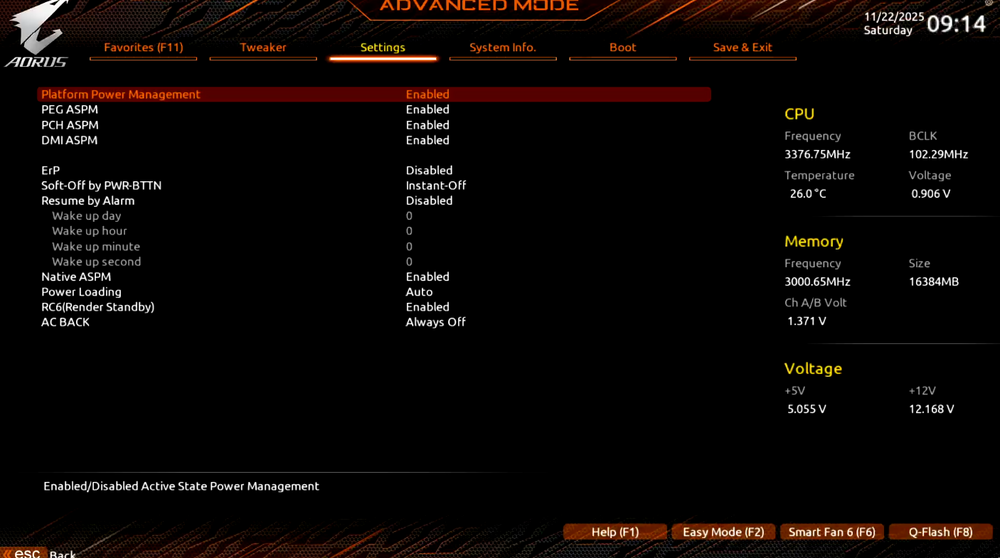
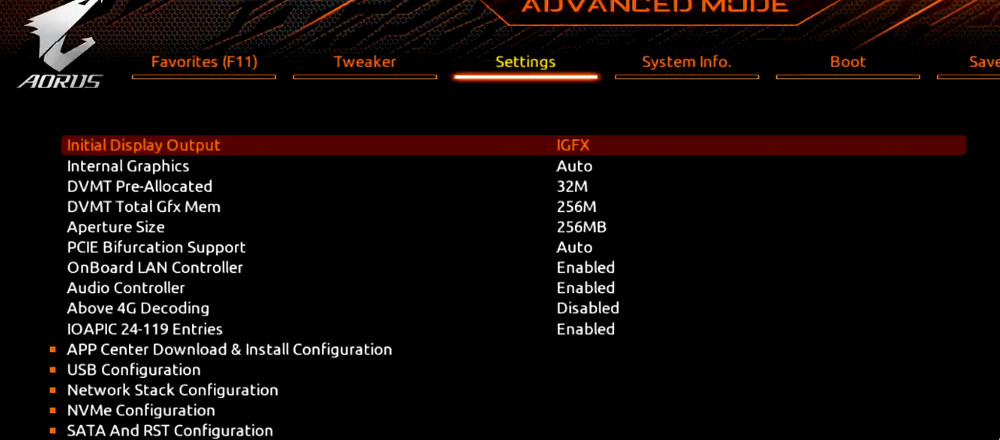
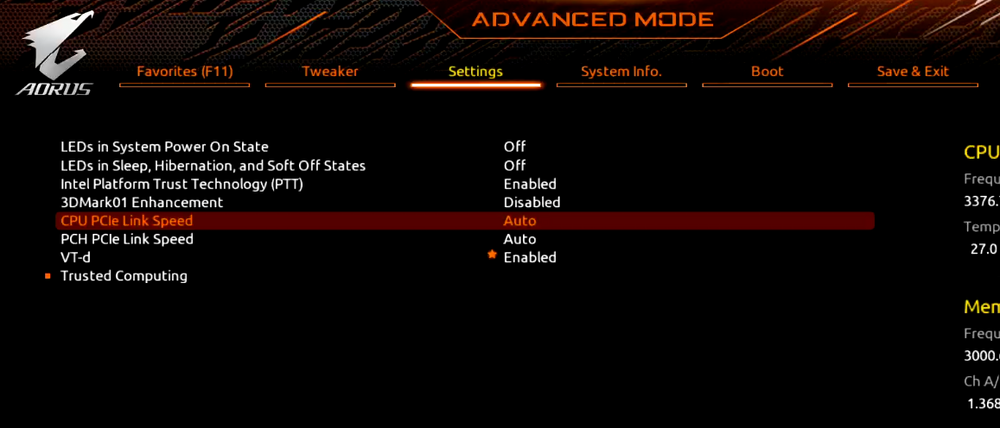
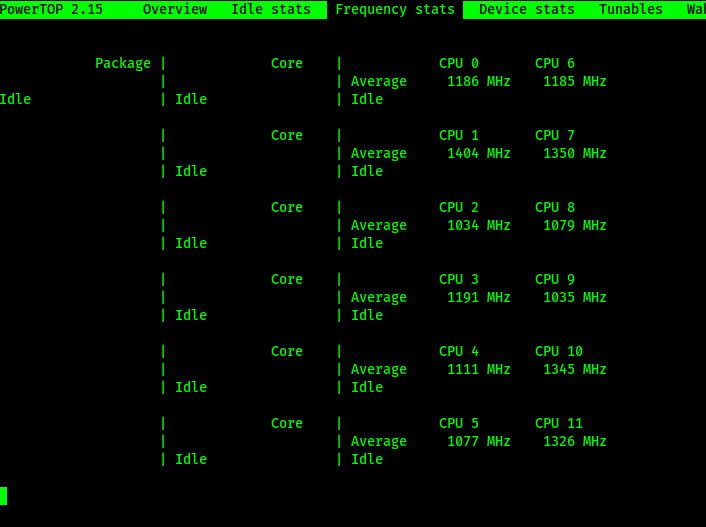
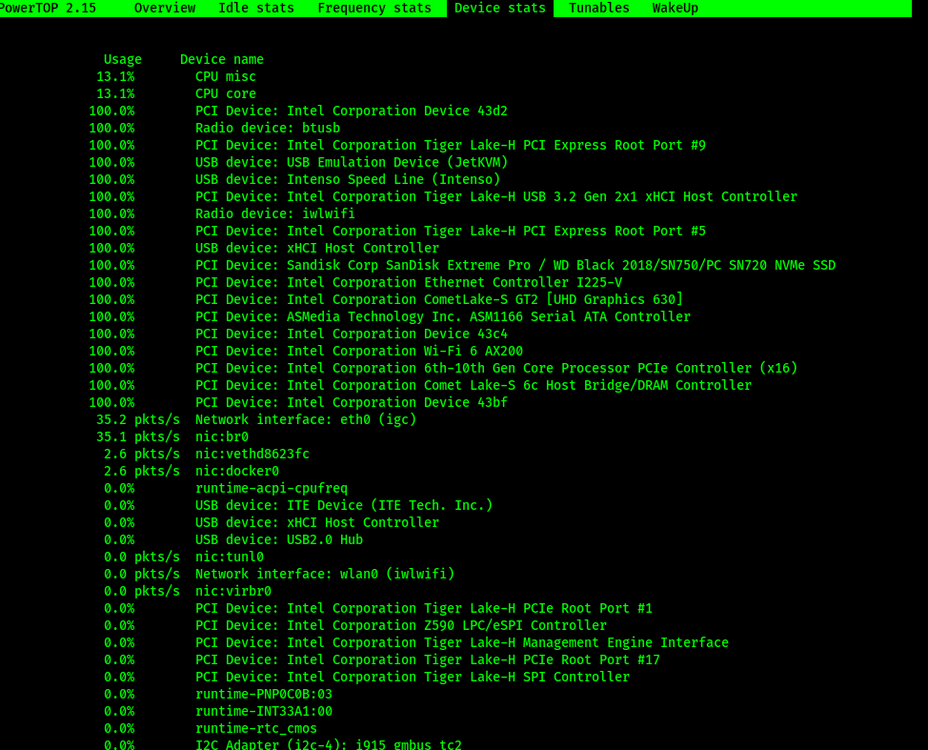
-
Can someone verify that my bios settings are alright, or have I missed something?
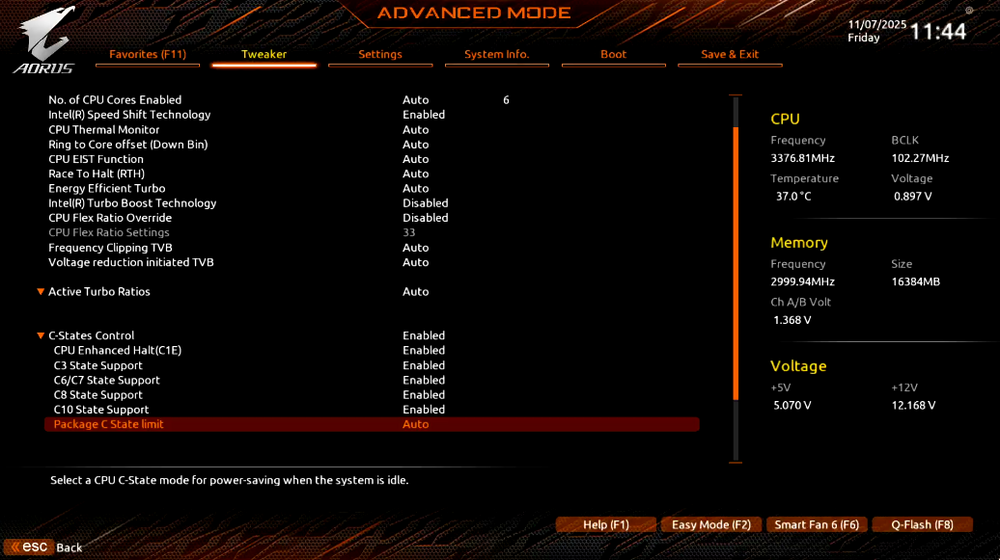
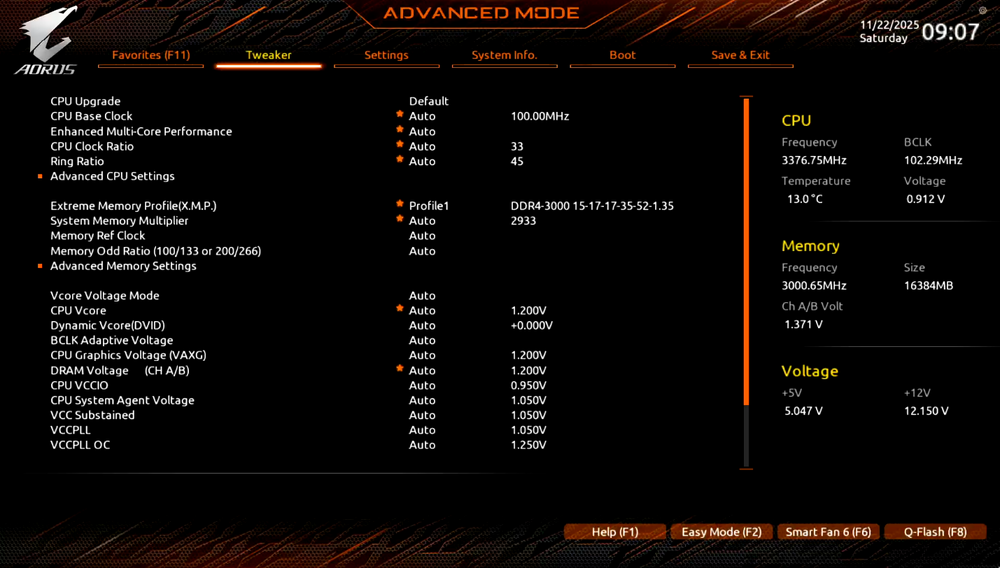
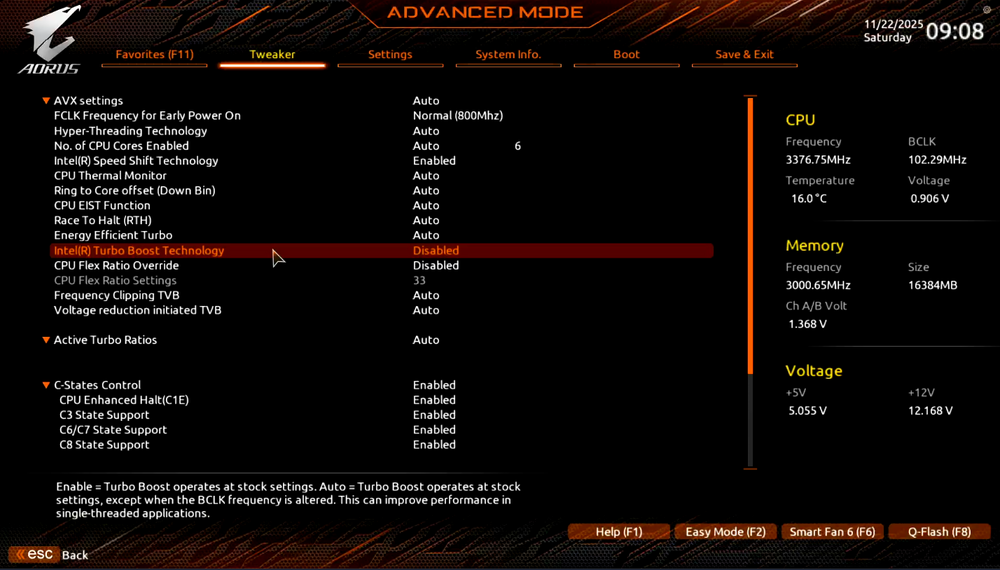
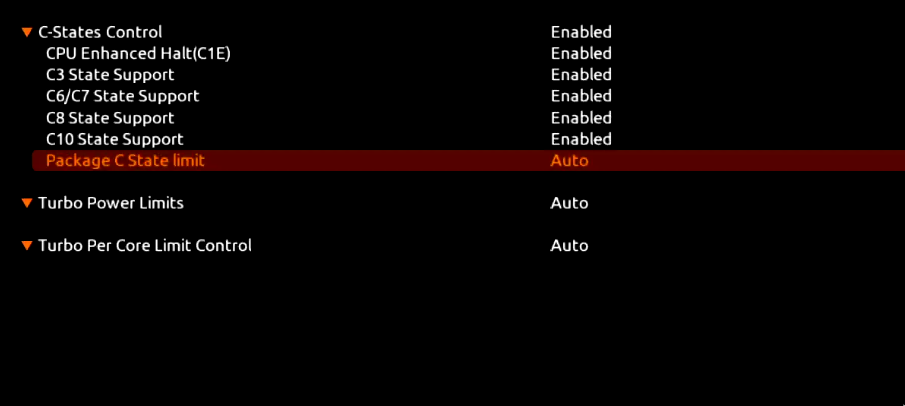
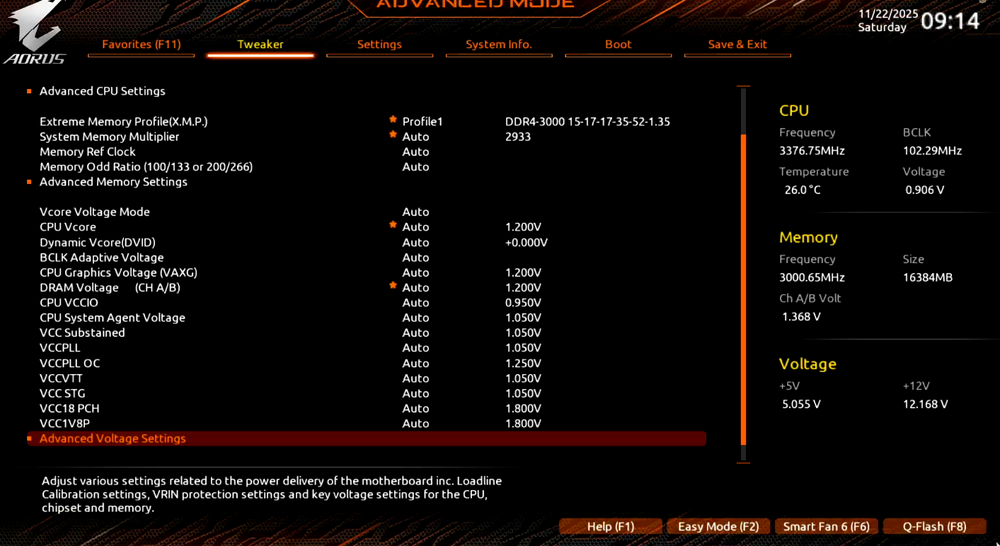
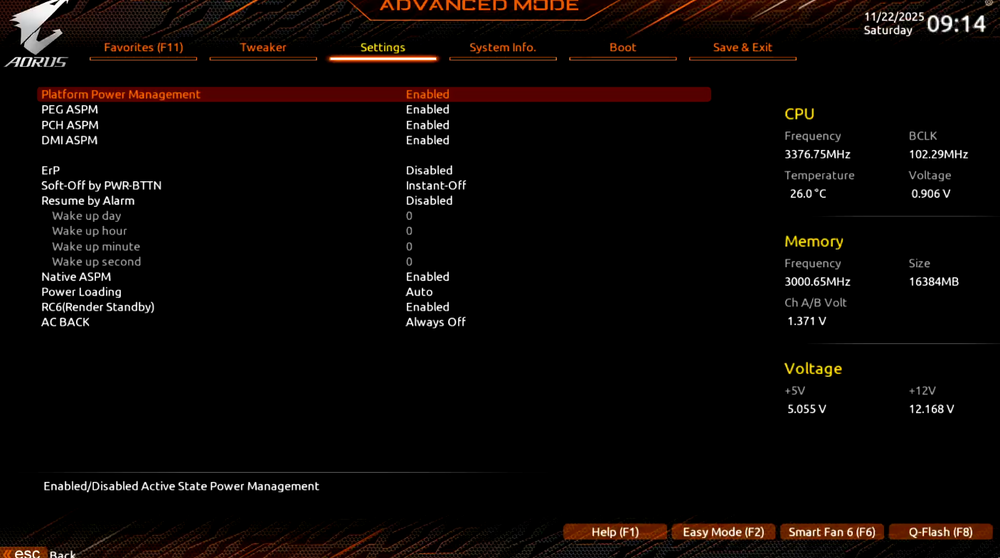
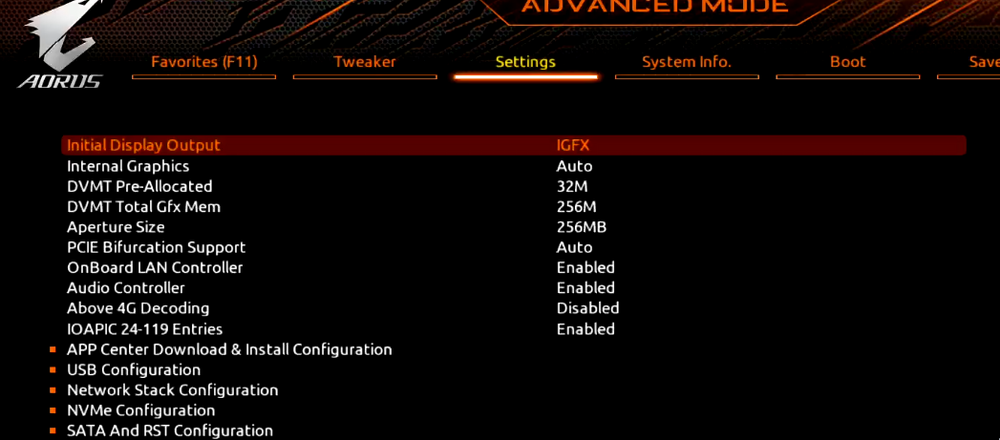
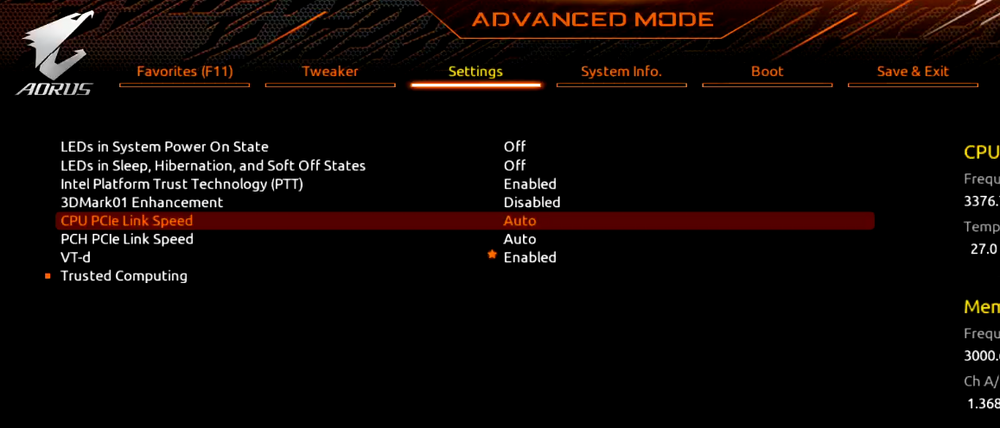
-
So it worked with the Live USB. Thanks for the hint. It took ages setting up a stick and booting it. In the end it worked with a portable Windows live image. "WintoUSB" You just need to remove the unraid stick and replace with the windows live version. Booting took over 60 minutes because it installed stuff and rebooted multiple times. Flashing my ASM1166 after the first boot was fast n easy. Thank you guys for your help!
-
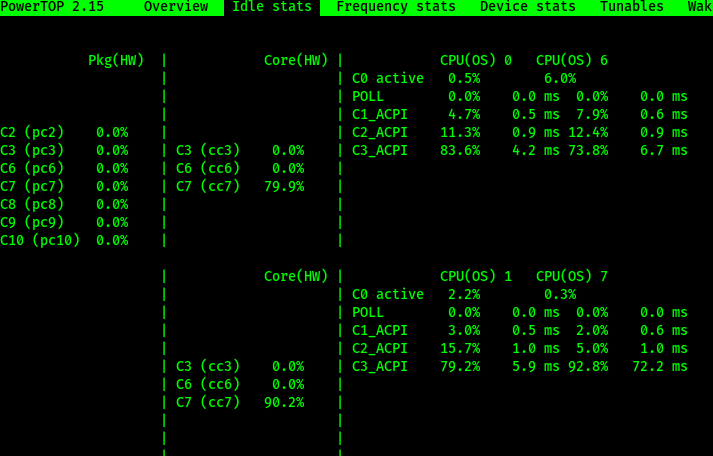
Hi all, I currently try to "eco" my server. For a couple of weeks I now try to find a way to lower the consumption. Unfortunately I don't reach any other state than C7. Using --auto-tune and stopping the array wont make it start again. My Setup: mini-ITX Z590I AORUS ULTRA Platinum certified PSU Intel® Core™ i5-10600 CPU @ 3.30GHz 16GB DDR4 RAM 6xHDD 1xSSD MZHOU PCI-E 4x 6Port ASM1166 In the current state it drains in idle around 39-43 watts. Not optimal but still better than the ~55 before.. I just today successfully flashed my ASM1166 card to the recommended firmware. Was hoping that this will do the med_power_with_dipm support trick, but unfortunately nothing has changed. As soon as I Enable SATA link power management for host*, I cannot restart the array. 00:01.0 PCI bridge: Intel Corporation 6th-10th Gen Core Processor PCIe Controller (x16) (rev 03) (prog-if 00 [Normal decode]) LnkCap: Port #2, Speed 8GT/s, Width x16, ASPM L0s L1, Exit Latency L0s <256ns, L1 <8us LnkCtl: ASPM L0s L1 Enabled; RCB 64 bytes, LnkDisable- CommClk+ 00:1b.0 PCI bridge: Intel Corporation Tiger Lake-H PCIe Root Port #17 (rev 11) (prog-if 00 [Normal decode]) LnkCap: Port #17, Speed 8GT/s, Width x1, ASPM L0s L1, Exit Latency L0s <1us, L1 <4us LnkCtl: ASPM L0s L1 Enabled; RCB 64 bytes, LnkDisable- CommClk- 00:1b.4 PCI bridge: Intel Corporation Device 43c4 (rev 11) (prog-if 00 [Normal decode]) LnkCap: Port #21, Speed 8GT/s, Width x1, ASPM L0s L1, Exit Latency L0s <1us, L1 <4us LnkCtl: ASPM L0s L1 Enabled; RCB 64 bytes, LnkDisable- CommClk- 00:1c.0 PCI bridge: Intel Corporation Tiger Lake-H PCIe Root Port #1 (rev 11) (prog-if 00 [Normal decode]) LnkCap: Port #1, Speed 8GT/s, Width x1, ASPM L0s L1, Exit Latency L0s <1us, L1 <4us LnkCtl: ASPM L0s L1 Enabled; RCB 64 bytes, LnkDisable- CommClk- 00:1c.4 PCI bridge: Intel Corporation Tiger Lake-H PCI Express Root Port #5 (rev 11) (prog-if 00 [Normal decode]) LnkCap: Port #5, Speed 8GT/s, Width x1, ASPM L0s L1, Exit Latency L0s <1us, L1 <16us LnkCtl: ASPM L1 Enabled; RCB 64 bytes, LnkDisable- CommClk+ 00:1c.7 PCI bridge: Intel Corporation Device 43bf (rev 11) (prog-if 00 [Normal decode]) LnkCap: Port #8, Speed 8GT/s, Width x1, ASPM L0s L1, Exit Latency L0s <1us, L1 <16us LnkCtl: ASPM L1 Enabled; RCB 64 bytes, LnkDisable- CommClk+ 00:1d.0 PCI bridge: Intel Corporation Tiger Lake-H PCI Express Root Port #9 (rev 11) (prog-if 00 [Normal decode]) LnkCap: Port #9, Speed 8GT/s, Width x4, ASPM L1, Exit Latency L1 <16us LnkCtl: ASPM L1 Enabled; RCB 64 bytes, LnkDisable- CommClk+ 00:1d.4 PCI bridge: Intel Corporation Device 43b4 (rev 11) (prog-if 00 [Normal decode]) LnkCap: Port #13, Speed 8GT/s, Width x1, ASPM L0s L1, Exit Latency L0s <1us, L1 <4us LnkCtl: ASPM L0s L1 Enabled; RCB 64 bytes, LnkDisable- CommClk- 01:00.0 SATA controller: ASMedia Technology Inc. ASM1166 Serial ATA Controller (rev 02) (prog-if 01 [AHCI 1.0]) LnkCap: Port #0, Speed 8GT/s, Width x2, ASPM L0s L1, Exit Latency L0s <4us, L1 <64us LnkCtl: ASPM L0s L1 Enabled; RCB 64 bytes, LnkDisable- CommClk+ 05:00.0 Ethernet controller: Intel Corporation Ethernet Controller I225-V (rev 03) LnkCap: Port #0, Speed 5GT/s, Width x1, ASPM L1, Exit Latency L1 <4us LnkCtl: ASPM L1 Enabled; RCB 64 bytes, LnkDisable- CommClk+ 06:00.0 Network controller: Intel Corporation Wi-Fi 6 AX200 (rev 1a) LnkCap: Port #0, Speed 5GT/s, Width x1, ASPM L1, Exit Latency L1 <8us LnkCtl: ASPM L1 Enabled; RCB 64 bytes, LnkDisable- CommClk+ 07:00.0 Non-Volatile memory controller: Sandisk Corp SanDisk Extreme Pro / WD Black 2018/SN750/PC SN720 NVMe SSD (prog-if 02 [NVM Express]) LnkCap: Port #0, Speed 8GT/s, Width x4, ASPM L1, Exit Latency L1 <8us LnkCtl: ASPM L1 Enabled; RCB 64 bytes, LnkDisable- CommClk+I dont know what these L[0-1] state's mean, but I guess L1 enabled means it is capable of power savings but stays at L0 (in use maybe?)
-
I will try the Windows live USB method. I report back if it works.
-
I resolved it myself in the following way: !This requires you to have an backup of your flash drive without having changed your disk's in any way! !! This is not recommended if you have experienced a faulty Disk !! (In my case I unassigned all disk's from the array, but this step is maybe not necessary) Shut down your server unplug your USB drive, and mount it somewhere where u have a backup available backup your current USB drive after that replace your config/super.dat on the USB drive with the one from your flash backup replug into your server and boot. Everything should now be as it was before. Edit: BTW I wanted to thank you guys for your fast reply and help
-
They are both unassigned from the array and I could mount them via UD, but I cannot see an "read only " mode. edit: found the read only setting. Do I need to unassign all drives from the array before I trigger "new config"?







