de Techneut
Members
-
Joined
-
Last visited
-
I have a few questions reading this thread. Is @Squid still maintaining this plugin? Like mentioned above, +1 for delay on docker auto updates. Another feature I would like to see is an exclude selector. In my case I have one container I don't want to auto update. To do this I have to disable "Update All Docker Applications", and manually select all except for the one I would like to exclude. When I add new container I need to manually enable the "Auto Update" for those containers. An exclude option would solve this.

-
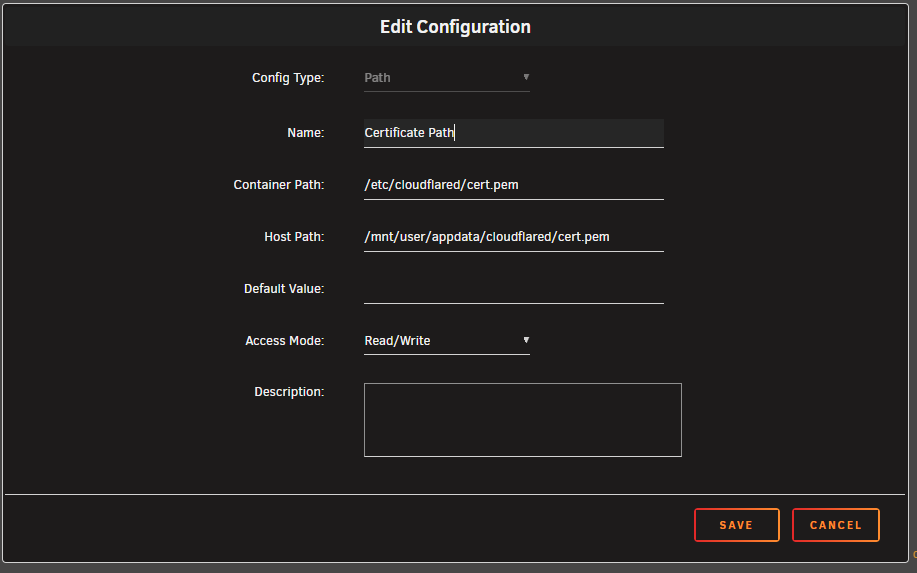
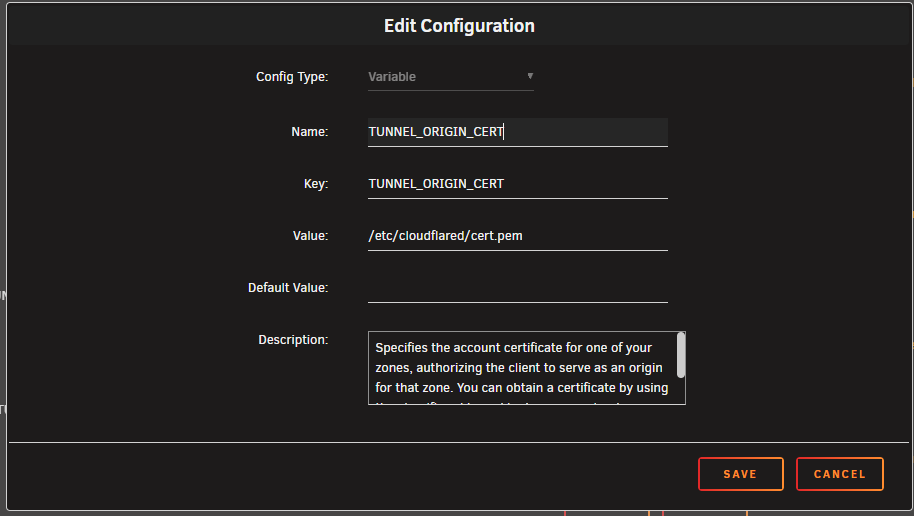
Managed to get it working. What I needed to do wat map the directory of the cert.pem to /etc/cloudflared/cert.pem And set the variable TUNNEL_ORIGIN_CERT to /etc/cloudflared/cert.pem Now it is working!
-
I was checking the container logs, and did see the following error? 2025-08-25T20:25:38Z ERR Cannot determine default origin certificate path. No file cert.pem in [~/.cloudflared ~/.cloudflare-warp ~/cloudflare-warp /etc/cloudflared /usr/local/etc/cloudflared]. You need to specify the origin certificate path by specifying the origincert option in the configuration file, or set TUNNEL_ORIGIN_CERT environment variable originCertPath= When I was looking at the variable in the container said to go to download a cert.pem at this link: https://dash.cloudflare.com/argotunnel I did this, but how do I put this file in this variable: Also is this really needed? Or can I ignore the error?

-
As a complete MacOS noob, I do not understand how to install this. Can you give me some explanation about how to install this?
-
Has anyone managet to passthrough the iGPU? I'm currently running Sequioa macinabox without any problems. Would like to passthrough my iGPU from my 12600k processor.
-
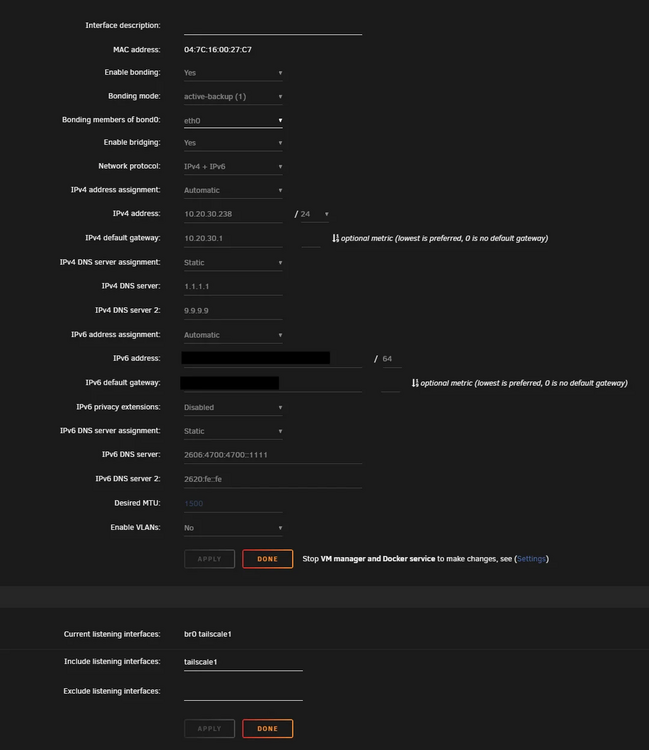
When I have IPv6 enabled on unraid. I notice that it cannot resolve DNS queries. When I have IPv6 enabled, my config looks like this: I Use static DNS servers. But with this configuration when I try to ping anything like, google.com, or cloudflare.com. I do get a "Destination Host Unreachable". When I disable IPv6 and go with IPv4 only, the ping is working fine to google and cloudflare: root@Tower:~# ping google.com PING google.com (142.251.39.110) 56(84) bytes of data. 64 bytes from ams15s48-in-f14.1e100.net (142.251.39.110): icmp_seq=1 ttl=118 time=6.05 ms 64 bytes from ams15s48-in-f14.1e100.net (142.251.39.110): icmp_seq=2 ttl=118 time=5.83 ms 64 bytes from ams15s48-in-f14.1e100.net (142.251.39.110): icmp_seq=3 ttl=118 time=6.61 ms 64 bytes from ams15s48-in-f14.1e100.net (142.251.39.110): icmp_seq=4 ttl=118 time=7.26 ms 64 bytes from ams15s48-in-f14.1e100.net (142.251.39.110): icmp_seq=5 ttl=118 time=5.32 ms 64 bytes from ams15s48-in-f14.1e100.net (142.251.39.110): icmp_seq=6 ttl=118 time=5.92 ms 64 bytes from ams15s48-in-f14.1e100.net (142.251.39.110): icmp_seq=7 ttl=118 time=8.89 ms Other devices in my home network are working fine with IPv6. What causes the issue that DNS on IPv6 is not working on unraid?
-
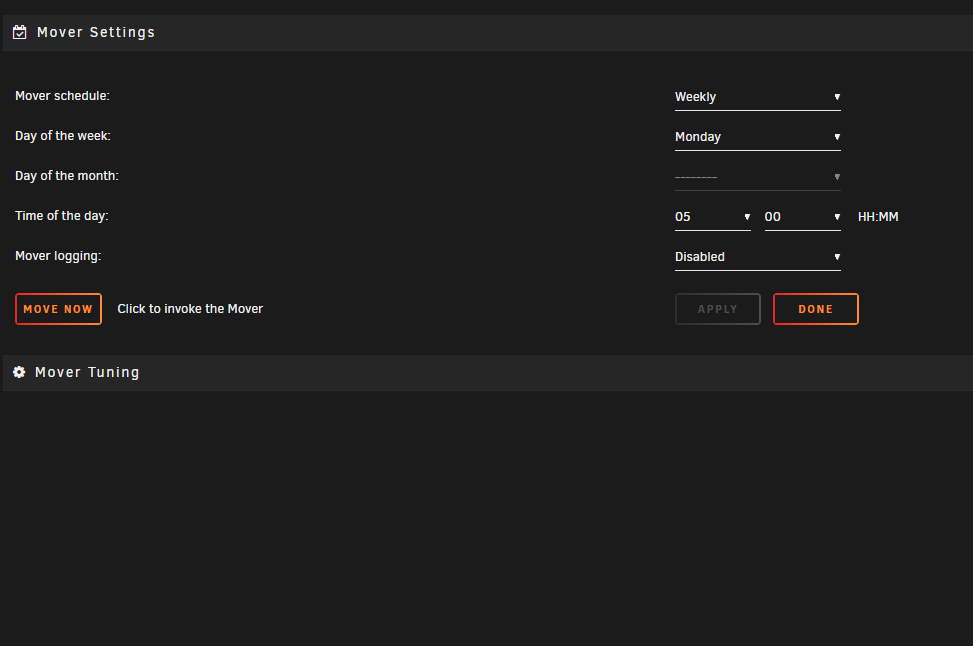
How can I read the mover log file?
-
For some reason since the last update, mover tuning settings is empty: What could be wrong?
-
Did you already solve this? If not, I recommend to use the Frigate docker container directly in Unraid. Not within Home Assistant. You can install the Frigate integration in home assistant and point it to the docker container in Unraid. If you need more information, please let me know.
-
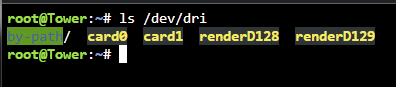
I found the solution. When you type: ls -l /sys/class/drm/renderD*/device/driver you get the following result: There I could see renderD129 was the intel device. To let PLEX use this, you need to add the following to the Preferences.xml file in de appdata folder of PLEX: HardwareDevicePath="/dev/dri/renderD129" Which looks like this: Then a reboot of PLEX, and the iGPU does the transcoding.


-
I have a intel 12600k and nvidia 1050ti in my system. When I do: ls /dev/dri ls /dev/dri I see both the intel gpu and nvidia gpu. How do I correctly point the Intel GPU to Plex?
-
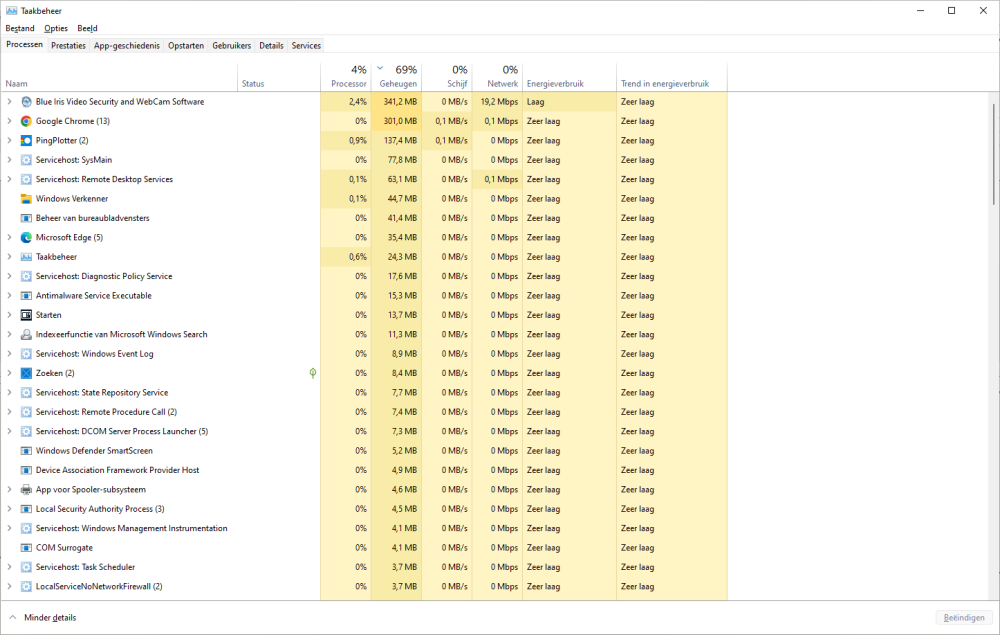
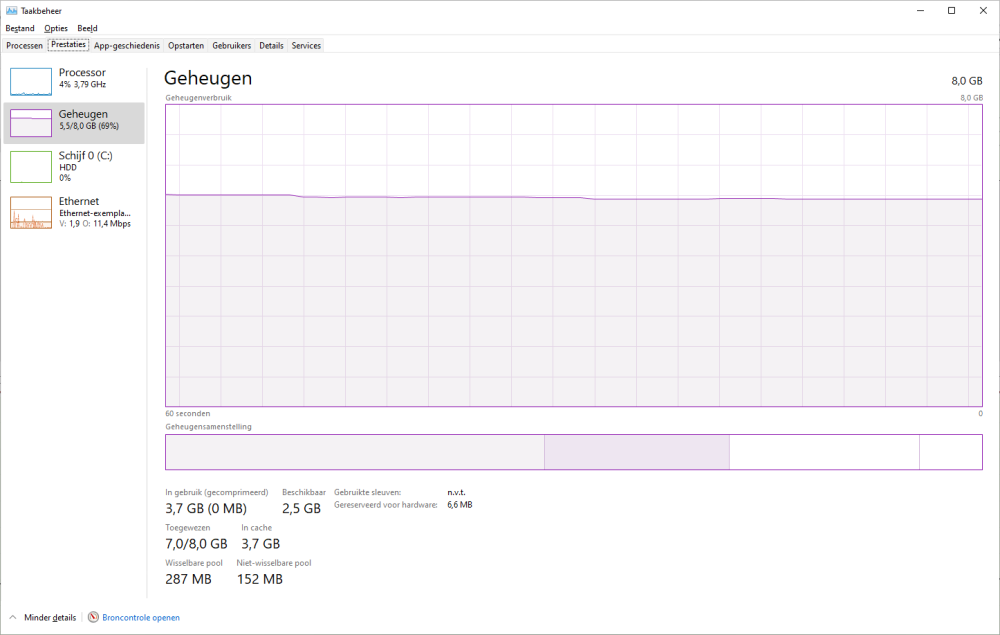
Having similar issues on a windows 11 machine. Have set initial and max memory the same: When I look in the task manager of the virtual machine, I can see not allot of memory is been used. But it says 69% is already in use: When I open a few more things the VM just freezes and becomes unresponsive. While I think it still has allot of memory in spare. What can I do to solve this?

-
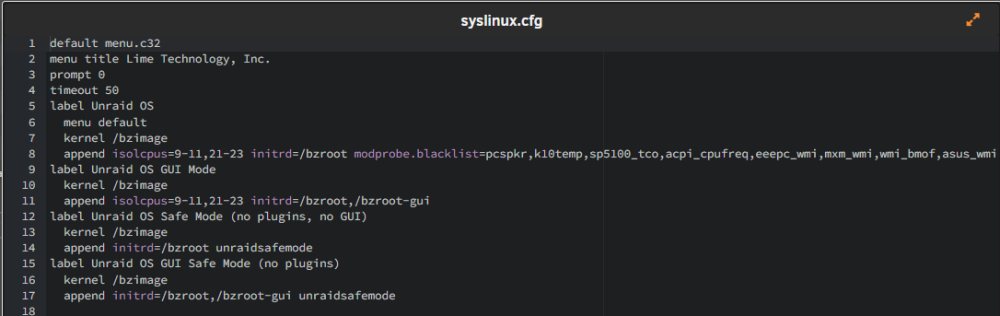
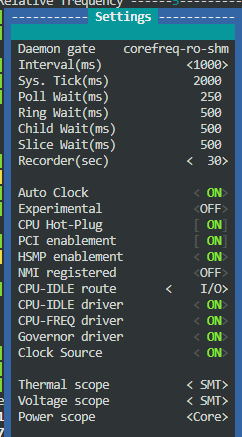
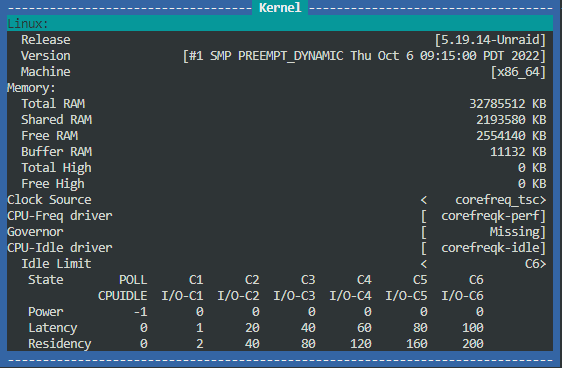
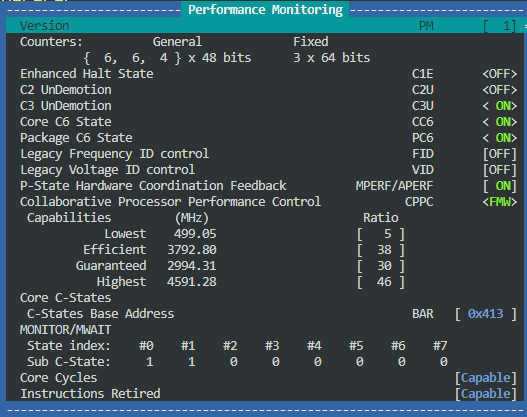
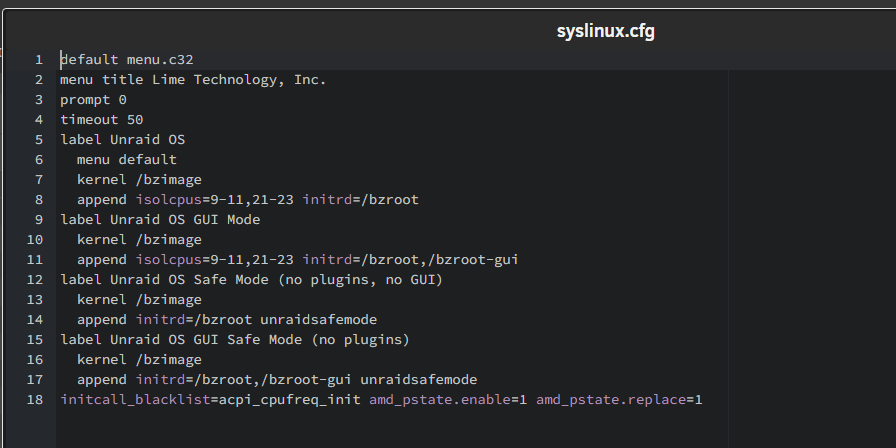
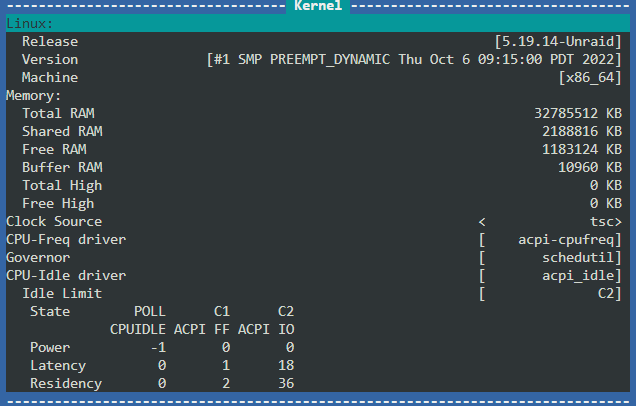
I corrected my syslinux.cfg, added your line on line 8 in the cfg: In settings I can enable all the 4 drivers and set CPU-IDLE route to I/O In the kernel I can set the Idle Limit to C6, only I'm missing the govenor and I don't where I can change this? Performance monitoring looks like this, didn't change anything here: Processor looks like this, didn't change anything here either: Another question, once I get all these settings correct, how do I save them, so there are there after a reboot?
-
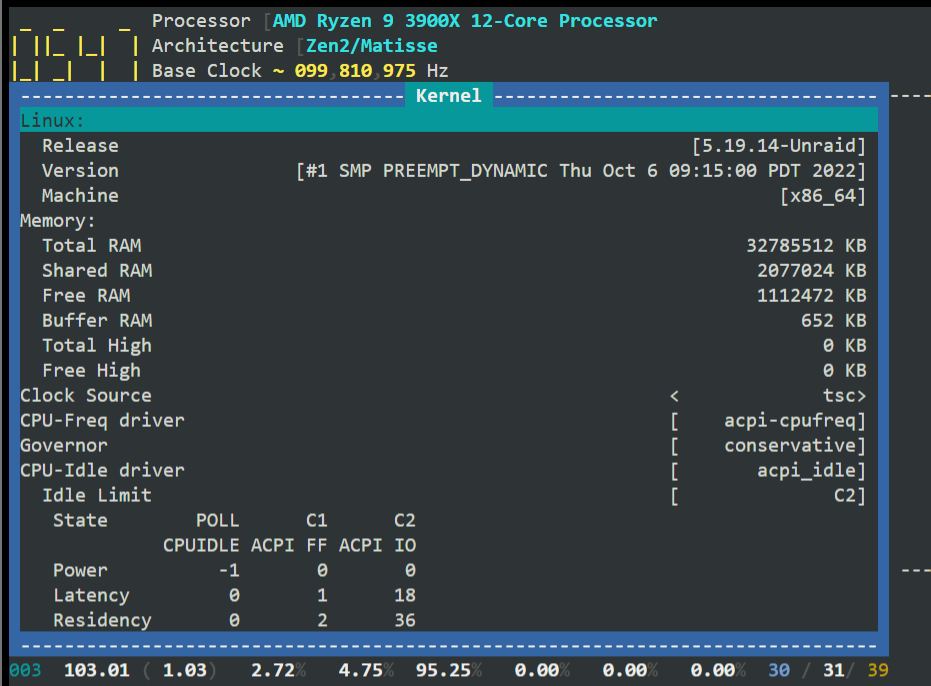
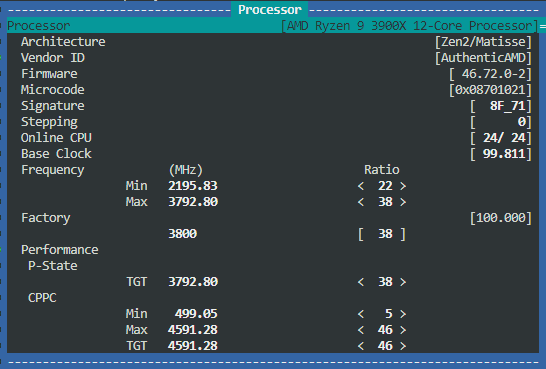
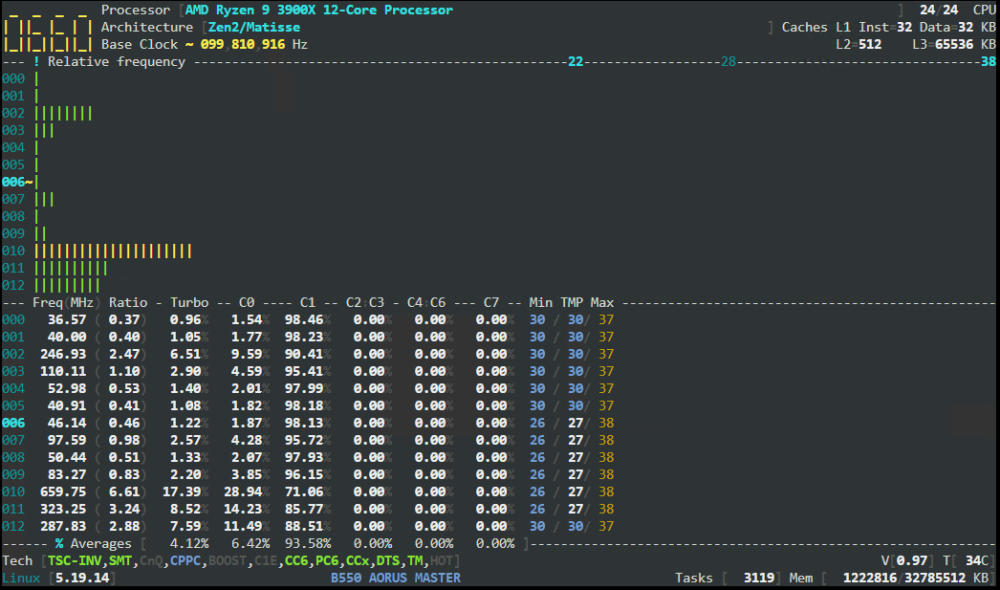
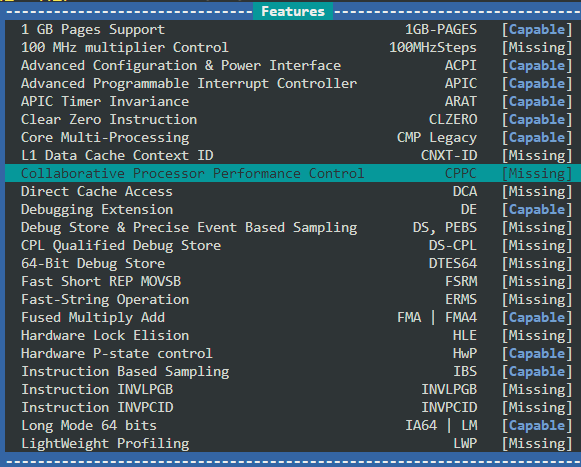
I'm running a ryzen 9 3900x and am following this guide to reduce the power of the cpu. I'm unable to get CPPC working and get the CPU into the C6-state. This is what I have done: I have the following settings in the bios: Global C-state Control = Enabled Power Supply Idle Control = Low Current Idle CPPC = Enabled CPPC Preferred Cores = Enabled I've added the following line in my syslinux.cfg: initcall_blacklist=acpi_cpufreq_init amd_pstate.enable=1 amd_pstate.replace=1 In the go file I added: modprobe amd_pstate After a reboot I can see the cpu frequency's do go below 2200MHz, but CPPC is still in blue: Kernel data: Features (CPPC = Missing): What do I need to change to get the CPU-Freq driver to amd-pstate and CPU-Idle driver to corefreqk-idle?
-
Can you explain how you did this? Or give me a guide about how to do this? If I look at my cpu with CoreFreq I get the following: Which says idle limit is C2, is there a way to change this? My bios is a gigabyte auros master B550. Don't know if I need to enable more settings in the bios?