de Techneut
Members
-
Joined
-
Last visited
Everything posted by de Techneut
-
I have a few questions reading this thread. Is @Squid still maintaining this plugin? Like mentioned above, +1 for delay on docker auto updates. Another feature I would like to see is an exclude selector. In my case I have one container I don't want to auto update. To do this I have to disable "Update All Docker Applications", and manually select all except for the one I would like to exclude. When I add new container I need to manually enable the "Auto Update" for those containers. An exclude option would solve this.

-
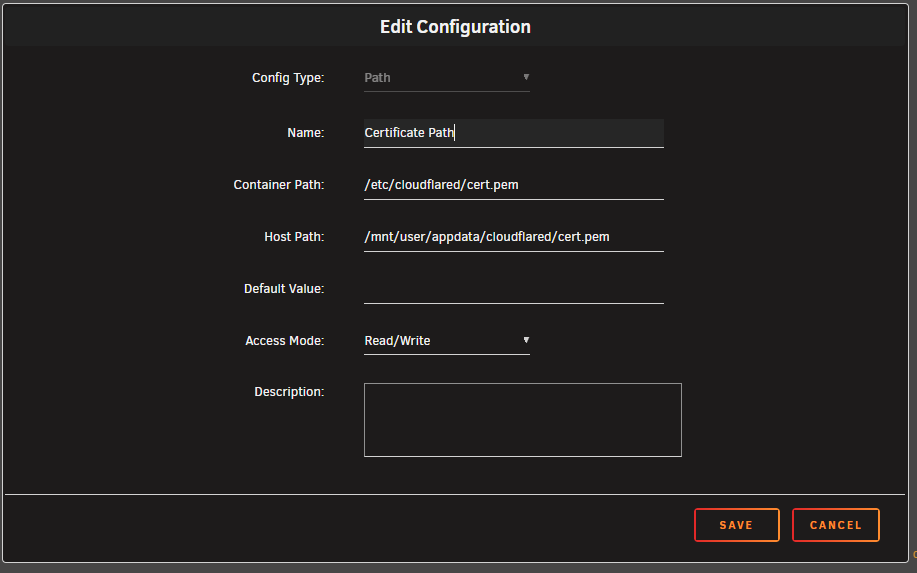
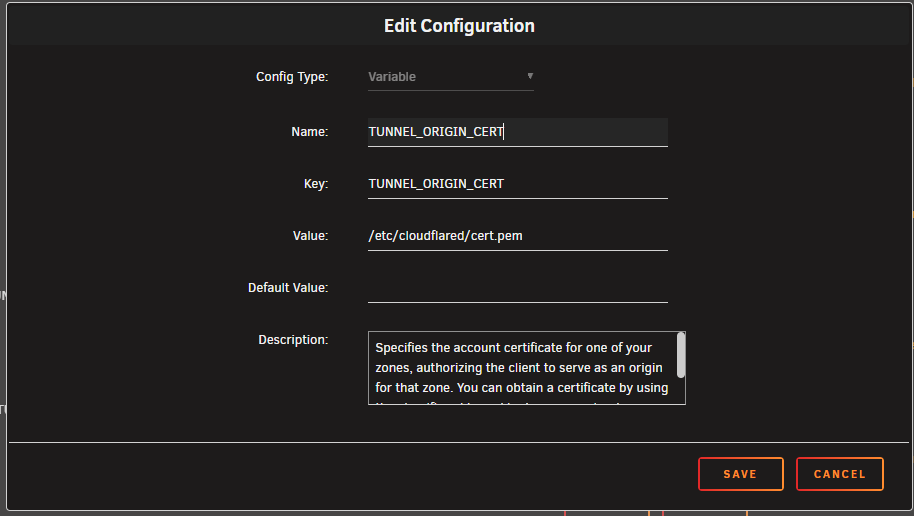
Managed to get it working. What I needed to do wat map the directory of the cert.pem to /etc/cloudflared/cert.pem And set the variable TUNNEL_ORIGIN_CERT to /etc/cloudflared/cert.pem Now it is working!
-
I was checking the container logs, and did see the following error? 2025-08-25T20:25:38Z ERR Cannot determine default origin certificate path. No file cert.pem in [~/.cloudflared ~/.cloudflare-warp ~/cloudflare-warp /etc/cloudflared /usr/local/etc/cloudflared]. You need to specify the origin certificate path by specifying the origincert option in the configuration file, or set TUNNEL_ORIGIN_CERT environment variable originCertPath= When I was looking at the variable in the container said to go to download a cert.pem at this link: https://dash.cloudflare.com/argotunnel I did this, but how do I put this file in this variable: Also is this really needed? Or can I ignore the error?

-
As a complete MacOS noob, I do not understand how to install this. Can you give me some explanation about how to install this?
-
Has anyone managet to passthrough the iGPU? I'm currently running Sequioa macinabox without any problems. Would like to passthrough my iGPU from my 12600k processor.
-
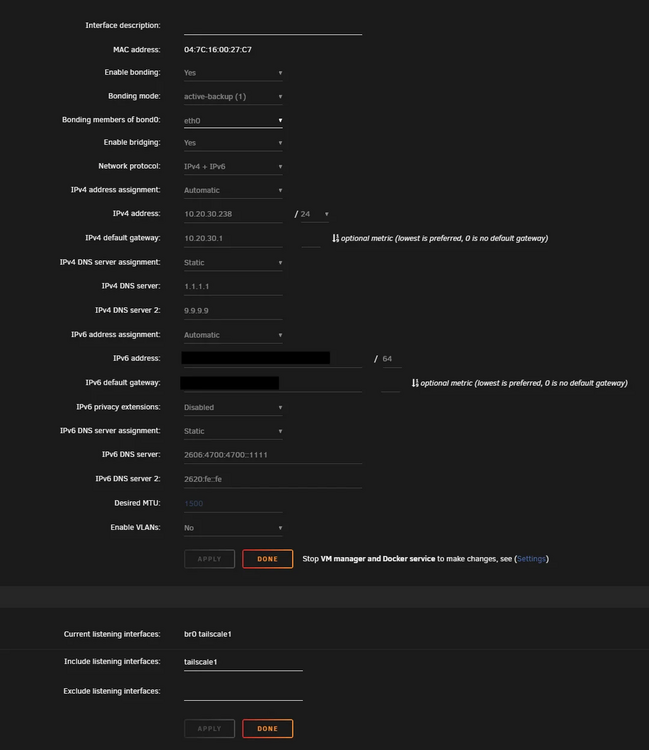
When I have IPv6 enabled on unraid. I notice that it cannot resolve DNS queries. When I have IPv6 enabled, my config looks like this: I Use static DNS servers. But with this configuration when I try to ping anything like, google.com, or cloudflare.com. I do get a "Destination Host Unreachable". When I disable IPv6 and go with IPv4 only, the ping is working fine to google and cloudflare: root@Tower:~# ping google.com PING google.com (142.251.39.110) 56(84) bytes of data. 64 bytes from ams15s48-in-f14.1e100.net (142.251.39.110): icmp_seq=1 ttl=118 time=6.05 ms 64 bytes from ams15s48-in-f14.1e100.net (142.251.39.110): icmp_seq=2 ttl=118 time=5.83 ms 64 bytes from ams15s48-in-f14.1e100.net (142.251.39.110): icmp_seq=3 ttl=118 time=6.61 ms 64 bytes from ams15s48-in-f14.1e100.net (142.251.39.110): icmp_seq=4 ttl=118 time=7.26 ms 64 bytes from ams15s48-in-f14.1e100.net (142.251.39.110): icmp_seq=5 ttl=118 time=5.32 ms 64 bytes from ams15s48-in-f14.1e100.net (142.251.39.110): icmp_seq=6 ttl=118 time=5.92 ms 64 bytes from ams15s48-in-f14.1e100.net (142.251.39.110): icmp_seq=7 ttl=118 time=8.89 ms Other devices in my home network are working fine with IPv6. What causes the issue that DNS on IPv6 is not working on unraid?
-
How can I read the mover log file?
-
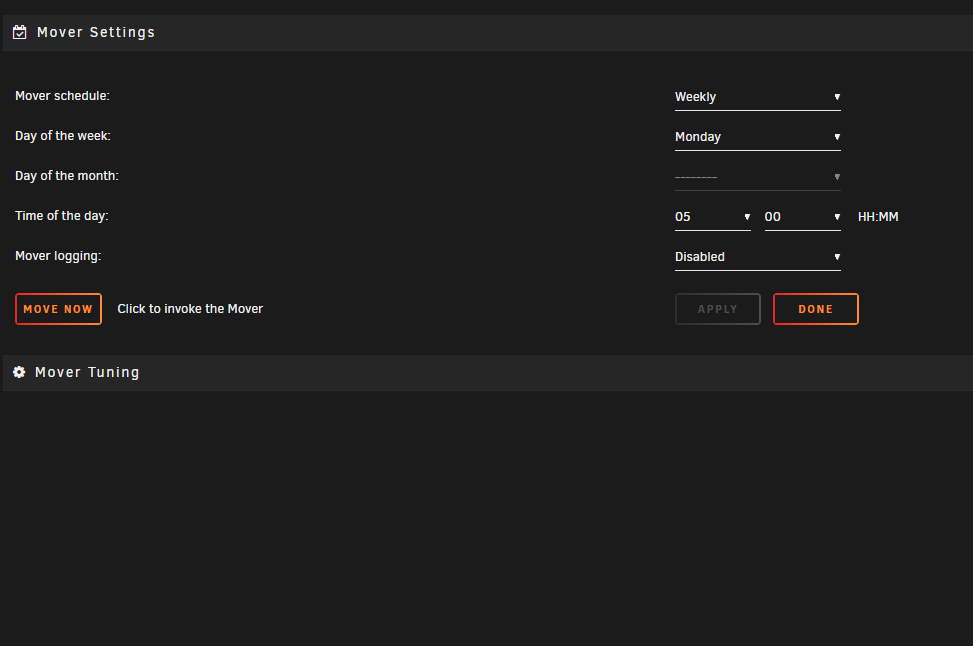
For some reason since the last update, mover tuning settings is empty: What could be wrong?
-
Did you already solve this? If not, I recommend to use the Frigate docker container directly in Unraid. Not within Home Assistant. You can install the Frigate integration in home assistant and point it to the docker container in Unraid. If you need more information, please let me know.
-
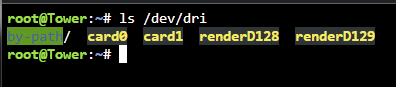
I found the solution. When you type: ls -l /sys/class/drm/renderD*/device/driver you get the following result: There I could see renderD129 was the intel device. To let PLEX use this, you need to add the following to the Preferences.xml file in de appdata folder of PLEX: HardwareDevicePath="/dev/dri/renderD129" Which looks like this: Then a reboot of PLEX, and the iGPU does the transcoding.


-
I have a intel 12600k and nvidia 1050ti in my system. When I do: ls /dev/dri ls /dev/dri I see both the intel gpu and nvidia gpu. How do I correctly point the Intel GPU to Plex?
-
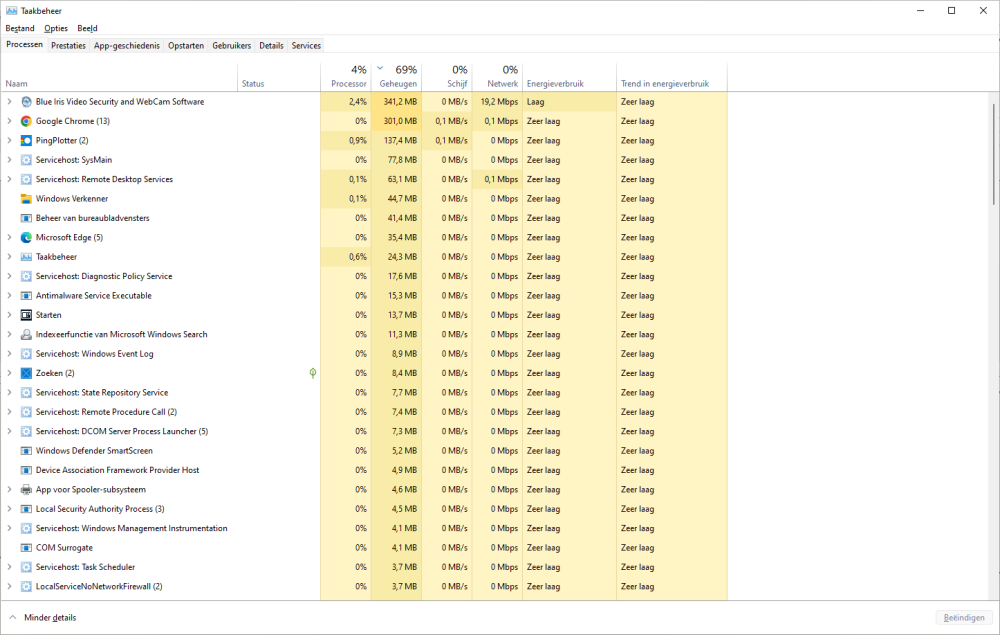
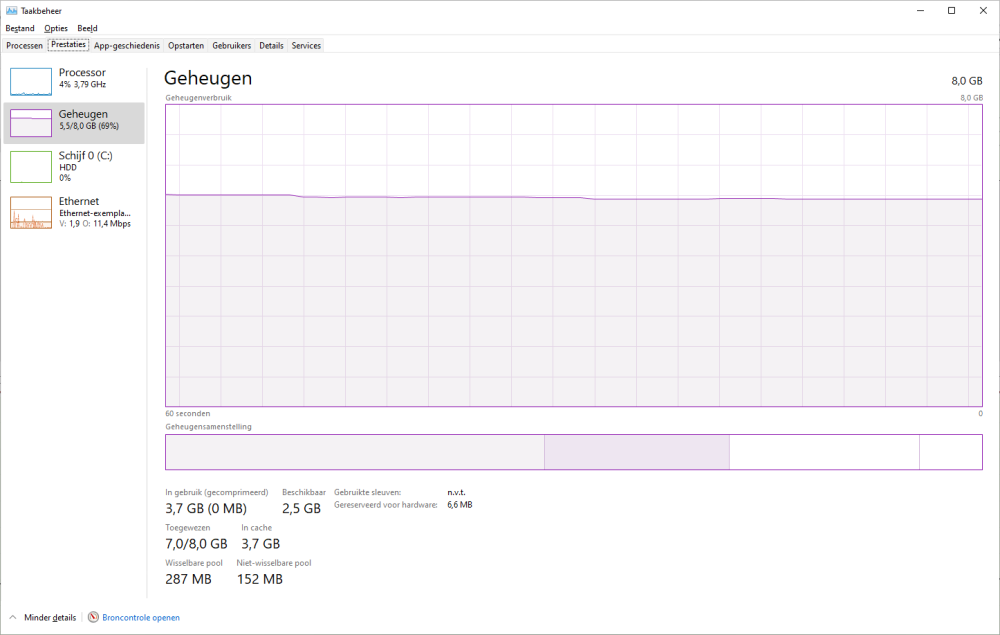
Having similar issues on a windows 11 machine. Have set initial and max memory the same: When I look in the task manager of the virtual machine, I can see not allot of memory is been used. But it says 69% is already in use: When I open a few more things the VM just freezes and becomes unresponsive. While I think it still has allot of memory in spare. What can I do to solve this?

-
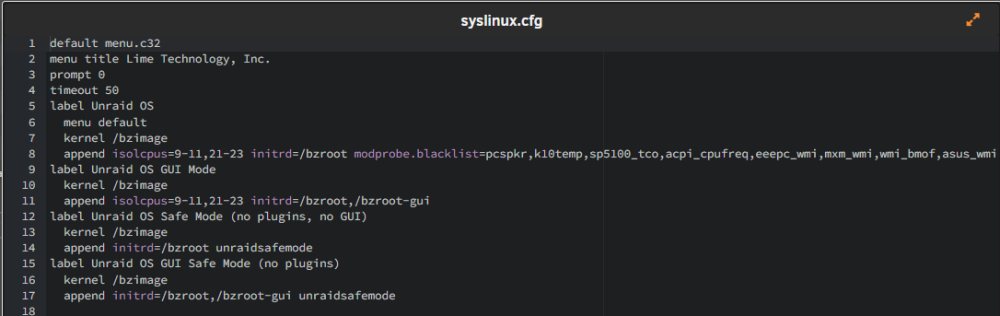
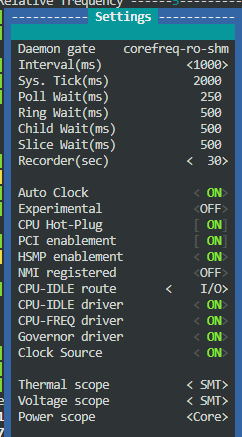
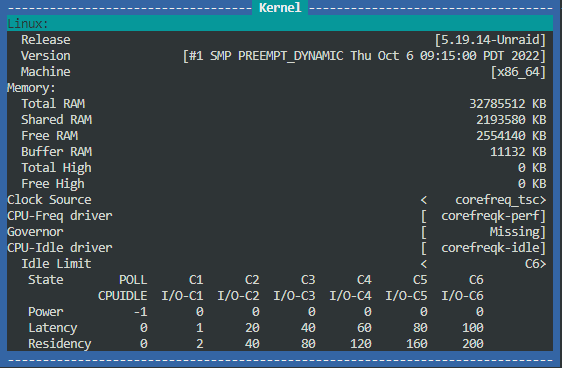
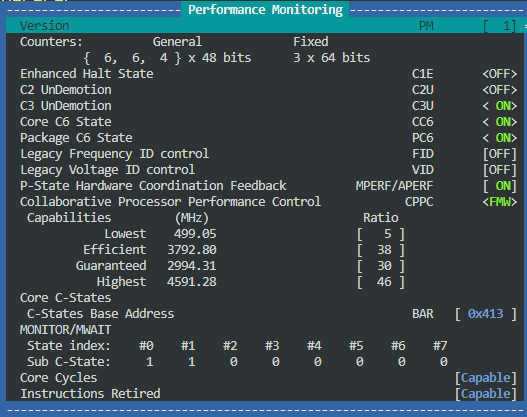
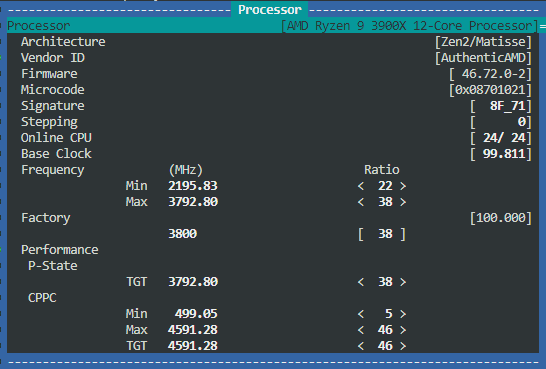
I corrected my syslinux.cfg, added your line on line 8 in the cfg: In settings I can enable all the 4 drivers and set CPU-IDLE route to I/O In the kernel I can set the Idle Limit to C6, only I'm missing the govenor and I don't where I can change this? Performance monitoring looks like this, didn't change anything here: Processor looks like this, didn't change anything here either: Another question, once I get all these settings correct, how do I save them, so there are there after a reboot?
-
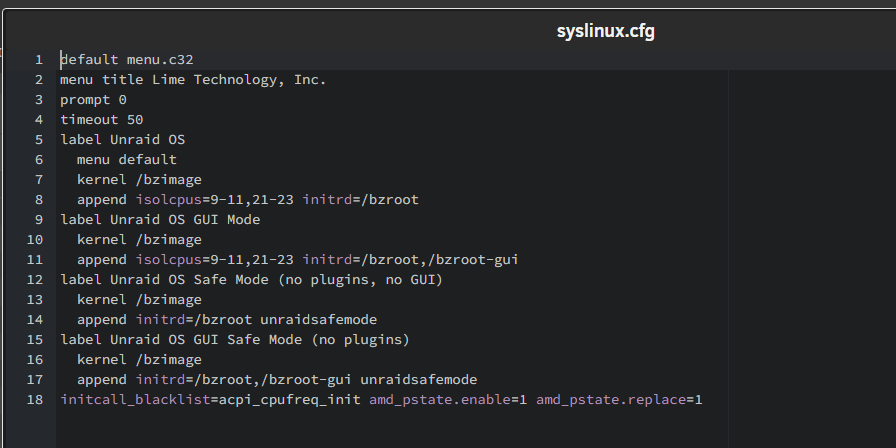
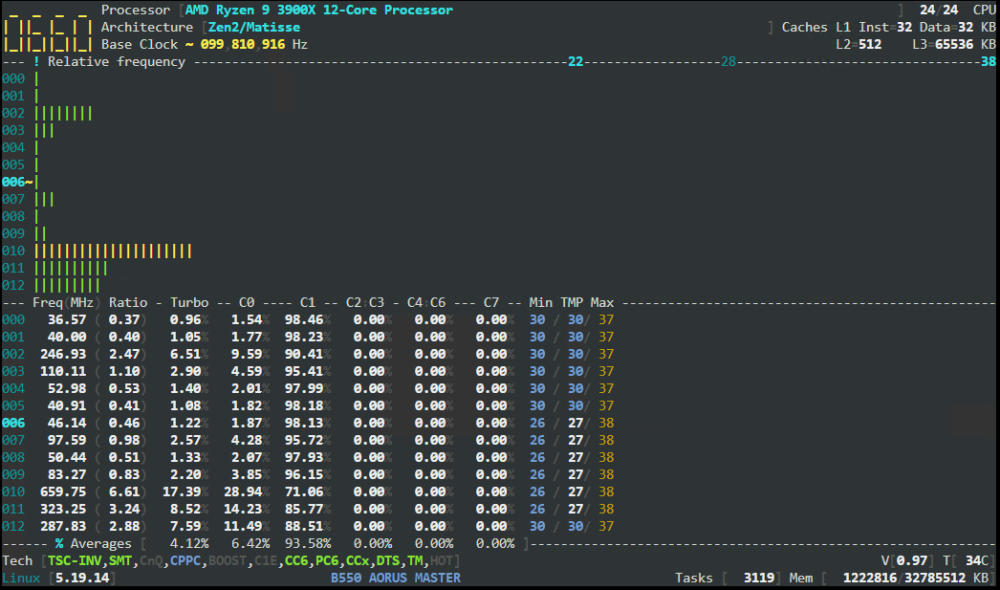
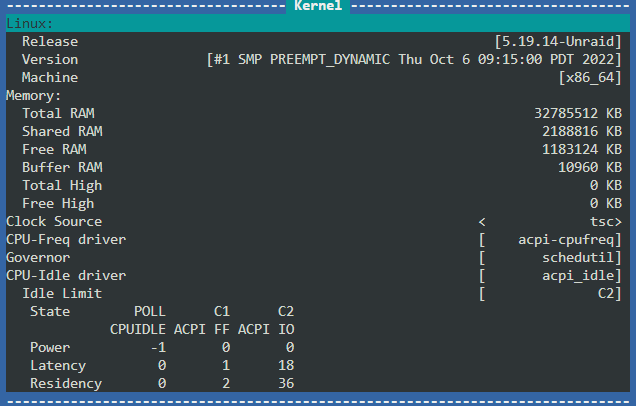
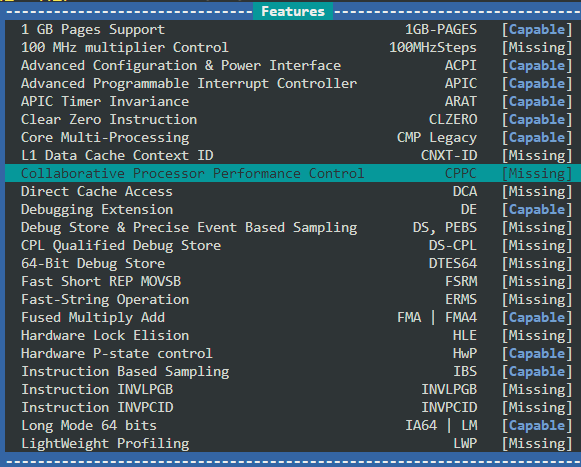
I'm running a ryzen 9 3900x and am following this guide to reduce the power of the cpu. I'm unable to get CPPC working and get the CPU into the C6-state. This is what I have done: I have the following settings in the bios: Global C-state Control = Enabled Power Supply Idle Control = Low Current Idle CPPC = Enabled CPPC Preferred Cores = Enabled I've added the following line in my syslinux.cfg: initcall_blacklist=acpi_cpufreq_init amd_pstate.enable=1 amd_pstate.replace=1 In the go file I added: modprobe amd_pstate After a reboot I can see the cpu frequency's do go below 2200MHz, but CPPC is still in blue: Kernel data: Features (CPPC = Missing): What do I need to change to get the CPU-Freq driver to amd-pstate and CPU-Idle driver to corefreqk-idle?
-
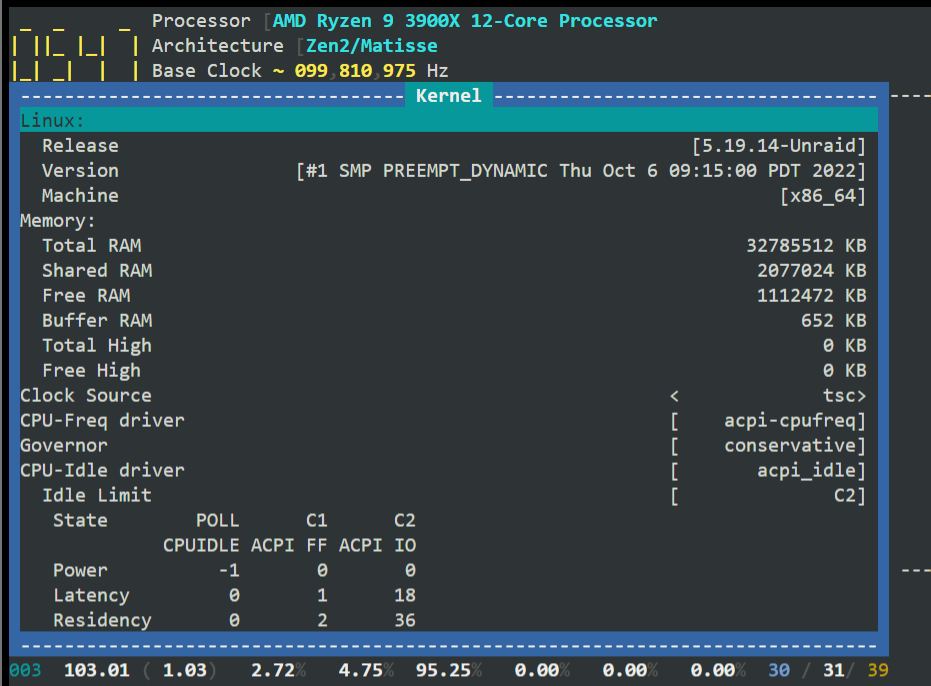
Can you explain how you did this? Or give me a guide about how to do this? If I look at my cpu with CoreFreq I get the following: Which says idle limit is C2, is there a way to change this? My bios is a gigabyte auros master B550. Don't know if I need to enable more settings in the bios?
-
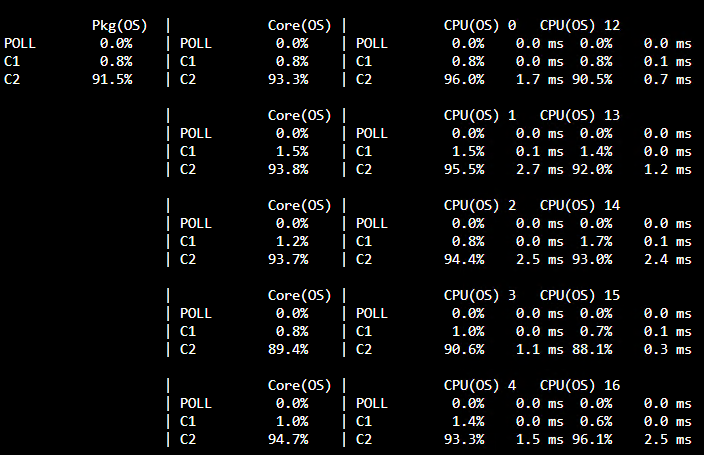
I have a server with a ryzen 9 3900x, when I look at the c-states in powertop I get the following: In the bios I have the following enabled: Global C-state Control = Enabled Power Supply Idle Control = Low Current Idle CPPC = Enabled CPPC Preferred Cores = Enabled I was thinking I should also be seeing C6 as c-state. But it's not showing. Is there a way to get the machine in to the c6 state? Or could it be possible that a pcie device is preventing this?
-
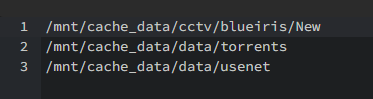
Thanks for the reply! By coincidence I already did the same as what you described. Now it is working for me! What I did was deleting the mover_ignore file (Which I originally created in windows) and created a new text file. The new file looks as follows: Compared to the old one I removed the / at the end. Now everything is working as expected.
-
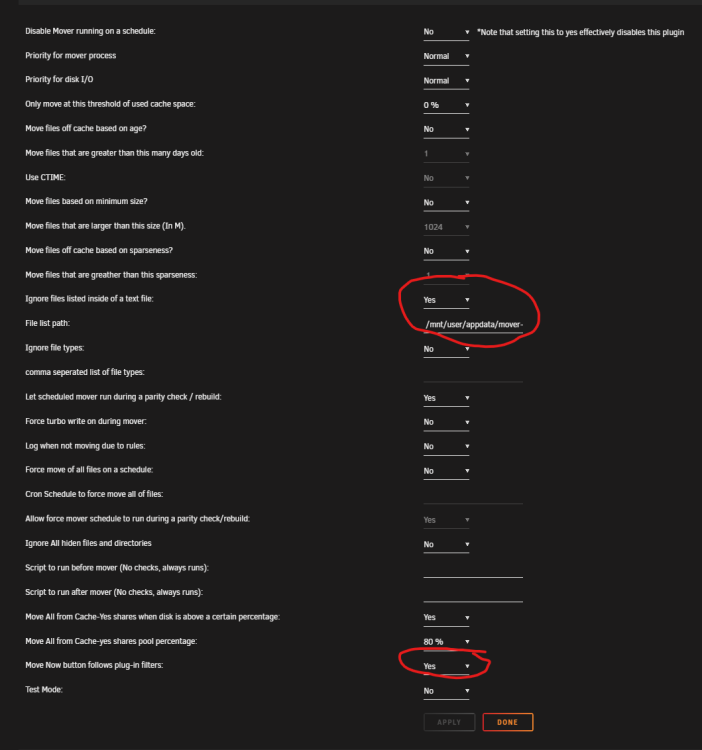
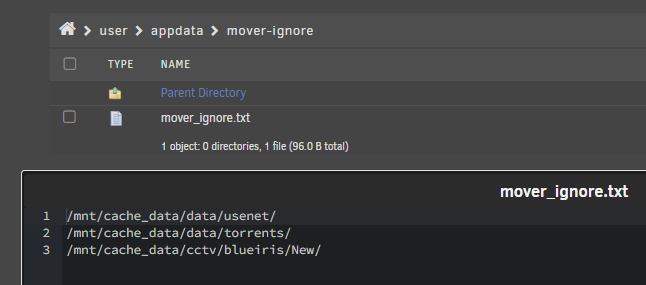
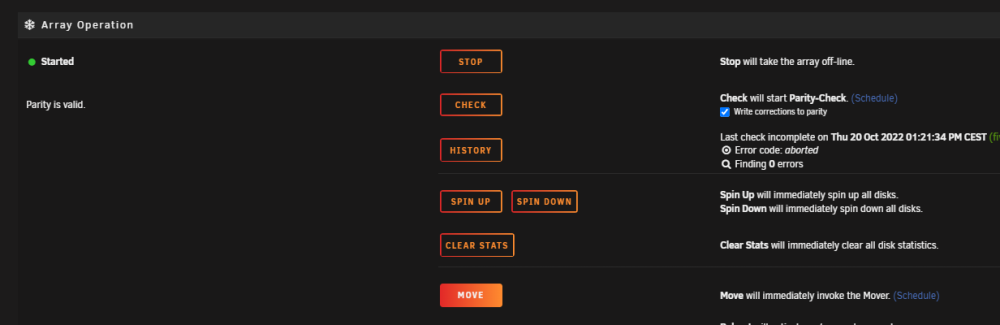
I'm trying to exclude some folders from the mover with the "Ignore files listed inside of a text file:". But it doesn't seem to work. I have the configuration as follow: * Ignore files listed inside of a text file: --> set to "Yes" * File list path: " /mnt/user/appdata/mover-ignore/mover_ignore.txt" * Move Now button follows plug-in filters: --> set to "Yes", this for testing when I manually press the move command My mover_ignore.txt look like this: In those directories I've created a test file, which I can see is on the cache_data: When I run the mover: I get the following result in the "Syslog file": Oct 25 14:48:39 Tower root: mover: started Oct 25 14:48:39 Tower root: mvlogger: No Script to Run. Oct 25 14:48:39 Tower root: mvlogger: CACHETHRESH: 80 Oct 25 14:48:39 Tower root: mvlogger: Checking to see if we should all files from share. Oct 25 14:48:39 Tower root: mvlogger: Move All Cache Threshold: 80 Oct 25 14:48:39 Tower root: mvlogger: /mnt/cache PCT USED: 28 Oct 25 14:48:39 Tower root: mvlogger: /mnt/cache_data PCT USED: 1 Oct 25 14:48:39 Tower root: mvlogger: Done checking Move All from Share Oct 25 14:48:39 Tower root: mvlogger: Share Name Only: cctv Oct 25 14:48:39 Tower root: mvlogger: Cache Pool Name: cache_data Oct 25 14:48:39 Tower root: mvlogger: cache_data Threshold Pct: Oct 25 14:48:39 Tower root: mvlogger: OVERALL Threshold: 0 Oct 25 14:48:39 Tower root: mvlogger: Share Path: /mnt/cache_data/cctv Oct 25 14:48:39 Tower root: mvlogger: Pool Pct Used: 1 % Oct 25 14:48:39 Tower root: mvlogger: DFTPCT LIMIT USED FOR SETTING: 0 Oct 25 14:48:39 Tower root: mvlogger: Threshold Used: 0 Oct 25 14:48:39 Tower root: mvlogger: Adding Skip File List Oct 25 14:48:39 Tower root: mvlogger: Skip File List Path: /mnt/user/appdata/mover-ignore/mover_ignore.txt Oct 25 14:48:39 Tower root: mvlogger: Skipfiletypes string: find "/mnt/cache_data/cctv" -depth | grep -vFf '/mnt/user/appdata/mover-ignore/mover_ignore.txt' Oct 25 14:48:39 Tower root: mvlogger: Not in Test mode Oct 25 14:48:39 Tower root: mvlogger: Complete Mover Command: find "/mnt/cache_data/cctv" -depth | grep -vFf '/mnt/user/appdata/mover-ignore/mover_ignore.txt' | /usr/local/sbin/move -d 1 Oct 25 14:48:39 Tower root: mvlogger: Share Name Only: data Oct 25 14:48:39 Tower root: mvlogger: Cache Pool Name: cache_data Oct 25 14:48:39 Tower root: mvlogger: cache_data Threshold Pct: Oct 25 14:48:39 Tower root: mvlogger: OVERALL Threshold: 0 Oct 25 14:48:39 Tower root: mvlogger: Share Path: /mnt/cache_data/data Oct 25 14:48:39 Tower root: mvlogger: Pool Pct Used: 1 % Oct 25 14:48:39 Tower root: mvlogger: DFTPCT LIMIT USED FOR SETTING: 0 Oct 25 14:48:39 Tower root: mvlogger: Threshold Used: 0 Oct 25 14:48:39 Tower root: mvlogger: Adding Skip File List Oct 25 14:48:39 Tower root: mvlogger: Skip File List Path: /mnt/user/appdata/mover-ignore/mover_ignore.txt Oct 25 14:48:39 Tower root: mvlogger: Skipfiletypes string: find "/mnt/cache_data/data" -depth | grep -vFf '/mnt/user/appdata/mover-ignore/mover_ignore.txt' Oct 25 14:48:39 Tower root: mvlogger: Not in Test mode Oct 25 14:48:39 Tower root: mvlogger: Complete Mover Command: find "/mnt/cache_data/data" -depth | grep -vFf '/mnt/user/appdata/mover-ignore/mover_ignore.txt' | /usr/local/sbin/move -d 1 Oct 25 14:48:40 Tower move: file: /mnt/cache_data/data/torrents/test file 2.txt Oct 25 14:48:40 Tower move: file: /mnt/cache_data/data/usenet/test file 3.txt Oct 25 14:48:40 Tower root: mvlogger: Share Name Only: share Oct 25 14:48:40 Tower root: mvlogger: Cache Pool Name: cache Oct 25 14:48:40 Tower root: mvlogger: cache Threshold Pct: Oct 25 14:48:40 Tower root: mvlogger: OVERALL Threshold: 0 Oct 25 14:48:40 Tower root: mvlogger: Share Path: /mnt/cache/share Oct 25 14:48:40 Tower root: mvlogger: Pool Pct Used: 28 % Oct 25 14:48:40 Tower root: mvlogger: DFTPCT LIMIT USED FOR SETTING: 0 Oct 25 14:48:40 Tower root: mvlogger: Threshold Used: 0 Oct 25 14:48:40 Tower root: mvlogger: Adding Skip File List Oct 25 14:48:40 Tower root: mvlogger: Skip File List Path: /mnt/user/appdata/mover-ignore/mover_ignore.txt Oct 25 14:48:40 Tower root: mvlogger: Skipfiletypes string: find "/mnt/cache/share" -depth | grep -vFf '/mnt/user/appdata/mover-ignore/mover_ignore.txt' Oct 25 14:48:40 Tower root: mvlogger: Not in Test mode Oct 25 14:48:40 Tower root: mvlogger: Complete Mover Command: find "/mnt/cache/share" -depth | grep -vFf '/mnt/user/appdata/mover-ignore/mover_ignore.txt' | /usr/local/sbin/move -d 1 Oct 25 14:48:40 Tower root: find: '/mnt/cache/share': No such file or directory Oct 25 14:48:40 Tower root: mover: finished Oct 25 14:48:40 Tower root: mvlogger: No After Script to Run. I can see here that the test files are moved, while I wan't to keep these directories including the files on the cache disk. Can someone help me? I don't know what I'm doing wrong?


-
I've just updated to unraid 6.11, and docker folder is not compatible anymore. Can the docker folder be updated to work with 6.11?

-
I don't know these commands? When I do a "docker --help" I get the following result: root@Tower:~# docker --help Usage: docker [OPTIONS] COMMAND A self-sufficient runtime for containers Options: --config string Location of client config files (default "/root/.docker") -c, --context string Name of the context to use to connect to the daemon (overrides DOCKER_HOST env var and default context set with "docker context use") -D, --debug Enable debug mode -H, --host list Daemon socket(s) to connect to -l, --log-level string Set the logging level ("debug"|"info"|"warn"|"error"|"fatal") (default "info") --tls Use TLS; implied by --tlsverify --tlscacert string Trust certs signed only by this CA (default "/root/.docker/ca.pem") --tlscert string Path to TLS certificate file (default "/root/.docker/cert.pem") --tlskey string Path to TLS key file (default "/root/.docker/key.pem") --tlsverify Use TLS and verify the remote -v, --version Print version information and quit Management Commands: builder Manage builds config Manage Docker configs container Manage containers context Manage contexts image Manage images manifest Manage Docker image manifests and manifest lists network Manage networks node Manage Swarm nodes plugin Manage plugins secret Manage Docker secrets service Manage services stack Manage Docker stacks swarm Manage Swarm system Manage Docker trust Manage trust on Docker images volume Manage volumes Commands: attach Attach local standard input, output, and error streams to a running container build Build an image from a Dockerfile commit Create a new image from a container's changes cp Copy files/folders between a container and the local filesystem create Create a new container diff Inspect changes to files or directories on a container's filesystem events Get real time events from the server exec Run a command in a running container export Export a container's filesystem as a tar archive history Show the history of an image images List images import Import the contents from a tarball to create a filesystem image info Display system-wide information inspect Return low-level information on Docker objects kill Kill one or more running containers load Load an image from a tar archive or STDIN login Log in to a Docker registry logout Log out from a Docker registry logs Fetch the logs of a container pause Pause all processes within one or more containers port List port mappings or a specific mapping for the container ps List containers pull Pull an image or a repository from a registry push Push an image or a repository to a registry rename Rename a container restart Restart one or more containers rm Remove one or more containers rmi Remove one or more images run Run a command in a new container save Save one or more images to a tar archive (streamed to STDOUT by default) search Search the Docker Hub for images start Start one or more stopped containers stats Display a live stream of container(s) resource usage statistics stop Stop one or more running containers tag Create a tag TARGET_IMAGE that refers to SOURCE_IMAGE top Display the running processes of a container unpause Unpause all processes within one or more containers update Update configuration of one or more containers version Show the Docker version information wait Block until one or more containers stop, then print their exit codes Run 'docker COMMAND --help' for more information on a command. To get more help with docker, check out our guides at https://docs.docker.com/go/guides/
-
If that was working I wouldn't be here. This docker is created with docker compose, so I don't knop if the "auto update" supposed to be working here.
-
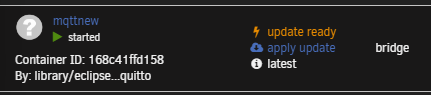
I did this a while ago, now unraid says mqtt has an update but I don't know how to update it. Can someone tell me how to apply the update?
-
How's the test going? If I can help you, let me know. Would be glad to help.
-
Thanks for the fast reply spants. Did create a docker with the guide you wrote. It seems to work like it should. See the log below, this was after a compleet reboot of the unraid server: 1656677854: mosquitto version 2.0.14 starting 1656677854: Config loaded from /mosquitto/config/mosquitto.conf. 1656677854: Opening ipv4 listen socket on port 1883. 1656677854: Opening ipv6 listen socket on port 1883. 1656677854: mosquitto version 2.0.14 running 1656677854: New connection from 10.20.30.245:52995 on port 1883. 1656677854: New client connected from 10.20.30.245:52995 as BlueIris (p2, c1, k20, u'unraidmqtt'). 1656677855: New connection from 172.18.0.1:45068 on port 1883. 1656677855: New client connected from 172.18.0.1:45068 as mqttjs_917b0112 (p2, c1, k60, u'unraidmqtt'). 1656677858: New connection from 172.18.0.1:45084 on port 1883. 1656677858: New client connected from 172.18.0.1:45084 as frigate (p2, c1, k60, u'unraidmqtt'). 1656677858: New connection from 10.20.30.250:49785 on port 1883. 1656677858: New client connected from 10.20.30.250:49785 as 633R90zlgEZTP3erW7B1iZ (p2, c1, k60, u'unraidmqtt'). 1656677886: New connection from 10.20.30.249:51142 on port 1883. 1656677886: New client connected from 10.20.30.249:51142 as mqtt-explorer-0fa062fa (p2, c1, k60, u'unraidmqtt'). 1656678032: Client mqtt-explorer-0fa062fa disconnected. 1656678198: mosquitto version 2.0.14 terminating 1656678198: Saving in-memory database to /mosquitto/data//mosquitto.db. 1656678339: mosquitto version 2.0.14 starting 1656678339: Config loaded from /mosquitto/config/mosquitto.conf. 1656678339: Opening ipv4 listen socket on port 1883. 1656678339: Opening ipv6 listen socket on port 1883. 1656678339: mosquitto version 2.0.14 running 1656678340: New connection from 172.18.0.1:58424 on port 1883. 1656678340: New client connected from 172.18.0.1:58424 as mqttjs_917b0112 (p2, c1, k60, u'unraidmqtt'). 1656678340: New connection from 10.20.30.245:53037 on port 1883. 1656678340: New client connected from 10.20.30.245:53037 as BlueIris (p2, c1, k20, u'unraidmqtt'). 1656678411: New connection from 10.20.30.250:46975 on port 1883. 1656678411: New client connected from 10.20.30.250:46975 as 6vhnjCb23eaQ6hObVOIxmr (p2, c1, k60, u'unraidmqtt'). 1656678445: New connection from 172.18.0.1:52694 on port 1883. 1656678445: New client connected from 172.18.0.1:52694 as frigate (p2, c1, k60, u'unraidmqtt'). 1656678587: New connection from 10.20.30.249:51464 on port 1883. 1656678587: New client connected from 10.20.30.249:51464 as mqtt-explorer-0fa062fa (p2, c1, k60, u'unraidmqtt'). 1656678702: Client mqtt-explorer-0fa062fa disconnected. 1656678756: Client 6vhnjCb23eaQ6hObVOIxmr closed its connection. 1656678812: mosquitto version 2.0.14 terminating 1656678812: Saving in-memory database to /mosquitto/data//mosquitto.db. 1656679036: mosquitto version 2.0.14 starting 1656679036: Config loaded from /mosquitto/config/mosquitto.conf. 1656679036: Opening ipv4 listen socket on port 1883. 1656679036: Opening ipv6 listen socket on port 1883. 1656679036: mosquitto version 2.0.14 running 1656679046: New connection from 172.18.0.1:38806 on port 1883. 1656679046: New client connected from 172.18.0.1:38806 as mqttjs_deb08702 (p2, c1, k60, u'unraidmqtt'). 1656679051: New connection from 172.18.0.1:38808 on port 1883. 1656679051: New client connected from 172.18.0.1:38808 as frigate (p2, c1, k60, u'unraidmqtt'). 1656679056: New connection from 10.20.30.245:49676 on port 1883. 1656679056: New client connected from 10.20.30.245:49676 as BlueIris (p2, c1, k20, u'unraidmqtt'). 1656679103: New connection from 10.20.30.250:49763 on port 1883. 1656679103: New client connected from 10.20.30.250:49763 as 2bt2ghrZam0tCM674kT4SH (p2, c1, k60, u'unraidmqtt'). 1656679199: New connection from 10.20.30.249:51973 on port 1883. 1656679199: New client connected from 10.20.30.249:51973 as mqtt-explorer-0fa062fa (p2, c1, k60, u'unraidmqtt').
-
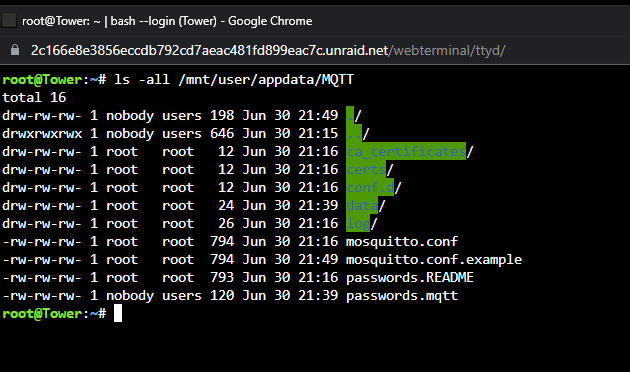
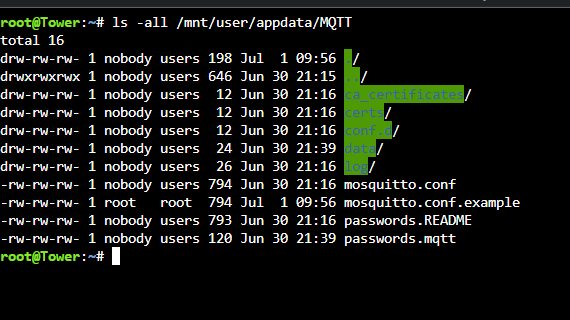
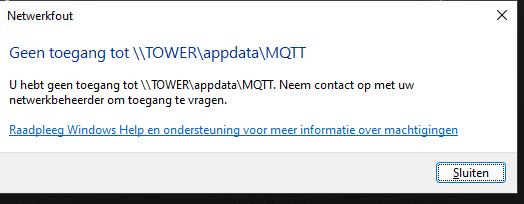
So I did a reïnstall of MQTT, because the container is very simple to setup. At first deleted the container and the app data folder, the installed the docker again. When i did the following command: ls -all /mnt/user/appdata/MQTT It did gave me this result: With this I was not able to acces the files in code server or smb share. Then I did the following command: chown -R nobody:users /mnt/user/appdata/MQTT After a reboot of MQTT I get the following permissions: When I checked the log file of MQTT I could see the error was still there: 1656662227: Saving in-memory database to /config/data/mosquitto.db. 1656662227: Error saving in-memory database, unable to open /config/data/mosquitto.db.new for writing. 1656662776: Error: Permission denied. When I tried to acces the share to code server or smb it was still not able to acces it: I have other shares with the same permmisions which are accesaible. MQTT is working, but I'm worried about these issues.