





meep
Members
-
Joined
-
Last visited
Everything posted by meep
-
Not sure what’s going on without a little more detail, but why would you need a dummy Hdmi in the gpu if you have the card attached to an actual display? Does the display support audio over Hdmi, or what’s the physical set up like? What’s shown in your windows audio control panel?
-
Hi That's a massive co-incidence, I have also recently retired a Core X9. It's a massive case, but really, for its size, has very very poor support for multiple disks. Happy to try to answer your questions; HBA = Host Bus Adapter. There are many types. A SAS HBA is just one type of HBA, but since it's the most prevalent for unRaid purposes, the terms are used somewhat interchangeably around here. The HBA sits in a PCIe slot on your main system motherboard, and gets its own power from there. You are correct, though, it handles data only - you still need to power the drives in your external chassis. There are a few ways to do this. If you purchase a dedicated 'disk shelf' chassis, it will usually come with its own power supply, often two 'server' type PSU for redundancy. If you are using a standard CP chassis as a DIY disk shelf, you wont have this luxury, so there are. a few options. At a basic level, you could run a lengthy molex cable from your main system PSU out to the chassis and use that. However, if you have more than a couple of disks, you run the risk of overloading / overheating. A much better solution is to install a dedicated PSU in the external chassis. This, in itself, presents a further challenge - how can you get this secondary PSU to turn on if you have no motherboard? Again, two options; You can use a multi-PSU adapter. This device takes a power cable from your main PSU, and the ATX from your secondary PSU. When your main system is powered on, the secondary PSU also receives the 'on' signal and powers up. The downside here is that you still need to run a power cable between the two systems. My preferred solution is to use a PSU Jumper Bridge on the secondary PSU. This gadget shorts the power on pins, so as soon as you flick the physical power toggle switch on the secondary PSU, it springs to life as it receives the 'on' signal from the adapter. The downside is you lose the sync between the two systems - you secondary system is 'always on' until you physically switch it off. My solution to this is to use a power strip with slave sockets that are only powered when there's power draw on a master docket (the main PC) With a secondary PSU in the external chassis, you have plenty of power for drives, fans and anything else needed. If you want to move your SAS card to the external chassis, you need to extend your PCIe there. Then, you need to look at PCIe expanders, bifurcation etc. This can be expensive. However, if you place a SAS EXPANDER in your chassis, you have more options. (you can pick these up cheaper than the amazon link - I just added that for illustrative purposes). The SAS Expander looks like a PCIe card, but its not. It does not need to plug into a PCIe slot. It can, but doing so is only for the purpose of providing the card itself with power. The card also has a molex connector that is an alternative for power. So such an expander can be mounted in a PCIe slot, or mounted anywhere in your chassis. (they come in different form factors, some are integrated into hot swap drive backplanes etc.) The SAS expander connects to your main system by connecting to your HBA. One or more of the HBA SAS Ports is connected to the SAS Expander which in turn connects to your drives. In this way, s ingle 4 channel SAS port can expand to up to 20 channels (drives). One handy way of powering and mounting the SAS expander in the external chassis is to use a PCIe expander typically used by the mining community. In this scenario, you are not using it for data at all, just as a mounting point and power provider for the SAS expander. Of course, most of the above relates to the DIY approach. Splashing out on a proper disk shelf system will negate a good deal of the hackery and provide everything in a unified package - but often at a cost!
-
Yes, I have this kind of setup. You can externalise hard drives in a specialised 'disk shelf' chassis, or simply use any suitable PC case you have lying around. The systems are usually connected through a SAS controller (HBA) in the main system. The controller will have internal or external SAS ports that are typically connected to the target / external drive array using something like a Dual Mini SAS 26pin SFF-8088 to 36pin SFF-8087 Adapter. unRaid will see these external drives just like regular drives. You can add them to the array, use them for parity, cache or as unassigned disks. You might be interested in this blog post where I touch on the idea. It can get a lot more complicated with expanders, disk backplanes etc., but in basic terms, what you envisage is possible, and quite common. Search on here or the interweb for 'disk shelf', 'hba', 'SAS controller', 'backplane' to get started.
-
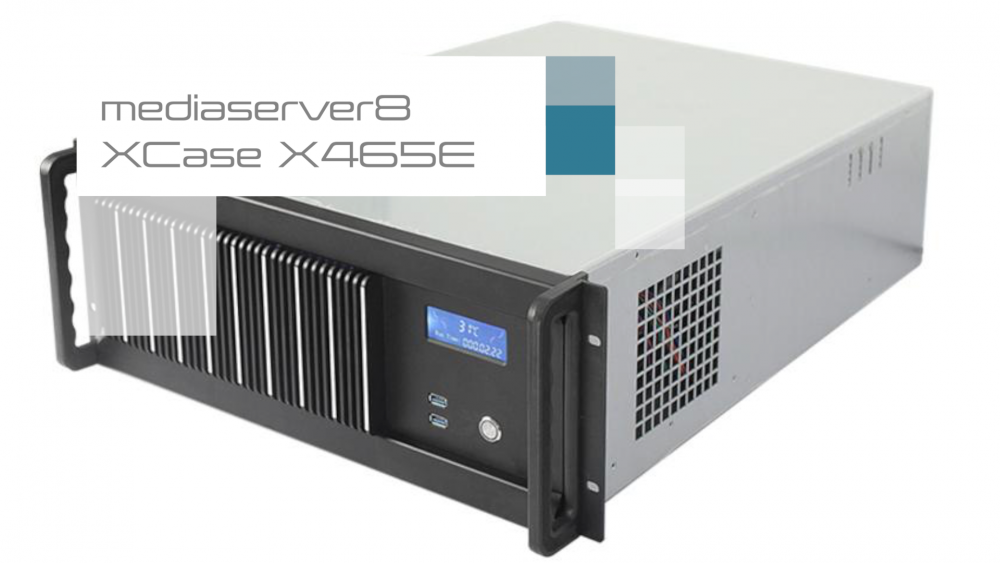
I made a quick video overview of the XCase X465E - its got TWELVE PCI slots form those bifurcators out there.
-
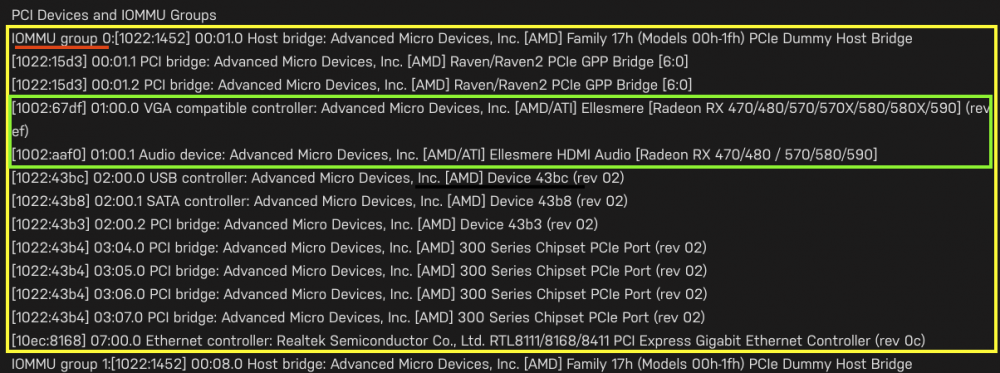
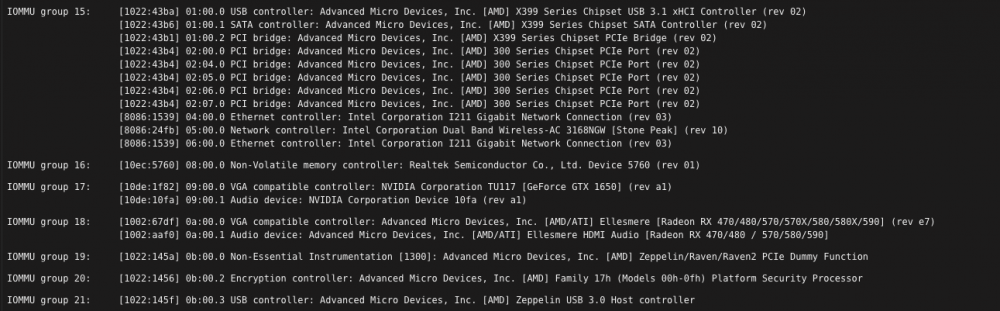
So here's your problem. Your GPU (video and audio) are stacked inside IOMMU group 0 with a bunch of other devices. Your passthrough devices are in the green box, but, as you can see, they are in the same group (yellow box) as lots of others. You need to switch on IOMMU in the Bios and play with the ACS override options (Settings -> VM Manager) Any PCI/PCIe device you want to pass through to a VM MUST be isolated in its own IOMMU group. Here's an example from my own systems devices; You can see that my Nvidia and AMD GPUs have the video and audio devices correctly paired inside discrete IOMMU groups (17 & 18). This is the kind of listing you need before you can start passing through anything to VMs. Have you watched any of the SpaceInvaderOne videos on YouTube which go through all of this in very fine detail?

-
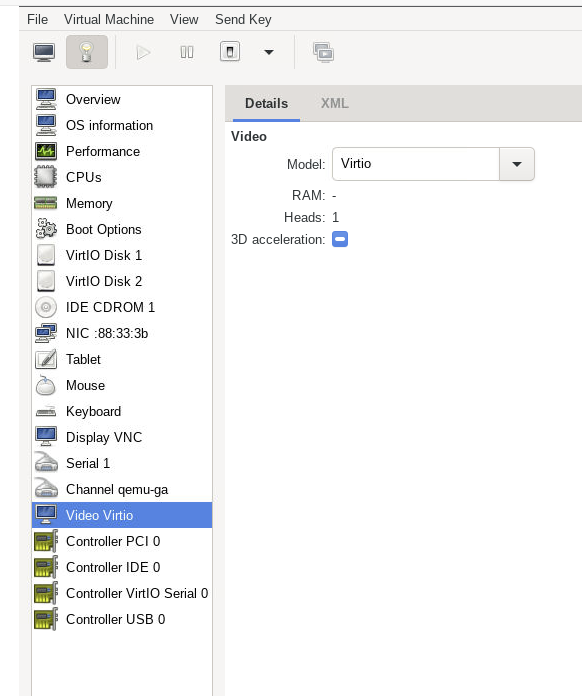
The 2020 Solution to this is; 1. Install virt-manager docker 2. In virt-manager, change the video device model to virtio 3. Enjoy your extra resolutions
-
Two things you can try 1. You have not passed the sound portion of your GPU through. You really do need to select the GPOU sound device, even if you're not going to use it. 2 You need to post your IOMMU groupings to help diagnosis. (Tools -> System Devices)
-
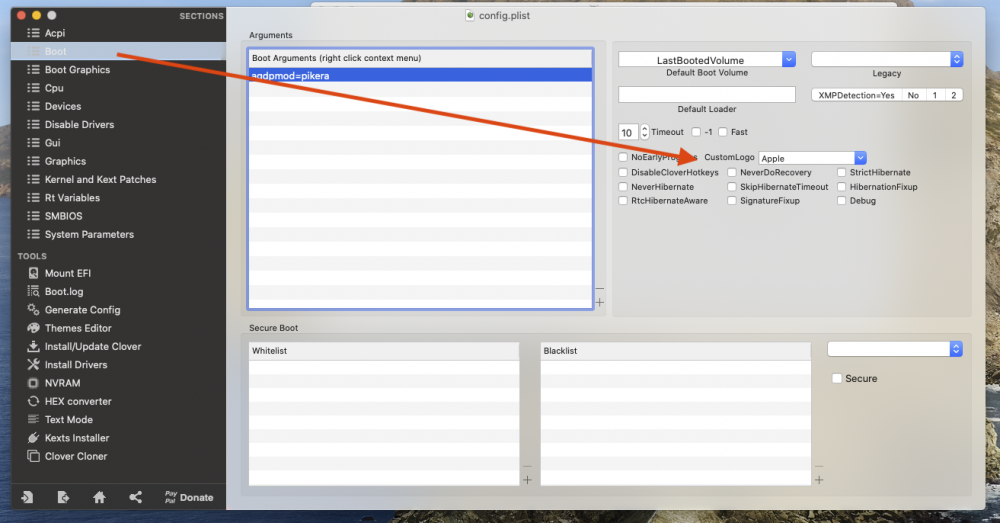
This is what I set up, but honestly, I reboot my MacOS VMs so infrequently, I forget how much this covers up! Also, I neglected to mention I run an RX570, and it sounds like that works OK for you, so I might not be able to help much with the RX5700.
-
Does it truly hang? I've had cases where it just takes a very long time to progress through the first boot. Keep a close eye on the loader bars to see if they are moving at all. That 4x progress bar is fairly normal (you can 'hide' it through a setting in Clover that throws up a full screen image). I'm running 10.15.4 with Clover and it boots OK. Happy to share anything you'd like to see. You might find some nuggets in this post where I describe how to get HEVC working; https://mediaserver8.blogspot.com/2020/01/enabling-hevc-on-rx570-in-macos-vm.html
-
Result! Well done on the perseverance.
-
Yes, it seems XP needs a floppy at that point, or a USB spoofed as a floppy. Did you try to et primary vDisk bus to 'IDE' in VM config?
-
Was the article above no help? set primary vDisk bus to IDE then, and see how that goes....
-
More good news. I found this for you; https://www.raymond.cc/blog/install-xp-setup-did-not-find-any-hard-disk-drives-installed-in-your-computer/ It looks lies WinXP doesn't support SATA for install, and VIRTIO is causing a problem for you. Also, it seems that the drivers need to be on floppy (!) or USB, so likely why pressing 'S' results in no dice. Try setting your primary vDisk bus to IDE specifically. Or see if you can follow the instructions oin the above article. Good luck!
-
Actually, here's the correct guide for drive install during the setup process; https://wiki.unraid.net/index.php/UnRAID_Manual_6#Loading_the_VirtIO_Drivers_During_Installation
-
When you have the opportunity to load drivers, take it! You need to follow the driver installation sequence described here; http://lime-technology.com/wiki/index.php/UnRAID_6/VM_Management#Step_5:_Install_the_VirtIO_drivers_from_inside_the_VM_.28Windows_Guests_Only.29 That's actually for post-OS-install updates, but you my be getting that BSD because Windows Setup doesn't have drivers for some of your VM devices. You need to load the relevant drivers from the ISO as part of the setup process. (you need to do this for Win10, why not XP?) That page specifically indicates that the viostor drivers should be installed last. You'll need to load Balloon, NetKVM and vioserial drivers first, then viostor. You do them one at a time, so its a bit repeditive.
-
You could try rebuilding the VM using Q35 rather than i440 machine type. That's got me out of a few pickles in the past. Have you selected your target install disk by this point? It's been a while since I did an XP install? Was there an opportunity to load custom drivers before this point? You might need to load vistor and other drivers from the viirtio iso? Beyond that, I'd be stumped.
-
try reducing the number of CPU cores to just 1 for the setup process.
-
Hi @Frag-O-Byte Sorry to hear you're having trouble. I know how frustrating it can be when things don't work as expected. However, do persevere, once it's all working, it's amazing. I'm running 3x VMs permanently, two MacOS workstations with multi-device passthrough and one Win10 headless. They have been rock solid (apart from this past couple of weeks when I added some more RAM that turns out is definitely not liked by my system! You're on the right track by attempting to get one VM up and running with stability first. Anyway, there's a few things you can try.... 1. Try installing GPU drivers not in Splashtop mode but booted to the GPU (if you can). Many GPUs will output a low resolution display without drivers. It might be better to do the install with display attached etc. 2. Try re-making your VM as i440 rather than Q35. I have had issues in the past where, in particular, AMD drivers would not even install in one config, but were fine in the other. (you need to completely remake your VM to make this change) 3. If you haven't already, try using SeaBios as the bios. I've found this more stable/reliable 4. Likely not an issue as you're booting windows, but often MacOS VMs get shirty if the number of CPU cores passed through don't match a real Mac. So, they work well with 4 or 8, but not 5, 6 or 7. Also, Windows VMs used to have an issue applying windows updates when more than a single CPU core was defined. It might be worth your while reducing or adjusting the CPU config, just for testing. 5. In your XML, you should update this; <hostdev mode='subsystem' type='pci' managed='yes'> <driver name='vfio'/> <source> <address domain='0x0000' bus='0x42' slot='0x00' function='0x1'/> </source> <address type='pci' domain='0x0000' bus='0x06' slot='0x00' function='0x0'/> </hostdev> to this <hostdev mode='subsystem' type='pci' managed='yes'> <driver name='vfio'/> <source> <address domain='0x0000' bus='0x42' slot='0x00' function='0x1'/> </source> <address type='pci' domain='0x0000' bus='0x05' slot='0x00' function='0x1'/> </hostdev> This is your GPU audio device, and the change is subtle. I've adjusted the bus from '6' to '5' to match the HDMI config, but bumped the function from '0' to '1'. This is a more realistic configuration and, given your issue appears to be with your GPU, might have an impact. You need to make this change in XML mode, and repeat it if you happen to change/re-save your GPU from the form editor. Good luck!
-
Interesting project! you will set up your 4tb drives in the unraid array. You will have one as parity, the other three as data drives. You will have 12 TB of shareable storage, and parity protection for one drive failure. Parity protection != backup. If the data is mission critical, you should also have a backup to a separate system, offsite etc. once set up, you can go about setting up shares on your array. You have a lot of flexibility here. You could have one share per vm, and have each windows instance mount it’s own. Or you could have one or more shares by function (queue, in progress, completed, output) and have each vm mount each of these. you have a lot of options. you also have a fairly steep learning curve ahead to get this set up correctly and, critically for a production environment, in a stable fashion. What motherboard do you have, as a matter of interest?
-
All right. Good luck with it.
-
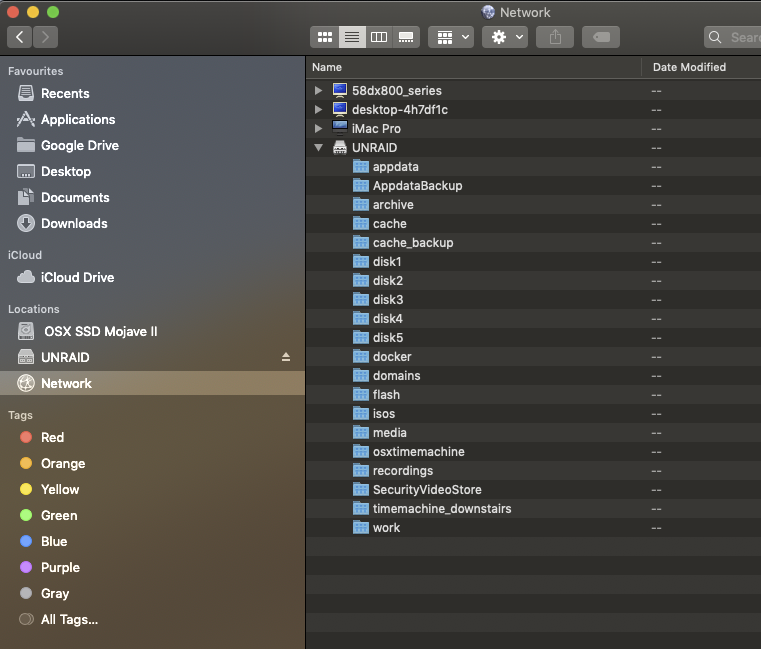
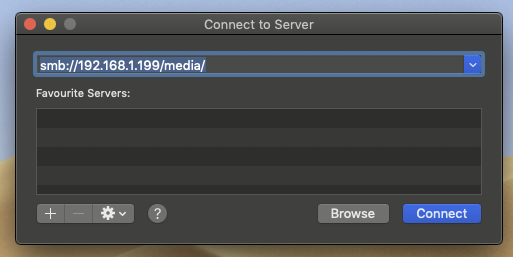
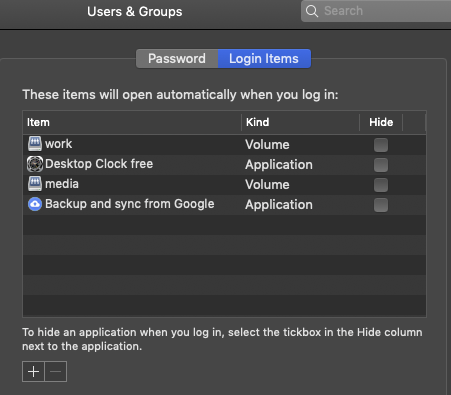
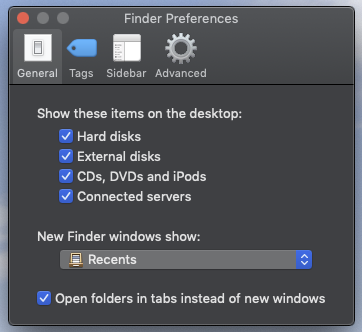
Hi @acosmichippo You don't need to 'passthrough' unRAID shares via XML. like this. You simply mount them from within the OS, like you would any network volume; Either find the share on your network and double-click it. It will appear on your desktop (if you have finder prefs set to display*), or at the very least will be available in finder; If your server is not showing up under network for some reason, you click Go->Connect To Server in the finder menu, and enter your server and share details; Once you have accessed one or more volumes, you can drag them in to login items for your account in users and groups. This will cause those volumes to mount every time you reboot your VM; *Here's how to configure finder preferences to have everything mounted appear on your desktop; If you have trouble, you need to search online for 'MacOS Network Volume Mounting' or some such, not unRaid, as what you're doing is the same as if you have a MAC on a LAN and you want to connect to a separate fileserver. Good luck!
-
I have a Clover boot problem that's just started somewhat out of the blue. For the past few days, when I boot my MacinaboxCataloina VM, I just get a blank screen with a solid cursor (it's been working perfectly for several months); System hangs there and no Clover menu loads. I 3x disks defined, my clover QCow, a System disk and a Scratch disk; <disk type='file' device='disk'> <driver name='qemu' type='qcow2' cache='writeback'/> <source file='/mnt/user/domains/MacinaboxCatalina/Clover.qcow2' index='3'/> <backingStore/> <target dev='hdc' bus='sata'/> <boot order='1'/> <alias name='sata0-0-2'/> <address type='drive' controller='0' bus='0' target='0' unit='2'/> </disk> <disk type='block' device='disk'> <driver name='qemu' type='raw' cache='writeback'/> <source dev='/dev/disk/by-id/ata-Crucial_CT120M500SSD1_14340D03A1FD' index='2'/> <backingStore/> <target dev='hdd' bus='sata'/> <alias name='sata0-0-3'/> <address type='drive' controller='0' bus='0' target='0' unit='3'/> </disk> <disk type='block' device='disk'> <driver name='qemu' type='raw' cache='writeback'/> <source dev='/dev/disk/by-id/ata-TS64GSSD340_20140731B61710144112' index='1'/> <backingStore/> <target dev='hde' bus='sata'/> <alias name='sata0-0-4'/> <address type='drive' controller='0' bus='0' target='0' unit='4'/> </disk> If I remove both system and scratch disk (the second 2x entries), the VM will load up the Clover boot menu, but obviously cannot go any further due to there being no volumes available. Adding back either of the disks will revert to the black screen and no Clover menu. I've maxed out my Google-Fu and found that this screen can appear if the Clover timeout is set to zero. The solution in this case is to hold down any key at boot to force the clover menu to load. This kind of works for me. I can hold down, say, the space bar and after 3 or 4 attempts, it will load up Clover and I can progress. It seems somewhat sensitive to when the key is first pressed though, holding from VM launch in unRAID UI won't cut the mustard, I've got to find some indeterminate time in the first 5/6 seconds. Now, I checked my clover config, and my timeout is set to 5 seconds. So while the problem manifests and the solution (mostly) works as per my research, the cause is not as described. I've tried replacing the clover qcow image file from a different VM, thinking there might be corruption, I had the same problem (the clover qcpw works fine on the other VM). I'm a bit stumped by this. Not a show stopper, but a major PITA. Any insights or suggestions appreciated. Thanks for reading. Please forgive the horrid state of my monitor - I think my wife was 'cleaning' at the weekend 😞
-
I've written up a somewhat more off-the-wall approach to getting discrete USB to 4x VMs using only a single motherboard slot; https://mediaserver8.blogspot.com/2020/04/unraid-discrete-usb-passthrough-to.html#more
-
I do hope you are correct, but a few indicators suggest that the card you linked to is not the ‘old’ 4x discrete controller card: https://www.sonnettech.com/product/legacyproducts/allegroprousb3pcie.html The old one is a usb3-pro-4pm-e, the linked card is usb3-4pm-e (no ‘pro’) The old one is 4x pcie, this is 1x pcie The old one has 4x controller chips ranged vertically beside the rear-facing ports, not visible on the usb3-4pm-e The old card retailed for well north of $100. At half that, the linked card would be a star bargain I look forward to your findings though, and live in hope......
-
Enjoyed that a lot, and now I have yet another podcast/chat channel to while away the hours with as I explore the guys back catalog. @jonpOne point: I have encountered exactly the same issue as Mike described with a multi-drive BTRFS cache setup. A hard reset would corrupt the whole cache and no amount of scrubbing or recovery would bring it back. I've downgraded to a single cache with XFS as it was just too unreliable. Looking forward to multiple pools! Now, I'm off to do some tweeting to try to win one of those case badges.....





