






jonp
Members
-
Joined
-
Last visited
Everything posted by jonp
-
Nice guide! I wouldn't delete that! Could be helpful for others.
-
Ok, I think you may be using the virbr0 bridge which is not yet enabled to accept incoming connections from an external source. To fix this, goto the network settings page of the unRAID webgui and enable a bridge and give it a name. Then, with your VM turned off, go to the VMs page of the web GUI and edit your VM. Turn on advanced view and change the network bridge from virbr0 to the bridge you created. This will give your VM an ip from your router. From there, your rdp should work.
-
When the VM is started, click the "eyeball" looking button from the VMs page. That will open a browser-based VNC connection to your VM.
-
Thanks to Sparkly for bringing this to my attention. I will need to test this container out myself to see what's going on. This is definitely unusual...
-
Actually the proper place to put this now would be in the "Extra Parameters" section (also hidden under "advanced view").
-
I'd be interested in hearing how this plays out.
-
Done
-
Yeah. I guess we should edit the default, eh?
-
I followed these instructions to restore my Docker image file. My question is I see in all the threads they are saying their docker image is /nmt/cache/image.img After following the 2 steps mine comes up as /nmt/cache/docker. There is no .img file name. is this correct and OK ? Is it /mnt not /nmt, right? And if you don't put an extension, linux figures it out anyway. Although I'd probably rather have one there.
-
dmacias' solution is the right one. There are two cursor modes when accessing a VM: absolute and relative. Absolute movement is what you want, as it locks the cursor in the VNC session to your cursor on the local desktop / laptop you're using for management (or tablet for that matter). Relative is for...well...I honestly don't know it's intended use. It seems like there really isn't a situation in which it makes sense to use it, but I'm sure I just haven't come across it yet. Anyway, what dmacias has suggested will put you in absolute mode and solve your "double cursor" problem.
-
Store the docker image under /mnt/cache (no sub folder) and it won't move. As far as a user share, you can create a share and set the use cache to only.
-
Yes for now that is required. This is because crashplan, for whatever reason, hasn't made a web management interface yet.
-
You can do this with the unRAID Crashplan container. You will still need s Windows PC with the crashplan client installed in order to connect to and manage Crashplan, but this isn't the same as running the service on your Windows computer and leveraging mapped drives. See here for instructions on configuring the Windows client. They start about half way down this page: http://support.code42.com/CrashPlan/Latest/Configuring/Using_CrashPlan_On_A_Headless_Computer
-
I had this happen to me once before in testing a long time ago, but could never recreate it thereafter. Can you share a syslog?
-
Give it a shot!! Just put a # in front of that line in your go file and save. This way if it doesn't work, you just remove the # and its back to as it was. You should be able to remove it. Works like a treat, my go file is now very much neater. Cheers jon for walking me through this, made it much easier than the trial and error rigmarole I would have had to go through by myself, much appreciated once again. No problem! Glad we got you squared away and that you validated this method works solid.
-
Give it a shot!! Just put a # in front of that line in your go file and save. This way if it doesn't work, you just remove the # and its back to as it was. You should be able to remove it.
-
Which method did you use? Did you use the "easy way" that I showed you and all just worked?
-
At what step specifically? How large did you specify the image? Can you access the server via telnet or SSH?
-
Lol, we've all been there. So to catch me up, was this all just an issue with the repo or is that unrelated to the issue at hand?
-
I'm not 100% certain but i don't think you should be adding :latest to import an image, it probably can't find it. Sparkly, can you tell me the exact steps that you instructed dikkiedirk to do to create the container to begin with? I need to test.
-
Hmm, the quotes around the volume mappings is probably what's causing the problem, but need to double check. I will get back to you on this later today as this is an important scenario that isn't covered in this guide.
-
Did you do a docker commit and docker push to a repository? If not, then you need to do that. You also need to add the docker through the ui so you create a my-templatefor it. Otherwise you will have to redo all the steps again. Thos steps are all mumbo-jumbo to me. When I click add container I see a my-template entry though. How do I do this committing and pushing? My docker page is attached. are you talking about asset-upnp ? Yes Sparkly. Then you're already using sparkly's repository, as shown in your screenshot. You should be good. Really? Sigh or relief You can always NOT delete your previous image and just create a new one under a new name to test.
-
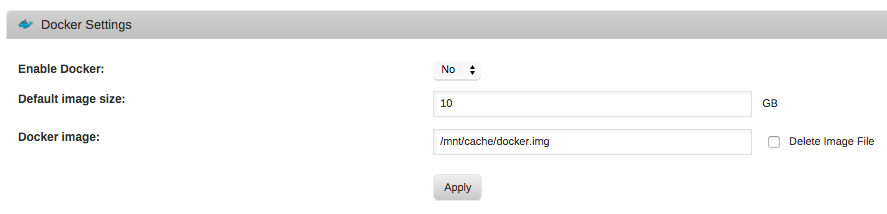
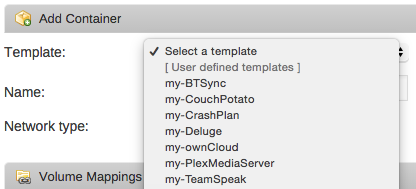
All, Should you wish to recreate your Docker virtual disk image from scratch, but retain your application data to avoid requiring reconfiguration for certain apps, the process is simple. Step 1: Delete your previous image file Login to your system from the unRAID webGui (http://tower or http://tower.local from Mac by default). Navigate to the Docker tab. Stop the Docker service if it is not already. Click the checkbox next to the Docker image that says Delete Image File. Click the Delete button after clicking the checkbox to delete the image (this may take some time depending on the size of your image). After the file has been deleted, you can simply re-enable the Docker service and the image will be created in the same storage location with the same name. Step 2: Redownloading your applications With the Docker service restarted, click Add Container. From the Template drop down, select one of your previously downloaded applications from the top of the list under User defined templates. If none of your volume mappings or port mappings have changed, you can click create immediately to start the download process. Repeat this process for each application you wish to re-download. Toggle the Autostart for each application after it downloads (only if desired). Step 3: There is no step 3... Seriously... What, you expected more steps? Nope! You're done!
-
There are two things to change. The first is the machine type setting and the second is in the qemu command line arguments. I've highlighted the parts that should be changed below: However, if you are going to use the machine type of PC, I would actually first try to eliminate the QEMU arguments altogether and use the method I posted at the beginning of this thread. The machine type of PC still needs to be set as I indicated above, but you can then remove the <qemu:commandline> section of the XML. Instead, before </devices> you would insert this: <hostdev mode='subsystem' type='pci' managed='yes'> <driver name='vfio'/> <source> <address domain='0x0000' bus='0x02' slot='0x00' function='0x0'/> </source> </hostdev> That above code is accurate for your pci device of 2:00.0
-
Yes. Q35 is a more modern machine type, but still heavy in development and not fully supported by libvirt yet. Some folks who have attempted GPU pass through with the PC machine type and failed had success when switching to Q35. That said, it's advised that new users as of the latest beta first try the PC type before attempting Q35. The fate of the Q35 machine type longer term is yet to be determined. Is there any way to switch a machine type from q35 to pc? Yes. With windows vms that are already installed though, this will cause you to need to reactivate your Windows license as this will look like you're changing the entire motherboard. For VMs that utilize pci pass through, GPUs or otherwise, you'll need to adjust your qemu command line section of the xml to not use pcie. Share your xml and I'll reply with the edits to make.


