


Endy
Members
-
Joined
-
Last visited
Everything posted by Endy
-
I've been struggling to get Bitwarden to work. The docker is installed and I can access it by IP, but not by reverse proxy. My ISP blocks port 80, but not port 443 so I am using Cloudflare to force 443. First I followed SpaceInvader's video and was using SWAG. I just get an Error 522 from Cloudflare. (Everything else through SWAG was working just fine.) Then I switched everything over to using HAProxy in Pfsense. Instead of using the custom network, I gave each of the docker containers their own static IP addresses. Again, I can get everything working, but Bitwarden gets Error 522 from Cloudflare. HAProxy stats shows that Bitwarden is up. I've searched and searched, but I can not find an answer. Any ideas?
-
I've had SWAG working for awhile now (For Nextcloud, Emby, etc.), but I am trying to get it to work for Bitwarden, but I am getting a 522 error. Cname has been created and added to SWAG for the LE certificate. Bitwarden container is on the same proxynet as SWAG. I can reach Bitwarden using the localip:port, but not by domain name. I'm using the default bitwarden.subdomain.conf file with a minor change to location /admin. I changed the Bitwarden container name to just bitwarden from bitwardenrs to match the file. # make sure that your dns has a cname set for bitwarden and that your bitwarden container is not using a base url # make sure your bitwarden container is named "bitwarden" # set the environment variable WEBSOCKET_ENABLED=true on your bitwarden container server { listen 443 ssl; listen [::]:443 ssl; server_name bitwarden.*; include /config/nginx/ssl.conf; client_max_body_size 128M; # enable for ldap auth, fill in ldap details in ldap.conf #include /config/nginx/ldap.conf; # enable for Authelia #include /config/nginx/authelia-server.conf; location / { # enable the next two lines for http auth #auth_basic "Restricted"; #auth_basic_user_file /config/nginx/.htpasswd; # enable the next two lines for ldap auth #auth_request /auth; #error_page 401 =200 /ldaplogin; # enable for Authelia #include /config/nginx/authelia-location.conf; include /config/nginx/proxy.conf; resolver 127.0.0.11 valid=30s; set $upstream_app bitwarden; set $upstream_port 80; set $upstream_proto http; proxy_pass $upstream_proto://$upstream_app:$upstream_port; } location /admin { return 404; } location /notifications/hub { include /config/nginx/proxy.conf; resolver 127.0.0.11 valid=30s; set $upstream_app bitwarden; set $upstream_port 3012; set $upstream_proto http; proxy_pass $upstream_proto://$upstream_app:$upstream_port; } location /notifications/hub/negotiate { include /config/nginx/proxy.conf; resolver 127.0.0.11 valid=30s; set $upstream_app bitwarden; set $upstream_port 80; set $upstream_proto http; proxy_pass $upstream_proto://$upstream_app:$upstream_port; } } I'm drawing a blank on what to try next.
-
I have a Dell H310 flashed to IT mode. I just plugged it in and it worked. It was previously used in my old server using forward breakout cables and now it's connected to the backplane in my CSE-846.
-
@mafoster I took a quick look and some of it is out of my realm of experience because I have not tried to set up a vm for Catalina or using an AMD video card. There is one thing I did see. It looks like you were able to stub the video card, but you may want to follow this video: https://www.youtube.com/watch?v=QlTVANDndpM&t=601s Be aware that changes made to the vm in xml are overwritten if you make any other changes using the gui view.
-
I am not even seeing bluetooth listed in the devices (entirely possible it's there and I am just not seeing it) and I don't use it, so I don't think I am gonna be much help there. The problem with the onboard audio is the same as with that 3rd usb device. It may be possible to get it working, but I haven't tried it. More info here:
-
I think there have been a couple. One by jonp and one by Spaceinvader One. <hostdev mode='subsystem' type='pci' managed='yes'> <driver name='vfio'/> <source> <address domain='0x0000' bus='0x0f' slot='0x00' function='0x0'/> </source> <rom file='/mnt/user/General Storage/NVIDIA.GTX1080Ti.11264.170118.rom'/> <address type='pci' domain='0x0000' bus='0x04' slot='0x00' function='0x0'/> </hostdev> I think this is your problem. You left off multifunction='on'. So it should look like this: <hostdev mode='subsystem' type='pci' managed='yes'> <driver name='vfio'/> <source> <address domain='0x0000' bus='0x0f' slot='0x00' function='0x0'/> </source> <rom file='/mnt/user/General Storage/NVIDIA.GTX1080Ti.11264.170118.rom'/> <address type='pci' domain='0x0000' bus='0x04' slot='0x00' function='0x0' multifunction='on'/> </hostdev> And then you may or may not need to change the Bus of the last device because of the number gap from Bus 4 to Bus 6. I'm not sure how that is handled by the vm and it may not be a problem at all. I know that I have seen it somewhere, but I just don't recall where.
-
I didn't really go into actually setting up Windows and installing drivers. Spaceinvader One has a video for that as well. But basically this is where the VirtIO drivers come in and I'd have to watch the video again to tell you what exactly is needed. Yes, the slots were the same. On a Windows 7 vm, the bus was the same but the slots were different, just like in the video. I do not know why that is. But basically, because the graphics and sound are one device and that's the way we want them to be seen by the vm, both the bus and the slot need to match. This is one of those things that I know I have dealt with in the past, but my memory fails me to the specifics. Again, I think this may be in the video for setting up a Windows 10 vm. I think I have also recently read a post about that here on the forum somewhere? I would say with the new vfio-pci.cfg plugin, it is much much easier now to determine which usb port is which and plan accordingly. But it's also good to have options.
-
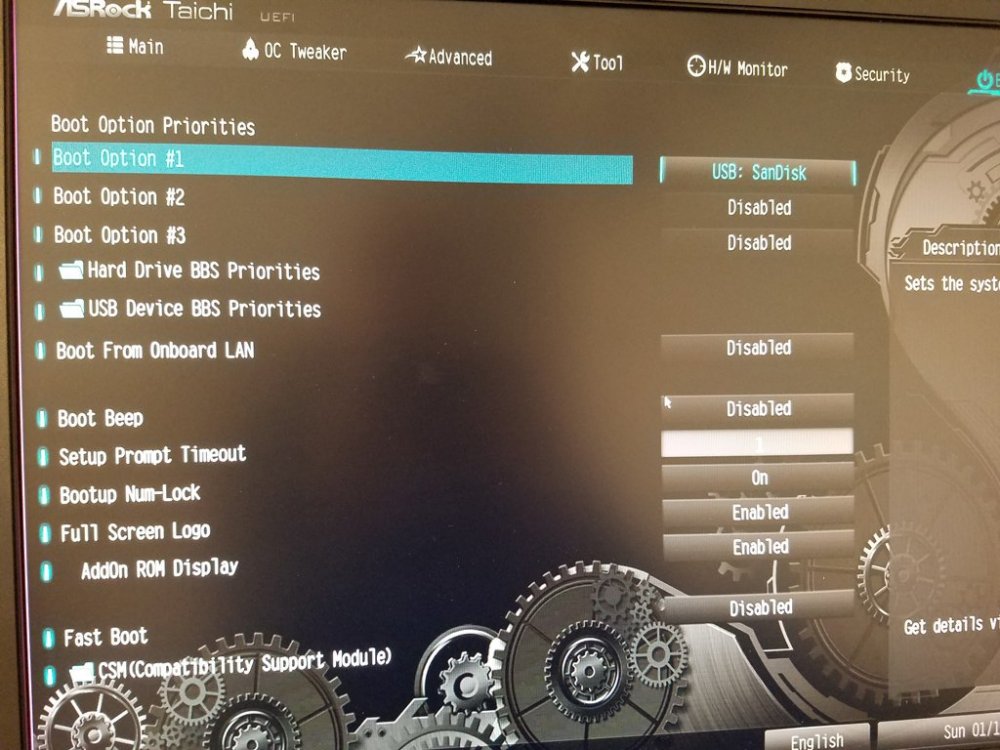
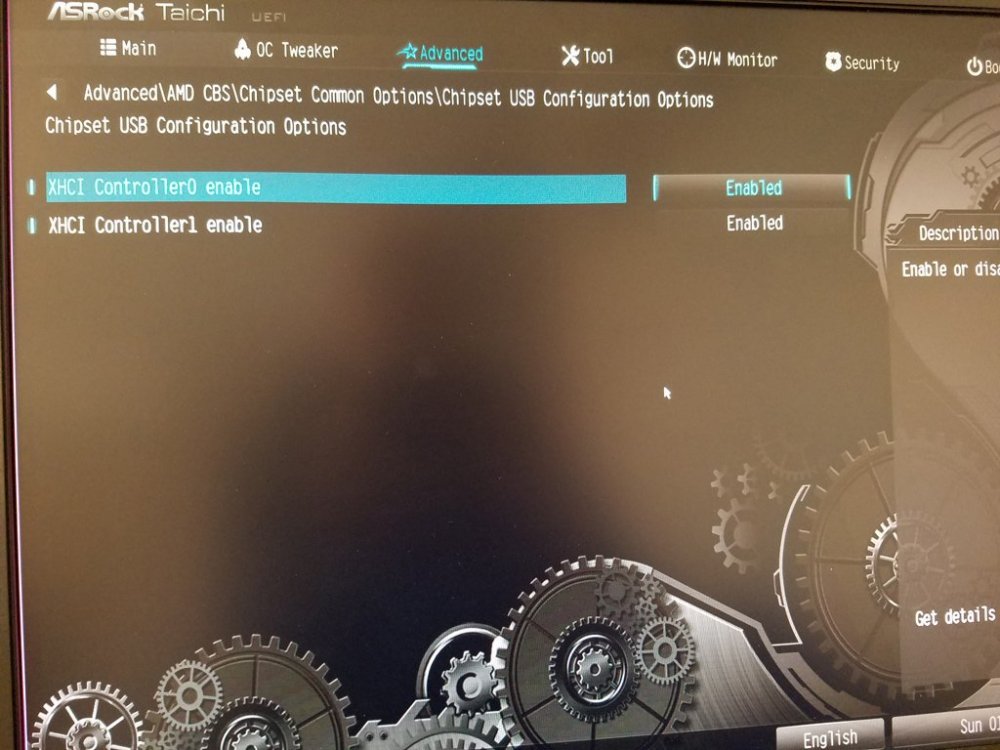
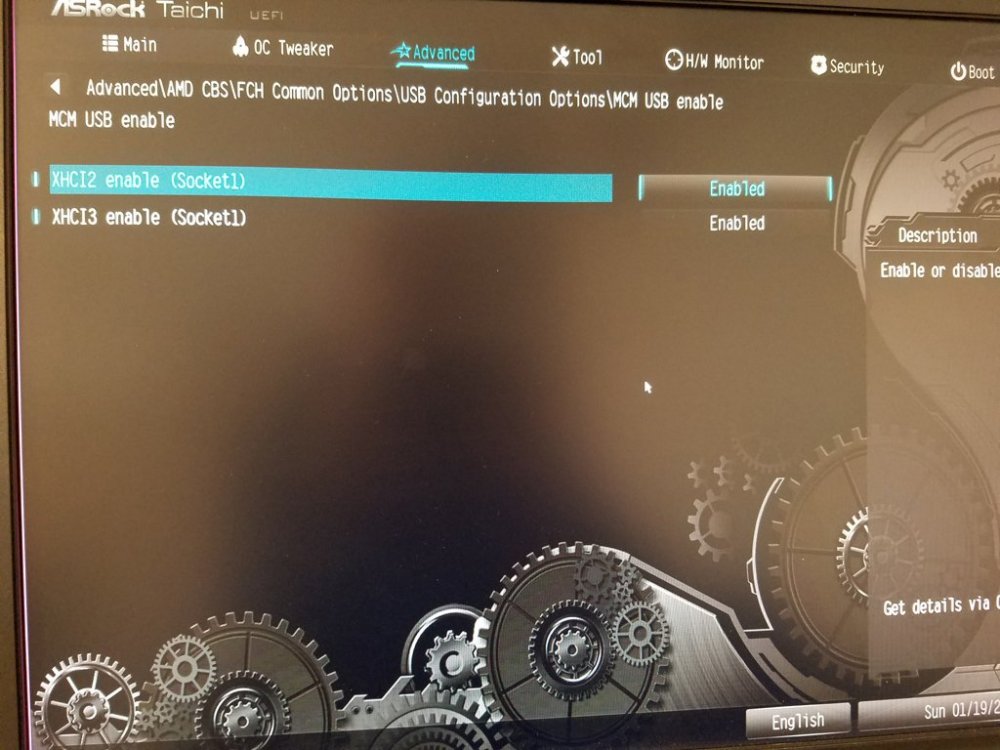
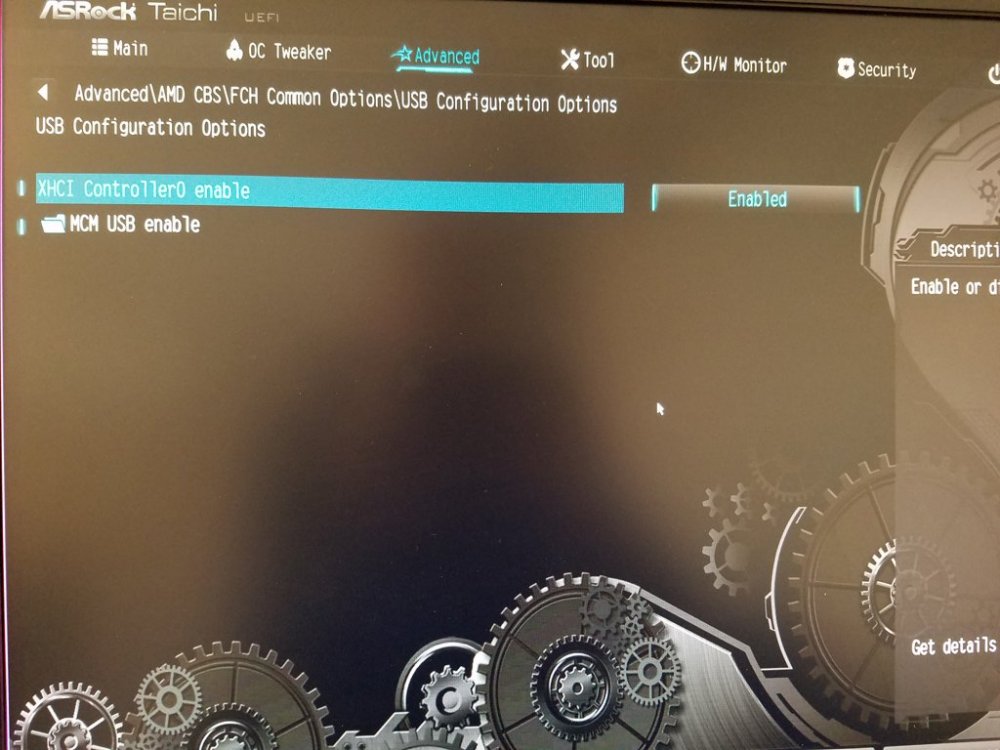
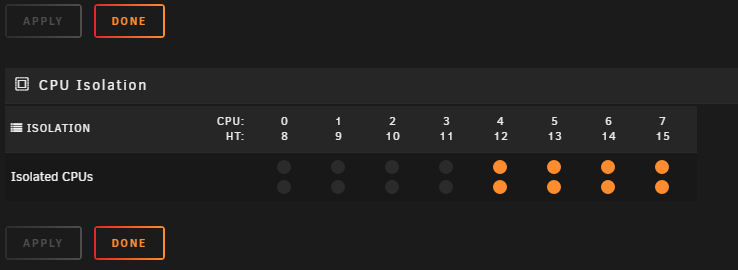
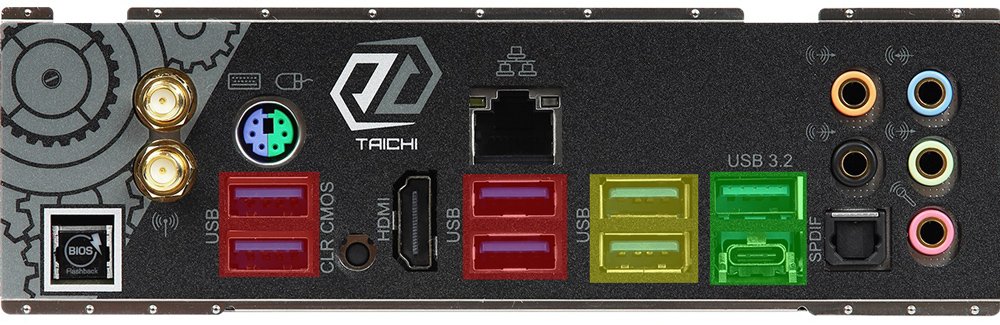
I’ve seen a lot of people asking questions and having problems getting graphics cards and onboard usb controllers passed through on Ryzen X570 systems. I had some issues myself that thanks to a couple of people here on the forums I was able to get resolved. This guide is about setting up a Windows 10 vm using a single graphics card with onboard usb passed through. Because I have managed to get it working, I thought it might be a good idea to write a little guide based on my setup in case it can help some other people. While this was specific to my motherboard and hardware, there are parts that should be applicable for other hardware combinations. Let’s start with my hardware. I’m using a Ryzen 7 3800X with the AsRock X570 Taichi. The graphics card is a Geforce GTX 1070. BIOS First step is to make sure the bios is up to date. At the time I am writing this the newest bios for my motherboard is 2.70 dated 12-9-2019. This is the AGESA version: Update AMD AGESA Combo-AM4 1.0.0.4 Patch B Once updated, boot into the bios once then restore default settings, save, reboot and go back into the bios. To enable IOMMU I found this at level1techs: https://forum.level1techs.com/t/x570-taichi-iommu-groups/145762/2 After some trial and error, I found that in order to passthrough the motherboard usb controllers, I had to change some usb options from Auto to Enabled. Because there is one controller that can’t be passed through, not all of these probably need to be changed, but I’m not sure which ones are for which controllers. Doesn’t seem to be causing me any issues at the moment. Go to Advanced>AMD CBS>FCH Common Options>USB Configuration Options and change XHCI Controller to Enabled. While there go to MCM USB enable and set XHCI2 enable and XHCI3 enable to Enabled. Next is Advanced>AMD CBS>Chipset Common Options>Chipset USB Configuration Options. Change XHCI Controller0 enable and XHCI Controller1 enable to Enabled. The last thing is to set the boot device to the Unraid usb non uefi. (Supposedly booting the usb using uefi can cause problems, but I have not experienced those myself so I can’t comment on that. This is the better safe than sorry approach.) Save settings and reboot. Isolating Cores This next step may be considered optional, but it’s about making sure the vm has the best chance of performing as best it can. In Unraid go to Settings>CPU Pinning. At the bottom you can choose which CPU cores you would like to isolate. Unraid like to use core 0, so I stay away from that one and usually start at the other end. Keep in mind to match the hyperthreads together. In my case I went with cores 4-7 and the matching hyperthreads 12-15. Syslinux Next, in Unraid, go to the Main tab and click on Flash then scroll down to Syslinux Configuration. To edit these click on Menu View and it will change to Raw View. I like to have a separate menu option for hardware passthrough so I just copy everything for ‘label Unraid OS’, delete ‘menu default’ under ‘label Unraid OS’, then paste in the new menu item with the other menu items. Make sure to rename it and that it says ‘menu default’ so that’s the one that Unraid will boot into automatically. The only other change is to add ‘video=efifb:off’ after ‘ initrd=/bzroot’. I admit that I am not sure on the details of why this is necessary, but I believe it has to do with passing through the only graphics card in the system. label Unraid OS HWPT menu default kernel /bzimage append isolcpus=4-7,12-15 initrd=/bzroot video=efifb:off vfio-pci.cfg To stub the graphics card and usb controller I highly recommend using the VFIO-PCI CFG plugin. So far it works really well and makes things much easier. Plus, it gives useful information like if your device can be reset and also which devices are attached to which usb controllers (very useful for figuring out which usb ports belong to which usb controllers). The plugin can be found in Community Apps. Once installed you can find it in the Settings tab. Go there and it’s a good time to double check that the IOMMU groups are looking like they should. Then it’s as easy as selecting which devices you want to stub. Check the graphics card and it’s audio controller. For the onboard usb controllers, it’s tempting to try using the one that is off on in it’s own group. In my case that was this one: Group 33 10:00.3 [RESET] 1022:149c USB controller: Advanced Micro Devices, Inc. [AMD] Matisse USB 3.0 Host Controller However, that one will not work and was one of the problems I ran into, but thanks to an explanation by @Skitals it makes sense why that one would not work. The address is Bus:Device:Function. Notice that the Function for that usb controller is 3. That means that despite being in it’s own IOMMU group, it belongs to another device and therefore, can’t be passed through. Good thing there are two other usb controllers on this motherboard in this group: Group 20 03:08.0 [RESET] 1022:57a4 PCI bridge: Advanced Micro Devices, Inc. [AMD] Device 57a4 0a:00.0 [RESET] 1022:1485 Non-Essential Instrumentation [1300]: Advanced Micro Devices, Inc. [AMD] Starship/Matisse Reserved SPP 0a:00.1 1022:149c USB controller: Advanced Micro Devices, Inc. [AMD] Matisse USB 3.0 Host Controller 0a:00.3 [RESET] 1022:149c USB controller: Advanced Micro Devices, Inc. [AMD] Matisse USB 3.0 Host Controller Select the three Oa:00 devices. Make sure the usb drive that Unraid uses is not in one of the usb ports for those two controllers and then reboot. For reference, here’s a picture that shows the back panel of the X570 Taichi. The ports colored in red belong to the usb controller that’s off in it’s own group. The yellow and green colored ports belong to the two other usb controllers. I have not yet tried to figure out which controllers the mother usb headers belong to. vm xml – graphics card Before creating the vm, we’ll need a dump of the vbios. While it is possible to download from techpowerup, that may or may not be the right vbios for your exact card. I found it was easiest to put Hiren’s BootCD on a usb drive and swap that with the unraid usb drive, boot into that, dump the vbios with GPUZ and save that to the usb drive. Take that usb drive to another computer and edit the vbios with a hex editor to remove the header as seen in this Spaceinvader One video: https://www.youtube.com/watch?v=1IP-h9IKof0&t=438s Put the Unraid usb drive back in the server and start it up. (Now is a good time to make sure it’s still booting into Legacy mode and not uefi as I noticed mine had switched at this point.) Put the vbios file somewhere on your Unraid server so that the vm will be able to access it. (Maybe a vbios folder in with your ISO folders.) Time to create a Windows 10 vm. Go to the VMS tab, Add VM, Windows 10. I’ll just mention the things that I actually change and the rest of the settings will stay at defaults. Logical CPUs - change this to match the the cores you isolated earlier Initial and Max Memory – change these to the desired amount of RAM for the vm, I’m using 8192 MB for both Machine – Q35 OS Install ISO – point this to your Windows 10 install ISO VirtIO Drivers ISO – might want to make sure you have the latest version (virtio-win-0.1.171.iso as of the time I am writing this) They can be found here under Direct downloads virtio-win iso: https://docs.fedoraproject.org/en-US/quick-docs/creating-windows-virtual-machines-using-virtio-drivers/index.html Note: You can set your default virtio iso in Settings>VM Manager. Graphics Card – set to your graphics card Graphics ROM BIOS – point this to the vbios file you got from your graphics card earlier Sound Card – set to the graphics card audio controller Other PCI Devices – I had some issues with this but so far I have found two ways that seem to work. The first is to just select the usb controller that ends in .3. (In the reference photo above, I believe it’s the usb ports colored in yellow.) The other way is to select the 2 usb controllers and the non-essential instrumentation. Then the xml also needs to be edited which will be explained below. Uncheck Start VM after creation Click Create Now the xml of the vm needs to be edited, so go in to edit it and click on Form View to change it to XML View. Now we need to follow this video by Spaceinvader One. There is one thing I noticed that was different for my setup and that was that it was the Bus that was different and not the Slot, so I went ahead and changed the Bus to match. https://www.youtube.com/watch?v=QlTVANDndpM&t=601s Usb Controller If both usb controllers were selected, then the xml needs to be edited in a similar fashion as to the way the graphics card xml was edited. Here’s mine for an example: <hostdev mode='subsystem' type='pci' managed='yes'> <driver name='vfio'/> <source> <address domain='0x0000' bus='0x0a' slot='0x00' function='0x0'/> </source> <address type='pci' domain='0x0000' bus='0x05' slot='0x00' function='0x0' multifunction='on'/> </hostdev> <hostdev mode='subsystem' type='pci' managed='yes'> <driver name='vfio'/> <source> <address domain='0x0000' bus='0x0a' slot='0x00' function='0x1'/> </source> <address type='pci' domain='0x0000' bus='0x05' slot='0x00' function='0x1'/> </hostdev> <hostdev mode='subsystem' type='pci' managed='yes'> <driver name='vfio'/> <source> <address domain='0x0000' bus='0x0a' slot='0x00' function='0x3'/> </source> <address type='pci' domain='0x0000' bus='0x05' slot='0x00' function='0x2'/> </hostdev> I should also mention that I changed the Bus since before it was audio was 5, non-essentials device was 6, usb controller was 7 and usb controller was 8. With the audio moved to Bus 4 with the graphics card, I changed the other 3 devices to the now vacated Bus 5. That should about cover it. If you are trying to use a previous vm and it doesn’t start and no error comes up and it’s just nothing on the screen, try removing the vm and recreating it. (Thanks to @testdasi for that one.)
-
Yes, if you boot into GUI mode, then you need to add it there.
-
That's pretty much exactly what I did. Put my CSE-846 on it's side. However, I had no idea that anyone was making a little cart like that so I made my own that actually looks rather similar. (Except mine is made out of wood.)
-
I could use a little help. I've got the LetsEncrypt docker setup and it's working for things like Emby no problem. No I am trying to setup some websites for testing. I managed to get a wordpress site working with .conf file in the site-confs folder so that it uses a subdomain of my domain. So that much works. I've also tried setting up a phpBB forum on it's own subdomain, but that isn't working. I add the .conf file for nginx that comes with phpBB to the site-confs folder (modified with my domain details) and I just get an error that it can't connect the default site and the wordpress site stop working as well. I've tried searching but have not come across anything that has worked so far. Any one who has successfully gotten phpBB to work with this docker have any ideas?
-
To use your Flash series as an example, you would create a Flash (2014) folder, the year in the folder name is only needed to differentiate from Flash (1990), where your Emby tv library is pointing to. Inside that folder (this part may no longer be needed but I still do it), you would create at least one season folder, ie Season 1. When Auto Organize sees a new file in the watch folder, it will try to parse the name and see if it matches with an existing series in Emby. If it matches, it renames and moves the file to the correct location for that series. There are rare times where this doesn't work because it can't figure out what series a file belongs to (and Auot Organize only works with series, not movies). In that case, click on the folder icon next to the listed file. Here you can specify which series, season, and episode number the file is. If you click on "remember this correction" it will add it to the list of smart matches and should take care of it properly next time.
-
An easy way is probably to use Emby's Auto Organize plugin.
-
Just updated to the latest Unraid RC and I haven't checked the Seagate drive yet, but I was able to run a smart test on the ssd now so it looks like it's working. Thank you both @dlandon and @bonienl for looking into this.
-
Still not working. Neither an SSD connected to the motherboard nor the Seagate backup drive connected by usb.
-
One is an ssd connected to the motherboard, the other is a Seagate Backup Plus connected by usb and shows smart info.
-
Should I be able to run the smart tests on unassigned drives? I click on the start buttons and nothing happens. It does work on my array drives.
-
I was playing with Plex as a dvr and I noticed that I am not able to delete the files it creates using File Explorer on a Windows pc (user share set to secure). It appears to be a permissions issue. PUID is 99 and PGID is 100 and this is the same as the Deluge docker, but I have no problems deleting files created by Deluge. Any ideas?
-
I'm sorry, I was avoiding this thread until I had time to answer ALL of the related posts. My apologies to you. I suppose I would have considered killing it after 5 to 6 hours, definitely if it was still running after 10 hours. I don't have any ideas yet as to what could have gone wrong. Can you tell if there is any I/O to the drive? Syslog may help, post your diagnostics (Need help? Read me first!) We should take this to a separate thread. Thank you, that's all I needed to know. The only indication that there is something going on is the number of writes listed on the Main tab is slowly increasing for that drive and the parity drive. The syslog only shows that the process has started and nothing related since. Because this is in preparation for some significant hardware changes (new motherboard etc.), I am not really that worried about it. I've got 2 other 500GB drives I was planning on removing from the array as well and so as soon as I get my new drive precleared and the data moved off those other 2 drives, I'll just rebuild parity anyways.
-
Well since no one is telling me that this is normal or not and it's been over 50 hours, I guess I'll have to see about killing the script.
-
It's been over 24 hours and it's still running. Does it really take this long for a 500GB hard drive? I could have just pulled the drive and rebuilt parity and it would have been done by now.
-
For the Clear an Unraid array data drive script, just how long should it take? I used it on a 500GB drive and it's been running for around 15 hours now. I used the run in background option and I don't see any sort of progress indicator except that it says "Running".
-
Update CA. Those errors are what the "I'd like to reiterate about manually editing xml files" comment is about in the previous post, (and why the blacklist processing got changed) And yeah, they are harmless, but ultimately caused by a particular way to malform an xml file. I believe it happened once after updating today, but I could be wrong. I can let you know if it happens again.
-
Got another one for you Squid. This does not happen every time I open CA, but I have noticed it about 3 times today. It doesn't seem to be causing any issues that I can see as it goes away as soon I click on anything else.
-
Easy enough to know for sure. Check for updates. Normally yes, but since I seem to be having an issue with plugins right now, I couldn't be sure.


