





clowncracker
Members
-
Joined
-
Last visited
Everything posted by clowncracker
-
Sorry, both of those screenshots are from after the rebuild. WDC_WD140EDGZ was already rebuilt and is selectable from the dropdown as a replacement for disk 3. I was just showing that it recognizes TOSHIBA_HDWE150 as disk 3, even though it was already rebuilt with WDC_WD140EDGZ.
-
What should I do with disk 3? Leave it with no device? For reference, TOSHIBA_HDWE150 was the disk that failed and was replaced with WDC_WD140EDGZ. WDC_WD140EDGZ was rebuilt and then I did a Check Filesystem to correct the issues.
-
Here is the diagnostic file. I turned the system back on it doesn't seem to accept the newly rebuilt drive: clowncracker-diagnostics-20231101-0721.zip


-
I recently had a drive fail during a parity check (was not writing corrections). I then replaced the drive and did a data-rebuild. Afterwards I ran Check Filesystem Status and corrected the newly rebuilt drive. I started another Parity Check (non-correcting), but I've run into 3168 errors in the first 5 minutes. Do I have an issue with my parity or my newly rebuilt drive? Is there a way I can check and validate that my data isn't corrupted? EDIT: I also just noticed that my rebuilt drive isn't showing the correct capacity in Unraid. I replaced a 5tb drive with a 14tb drive, but the drive is still showing as only 5tb in Unraid. I still have access to my old drive and a backup of my usb drive. Should I go back and try and fix my old drive and then replace it? What is best practice here? Would that fix my parity problem as well?

-
I've noticed that the plugin doesn't remove QCOW2 VM files. I have number of backups to keep set to 4, it removes the .fd and .xml files, but it won't remove the QCOW2 file. Any way I can get it to remove the extra backup? Here are the relevant logs: 2023-10-17 04:03:31 information: backup of Home Assistant to /mnt/user/backups/Unraid/VMs/Home Assistant completed. 2023-10-17 04:03:31 information: number of days to keep backups set to indefinitely. 2023-10-17 04:03:31 information: cleaning out backups over 4 in location /mnt/user/backups/Unraid/VMs/Home Assistant/ 2023-10-17 04:03:31 information: removed '/mnt/user/backups/Unraid/VMs/Home Assistant/20230919_0330_Home Assistant.xml' config file. 2023-10-17 04:03:31 information: removed '/mnt/user/backups/Unraid/VMs/Home Assistant/20230919_0330_xxx.fd' nvram file. 2023-10-17 04:03:31 information: did not find any vdisk image files to remove. 2023-10-17 04:03:31 information: did not find any vm log files to remove. 2023-10-17 04:03:31 information: removing local Home Assistant.xml. removed 'Home Assistant.xml'
-
It looks good now:

-
I believe I have resolved the issue. The share somehow got unmounted even though the mount button is disabled. I've manually remounted the share and have set AUTOMOUNT = true on the settings.
-
Refreshing Disks and Configuration didn't work, just PM'd you the file. It's weird, if I use my Windows PC to access the SMB share (totally unrelated to Unraid) it works. So I know it's online.
-
I recently updated to 6.11.5 from 6.9.2, but now my unassigned device doesn't show any space (Used/Free). This has led Unraid to believe there is no space available and has interrupted my backups. What can I do to get the space data back?

-
/usr/local/emhttp/state/usb.ini before restarting server: [001/005] VM = "" virsh = "error: Failed to attach device from /tmp/libvirthotplugusbbybusHome Assistant-001-005.xml error: internal error: unable to execute QEMU command 'chardev-add': Failed to add chardev 'charua-serial001005': Could not open '/dev/serial/by-id/': Is a directory " connectmethod = "Manual" connectmap = "Serial" virsherror = "" connected = "" bus = 001 dev = 005 ID_VENDOR_FROM_DATABASE = "" ID_VENDOR_ID = "10c4" ID_MODEL = "Sonoff_Zigbee_3.0_USB_Dongle_Plus" ID_MODEL_ID = "ea60" USBPort = "1-9" class = "interface" parents = "usb1,0000:00:14.0,pci0000:00" ID_SERIAL = "ITead_Sonoff_Zigbee_3.0_USB_Dongle_Plus_12dc1e85c960ec11bd353d7625bfaa52" isSerial = "1" isSerialPath = "usb-ITead_Sonoff_Zigbee_3.0_USB_Dongle_Plus_12dc1e85c960ec11bd353d7625bfaa52-if00-port0" [001/007] virsherror = "" connected = "" VM = "" virsh = "Device attached successfully " connectmethod = "Manual" connectmap = "Device" bus = 001 dev = 007 ID_VENDOR_FROM_DATABASE = "" ID_VENDOR_ID = "10c4" ID_MODEL = "CP2102N_USB_to_UART_Bridge_Controller" ID_MODEL_ID = "ea60" USBPort = "1-14" class = "interface" parents = "usb1,0000:00:14.0,pci0000:00" ID_SERIAL = "Silicon_Labs_CP2102N_USB_to_UART_Bridge_Controller_ee3d070e8d94eb1188e236703d98b6d1" isSerial = "1" isSerialPath = "usb-Silicon_Labs_CP2102N_USB_to_UART_Bridge_Controller_ee3d070e8d94eb1188e236703d98b6d1-if00-port0" [001/002] virsherror = "" connected = "" VM = "" virsh = "Device attached successfully " connectmethod = "Manual" connectmap = "Device" bus = 001 dev = 002 ID_VENDOR_FROM_DATABASE = "Cambridge Silicon Radio, Ltd" ID_VENDOR_ID = "0a12" ID_MODEL = "CSR8510_A10" ID_MODEL_ID = 0001 USBPort = "1-1" class = "interface" parents = "usb1,0000:00:14.0,pci0000:00" ID_SERIAL = "0a12_CSR8510_A10" isSerial = "" isSerialPath = "" [001/001] connected = "" bus = 001 dev = 001 ID_VENDOR_FROM_DATABASE = "Ports=16 Speed=480 Power=0mA " ID_VENDOR_ID = "1d6b" ID_MODEL = "" ID_MODEL_ID = 0002 USBPort = "1-0" class = "roothub" parents = "0000:00:14.0,pci0000:00" ID_SERIAL = "Linux_5.19.17-Unraid_xhci-hcd_xHCI_Host_Controller_0000:00:14.0" isSerial = "" isSerialPath = "" [001/006] connected = "" bus = 001 dev = 006 ID_VENDOR_FROM_DATABASE = "" ID_VENDOR_ID = "046d" ID_MODEL = "USB_Receiver" ID_MODEL_ID = "c52b" USBPort = "1-13" class = "interface" parents = "usb1,0000:00:14.0,pci0000:00" ID_SERIAL = "Logitech_USB_Receiver" isSerial = "" isSerialPath = "" [001/003] connected = "" bus = 001 dev = 003 ID_VENDOR_FROM_DATABASE = "" ID_VENDOR_ID = "051d" ID_MODEL = "Back-UPS_RS1000G_FW:868.L5_-P.D_USB_FW:L5_-P" ID_MODEL_ID = 0002 USBPort = "1-2" class = "interface" parents = "usb1,0000:00:14.0,pci0000:00" ID_SERIAL = "American_Power_Conversion_Back-UPS_RS1000G_FW:868.L5_-P.D_USB_FW:L5_-P_3B1802X19471" isSerial = "" isSerialPath = "" [001/004] connected = "" bus = 001 dev = 004 ID_VENDOR_FROM_DATABASE = "Ports=4 Speed=480 Power=100mA " ID_VENDOR_ID = 05e3 ID_MODEL = "" ID_MODEL_ID = 0610 USBPort = "1-6" class = "hub" parents = "usb1,0000:00:14.0,pci0000:00" ID_SERIAL = "05e3_USB2.0_Hub" isSerial = "" isSerialPath = "" [002/003] connected = "" bus = 002 dev = 003 ID_VENDOR_FROM_DATABASE = "" ID_VENDOR_ID = "18d1" ID_MODEL = 9302 ID_MODEL_ID = 9302 USBPort = "2-3" class = "interface" parents = "usb2,0000:00:14.0,pci0000:00" ID_SERIAL = "18d1_9302" isSerial = "" I rebooted the server the and USB devices connected correctly. Go figure sometimes all you need is a reboot. Thanks for the help! EDIT: I also got the updated serial ID in HA working correctly. So all of my problems are solved.
-
The USB devices were disconnected from the VM when I ran that (the VM was off). Reran it with the VM on (when VM Attach was still showing) and after manually attaching the USB devices in manager, both led to the same output. Where is the output of that script? It didn't display anything after running.
-
[001/005] VM = "" virsh = "error: Failed to attach device from /tmp/libvirthotplugusbbybusHome Assistant-001-005.xml error: internal error: unable to execute QEMU command 'chardev-add': Failed to add chardev 'charua-serial001005': Could not open '/dev/serial/by-id/': Is a directory " connectmethod = "Manual" connectmap = "Serial" virsherror = "" connected = "" [001/007] virsherror = "" connected = "" VM = "" virsh = "Device attached successfully " connectmethod = "Manual" connectmap = "Device" [001/002] virsherror = "" connected = "" VM = "" virsh = "Device attached successfully " connectmethod = "Manual"
-
Just updated my post, having an entirely different issue now.
-
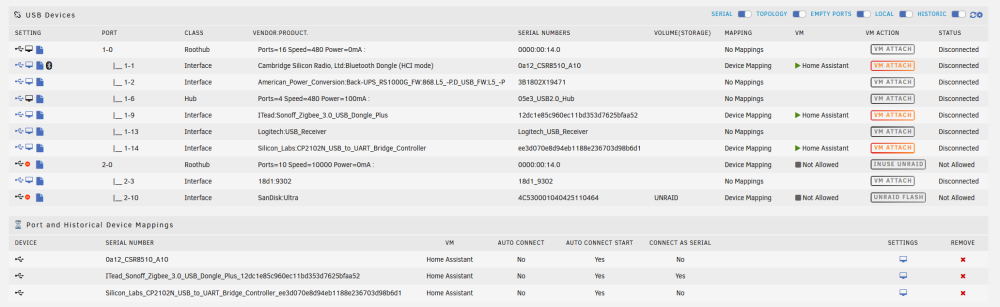
I've run into an entirely new issue. Now the USB devices will not even attach when the VM starts. It just shows VM Attach. I've tried uninstalling and reinstalling the plugin. I just recently upgraded to version 6.11.5. Here are my logs/outputs: ls /etc/libvirt/hooks/ qemu* qemu.d/ ls /etc/libvirt/hooks/qemu.d/ USB_Manager* Unraid Logs: Aug 27 08:40:13 clowncracker-NAS usb_manager: Info: virsh called Home Assistant 001 005 error: Failed to attach device from /tmp/libvirthotplugusbbybusHome Assistant-001-005.xml error: internal error: unable to execute QEMU command 'chardev-add': Failed to add chardev 'charua-serial001005': Could not open '/dev/serial/by-id/': Is a directory Aug 27 08:40:16 clowncracker-NAS usb_manager: Info: virsh called Home Assistant 001 002 Device attached successfully Aug 27 08:40:17 clowncracker-NAS kernel: TCP: request_sock_TCP: Possible SYN flooding on port 31242. Sending cookies. Check SNMP counters. Aug 27 08:44:04 clowncracker-NAS kernel: br0: port 2(vnet4) entered disabled state Aug 27 08:44:04 clowncracker-NAS kernel: device vnet4 left promiscuous mode Aug 27 08:44:04 clowncracker-NAS kernel: br0: port 2(vnet4) entered disabled state Aug 27 08:44:04 clowncracker-NAS kernel: usb 1-1: reset full-speed USB device number 2 using xhci_hcd Aug 27 08:44:04 clowncracker-NAS kernel: usb 1-14: reset full-speed USB device number 7 using xhci_hcd Aug 27 08:44:05 clowncracker-NAS kernel: cp210x 1-14:1.0: cp210x converter detected Aug 27 08:44:05 clowncracker-NAS kernel: usb 1-14: cp210x converter now attached to ttyUSB1 Aug 27 08:44:05 clowncracker-NAS usb_manager: Info: rc.usb_manager tty_add Silicon_Labs_CP2102N_USB_to_UART_Bridge_Controller_ee3d070e8d94eb1188e236703d98b6d1 /dev/ttyUSB1 Aug 27 08:44:05 clowncracker-NAS usb_manager: Info: rc.usb_manager Processing tty attach Silicon_Labs_CP2102N_USB_to_UART_Bridge_Controller_ee3d070e8d94eb1188e236703d98b6d1 /dev/ttyUSB1 Aug 27 08:44:05 clowncracker-NAS usb_manager: Info: rc.usb_manager vm_action Home Assistant stopped end - Aug 27 08:44:05 clowncracker-NAS usb_manager: Info: rc.usb_manager VM Shutdown 001/005 vm: Home Assistant Aug 27 08:44:05 clowncracker-NAS usb_manager: Info: rc.usb_manager VM Shutdown 001/007 vm: Home Assistant Aug 27 08:44:05 clowncracker-NAS usb_manager: Info: rc.usb_manager VM Shutdown 001/002 vm: Home Assistant Aug 27 08:44:05 clowncracker-NAS usb_manager: Info: rc.usb_manager Autoconnect No Mapping found Silicon_Labs_CP2102N_USB_to_UART_Bridge_Controller_ee3d070e8d94eb1188e236703d98b6d1 /dev/ttyUSB1 port Aug 27 08:44:32 clowncracker-NAS kernel: br0: port 2(vnet5) entered blocking state Aug 27 08:44:32 clowncracker-NAS kernel: br0: port 2(vnet5) entered disabled state Aug 27 08:44:32 clowncracker-NAS kernel: device vnet5 entered promiscuous mode Aug 27 08:44:32 clowncracker-NAS kernel: br0: port 2(vnet5) entered blocking state Aug 27 08:44:32 clowncracker-NAS kernel: br0: port 2(vnet5) entered forwarding state Aug 27 08:44:32 clowncracker-NAS usb_manager: Info: rc.usb_manager vm_action Home Assistant prepare begin - If I hit VM Attach manually, the device configured to Serial has a Virsh error: Unraid Logs: Aug 27 08:48:55 clowncracker-NAS kernel: cp210x ttyUSB1: cp210x converter now disconnected from ttyUSB1 Aug 27 08:48:55 clowncracker-NAS kernel: cp210x 1-14:1.0: device disconnected Aug 27 08:48:55 clowncracker-NAS usb_manager: Info: virsh called Home Assistant 001 007 Device attached successfully Aug 27 08:48:56 clowncracker-NAS usb_manager: Info: connect as serial guest port is:04 Aug 27 08:48:56 clowncracker-NAS usb_manager: Info: virsh called Home Assistant 001 005 error: Failed to attach device from /tmp/libvirthotplugusbbybusHome Assistant-001-005.xml error: internal error: unable to execute QEMU command 'chardev-add': Failed to add chardev 'charua-serial001005': Could not open '/dev/serial/by-id/': Is a directory Aug 27 08:48:58 clowncracker-NAS usb_manager: Info: virsh called Home Assistant 001 002 Device attached successfully ls /dev/serial/by-id usb-ITead_Sonoff_Zigbee_3.0_USB_Dongle_Plus_xxx-if00-port0@
-
I'm having an issue where Connect as Serial Guest Port Number won't change from 04. I need to change it to 00, since that is what my HA VM is expecting. I recently ran into this issue after upgrading Unraid. I can get it to work if I hotplug the USB devices in the correct order, but ideally I would like to set it and forget it like I had it before. It works when the device is classified as ttyUSB0. Here is the hardware info when it works: DEVLINKS: >- /dev/serial/by-id/usb-ITead_Sonoff_Zigbee_3.0_USB_Dongle_Plus_xxx-if00-port0 /dev/serial/by-path/pci-0000:00:07.0-usb-0:1:1.0-port0 DEVNAME: /dev/ttyUSB0 DEVPATH: /devices/pci0000:00/0000:00:07.0/usb2/2-1/2-1:1.0/ttyUSB0/tty/ttyUSB0 ID_BUS: usb ID_MODEL: Sonoff_Zigbee_3.0_USB_Dongle_Plus ID_MODEL_ENC: Sonoff\x20Zigbee\x203.0\x20USB\x20Dongle\x20Plus ID_MODEL_ID: ea60 ID_PATH: pci-0000:00:07.0-usb-0:1:1.0 ID_PATH_TAG: pci-0000_00_07_0-usb-0_1_1_0 ID_REVISION: '0100' ID_SERIAL: ITead_Sonoff_Zigbee_3.0_USB_Dongle_Plus_xxx ID_SERIAL_SHORT: xxx ID_TYPE: generic ID_USB_DRIVER: cp210x ID_USB_INTERFACES: ':ff0000:' ID_USB_INTERFACE_NUM: '00' ID_USB_MODEL: Sonoff_Zigbee_3.0_USB_Dongle_Plus ID_USB_MODEL_ENC: Sonoff\x20Zigbee\x203.0\x20USB\x20Dongle\x20Plus ID_USB_MODEL_ID: ea60 ID_USB_REVISION: '0100' ID_USB_SERIAL: ITead_Sonoff_Zigbee_3.0_USB_Dongle_Plus_xxx ID_USB_SERIAL_SHORT: xxx ID_USB_TYPE: generic ID_USB_VENDOR: ITead ID_USB_VENDOR_ENC: ITead ID_USB_VENDOR_ID: 10c4 ID_VENDOR: ITead ID_VENDOR_ENC: ITead ID_VENDOR_ID: 10c4 MAJOR: '188' MINOR: '0' SUBSYSTEM: tty TAGS: ':systemd:' USEC_INITIALIZED: '1830641' (replaced actual serial with xxx).
-
How would I go about checksums? Even if I don't have them now, how can I implement them moving forward? I wish I knew if the errors were coming from the parity drives or the data drives.
-
Parity check finished with 261 parity errors and UDMA CRC error count on the parity drive went from 0 to 3. Should I just write corrections or is there something I can do to check the integrity of the files?
-
UPDATE: UDMA CRC error count on the Parity drive has gone from 0 to 3. Not sure if that indicates if I should or should not write corrections.
-
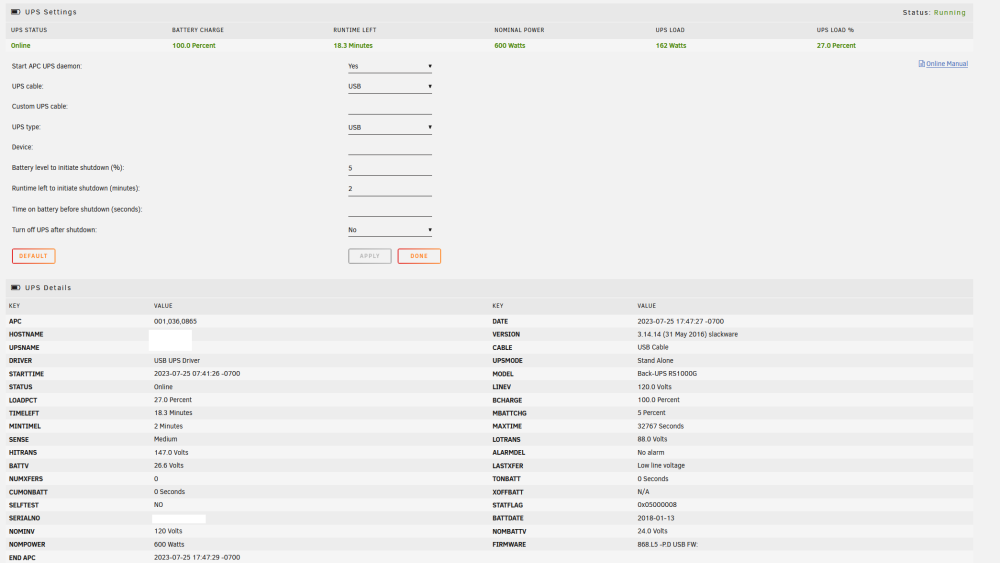
I'm looking at the logs and I don't see any mention of a shutdown. Is there a reason why the server wouldn't have shutdown cleanly? Here is the relevant log snippet: Jul 25 06:12:45 clowncracker-NAS apcupsd[25426]: Power failure. Jul 25 06:12:48 clowncracker-NAS apcupsd[25426]: Power is back. UPS running on mains. Jul 25 06:12:49 clowncracker-NAS apcupsd[25426]: Power failure. Jul 25 06:12:55 clowncracker-NAS apcupsd[25426]: Running on UPS batteries. The next log files are at 7:42:37, so I don't think it shut down cleanly. Here are my UPS settings, any reason why it didn't shut down cleanly?
-
I swapped out both parity drives at the beginning of the month, but I ran parity checks then and didn't run into any issues. I did have a power outage last night, but the shutdown should have been clean (server is attached to a UPS).
-
I just started a parity check and there are already 261 errors found. I do not have the parity check set to automatically fix errors. Attached are my diagnostic files. I ready that the Dynamix File Integrity plugin might help find the issue, but I thought the logs might provide information while the parity check is still running.
-
Did you ever find out how to get the Coral TPU working?
-
I want to reiterate that I'm still having this issue. This is the only docker where this is a problem. I noticed that I'm still on version 2023.4.0, so updates aren't coming through. Something has broken to the link to vaultwarden/server.
-
I mentioned this previously, but I'm on unraid version 6.9.2 and I still have the not available issue. The problem stated here isn't on the older version of unraid and cannot be solved with this solution.
-
The issue ended up being the motherboard.




