





yogy
Members
-
Joined
-
Last visited
Everything posted by yogy
-
The picture above says he did. Hmm, I'm out of options. Maybe you should change something in the config file.
-
Maybe a stupid question, but you did test if SMTP Email Settings is actualy working properly?
-
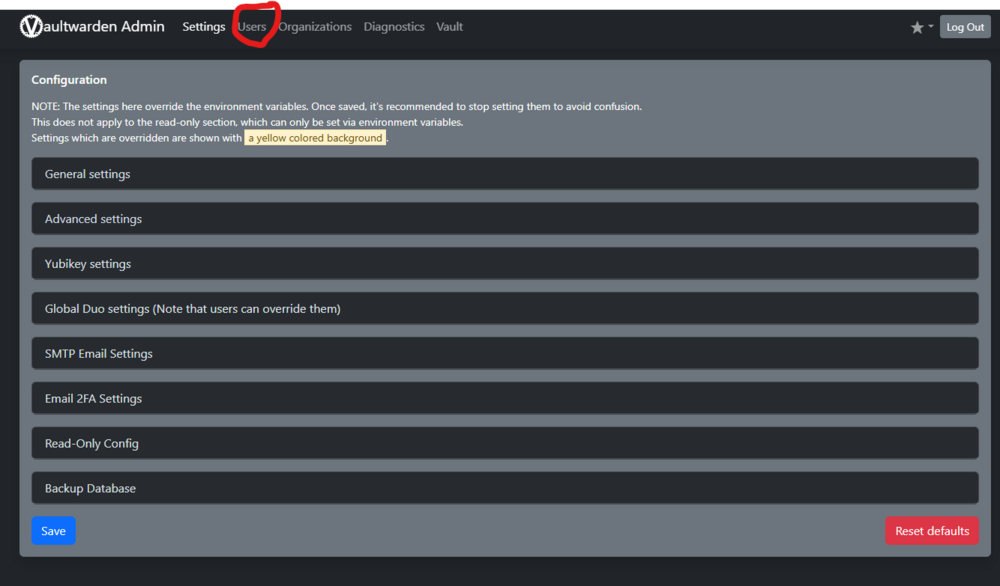
I can only answer question 2 and 3 since I don't use Swag and I'm not familiar with it. Question 2: you probably didn't configure SMTP Email Settings in the Admin console. Do that and email can be sent to user, the same goes for invitations (but you have to enable that option first >> Allow invitations. Question 3: You just create additional users in the Admin console (see attached picture) with whoom you would like to share passwords within organisation. To be able to invite new users you have to do the same as per question 2, configure SMTP Email Settings and enable Allow invitations.
-
That worked, but cannot do it via GUI (Admin Snapshots) 😕
-
What could be wrong with my output. I'm trying to clone a snapshot from one zfs pool to another. root@Tank:~# zfs send cache/appdata@2024-11-01-111541 | zfs receive -F cache_backup/snapshots_appdata cannot receive new filesystem stream: pool must be upgraded to receive this stream. warning: cannot send 'cache/appdata@2024-11-01-111541': signal received root@Tank:~#
-
Maybe this can help
-
If all you did is generate the hash from the same passphrase, then no.
-
Is your token in plane text or hashed. If it's in plane text just replace with another, restart the container and it should work with a new one.
-
And today the issue is suddenly gone. Strange.
-
I have an exact same issue. I'm on 6.12.4. No update of the app available.
-
Hmm, I'm out of options here. I would recommend to check also your DDNS settings. Try to install some other app (something simple like qbittorrent) with access to the internet, setup another CNAME in Cloudflare, add another host to NPM and test if the resault is the same as for vaultwarden (warden subdomain). If it's the same I would start with DDNS settings and also check the certificate.
-
What port is in docker settings (see picture bellow). Do you use Let's Encrypt for your certificate? If it's the same as mine, change https to http in NginxProxyManager and save.

-
Port 4743 is a HTTP port. Try to change it under Scheme in NPM and report back.
-
I'm not sure if I understand your question correctly, but in unRAID, updating docker containers is very simple. If you go to DOCKER you will get a notification that a docker container is available for update and then just click update and you are done.
-
It doesn't save as of recently or ... Did you update the app recently? Is "Ask to add login" checked under Settings? Just guessing ....
-
Here is a very quick guide how to use Argon2 hash for Vaultwarden. You can use different ways to enable access to admin page here but like I said, this is a very quick solution: Go to https://argon2.online/ Enter a passphrase in Plain Text Input, click once on the Salt cogwheel and leave everything as default and click GENERATE HASH Go to Vaultwarden Admin's Page >> General Settings and replace your current admin token in plain text with the generated hash value ($argon2i$v=19$m=16,t=2,p=1$YnJvYm1vSD...........) Save and restart the vaultwarden container To login to admin's page you must use your plain text value, not the hash I hope you will find this very quick tutorial useful.
-
You can take a look for admin key in /mnt/user/appdata/vaultwarden/config.json. Use cat command in front of the path and you will see your admin token in plain text. Just FYI. Don't use admin page over the internet. Block it. It should only be accessible via your LAN. If you are using your own domain via Cloudflare, just take a look at my guide how to create Cloudflare tunnel (Zero Trust) for reverse proxy and how to secure your admin page via internet.
-
My upgrade from 6.12.2 went through just fine. I have Nvidia Geforce 1660 super and 7 docker containers, no vm's. System seems to be working OK.
-
Does it happen automaticaly or you need to unistall the previous one and install a new one from SimonF
-
Strange. Can you try Google Authenticator, just to try if it works with this one.
-
Sorry, I'm not familiar with Swag. The above instructions are for Nginx Proxy Manager (NPM). If you are usin Cloudflare you can ditch self hosted reverse proxy and use this method. Hmm, as for TOTP .... please explain your method for enabling it and what app are you using?
-
What reverse proxy are you using?
-
Delete cookies and cache for this domain in your browser or try a different browser.
-
Yes this is the correct repo
-
I recently switched from Reverse Proxy Docker Container (NginxProxyManager - NPM) to Cloudflare's Zero Trust platform. You can find many tutorials online (YT) on how to do that, this is not the topic here. Please find bellow a short guide on HOW TO PROTECT VAULTWARDEN ADMIN'S PAGE (access via internet) WHEN USING CLOUDFLARE'S ZERO TRUST TUNNELS If you enabled admin's page in Vaulwarden, you should (or already) know it shouldn't be exposed to the internet (only via local network). If you are still using NPM >> Edit (Vaulwarden Proxy Host) >> Advancend, and put the following line under Custom Nginx Configuration location /admin { return 404; } If you are using Cloudflare's Zero Trust platform (tunnels) instead, you can secure the Vaultwarden's admin page from being accessed over the internet with the following instructions: This will be a very simple policy rule, you can later tweak your settings as you choose and try it out 1. In the Zero Trust Overview (https://one.dash.cloudflare.com/) under Access >> chose Applications 2. Click on Add an application 3. Select Self-hosted 4. Tab - Configure App - Enter Application name (example: Vaulwarden_admin_access), subdomain (your actual subdomain for vaultwarden), domain (your root domain) and Path (enter: admin) and click Next 6. Tab - Add Policies - Enter Policy name >> Action (Allow) 7. Under Configure rules >> Include >> Selector choose Emails >> under Value enter the email address you own (have access to, but only you. You can put as many email addresses you want) and click Next. 8. Tab - Setup - no need to configure anything, just click Add Aplication Now go to your admin's page over the internet (https://sub.domain.com/admin) and you will be presented with Cloudflare's Zero Trust (access) page where you first need to enter one of the authorised emails in step 7. When you receive a code to your mailbox, enter the code in the next page and now you have access to admin's page over the internet. You can add additional security layers in step 7 (Include >> Add Include or Add require or Add exlude I hope you will find this short tutorial useful.



