Nodiaque
Members
-
Joined
-
Last visited
Everything posted by Nodiaque
-
Ok, so I made a new template. Windrose-Linux. This docker is totally different then the current Windrose one. Windrose didn't release the Linux dedicated server into steamcmd. The only way to get the file are to extract them from their own docker. We could use their docker directly, but that docker doesn't run as 99:100 user which break unraid. So what I did is I extracted the docker, copied the server files, checked the dockerfile from the original docker and made it unraid compatible. Because of that, this docker doesn't auto-update with SteamCMD (it doesn't use SteamCMD at all). I will need to extract each time and create a new docker version, thus update won't be as fast for sure. Since I do not own the game, I haven't tested. According to log, everything seems to run fine. Migration should be as easy as starting the game, stopping, copying the config file and the save folder. DO NOT MAP DIRECTLY TO THE OTHER CONTAINER. You will have to create the config file (can be an empty file) before starting, else it will create a folder and crash. This docker contain all of the game, so it's bigger (~5gb) and you only have the savegame and the config file in appdata.
-
OK so I've checked that. What they release is a dedicated docker image built by them on repo windroseserver/windroseserver:latest. We could use that, problem is we cannot change the user. They run everything under the user ue_user and everything is under /home/ue_user/app. Because of that, if we set --user=99:100, it break. They didn't release anything to create our own linux server beside that. I'm trying to understand how the docker one they release work and see if it's simply running wine like we are doing. edit: Ok so far, I've manage to understand what they did. The problem is the source file aren't on steam. I could extract them directly from their own docker and have it run, problem will be each update will require a manual job (new image) which will mean having a maintainer. I'll continue investigating.
-
Easy fix? Restore your earlier working backup. Immich also do daily backup (unless you didn't enable backup) so you can simply restore immich backup.
-
Now what you can do is update to latest version of postgresql. The latest is ghcr.io/immich-app/postgres:18-vectorchord0.5.3-pgvector0.8.1. The version you currently have is a stepping stone because you had an older version. Do make a backup before. Easy way is stop the database, copy appdata and do the job. If something happen, just stop, change container info, copy back the backup and start. Also, check database log. If you are user other then postgres in your database, it could fail the update (some job after the database is ran using postgres user. I already opened a ticket on that). Easy way is simply to open a backup file using the FAQ procedure and run a restore database on a DB container (with updated configuration in immich container to for the database user). You can try without changing the username and see what happen. The database log will show you. Good thing with that is it's easy to restore.
-
For that exact info, refer to the upgrade guide posted in the postgres container log
-
Start by updating your Sql to latest version following official guide posted in the startup log of the postgres container. Backup between each step. Once you are done, update the immich container and that's it. You cannot just replace to whatever container you want for postgres, you have chance to corrupt or be in a weirs state. Follow the official guide. Edit: I did wrote a typo. I see I said trigger the update in immich when I was talking about the backup. Sorry for that, I mean instead of doing an unsupported dumb, trigger the immich built-in backup instead. I've fixed my typo
-
Just saw your edit. What you said about PostgreSQL look like what you must do. For the dumb, I would just trigger the backup in immich itself instead so you have a working per immich backup. Just change the next run time to 2 minutes later and it will run. Once you have move to that PostgreSQL, start immich with same version, do not update. Backup again. You can then move to latest PostgreSQL after (the one you linked isn't latest but it's a step you need to do). It is also required to do those step if you want to move to official. Also, if in your PostgreSQL container, you used a custom username like immich instead of postgres, I suggest you do the username migration I put in the FAQ of my post. Immich maintener doesn't support custom username. It's very easy to do. And required if you want to go official.
-
Official or not is your call. I prefer official, but it's 4 docker to manager. This docker is aio with machine learning, still require redis/vaulkey and PostgreSQL docker. But it's not supported by immich. As for migrating, I'm not aware of special migration path, but you should maybe look at the FAQ from immich website and see if there's something about moving from 1 to 3. Maybe you need to go at 2 first. There is 2 guide I'm talking about. The first one I talk about is from immich not rorar. It's written in the log of immich PostgreSQL container when you start it. It talk about vector unsupported and shoe you how to migrate to latest version of official immich PostgreSQL container. I don't have the link to that, it's written in the log. My guide is how to migrate from this support container to the official container. It is the last link you put. Just before that guide, I made another post on how to move to latest immich PostgreSQL but I highly suggest following the upgrade link in the immich PostgreSQL startup log.
-
Yes, read previous post, I posted a guide to migrate to the official docker but there's also in it a guide to migrate database that you can follow and continue using this container As for the postgresql migrationg, simply follow what's in the log file of the container (restart it and look at the beginning, there's a link to a guide).
-
I made a guide on previous post that can help you migrate to postgres user instead of immich.
-
Eventually I'm planning to check that. I'm away for 2 weeks and I hope my health get better so I can get back on stuff like this.
-
I see you seems to have a user immich for the database? Check your log, postgres was giving me error when I migrate to the latest version. At immich, they recommended to migrate to postgres user
-
I myself knows it but I hate it. I prefer having container that do stuff the unraid way.
-
I had yourbpriblem. What happened is your Bd was upgraded but failed. Restore from a working backup of the original version before all of this. Then start the upgrade step. For the exact container, follow the guide the log will output. Because you used postgres 18 at one time, it updated and you are now in a stuck place. I'm away so I didn't read everything, sorry. But the beginning of your post show me exactly what happened to me. I did like you did, used a too high version and it failed the upgrade. Restore old postgres 16 with vector, boot up immich 2.7.5 with it. When it's working, start the upgrade from postgres 16 with same version of pgvector (the guide will show you). Once this is done, then you can migrate to postgres 18 and upgrade vector Edit: I see you might have found a way to fix the database. If it's not working, you can try what I wrote. That's how I fixed mine after doing the same mistake.
-
You are going to high version that's why. Check on my post, I said to go at postgres 16 but vectorchord 0.3. ghcr.io/immich-app/postgres:16-vectorchord0.3.0-pgvector0.3.0 Im unsure if this is the right tag, if it says not found, go at the repo url and find the tag nearest to that version. Once this is done, then you go at latest version. You won't be able to restore a backup with latest database version even with my guide. It will fail at vector. You need to migrate the database. Restore database at your old version and check the log, there will be a link for the migration and from what I recall, they put the right version to go for the migration of the database. Pretty sure it's what I wrote but I could be off.
-
For anyone that want to migrate to the official container, it's very easy. This container isn't a bad one, we are many that have used it for a long time and many still use it. This is simply if you want to be on official one where all the documentation from developer apply. Some prefer all in one solution (although it's not that all in one anymore) like this docker, other prefer to have it like it's intended by the author. It's a mater of choice. I followed Rorar guide (although his guide doesn't use the apps) and official guide with some tweaks. rorar guide: https://rorar.github.io/immich-unraid-manual/ I didn't do the custom network nor the google migration. Google migration was already done when I installed immich so useless. As for the custom network, I already have a custom network with all my docker. You could create one dedicated to immich, it's up to you if you want to go that route. Just remember, if you are using a reverse proxy where the docker isn't in the same network, you can't use <dockername> directly to refer to it. But you do want a custom network, not Bridge. The reason is with the default Bridge network, you can't use docker name. The container I used are from Rorar repo: immich-vectorchord-db-official : it is the latest supported database ghcr.io/immich-app/postgres:18-vectorchord0.5.3-pgvector0.8.1 immich_machine_learning_nvenc : Select the one according to your configuration. If using Hardware configuration with NVidia, take this one. Check Rorar docker list and select according to doc immich_server_nvenc : Immich server with NVidia HA. Change according to your configuration. For valkey, I used immich-valkey : Uses valkey/valkey:latest There is other valkey, this one is said to be optimized for immich. For the migration, we will simply create all new container and migrate database. Preparation Upgrade postgres to latest supported version. Check previous post for info. You don't have to, but if you have bad vector and such, it make everything way harder since import will fail. Do a database backup from immich, then shutdown all container regarding immich. If you share redis/vaulkey and postgres, it's ok not to shutdown them but they won't be used anymore. Rename appdata/immich to something else (immich_bak if you want). This guide use unraid nobody:users (99:100) configuration. Everthing under appdata for immich and all files in array/pool read/write by immich containers need to be chmod to these with proper permission. If you use custom permission, change accordingly. Array and share configuration One thing to keep in mind is how your library, thumbnail and such are configured in your current Immich. With the immich container from this thread, everything is under /photos. Because of that, it's harder to make path separation. Rorar explain well what you should put on SSD and what to put on Array. On my own configuration (you don't have to follow that), I have 2 share, one call Immich and the other Immich_Cache (that's because I have many SSD used as cache). Immich share is SSD move to Array and Immich_Cache is Array to SSD. Both create new file on SSD. Immich_Cache is just like appdata but on a separate pool. The reason is for performance, you want to have thumbnail, encoded-video and profile always on a SSD. The rest, you want them on an array since it's the actual file. This make browsing much faster (specially if you configured using multiple size thumbnail instead of original when browsing). It's a bit like Rorar did in his guide at Step 1: Create Unraid Shares - Immich on Unraid — Performance Setup Guide So for that, it would require to change some path. I myself moved the content from /photos/encoded-video, /photos/thumbnail and /photos/profile to the new SSD share I created. This is a breaking change from this container. I you want to come back to this container, you have to move back those file. You could also just leave it like that. Recommandation DO READ EACH DOCKER INFORMATION. Nearly all docker will have extra configuration and explanation in them, like if they are on SSD or not. This migration guide doesn't cover those scenario since they are properly explained in each docker template from Community Apps in Unraid. 1) Start by creating the postgresql server from the apps. In Extra-Parameters, add --user=99:100 Input the same password you used for the current Postgresql Immich Database. If you used a different username then postgres for the old database, the restore function won't work. If you change the username here, it won't work (I already opened a ticket on that). For that, see FAQ chapter later on how to fix the backup. Change the network to your custom docker network. Change TimeZone. Start the container 2) Create Valkey container from the apps In Extra-Parameters, add --user=99:100 Change the network to custom docker network Change TimeZone Start the container 3) Create machine learning from the apps Don't forget to take the one with the hardware acceleration you want. In Extra-Parameters, add --user=99:100 Change network to custom docker network change TimeZone Start the container This docker have a appdata/immich/model-cache path. Nothing else will write in immich appdata, the official docker doesn't use appdata. 4) Create immich_server from apps Don't forget to take the one with the hardware acceleration you want. In Extra-Parameters, add --user=99:100 Change network to custom docker network change TimeZone From here, you have to fill many path. You must point to the path of the already created files from the old immich container. You can select new path but move the content before starting the container. Do read the template, it is quite easy to understand. There is some entry that are information only, like "--- HDD Storage (Array) ---". Rorar use that to separate each type of path/variable in section to make it easier to read. So in short, in the old template, we had everything mapped to /photos. The official one use a per asset mapping. You can easily just map each one to them. Exemple on mine, everything was under /mnt/user/immich/photos/ in the old template. This is a Share that use cache for new file then move to Array. With this new docker, I've simply link directly each subfolder. I did the samething with the SSD variables. But the difference is I have another share with New file created to SSD and mover move from Array to SSD. I do have a pool dedicated for that. Under Database DB_HOSTNAME: immich-vectorchord-db-official (unless you changed the container name) DB_PORT: 5432 (unless you changed it) DB_USERNAME: postgres DB_PASSWORD: you_postgres_password DB_DATABASE_NAME: immich Under Valkey: REDIS_HOSTNAME: immich-valkey (unless you changed it) Change TimeZone. I changed the UMASK to 000 cause that's how I like it (personal preference). If you have any other custom path, map them accordingly. Start the container 5) Migrating the database Now that everything is mapped, you should see in the log that it's finding multiple things. Reach the WebUI. You should be greated with a setup screen. Press restore from backup. This will restart immich in maintenance mode (you might need to refresh the page). If refreshing the page lock you out, check the immich docker log. You will see a link that you open and get you directly in immich maintenance mode. Once in maintenance mode, it will scan everything and have green check. Inspect that everything is good. The only thing I have an error was profile because I have nothing in it. It must be green. Click next and select the most recent backup. And then it will import. If it fail, you need to read the error and find the problem. I myself had trouble because I didn't migrate to latest database version and removed the old vector. Go read previous post for guidance. Once it's finish, enjoy! If you have a reverse proxy, you will need to reconfigure because the official container use port 2283 instead of 8081. 6) Container start/stop order Since we are not all in one anymore, we have an order to start and stop to prevent issue. It won't be a big deal since the service is pretty resilient, but it's still a best practice. The stop order is simply the start in reverse. The start order you want to have in the docker list (and if you use backup solution like appdata-backup-restore, create a group and order them) 1) immich-valkey 2) immich-vectorchord-db-official 3) immich-machine-learning 4) immich-server FAQ Q. I'm using another user then postgres in postgres database A. You must migrate to postgres. There's other way, but you will be in unsuported teritory. The easiest way I found is to take the immich database backup on a computer, unzip and open the .sql file in something like notepad++. Search for the old database username. For instance, mine was immich. You should find entry like: Owner: immich OWNER TO immich; So the idea is simple. Do a find and replace. I suggest not looking only for the name cause, if like me you used immich, you will rename stuff that you don't want. So for exemple, I did a find and replace all with find: Owner: immich Replace: Owner: postgres Then find: OWNER TO immich; Replace: OWNER TO postgres; Save the file Now, at the restore database, choose upload. Once the upload is finish, find it in the webgui and restore.
-
The problem is you never updated your DB. I had the same problem. I myself moved all to Roar instead of having a all in one. Here's what you need to do. Put back your original postgresql version and restart the database as is. The database should now work. If it doesn't, restore a working database. Next, your immich container, go back to version 2 using the tag for it. If you were on latest, just use the latest 2 tag available. Once everything is back working, check the postgres log. You should see at the top a migration for your vector. Stop postgres and immich If I recall, all I had to do is migrate to the ghcr.io/immich-app/postgres:18-vectorchord0.5.3-pgvector0.8.1 but the version of the DB you had. Like this is a Postgresql 18, but tensorchord/pgvecto-rs:pg16-v0.3.0 is 16. So, do something like ghcr.io/immich-app/postgres:16-vectorchord0.3.0-pgvector0.3.0 and start. You should see a migration happening. It can be long. Once it's finish, launch Immich. Once immich is in working condition, start a new backup (I simply changed the date of immich daily backup so it would run in the next minute). Stop both container Change postgres to ghcr.io/immich-app/postgres:18-vectorchord0.5.3-pgvector0.8.1 and start. It will migrate. Start immich. Now, if you want to migrate to ROAR like I did, it's very simple. I had to add some --user=99:100 to some of it's container though (else they run on bad user). For this, what I did is close everything that already exist and install each container one by one. I changed some of the path mapping on the immich container itself to match what I had (this should be easy). I also added a lot of variable that we can't used with the AIO for the configuration (check official immich documentation). Once immich start, I put restore database which restarted immich in maintenance mode. Then, I selected to restore database. Since it was mapped to the exact backup folder from the other immich container, it was able to find it and restore it. And that's it, you have a immich latest version with official container. This will create 4 new container (immich machine learning, vaulkey, postgres and immich server). If you need hardware acceleration like nvidia, intel or other, select the appropriate immich_Server docker.
-
Oh! That is different then. I'll check it later on.
-
Hello, as stated in the FAQ, in the first page and in the docker description, the docker doesn't contain the game itself thus doesn't have any version. To update, simply restart the docker to restart steam and download the latest version. Sometime, the steamcmd doesn't detect change and you need to delete a file (see second post) to force the update.
-
Oh didn't knew this existed, thanks
-
I'm a bit trying to understand that vs backup/restore appdata plugin?
-
@Squid I was wondering if you have any idea of what's going on. Thank you
-
Redis itself (at least the official docker) doesn't use environment variable. It use the config file. I strongly suggest switching to config file instead for ongoing support
-
Summary: Support Thread for Nodiaque Pihole docker Application: Pihole Official DockerHub: https://hub.docker.com/r/pihole/pihole/ Pi-Hole - let's block those pesky ads! This is a template for the official PiHole Docker. Easiest way to setup is using a custom network for eth, select it in network and enter custom IP on your network. You can also use bridge mode. You cannot use host mode since Unraid is already listening on the DNS ports. If you set you router to give out the PiHole address to clients, make sure that you fix the unRaid servers dns to point to a real DNS Server. Please check https://hub.docker.com/r/pihole/pihole for additional variables that you may need. For all pihole specific help, please head to pihole official forum. This app is simply a wrapper of the official docker without any modification.
-
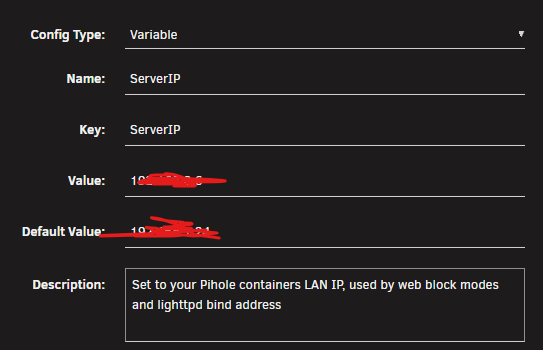
I'll tell you how I setup my pihole and docker network. I have many container with their own ip. You will need to enable advanced view everywhere. I use macvlan and enable host access. This is not required but I do need it for my own scenario. Then, enable IPv4 custom network on interface eth0. This should be the same range as your router. Then, in you docker, you will select the custom eth0 network. After that, you will see a place to put a fixed address right under it. Be sure that in "extra parameter", you have this: --cap-add=NET_ADMIN --hostname=hostnameofyourpiholehere After, in the template, you should see "serverip" and "serveripv6" (at least my template have). If your template doesn't have it, just create it Under value, it should be the same ip you used for fixed ip. I'm looking at the pihole available in the list and it seems the one I used isn'T listed anymore (but it's using the official pihole docker). I see binhex does also use the official docker so it should work if you add it in that docker. I honestly see way more option in mine but it might be option I added by reading the pihole wiki. You could use bridge mode. I don't like bridge mode cause it's putting the pihole in it's separate vlan, not what I like. I want them directly on my vlan and that's how I learn to do it. Running over multiple vlan is easier with custom docker network then using default bridge. There's also benefit on using custom vlan vs bridge but I won't go into that here. I did create a docker pihole with all the var I use. There's many other you can use and the link for them is in the description. It should appear soon in the CA tabs. It's by default in bridge mode.