






david279
Members
-
Joined
-
Last visited
Everything posted by david279
-
When putting my audio on the same bus as the gpu i get no volume controls from my display port and no sound, it is displayed in the sound options. Do i need AppleALC kext to get that to work, working sound from the GPU? Im using a rx 570 and i use a usb audio device for sound and it works without any issues but this would free up a usb port.
-
Passing through a iGPU is very tricky and doesn't work all that well. No matter the OS.
-
People here was also seeing the bug as well on the 6.8rc builds.
-
@Leoyzen I had heard about GPU performance being lower on AMD systems but this was a bit much. Running with AMD passed straight thru to the VM means about %50 loss in GPU power compared to the IvyBridge spoofed VM. And you can really tell the difference.
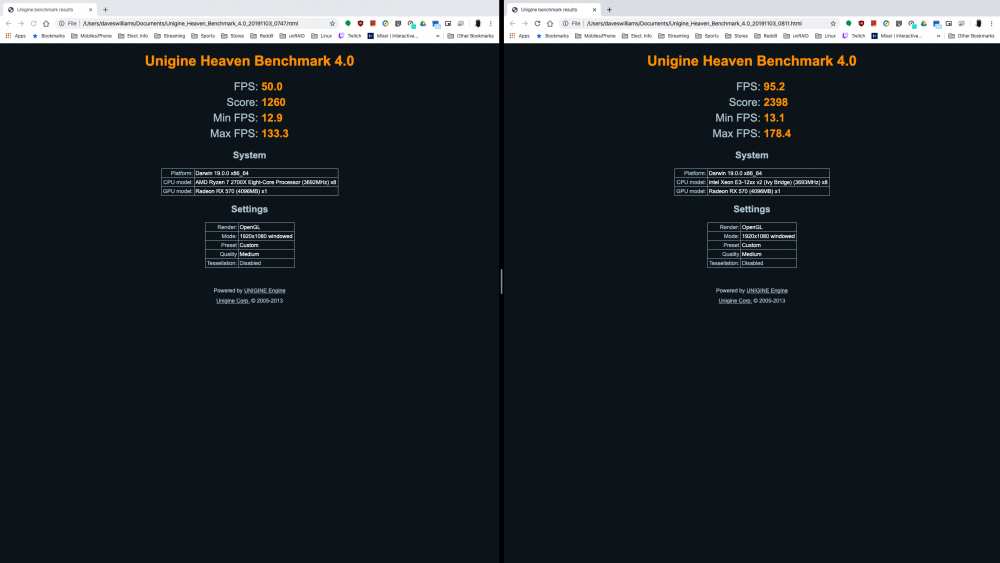
-
Not running this docker but i have been using mac vms for a while now and i keep VNC and GPU versions of my Mac VMs. Testing things in a VNC vm is a lot safer with the reset bugs. I run 1440p myself and i set the bios at 1440p and just keep the clover resolution at 1080p, the apple logo is a bit garbled at boot but the resolution clears up before the desktop shows up. Make sure you use updated Lilu and Whatevergreen kext too. It helps with the GPU.
-
I would backup the qcow2 file before even booting the VM. That way if you mess it up you can just go back to the original.
-
Boot up the VM. When in the VM mount the efi partition. You can use clover configurator to mount the efi. Go into the efi partition and edit the config.plist using clover configurator. Thats how you edit clover. You might want to make a backup of the qcow2 file just in case you break something.
-
Boot into VM using it. Mount it in Mac and use your favorite tool to configure it. I do most of my work with clover configurator.
-
I switched it up and now use the line like this <qemu:arg value='-cpu'/> <qemu:arg value='host,kvm=on,+invtsc,+hypervisor,+avx,+avx2,+aes,+xsave,+xsaveopt,+ssse3,+sse4_2,+popcnt'/> The system sees the cpu as r7 2700x just like its supposed too and runs great.
-
Ok i got it to boot using this. <qemu:arg value='-cpu'/> <qemu:arg value='EPYC-IBPB,kvm=on,+invtsc,+avx,+avx2,+aes,+xsave,+xsaveopt,+ssse3,+sse4_2,+popcnt,vmware-cpuid-freq=on,' I know i can remove the vmware line. Anything else i can get rid of on this line? Just to make it cleaner.
-
Well i fixed that and now all i get is a apple with no progress bar. Anything i should add to the qemu args. I removed the -cpu line and its args.
-
Tried mac 10.15.1 with the custom amd patches today and this is as for as i can get. Remove the cpu qemu arg line and added a topology. Updated to 0.5.2.
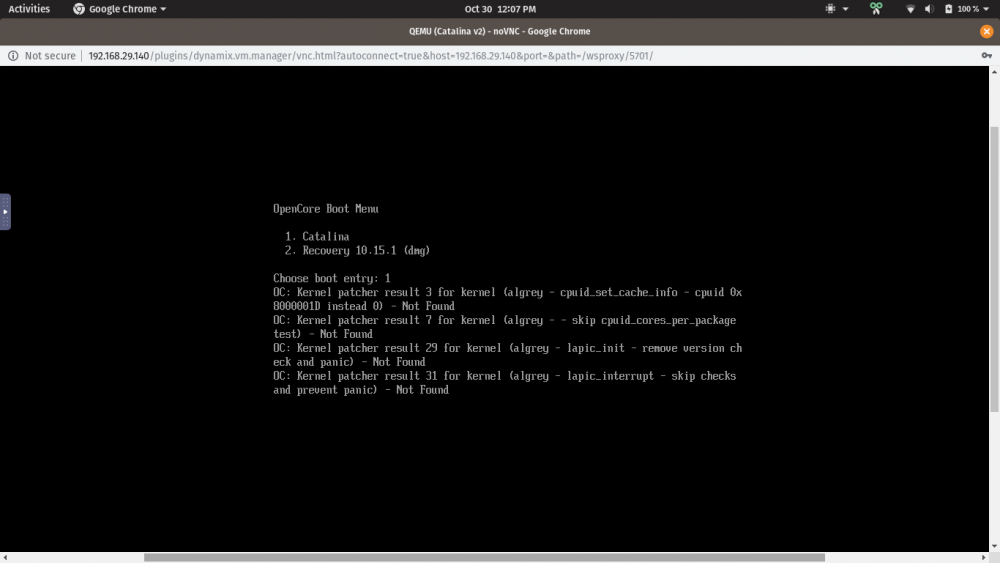
-
Nah you can only run Mac vms using Q35. All of us with AMD cards deal with pci error 127. Just Google "AMD reset bug" and you will see it effects all newer AMD cards across a bunch of Linux distros. As of now there is no fix for the RX series of cards.
-
Booted into 10.15.1 with my RX 570. You will need a updated whatevergreen kext or you get black screens so update it.
-
I just finished the update using the macPro smbios. I updated lilu and whatevergreen before hand and it completed successfully. I did the update in VNC and will boot with my GPU when I get home. It looks like the disabler kext works just fine for me..
-
@Mustangf22 delete the osk line in your post. Its not allowed to be post here.
-
Alert 10.15.1. is out backup your VM before attempting upgrading.
-
So We don't need the "kvm=on" line for own newer CPUs? Is that what you are saying.? 🤔
-
Use this for the arg values at the end of your xml. Also delete the NullCPU kext. You dont need it. <qemu:arg value='Penryn,vendor=GenuineIntel,kvm=on,+invtsc,+xgetbv1,+avx,+avx2,+aes,+xsave,+xsaveopt,+ssse3,+sse4_2,+popcnt,+bmi2,+smep,+bmi1,+fma,+movbe,vmware-cpuid-freq=on,'
-
Need this kext for iMacPro or MacPro to work. Put it in kext/other folder. MCEReporterDisabler.kext.zip
-
@CorneliousJD you need to make sure the ovmf files path match the file path that's on your server. The container uses a specific version of ovmf files to work. Look in the folder where the Mac vdisk are contained. type='pflash'>/usr/share/qemu/ovmf-x64/OVMF_CODE-pure-efi.fd</loader> <nvram>/etc/libvirt/qemu/nvram/427e2dee-2768-4ceb-90d7-29da86721f8d_VARS-pure-efi.fd</nvram> These lines should have a different path.
-
Yes you can update mac os versions but make backups just in case.
-
Stub the card from the system
-
While we looking this....Can we add the ability to use both ipv4 and ipv6 addresses for wireguard at the same time. The GUI right now its either ipv4 or ipv6. I know i could just added the address line in the cmd line to the wg0.conf for ipv6 but it would be convenient if i could do it in the GUI. I ran a wireguard server in a VM for a while so im used to playing with that config file.
-
I saw something like this too. I run pihole in a Vm and when the NAT setting in wireguard is set to yes all the clients in pihole have the name of unRAID server. The Pihole is ran in a ubuntu VM on my unRAID server. Once i set NAT to No all the correct client names returned to normal. Now i run wireguard with NAT set to No and enabled a static route on my route for wireguard to my unRAID server and all is good now.


