





giganode
Community Developer
-
Joined
-
Last visited
Everything posted by giganode
-
Ok, so you are missing the required library. The new version is available with Unraid 7.0.0. Seems like I should set the min OS version to 7.0.0
-
Can you search for these files? root@Node:~# ls /usr/lib64/libssl* /usr/lib64/libssl.so@ /usr/lib64/libssl.so.3@
-
Please share the command line used. I might have an idea.
-
You can find the plugin in Community Applications.
-
I updated the template for publishing because I wanted to have the command line for publishing shortened: #!/bin/bash source /boot/config/mqttcredentials if [[ -z "$MQTT_HOST" || -z "$MQTT_PORT" || -z "$MQTT_USER" || -z "$MQTT_PASSWORD" || -z "$MQTT_CLIENT_ID" ]]; then echo "Error: Information missing." exit 1 fi MQTT_URL=mqtt://$MQTT_USER:$MQTT_PASSWORD@$MQTT_HOST:$MQTT_PORT/$MQTT_CLIENT_ID mosquitto_pub -L "$MQTT_URL/sensor/voltage" -m "{\"voltage\": $voltage}" The old template can still be found in the repository.
-
So you are allowing unauthorized access? I don't have a setup like this but I would just try the commands without the -u and -P flags. But what about your libary issue? What command did you execute?
-
New release has a form on the settings page to enter credentials and a few smaller changes. I recommend removing the plugin and reinstalling it. After that, go to settings page and set up your mqtt data broker.
-
That is correct. At the moment it is empty. On next release you can edit the credentials there.
-
Ah okay. Sadly, you won‘t get any data from your PSU. It doesn‘t have the usb connection.
-
Which PSU model do you have installed?
-
Please take a look at the example in the about linked GitHub repo. as this is very custom from user to user there is no gui, at least for now. You need to manually extract the data you want to publish. On the other hand devs can use this plugin in combination with their own to add more functions. in the near future I will add preconfigured mqtt export to the corsairpsu plugin. Users will have the ability to activate that feature when they have MQTT Pub and Sub installed.
-
*reserved*
-
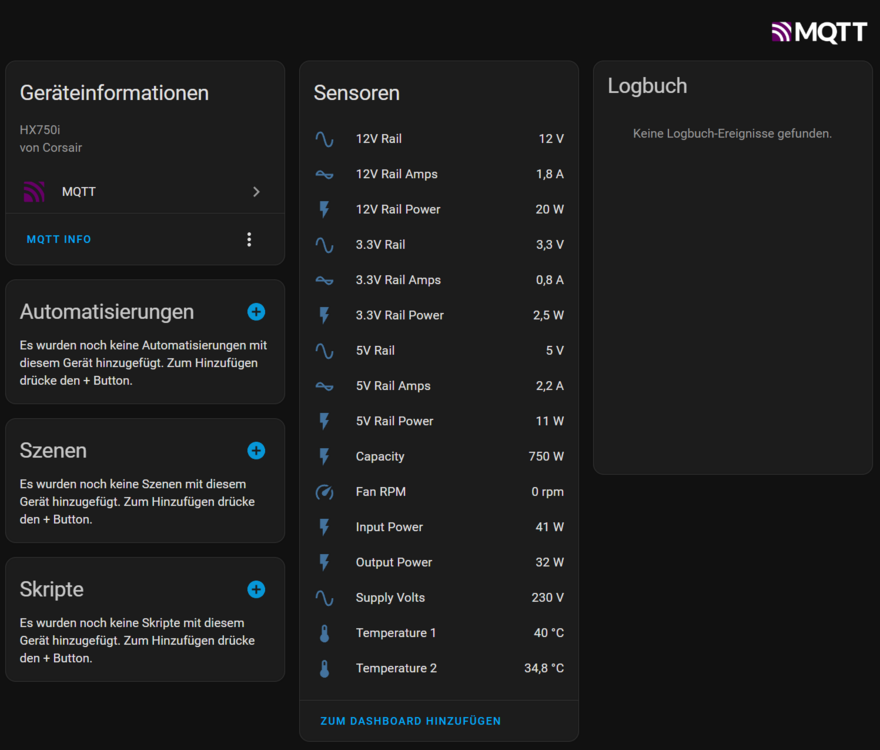
Hi! I wanted to publish some data from my unraid server to mosquitto so I can see and track it in Home Assistant. This plugin is the result and gives you the ability to publish custom data to your own mqtt data broker. You can also subscribe to a topic when you have an usecase for that, or just simply for debugging. For more information take a look at the github repository. Here is a quick example. I used the data provided from my corsair power supply:
-
Interesting. Do you have any more information? @alturismo already verified the plugin running on 7.0.0-beta.3. I just updated yesterday evening without any issue but couldn't test anymore cause it was way too late.
-
Hey, to fix this issue automatically, you can use my following bash script. You can just set it up to run on Array Startup and you won't recognize any more: #!/bin/bash FILE="/etc/sensors.d/sensors.conf" if [ -f "$FILE" ]; then sed -i '/chip "corsairpsu-hid[^"]*"/,+1d' "$FILE" echo "Entries have been removed." else echo "$FILE doesn't exist." fi
-
No, the VFs are for virtual machines. So 7 VFs can be used on 7 VMs simultaneously.
-
That’s the whole point of sriov. You don’t pass through the whole device to a vm anymore. You can use it to power docker and virtual machines at the same time. but keep in mind that this plugin is soon to be not working anymore with future OS/Kernel updates. There is quite some work to be done.
-
I have this board as well... nothing you can do to make it work
-
hey, it does not work but maybe we can make it work. please upload Diagnostics, I will then take a look at it 😇
-
Okay, somehow the issue with the cpu load is gone.. but I am missing some information with unraid 7.. Is there any work in progress? RAM usage is at 0%. CPU load is enterily missing, am I correct?
-
Good to hear! But... is that Idle consumption? 😃
-
Hi @BoKKeR.. I'm experiencing an odd behaviour. Whenever the Unraid-API docker runs, it generates a lot of load on CPU and almost doubles my power consumption. I already increased the mqtt update rate to 60s, but this just slightly improves the power consumption. Any suggestions?
-
You can also upload the Diagnostics in the meantime
-
Strange.. Here is a list of supported RMi/HXi series PSUs: 0x1c0a, /* RM650i */ 0x1c0b, /* RM750i */ 0x1c0c, /* RM850i */ 0x1c0d, /* RM1000i */ 0x1c04, /* HX650i */ 0x1c05, /* HX750i */ 0x1c06, /* HX850i */ 0x1c07, /* HX1000i */ 0x1c1e, /* HX1000i with USB-C */ 0x1c08, /* HX1200i */ 0x1c1f, /* HX1500i */ I guess you should try another usb header. Maybe you should also try to debug with unplugging other devices. Keep me informed! But I may be busy tomorrow..
-
Maybe other devices interfere your psu. Open Terminal and type in ls /dev/hid* For every hidraw entry type in corsairmi /dev/hidraw* Here is an example from my system: root@Node:/# corsairmi /dev/hidraw1 name: 'HX750i' vendor: 'CORSAIR' product: 'HX750i' powered: 46357097 (536d. 12h) uptime: 2321897 (26d. 20h) temp1: 40.8 temp2: 35.2 fan rpm: 0.0 supply volts: 230.0 total watts: 32.0 output0 volts: 12.0 output0 amps: 1.8 output0 watts: 20.0 output1 volts: 5.1 output1 amps: 2.2 output1 watts: 11.0 output2 volts: 3.3 output2 amps: 0.8 output2 watts: 2.5




