





danioj
Members
-
Joined
-
Last visited
Everything posted by danioj
-
I have just updated System Stats from 2015.12.19b to 2016.01.13. I noticed that the nice feature - "Placement of Stats menu" - allows the menu to move away from the header. As you know I have issues with space on Safari on my iDevices. Nice that you have given more ability to adapt to the top menu. Unfortunately it didn't work. Then I noticed this in the release notes: (requires unRAID 6.1.7 or higher) Is this a typo or are we expecting a pending release?

-
Which is probably what happened, since there was a very quick update to CA (actually to fix the issue dlandon pointed out) but I forgot about not having any naked & in the xml which messed up the xml and required a new update to get rid of it. The procedure suggested by johnnie.black worked! Plugin updated.
-
Ok, thanks. I'll give it a whirl in the morning!! Nearly midnight. Bed time!!
-
Has anyone tried this Plugin since it was in fact moved to a Plugin from a Docker? Just not sure if we are treating this as a BETA Plugin or if it is good to go to use in a Production env?
-
Just tried to update the Plugin to version 2016.01.10b from 2016.01.02 on both of my Main and Backup production servers and I receive the following error on both: plugin: updating: community.applications.plg plugin: downloading: https://raw.github.com/Squidly271/community.applications/master/archive/community.applications-2016.01.10.txz ... done plugin: bad file MD5: /boot/config/plugins/community.applications/community.applications-2016.01.10.txz
-
Given this is in BETA here is my feedback: As I mention in my above post I just ran the preclear plugin (using Brians faster script - see above post for link) across my 2 production severs for the latest round of preclears I needed to run: Main:Define R5:X10SL7-F:E3-1241v3:32GB ECC UB:HX850i Backup:DS380:C2550D4I:C2550:4GB ECC UB:ST45SF-G Note: As not to double up with posts (or post off topic) I did post the actual S.M.A.R.T results in the following post under the "Storage Devices and Controllers" section of the forum for those who are interested in the drives specifically: http://lime-technology.com/forum/index.php?topic=39526.msg433798#msg433798 Back to the plugin, Nothing to fault whatsoever. Both disks cleared without an issue and the plugin ran stable. No errors in the syslog to speak about which could be attributed to this plugin. GUI was accessed many many many times over the 140+ hours that the preclear(s) were running across both servers and not a flinch was seen. The preview of the progress (via clicking the 'eye") is a nice touch BUT after a glance at the beginning, middle and end the status on the Main page is more than sufficient for status. Excellent I would say in fact. For those who are interested, attached is how the GUI looked AFTER a successful preclear! Excellent experience so far!! As a side note, the plugin HAS to be close to coming out of BETA given it has been in that state since: 18 May 2015.


-
Yes, it will. The cache pool is seen as a single disk (/mnt/cache) and the trim operation works on all disks in the pool. In case you wonder: I have a SSD cache pool myself. Sweet - thank you!
-
The plugin works with cache disks only. The command is stored in the file /config/plugins/dynamix/ssd-trim.cron on your flash device. You can edit the file, but since this file is auto-generated all manual changes will be lost once an update from the GUI is done. Shame. Easily fixed though through a manual cron entry elsewhere for those other devices. A quick question about the plugin on a btrfs ssd cache pool. I am considering extending my single ssd cache to a btrfs cache pool for some fault tolerance of my cache (still running my apps and bn from a single ssd from Unassigned Devices) but will this plugin execute the TRIM command on both SSD's in such a pool?
-
I'd like to know this too. I have just had the plugin run for the first time and it run exactly as specified last night. However, I also have an SSD that is mounted via "Unassigned Devices" that i'd also like to schedule a TRIM for without having to add a CRON job manually BUT like open toe suggested if it is not possible then just knowing where to add the additional line for the extra disk would be cool!
-
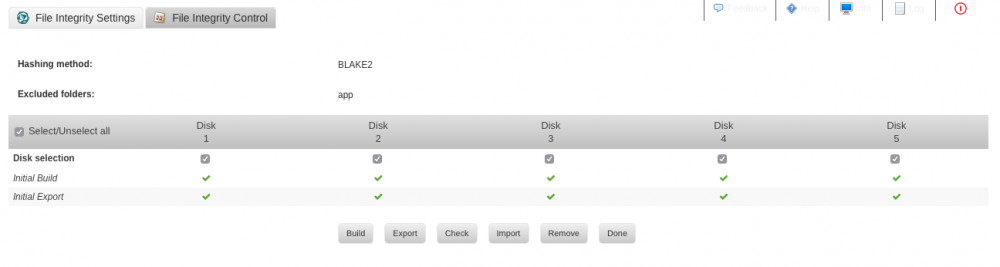
The confirmation symbol is a green check mark, since you updated after initial check you need to press build & export all disks to get it, should take a few seconds. Perfect. Thank you.
-
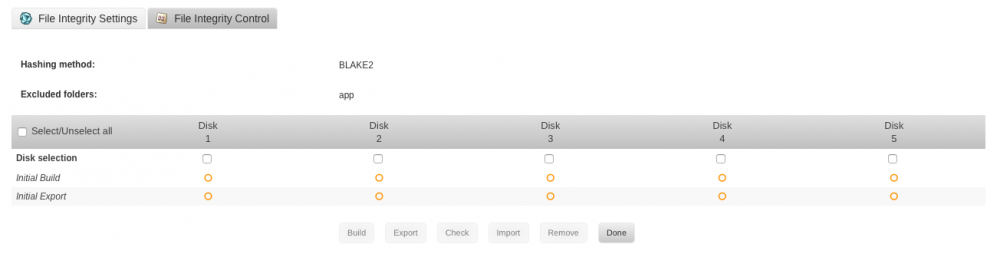
I have just updated to v2016.01.06a. With reference to the new feature "added initial build and initial export status of each disk on control page" When I installed this a couple of days ago I did a build. Under the "File Integrity and Control Tab" I now have orange circles against each disk for "Initial Build" and "Initial Export" (as attached). I have no issue with these orange circles identifying a positive (although I have never seen this symbol before for a positive confirmation) but any chance you can release a key for the possible status symbols? Thank you in advance!
-
I have just tried to install the unBALANCE plugin on my Main unRAID server both manually and via CA and unfortunately the installation failed. The error I just captured from CA is: plugin: bad file MD5: /boot/config/plugins/unbalance/unbalance-1.2.11.tgz Looking forward to using the plugin when I can. Looks excellent.
-
Dude - I know this is slightly off topic BUT that was a great catch. You were right. For WHATEVER reason it was set to Never. I have no idea HOW that happened, I guess it must have been me who did it at some point recently but I don't remember. Unless a few wines happened while I did it - who knows. Thank you very much! Set back to Default like the other drives. Anyway - clearly the issue had nothing to do with this plugin. Case closed.
-
The "automatic protect" is passive monitoring and should not spin up your parity disk. The verification tasks may spin up the parity disk together with the disk(s) which is/are examined at that time. Looking at my own system, all spins down as expected. Thanks for the quick reply. I manually spun down the Parity disk and left it for 20 mins. Seems nothing happened to spin it back up again which makes me feel better. Perhaps it was a freak happening / bug / some other issue that I have not yet found. Either way, as you suggested it doesn't appear it is this plugin causing it!
-
I have noticed something in the last couple of days. My Parity Drive seems to be constantly spun up. The only thing I have done with the Server in those few days is enable this plugin. I did a scan and also enabled the option "Automatically protect new and modified files:" using BLAKE. No other drives are spun up and IF it is the plugin it doesn't seem to be reading or writing to the drive either. Counts on both (as recorded by unRAID) are not increasing - at least not that I can see anyway!! Is there any reason that this plugin would keep the Parity drive spun up - perhaps monitoring - or should I be looking elsewhere?
-
Thanks, appreciate it. Well, thats just great! After a bit of reading it is working perfectly including access to my LAN IP's and hostnames by default. I don't know if you guys have done any customisations BUT that was much easier and painless in comparison to another Docker I used of the same App a while ago. So Thank you!
-
Thanks, appreciate it.
-
I seem to be having an issue with the installation of the OpenVPN-AS docker. After installing the docker App via CA Plugin I accessed the App GUI. I have nothing downloading and plenty of b/w available to the app. 2.5MB/s to be exact. I logged on using the default user id and password and am stuck on the installation screen which says: "Please click here to continue to download OpenVPN Connect. You will be automatically connected after the installation has finished." It has been about 45 mins and I am still stuck on the installation web page (see screenshot). I have tried reloading the URL and logging in again. Takes me straight back to the installation web page. There is nothing in the log that I can see that is wrong so far. Here it is. Can anyone help? Please enter 'yes' to indicate your agreement [no]: Once you provide a few initial configuration settings, OpenVPN Access Server can be configured by accessing its Admin Web UI using your Web browser. Will this be the primary Access Server node? (enter 'no' to configure as a backup or standby node) > Press ENTER for default [yes]: Please specify the network interface and IP address to be used by the Admin Web UI: (1) all interfaces: 0.0.0.0 (2) br0: 192.168.1.2 (3) docker0: 172.17.42.1 (4) virbr0: 192.168.122.1 (5) eth0: 192.168.1.2 (6) vetheda354d: 172.17.42.1 (7) virbr0-nic: 192.168.122.1 Please enter the option number from the list above (1-7). > Press Enter for default [2]: Please specify the port number for the Admin Web UI. > Press ENTER for default [943]: Please specify the TCP port number for the OpenVPN Daemon > Press ENTER for default [1194]: Should client traffic be routed by default through the VPN? > Press ENTER for default [yes]: Should client DNS traffic be routed by default through the VPN? > Press ENTER for default [yes]: Use local authentication via internal DB? > Press ENTER for default [no]: Private subnets detected: ['192.168.1.0/24', '192.168.122.0/24', '172.17.0.0/16'] Should private subnets be accessible to clients by default? > Press ENTER for default [yes]: To initially login to the Admin Web UI, you must use a username and password that successfully authenticates you with the host UNIX system (you can later modify the settings so that RADIUS or LDAP is used for authentication instead). You can login to the Admin Web UI as "openvpn" or specify a different user account to use for this purpose. Do you wish to login to the Admin UI as "openvpn"? > Press ENTER for default [yes]: > Specify the username for an existing user or for the new user account: Note: This user already exists. > Please specify your OpenVPN-AS license key (or leave blank to specify later): Initializing OpenVPN... Adding new user login... useradd -s /sbin/nologin "admin" Writing as configuration file... Perform sa init... Wiping any previous userdb... Creating default profile... Modifying default profile... Adding new user to userdb... Modifying new user as superuser in userdb... Getting hostname... Hostname: main Preparing web certificates... Getting web user account... Adding web group account... Adding web group... Adjusting license directory ownership... Initializing confdb... Generating init scripts... Generating PAM config... Generating init scripts auto command... Starting openvpnas... NOTE: Your system clock must be correct for OpenVPN Access Server to perform correctly. Please ensure that your time and date are correct on this system. Initial Configuration Complete! You can now continue configuring OpenVPN Access Server by directing your Web browser to this URL: https://192.168.1.2:943/admin Login as "admin" with the same password used to authenticate to this UNIX host. During normal operation, OpenVPN AS can be accessed via these URLs: Admin UI: https://192.168.1.2:943/admin Client UI: https://192.168.1.2:943/ See the Release Notes for this release at: http://www.openvpn.net/access-server/rn/openvpn_as_2_0_20.html * Stopping openvpnas openvpnas ...done. MOD Default {u'admin_ui.https.ip_address': u'all'} {u'admin_ui.https.ip_address': 'eth0'} MOD Default {u'cs.https.ip_address': u'all'} {u'cs.https.ip_address': 'eth0'} MOD Default {u'vpn.daemon.0.listen.ip_address': u'all'} {u'vpn.daemon.0.listen.ip_address': 'eth0'} MOD Default {u'vpn.daemon.0.server.ip_address': u'all'} {u'vpn.daemon.0.server.ip_address': 'eth0'} Jan 3 14:03:00 main syslog-ng[196]: syslog-ng starting up; version='3.5.3' Jan 3 14:17:01 main /USR/SBIN/CRON[295]: (root) CMD ( cd / && run-parts --report /etc/cron.hourly) Jan 3 15:17:01 main /USR/SBIN/CRON[298]: (root) CMD ( cd / && run-parts --report /etc/cron.hourly) Jan 3 16:17:01 main /USR/SBIN/CRON[301]: (root) CMD ( cd / && run-parts --report /etc/cron.hourly) ----------------------------------- _ _ _ | |___| (_) ___ | / __| | |/ _ \ | \__ \ | | (_) | |_|___/ |_|\___/ |_| Brought to you by linuxserver.io ----------------------------------- GID/UID ----------------------------------- User uid: 99 User gid: 100 ----------------------------------- We are now refreshing packages from apt repositorys, this *may* take a while MOD Default {} {} MOD Default {} {} MOD Default {} {} MOD Default {} {} Jan 3 17:06:06 main syslog-ng[77]: syslog-ng starting up; version='3.5.3' Jan 3 17:17:01 main /USR/SBIN/CRON[177]: (root) CMD ( cd / && run-parts --report /etc/cron.hourly) Jan 3 18:17:01 main /USR/SBIN/CRON[180]: (root) CMD ( cd / && run-parts --report /etc/cron.hourly) Jan 3 19:17:01 main /USR/SBIN/CRON[183]: (root) CMD ( cd / && run-parts --report /etc/cron.hourly) Jan 3 20:17:01 main /USR/SBIN/CRON[186]: (root) CMD ( cd / && run-parts --report /etc/cron.hourly) Jan 3 21:17:01 main /USR/SBIN/CRON[189]: (root) CMD ( cd / && run-parts --report /etc/cron.hourly) Jan 3 22:17:01 main /USR/SBIN/CRON[192]: (root) CMD ( cd / && run-parts --report /etc/cron.hourly) Jan 3 23:17:01 main /USR/SBIN/CRON[195]: (root) CMD ( cd / && run-parts --report /etc/cron.hourly) Jan 4 00:17:01 main /USR/SBIN/CRON[198]: (root) CMD ( cd / && run-parts --report /etc/cron.hourly) Jan 4 01:17:01 main /USR/SBIN/CRON[201]: (root) CMD ( cd / && run-parts --report /etc/cron.hourly) Jan 4 02:17:01 main /USR/SBIN/CRON[204]: (root) CMD ( cd / && run-parts --report /etc/cron.hourly) Jan 4 03:17:01 main /USR/SBIN/CRON[207]: (root) CMD ( cd / && run-parts --report /etc/cron.hourly) Jan 4 04:17:01 main /USR/SBIN/CRON[210]: (root) CMD ( cd / && run-parts --report /etc/cron.hourly) Jan 4 05:17:01 main /USR/SBIN/CRON[213]: (root) CMD ( cd / && run-parts --report /etc/cron.hourly) Jan 4 06:17:01 main /USR/SBIN/CRON[216]: (root) CMD ( cd / && run-parts --report /etc/cron.hourly) Jan 4 06:25:01 main /USR/SBIN/CRON[219]: (root) CMD (test -x /usr/sbin/anacron || ( cd / && run-parts --report /etc/cron.daily )) Jan 4 07:17:01 main /USR/SBIN/CRON[292]: (root) CMD ( cd / && run-parts --report /etc/cron.hourly) Jan 4 08:17:01 main /USR/SBIN/CRON[295]: (root) CMD ( cd / && run-parts --report /etc/cron.hourly) Jan 4 09:17:01 main /USR/SBIN/CRON[298]: (root) CMD ( cd / && run-parts --report /etc/cron.hourly) Jan 4 10:17:01 main /USR/SBIN/CRON[301]: (root) CMD ( cd / && run-parts --report /etc/cron.hourly) Jan 4 11:17:01 main /USR/SBIN/CRON[304]: (root) CMD ( cd / && run-parts --report /etc/cron.hourly) Jan 4 12:17:01 main /USR/SBIN/CRON[307]: (root) CMD ( cd / && run-parts --report /etc/cron.hourly) Jan 4 13:17:01 main /USR/SBIN/CRON[314]: (root) CMD ( cd / && run-parts --report /etc/cron.hourly) Jan 4 14:17:01 main /USR/SBIN/CRON[317]: (root) CMD ( cd / && run-parts --report /etc/cron.hourly) Jan 4 15:17:01 main /USR/SBIN/CRON[320]: (root) CMD ( cd / && run-parts --report /etc/cron.hourly) Jan 4 16:17:01 main /USR/SBIN/CRON[323]: (root) CMD ( cd / && run-parts --report /etc/cron.hourly) Jan 4 17:17:01 main /USR/SBIN/CRON[326]: (root) CMD ( cd / && run-parts --report /etc/cron.hourly) Jan 4 18:17:01 main /USR/SBIN/CRON[329]: (root) CMD ( cd / && run-parts --report /etc/cron.hourly) Jan 4 19:17:01 main /USR/SBIN/CRON[332]: (root) CMD ( cd / && run-parts --report /etc/cron.hourly) Jan 4 20:17:01 main /USR/SBIN/CRON[335]: (root) CMD ( cd / && run-parts --report /etc/cron.hourly) Jan 4 21:17:01 main /USR/SBIN/CRON[338]: (root) CMD ( cd / && run-parts --report /etc/cron.hourly) Jan 4 22:17:01 main /USR/SBIN/CRON[341]: (root) CMD ( cd / && run-parts --report /etc/cron.hourly) Jan 4 23:17:01 main /USR/SBIN/CRON[344]: (root) CMD ( cd / && run-parts --report /etc/cron.hourly) Jan 5 00:17:01 main /USR/SBIN/CRON[347]: (root) CMD ( cd / && run-parts --report /etc/cron.hourly) Jan 5 01:17:01 main /USR/SBIN/CRON[350]: (root) CMD ( cd / && run-parts --report /etc/cron.hourly) Jan 5 02:17:01 main /USR/SBIN/CRON[353]: (root) CMD ( cd / && run-parts --report /etc/cron.hourly) Jan 5 03:17:01 main /USR/SBIN/CRON[356]: (root) CMD ( cd / && run-parts --report /etc/cron.hourly) Jan 5 04:17:01 main /USR/SBIN/CRON[359]: (root) CMD ( cd / && run-parts --report /etc/cron.hourly) Jan 5 05:17:01 main /USR/SBIN/CRON[362]: (root) CMD ( cd / && run-parts --report /etc/cron.hourly) Jan 5 06:17:01 main /USR/SBIN/CRON[365]: (root) CMD ( cd / && run-parts --report /etc/cron.hourly) Jan 5 06:25:01 main /USR/SBIN/CRON[368]: (root) CMD (test -x /usr/sbin/anacron || ( cd / && run-parts --report /etc/cron.daily )) Jan 5 06:25:03 main syslog-ng[77]: Configuration reload request received, reloading configuration; Jan 5 07:17:01 main /USR/SBIN/CRON[424]: (root) CMD ( cd / && run-parts --report /etc/cron.hourly) Jan 5 08:17:01 main /USR/SBIN/CRON[427]: (root) CMD ( cd / && run-parts --report /etc/cron.hourly) Jan 5 09:17:01 main /USR/SBIN/CRON[430]: (root) CMD ( cd / && run-parts --report /etc/cron.hourly) Jan 5 10:17:01 main /USR/SBIN/CRON[433]: (root) CMD ( cd / && run-parts --report /etc/cron.hourly) Jan 5 11:17:01 main /USR/SBIN/CRON[436]: (root) CMD ( cd / && run-parts --report /etc/cron.hourly) Jan 5 12:17:01 main /USR/SBIN/CRON[439]: (root) CMD ( cd / && run-parts --report /etc/cron.hourly) Jan 5 13:17:01 main /USR/SBIN/CRON[442]: (root) CMD ( cd / && run-parts --report /etc/cron.hourly) Jan 5 14:17:01 main /USR/SBIN/CRON[445]: (root) CMD ( cd / && run-parts --report /etc/cron.hourly) Jan 5 15:17:01 main /USR/SBIN/CRON[452]: (root) CMD ( cd / && run-parts --report /etc/cron.hourly) Jan 5 16:17:01 main /USR/SBIN/CRON[455]: (root) CMD ( cd / && run-parts --report /etc/cron.hourly) Jan 5 17:17:01 main /USR/SBIN/CRON[458]: (root) CMD ( cd / && run-parts --report /etc/cron.hourly) Jan 5 18:17:01 main /USR/SBIN/CRON[461]: (root) CMD ( cd / && run-parts --report /etc/cron.hourly) Jan 5 19:17:01 main /USR/SBIN/CRON[464]: (root) CMD ( cd / && run-parts --report /etc/cron.hourly) ----------------------------------- _ _ _ | |___| (_) ___ | / __| | |/ _ \ | \__ \ | | (_) | |_|___/ |_|\___/ |_| Brought to you by linuxserver.io ----------------------------------- GID/UID ----------------------------------- User uid: 99 User gid: 100 ----------------------------------- We are now refreshing packages from apt repositorys, this *may* take a while MOD Default {} {} MOD Default {} {} MOD Default {} {} MOD Default {} {} Jan 5 20:38:50 main syslog-ng[78]: syslog-ng starting up; version='3.5.3' Jan 5 21:17:01 main /USR/SBIN/CRON[177]: (root) CMD ( cd / && run-parts --report /etc/cron.hourly) Jan 5 22:17:01 main /USR/SBIN/CRON[180]: (root) CMD ( cd / && run-parts --report /etc/cron.hourly) Jan 5 23:17:01 main /USR/SBIN/CRON[183]: (root) CMD ( cd / && run-parts --report /etc/cron.hourly) Jan 6 00:17:01 main /USR/SBIN/CRON[186]: (root) CMD ( cd / && run-parts --report /etc/cron.hourly) Jan 6 01:17:01 main /USR/SBIN/CRON[189]: (root) CMD ( cd / && run-parts --report /etc/cron.hourly) Jan 6 02:17:01 main /USR/SBIN/CRON[192]: (root) CMD ( cd / && run-parts --report /etc/cron.hourly) Jan 6 03:17:01 main /USR/SBIN/CRON[195]: (root) CMD ( cd / && run-parts --report /etc/cron.hourly) Jan 6 04:17:01 main /USR/SBIN/CRON[198]: (root) CMD ( cd / && run-parts --report /etc/cron.hourly) Jan 6 05:17:01 main /USR/SBIN/CRON[201]: (root) CMD ( cd / && run-parts --report /etc/cron.hourly) Jan 6 06:17:01 main /USR/SBIN/CRON[204]: (root) CMD ( cd / && run-parts --report /etc/cron.hourly) Jan 6 06:25:01 main /USR/SBIN/CRON[207]: (root) CMD (test -x /usr/sbin/anacron || ( cd / && run-parts --report /etc/cron.daily )) Jan 6 06:25:03 main syslog-ng[78]: Configuration reload request received, reloading configuration; Jan 6 07:17:01 main /USR/SBIN/CRON[264]: (root) CMD ( cd / && run-parts --report /etc/cron.hourly) Jan 6 08:17:01 main /USR/SBIN/CRON[267]: (root) CMD ( cd / && run-parts --report /etc/cron.hourly) Jan 6 09:17:01 main /USR/SBIN/CRON[270]: (root) CMD ( cd / && run-parts --report /etc/cron.hourly) Jan 6 10:17:01 main /USR/SBIN/CRON[273]: (root) CMD ( cd / && run-parts --report /etc/cron.hourly) Jan 6 11:17:01 main /USR/SBIN/CRON[276]: (root) CMD ( cd / && run-parts --report /etc/cron.hourly) Jan 6 12:17:01 main /USR/SBIN/CRON[279]: (root) CMD ( cd / && run-parts --report /etc/cron.hourly) Jan 6 13:17:01 main /USR/SBIN/CRON[282]: (root) CMD ( cd / && run-parts --report /etc/cron.hourly) Jan 6 14:17:01 main /USR/SBIN/CRON[285]: (root) CMD ( cd / && run-parts --report /etc/cron.hourly) Jan 6 15:17:01 main /USR/SBIN/CRON[292]: (root) CMD ( cd / && run-parts --report /etc/cron.hourly) Jan 6 16:17:01 main /USR/SBIN/CRON[295]: (root) CMD ( cd / && run-parts --report /etc/cron.hourly) Jan 6 17:17:01 main /USR/SBIN/CRON[298]: (root) CMD ( cd / && run-parts --report /etc/cron.hourly) Jan 6 18:17:01 main /USR/SBIN/CRON[301]: (root) CMD ( cd / && run-parts --report /etc/cron.hourly) Jan 6 19:17:01 main /USR/SBIN/CRON[304]: (root) CMD ( cd / && run-parts --report /etc/cron.hourly) Jan 6 20:17:01 main /USR/SBIN/CRON[307]: (root) CMD ( cd / && run-parts --report /etc/cron.hourly) Jan 6 21:17:01 main /USR/SBIN/CRON[310]: (root) CMD ( cd / && run-parts --report /etc/cron.hourly) Jan 6 22:17:01 main /USR/SBIN/CRON[314]: (root) CMD ( cd / && run-parts --report /etc/cron.hourly)
-
I have just had the need to install a new 8TB drive into each of my Backup and Main Servers and thought I would give this plugin a whirl. I have to say, from installation to execution so far this is an excellent piece of work and a pleasure to use. All those reasons to drop to the command line, using screen etc etc are all just disappearing into the realms of distant memory ...... It is work like this through the hard work of the community, in the addition of the bells and whistles like this (rounding off what is already and excellent product by Limetech) which make unRAID a very practical and essential piece of software in my life not to mention a joy to use with minimal effort. Thank you gfjardim. Haven't seen you around since November so I hope you are on an extended Christmas / New Year break and will be coming back soon! P.S. My only note to give was that I like others wanted to use Brians "Faster" preclear script (http://lime-technology.com/forum/index.php?topic=32564). I might have missed it but I didn't see a note in the thread saying that the script had to be named "preclear_disk.sh" in order for the plugin to find it. Pretty easy to figure out and once renamed everything was rosey. This is just in case anyone else has this issue and comes across this post! Only 3 cycles and 117 Hours to go!!
-
Mike install Community Applications plugin and all will become much much clearer.... Like he said. CHBMB is just too quick for me!
-
Community Applications Plugin. Its All about installing and managing Docker Apps. It integrates a Tab into the Gui called Apps which you can install from. Then they go into the Docker Tab once installed. Offical Description: This plugin will allow you to easily search for and add any of the unRaid docker or plugin applications. http://lime-technology.com/forum/index.php?topic=40262.0
-
Ah, so there is. I had my iPhone on landscape and didn't see it!!
-
I'm sure you can if you had the link to the repo. Just don't know what it is. You could try the support thread for HTPC Manager. The option to do this is still in the Docker Tab. Out of interest, when a more streamlined way of adding / managing the Apps (Dockers) exists why don't you want to use it?
-
Linuxserver.io have taken over management of this docker now. Search for it in Community Applicatikns Plugin.
-
Updated successfully as always. Looks so much cleaner now called Apps. Still not sure about Docker and Apps being seperate but the Plugin certainly looks very good! Just seen this though: "Note: All Applications listed here are 3rd party additions to unRaid. Neither the authors of Community Applications nor Limetech make any warranty as to the suitability of any applications listed herein" Did LT "make" you include this!? Have to admit I don't like it. Big red text in the middle of the screen. If you "Have" to have this there can we have some acknowledge button so once it's read once it will disappear??


