


danioj
Members
-
Joined
-
Last visited
Everything posted by danioj
-
Since you did a mock-up, I figured that I would do the same for how I would envision CA being integrated. No more plugins / Docker tabs at all. A single tab called Apps. Within that only the Docker Containers and Installed Plugins. No need to have Docker Repositories anymore at all, and the Install Plugin section is now also redundant (although cmd-line would still be available) I think its a cleaner display, and since CA is working towards a more unified UI between the two delivery methods, it only makes sense. That looks VERY nice!
-
For those that are reading - I would like you to know that is NOT my experience. I tested finless as has been suggested (both with a skirt and without) and the temps without fans under high I/O load were out of control. Without fans there is just no airflow in the case at all least of all over the drives. With the stock fans (as mine are now - I used the aftermarket fans I bought for another rig) are what my tests are based on (with skirt). No issue at all. I say this also as I am sat here on my couch on a 41'C ambient temp day in Melbourne AUS at my desk in shorts and no aircon (the aircon is blasting the living room right now so I can cool down later) and I am writing to the array a big multi hour job (50% through) and the drives (with fans running) are sitting at 36'C to 37'C. I do not in any way mean to suggest the previous poster has not experienced high temperatures but to suggest temperatures are higher in this case without fans over the fans that come with the case has not been my experience nor the experience of others I have spoken to on this forum with this case.
-
Nice build. Looks awfully familiar though!
-
I like your approach too. From what I'm reading of linuxserver.io they are indeed a great group of people. Thanks for your continued contributions though. Hope you don't disappear!!
-
I have to say (and it deserves the format of the line below) .... I F*****g LOVE this Plugin!!! Thank you! Excellent work!!!
-
+1 for no issues with Terracopy either. I use it ALL the time with Verify Copy enabled. Have thrown TB's of data around, never an issue. EDIT: I tell a lie. The v3.0 Alpha is a buggy thing. Crashes all the time. All my positive comments relate to the Stable versions.
-
Do you have a Backup of data? I hope so!!!
-
I just read this thread as my weekend tinkering begins after a shocking week @ work. Sounds great - I am going to play around. @jimbobulator: re your statement about Unraid maintaining enough resources for Web GUI / NAS functionality - Jonp said this in post #6
-
I tried to install this plugin today. Looks good - and wanted to have a play. I am running v6.0 RC4. Unfortunately I get an error that I am not able to diagnose. I wonder if someone can help. Plugin Install Log: plugin: installing: https://raw.githubusercontent.com/theone11/serverlayout_plugin/master/serverlayout.plg plugin: downloading https://raw.githubusercontent.com/theone11/serverlayout_plugin/master/serverlayout.plg plugin: downloading: https://raw.githubusercontent.com/theone11/serverlayout_plugin/master/serverlayout.plg ... done Installing plugin... Plugin folder /boot/config/plugins/serverlayout already exists Checking existing package /boot/config/plugins/serverlayout/serverlayout-package-2015.06.12.tar.gz... Latest package does not exist /boot/config/plugins/serverlayout/serverlayout-package-2015.06.12.tar.gz Saving any previous packages from /boot/config/plugins/serverlayout mv: cannot stat '/boot/config/plugins/serverlayout/serverlayout-package-*': No such file or directory Attempting to download plugin package https://raw.githubusercontent.com/theone11/serverlayout_plugin/master/serverlayout-package-2015.06.12.tar.gz... Package server down https://raw.githubusercontent.com/theone11/serverlayout_plugin/master/serverlayout-package-2015.06.12.tar.gz - Plugin cannot install Reverting back to previously saved packages... No previous packages to restored Plugin install failed plugin: run failed: /bin/bash retval: 1 Syslog: Jun 12 20:05:11 main emhttp: /usr/local/sbin/plugin install https://raw.githubusercontent.com/theone11/serverlayout_plugin/master/serverlayout.plg 2>&1 Jun 12 20:05:26 main logger: plugin: creating: /tmp/serverlayout-install - from INLINE content Jun 12 20:05:26 main logger: plugin: running: /tmp/serverlayout-install It is saying that the package server is down BUT when I paste the link into the web browser I can get the file and download it. I also did a wget of the file link on the unraid machine itself and that worked too. Stumped.
-
Yep, got it now. I was clicking the icon and bring up then menu. I didn't pick up (despite clearly reading it several times) the "name" of the VM was a link to another menu too, which of course you describe. Just tried it out and works as advertised. Still needed the partition tool for within Windows - that stupid recovery partition they put directly after the system partition which needs to be deleted (and wonderfully they remove the ability to remove it in the windows disk utility) as it prevents resizing into available space is a pain in the bum! But that isn't an Unraid issue. Thank you
-
*Running RC4. I just came across this post because I too have the need to grow a VM .img file a little. I have always been used to doing this from the command line BUT I was interested to try the GUI route. However, no matter what menu I selected no matter where I clicked I couldn't find the size setting of the "existing" .img file to change. Has this been removed recently or am I just blind. qemu-img resize vdisk1.img +5G That command worked like a charm. I DID have to do some partition fiddling within the Windows 10 VM as Windows created a recovery partition after the main system partition which stopped me from extending. AND for some reason Windows 10 doesn't want to let me delete it. So for those who come across this post who have a similar issue I used this free tool. http://www.easeus.com/partition-manager/epm-free.html They "Push" their paid versions obviously but this free version (not trial) should work fine.
-
https://lime-technology.com/forum/index.php?topic=39209.0 Hi @gfjardim!, I thought I would refer the above post in here! Are you still planning on releasing a container for Hamachi? If not, I might start working on it as my first docker experience, see if I can get it working! But if you are then I will pick something else. Ta Daniel
-
Just me abreviating Gary. Didn't want to write garycase.
-
Yep. I can't say "I agree with Gaz .." Because (while I do), well really, he helped me form the opinion. However, the above setup was selected as a backup server for me. (Which as you can see from above is complete). To be updated, but see my Project thread which shows a build of my replacement Main Server (not yet finished) which is an E12xx build for doing similar to what you mention. http://lime-technology.com/forum/index.php?topic=37567.0
-
Yep disk 1 was the warmest and what you mention is correct. Fan speeds (the Stock ones) were being reported in the BMI interface running at 1000 RPM. Sorry fellas - there was allot off text. I admit difficult to spot. In summary yes - I setup and run the test on the rig with all filters attached. In short - skirt aside (to manage the airflow) and the subsequent addition of the NF-12's (which as me and Gaz mention was probably an addition that wasn't really required for the sake of an extra 2C) I didn't fiddle with the default configuration of any component.
-
Hi Guys, To close off my part of this testing story, the other day I completed a Parity Sync with the new Noctua Fans installed as well as the custom skirt. Here are the results. Disk 1: Start Temperature: 26C, Finish Temperature: 34C, Peak Temperature**: 34C Disk 2: Start Temperature: 27C, Finish Temperature: 31C, Peak Temperature**: 33C Disk 3: Start Temperature: 25C, Finish Temperature: 30C, Peak Temperature**: 32C Motherboard Temperature: 37C CPU Temperature: 36C ** Note that for the peak temperature for this run I checked the temperature exactly half way through (so it might not be the true peak) - best I could do without watching it for hours and hours. To add to the conclusion I stated above - air flow is still the key here. The stock fans did a great job and as I mentioned I was happy and the temperatures were excellent. The Noctua NF-F12's have shaved ~2 degrees off what I recorded before with the stock fans which is always nice. However in my opinion I don't feel ~2 degrees is worth AUD $30 each I paid for them - AUD $90 for 2 degrees, if I hadn't already bought them before I had done the earlier test I wouldn't have done so again!
-
Will do. The Fans are arriving tomorrow. Given I am running a long S.M.A.R.T test as Weebo advised when thats done Ill install the fans so when I run a Parity check Ill have them in the case and then Ill post the results.
-
Well, I have just finished a preclear of my 8TB drives with the Custom Skirt in place. As a means of bringing my test together I have summarised. ASRock C2550D4I Mini ITX Motherboard Kingston 4GB (1x4GB), PC-12800 (1600MHz) ECC Unbuffered DDR3L, ValueRAM, CL11, 1.35V, Single Stick Silverstone ST45SF-G 450W SFX Form Factor Power Supply - ST45SF-G 3 x Seagate 8TB Archive HDD, SATA III, 5900RPM, 128MB (in top 3 bays). Configuration: There is nothing but trays in the remaining bays and case is running stock fans in default configuration (as attached) with all filters attached as designed. Location: My desktop next to a window which gets some sun throughout the day so some UV exposure BUT the ambient temperature outside over the test has not exceeded 29C. For 8 hours per day (night time) I have had the heating in the house set to 27C. 2 Preclear runs with a time of: ~58 Hours (give or take 40 minutes over the 3 drives) Run 1: Without Custom Skirt: Disk 1: Start Temperature: 42C, Finish Temperature: 41C, Peak Temperature*: 44C Disk 2: Start Temperature: 39C, Finish Temperature: 39C, Peak Temperature*: 41C Disk 3: Start Temperature: 37C, Finish Temperature: 36C, Peak Temperature*: 40C Motherboard Temperature: 35C CPU Temperature: 35C *Note: Peak temperature for Run 1 was captured from S.M.A.R.T reports at end of the run as I knew these were the highest temperatures these new disks had experienced. Run 2: With Custom Skirt: Disk 1: Start Temperature: 31C, Finish Temperature: 35C, Peak Temperature**: 36C Disk 2: Start Temperature: 30C, Finish Temperature: 33C, Peak Temperature**: 34C Disk 3: Start Temperature: 29C, Finish Temperature: 32C, Peak Temperature**: 33C Motherboard Temperature: 39C CPU Temperature: 38C **Note: Peak temperature for Run 2 was captured through observations recorded at 6 Hour Intervals as I knew I wouldn't be able to rely on S.M.A.R.T reports. I am still going to put the Noctua NF-F12 fans in there. As Gary mentioned before: a 1500rpm unit like this would "likely" provide about 25% more airflow than the stock fans => and a high quality unit like the Noctua NF-F12 will run at 1500rpm with the same 22dba noise level the stock fans have at 1200rpm. And I am more than happy with the noise level of the case which is pretty much silent to my ears (and that is with it sat next to me on my desktop - not lower down on a shelf near the floor where it will be when I'm done). To conclude, I love this case. If I had to go back and make the decision to buy it again I would without hesitation. I would have lived with the temperatures noted in Run 1 but the addition of the custom skirt has made them much more acceptable. I feel the addition of more drives (though to capacity) will not materially impact the overall temperature of the case and that (barring the 1 or 2 drives) won't impact temperatures more than 1C or 2C more. With the addition of the Noctua fans mentioned above I think Ill shave another 2C off the temperatures reported in Run 2. Based on this test I will not be "Modding" the drive cage or the case further with additional holes. I feel that adding additional holes does not guarantee better results and it has even been mentioned to me that this "could" have a negative impact on the temperatures (although this is so far unsubstantiated at the time of this post). Im also not going to replace the Cardboard skirt with an Aluminium one because I don't feel there is a need. I feel Silverstone have done a good job with this case and with a little airflow control the temperatures are great for such a nice SFF case. I hope this is helpful. If anyone wants any more details or information that I have not recorded please let me know.
-
If you need anything from me - eg measurements etc just let me know and I'll provide.
-
Gaz, that's funny 'AS' - 15 mins ago I just ordered 3 of them!!! I felt, as you mention, that the exisiting holes in the cage are adequate enough with my custom skirt. http://cplonline.com.au/index.php/noctua-nf-f12-pwm-120mm-1500rpm-pwm-fan.html
-
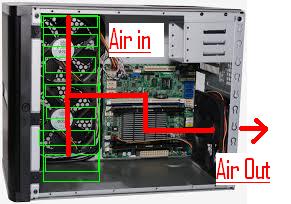
UPDATE!: As some of you may know following my other thread about the Seagate 8TB HDD's I have recently purchased (and as I mention in this thread earlier) I have been pre clearing like a maniac for the last 5 days with three disks in in the DS380 and as such testing the cooling capabilities of the case. I reported above that I was experiencing temps for disk1, disk2, disk3 of: 37C, 40C, 35C. After about 50 Hours of continued use in a pre clear those temperatures rose by a degree or s (worst case) and were sustained. While I agree with Garaycase that if I can sustain those temperatures I am well within Manufacturers Operating Temperature Spec's I thought - can I improve them - at very least give me headroom for increased temperatures due to additional disks in the future. For the purpose of this thread (ONLY) I was fortunate enough to have a Power Cut mid pre clear cycle 2 so I had to restart. So for redoing cycle 2 I only run 1 cycle so I could have a look at the reports and not wait for 3 cycles to finish. Anyway .... last night when cycle 2 finished I decided to explore a mod to the case (sort of) that came to me. I was thinking at work - how do I ensure the air from those fans goes over the drives??? STEP 1: I am looking at putting an aluminium plate between the fans and the motherboard and STEP 2: drilling holes in the drive cage on either side. The idea is to restrict air going into the main part of the case and just being evacuated and "forcing" it over the drives as well as increasing the exposure of the drive to the air by creating a little compartment of sorts where the fans are installed so the air can ONLY go over the drives. I completed a prototype of STEP 1 last night using cardboard from the side flap of the cases' box cut exactly the size of the gap between the cage and the edge of the fans sitting just on top of the small gap between the motherboard and the drive cage. If you can picture it the drive cage itself sits on the cut out thus applying a bit of pressure between the cage and the side of the case and thus keeping it in place (for now as its just a prototype). Tools for this little Prototype: From the Top of the fans: From the Middle of the fans From the bottom of the fans: *Sorry the pictures are so poor - due to case design this is the best I could get from in or out - but as you can see the cut out goes from the top to the bottom of the case creating a sealed compartment where the fans are from the rest of the case pushing air over the drives and then over the board and CPU and then out the back* The ambient temperature with all disks spinning after half an hour was 27C which I am happy with. To give me a real world example I cranked the heating in the house to 27C to make it as warm outside as inside the case and I started a third pre clear. I checked for 10 mins that things weren't going to increase to an ridiculous temperature and when satisfied that my concept was at least not going to do a destructive job on the drives, I went to bed. This morning, I am pleasantly surprised: Preclear is reporting (after 7 hours of continuous use) disk1, disk2, disk3 of 37C, 36C, 34C (Also noteworthy IPMI reports that the Motherboard and CPU temperatures are 39C, 38C). At very least I seem to have been able to "improve" the airflow and not make it worse. In addition keeping the temperatures under 40 is nice! :-). I don't know if things will improve if I switch from cardboard to Aluminium? I am also wondering if I need to bother with drilling the holes. Anyway, lets see how they stand after the full 50 hour cycle 3 pre clear is done. Will update.
-
Perhaps. Remember to post your mods when you are done. Just in Case! Anything's possible, but I really doubt that you'll have any significant problem with temps. The Lian-Li PC-Q25B has similar airflow, and the temps with 3 drives vs. the temps with 7 drives when I fully populated the case were not appreciably different (perhaps 1 degree higher on the upper drives). I think you are right. As I noted in the other thread about the Seagates - I am also thinking that the high temp experienced on the 2nd drive is due to it being a bad drive. It is now running at 42C and the others 39 and under after a whole day of operation - BUT what makes me think it is bad is that it has dropped behind disk 3 in the % complete even though it was started a few mins earlier. I don't think it should have. Time will tell.
-
Perhaps. Remember to post your mods when you are done. Just in Case!
-
I think you are right. They are all sat at 99% now for Cycle 1 of 3 pre read and they are at: Disk 1 (Top Bay) is reporting - 38 C - Preclear Running Time: 19hrs 41 mins Disk 2 (Second Bay) is reporting - 40 C - Preclear Running Time: 18 hrs 32 mins Disk 3 (Third Bay) is reporting 35 C - Preclear Running Time: 18 hrs 27 mins I think they are working out MAX now and I doubt the rest of the preclear script is going to increase the workload considerably. Time will tell over the next 3 days and I will post updates BUT I think the fan config is more than fine and I don't intend to tweak. Interesting that the middle bay of the top 3 bays has a higher temp than the others. I don't know what is causing that - maybe the drive itself - maybe the case design - maybe combination of all that plus components - who knows. As you mentioned in your earlier post I half expected the top one to be the hottest. Whatever way I think I am happy. This is a great case. P.S. I feel I am going to have to just keep an eye on things as I add more drives though - but thats nothing new.
-
UPDATE: Currently ALL disks are in cycle 1 of 3 preclear cycles (Currently in Pre Read). Disk 1 (Top Bay) is reporting - 37 C - Preclear Running Time: 14hrs 21 mins Disk 2 (Second Bay) is reporting - 40 C - Preclear Running Time: 13 hrs 12 mins Disk 3 (Third Bay) is reporting 34 C - Preclear Running Time: 13 hrs 7 mins It was a relativley cool night. In fact I went to bed a bit cold. When I went to bed Disk 1 was at 39 C, Disk 2 was at 41 C and Disk 3 was at 36 C I am quite surprised to see the temps are lower this morning. Given it is warmer and the sun is on the box too this morning - it was dark last night. A little concerned about drive 2 given what I saw before bed. I don't like to see my drives go over 40 C. Even on a preclear. But seems ok now.


