





timg11
Members
-
Joined
-
Last visited
Everything posted by timg11
-
From the Main page, I needed to reboot Unraid to change VFIO passthrough for a VM. I selected Reboot after stopping VMs and Dockers. It started the process and the Array seemed to stop in a minute or so. Now I have this screen that has gone on for 10 minutes. The T440 fan has increased to maximum speed. Reboot - T440 Array Stopped System is rebooting 612 Is something going on? I supposed I'll have to use IDRAC to power cycle it, but I'd prefer to have reboot from Unraid work as expected.
-
The integrated VGA in this T440 server shows the BIOS and the Unraid boot process. It ends with a text mode shell display, but after 10 minutes or so, times out and the screen blanks. How can I configure Unraid so the VGA display controlled by the Unraid system remains active?
-
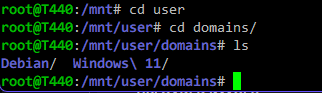
I tried what @JorgeB said, and did a block commit on the newest snapshot for the Windows VM, with pivot and delete. That deleted that one snapshot but 3 remain. @jorge said "It will commit all the changes since the snapshots to the backing vdisk and delete the snapshots", but since I see a different behavior, I'm checking back here with the experts before proceeding. It's not urgent to delete these snapshots and I definitely don't want to break or corrupt the VMs. I've attached the snapshots.db from the Windows 11 VM. cat-snapshots.db-Win11.txt Here is how the VM looks after the one commit: I re-started the VM and verified that it came up properly. Nothing seems to have been lost, so it is in the desired state. So should I just repeat the block commit on each of the other snapshots, starting at the bottom (most recent) Yes /mnt/user/domains has the VM. Here is the directory with my two VMs. I was not paying attention and forgot to use a Linux-friendly name for the Windows VM - Now I'm not sure what would happen if I changed it to Windows_11. Sorry the paste function on this site is broken again. I cannot paste any text, only images.

-
That graph looks exactly like what I observe. Thanks! (Curious about the little jump back to 250 right at the end by 100%, though)
-
Yesterday, I started a parity check on my array of 16T drives to be sure it is error-free before upgrading a drive. After 3 hours, it had reached 12%. Reads from the Array drives were reported at about 250 MB/s. 16,000,000 Mbytes / 250 MB/s = 17.7 hours. I'm assuming this is a physical level process, and the fact that the drives are 50% full doesn't matter. Today after 20 hours running, it is at 61%. Reads from the Array are now running around 150 MB/s. What happened? Drive temperatures have gone from 34C to 41C since yesterday. Is that hot enough to cause them to slow down to prevent overheating? Edit - now at 22 hours, speed is down to 120 MB/s, and estimate is 17 more hours to completion. If it continues to slow, it may never finish?
-
New user of this plugin here. It was recommended as useful to keep track of mapping between array drives and physical slots in a server. I just installed, and see this on the dashboard: Please configure Disk LocationFirst go to "System", click "Force SMART+DB", this might take some time depending on how many drives you have installed. Then the stern warning on the System tab "Force SMART+DB" button: NB! Operations done on this page will execute without warning or confirmation and cannot be undone after execution! Can anyone explain what Force SMART+DB actually does? Does it pose any risk to my array?
-
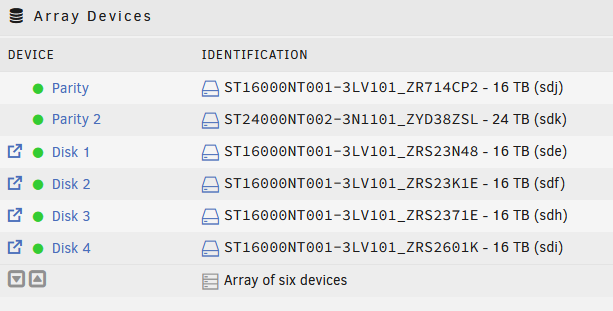
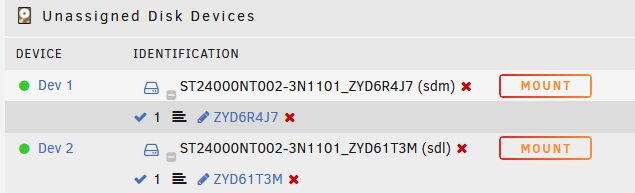
I want to upgrade a drive in an array from 16T to 24T. I have added at 24T Parity drive and the parity sync process is complete. Now there are two parity drives. I want to add one of these unassigned drives to the array: I understand I must first remove the 16T Parity before I can add a 24T drive to the array. So I stop the array and remove "Parity". Then what is the exact process to "unassign" Disk 4 from the Array, and Assign Device Dev 1 in its place. I want to end up with a 24T Parity, one 24T drive and 3 16T drives in the array. I will physically remove the current 16T parity drive, so I'll end up with one Unassigned 24T drive. Is this a standard "Drive Replacement" process? Will the 24T drive assigned to the array be automatically re-built with the correct data from Parity when the Array is started?
-
@Kilrah thanks for the tip. I'm very new to docker maintenance on Unraid. I installed the Docker container in early August. On the tags page, there are quite a few tags - sorted by Newest: TAG 2 Last pushed 27 days by gotifyci TAG 2.7 Last pushed 27 days by gotifyci TAG 2.7.3 Last pushed 27 days by gotifyci TAG latest Last pushed 27 days by gotifyci TAG 2.7.2 Last pushed about 1 month by gotifyci TAG 2.7.1 Last pushed about 1 month by gotifyci TAG 2.6 Last pushed 6 months by gotifyci So I assume I would use TAG 2.6 since all the others are one month old, which is after I installed, and this is the first time I've attempted an update. In the Container settings, I would change the Repository: setting from "gotify/server:latest" to "gotify/server:2.6" - correct? PS Now that I realize how important it is to keep track of Docker versions to be able to roll back to last known working, I looked at my other Docker containers. Some have clear indications in the Repository: field, like "11notes/unifi:7.5.187-unraid" or "postgres:17 ". But one is ambiguous "grafana/grafana". How would I know the current tag if I needed to roll back? Edit - I went ahead and tried 2.6. Here is the update report: Pulling image: gotify/server:2.6 IMAGE ID [2.6]: Pulling from gotify/server. IMAGE ID [63ce8e957633]: Pulling fs layer. Downloading 100% of 28 MB. Download complete. Extracting. Pull complete. IMAGE ID [e7def9680541]: Pulling fs layer. Downloading 100% of 93 B. Verifying Checksum. Download complete. Extracting. Pull complete. IMAGE ID [9a1821c438b4]: Pulling fs layer. Downloading 100% of 9 MB. Verifying Checksum. Download complete. Extracting. Pull complete. IMAGE ID [ad316556c9ff]: Pulling fs layer. Downloading 100% of 10 MB. Verifying Checksum. Download complete. Extracting. Pull complete. Status: Downloaded newer image for gotify/server:2.6 TOTAL DATA PULLED: 47 MB Removing container: gotify Successfully removed container 'gotify' Command executiondocker run -d --name='gotify' --net='bridge' --pids-limit 2048 -e TZ="America/Chicago" -e HOST_OS="Unraid" -e HOST_HOSTNAME="T440" -e HOST_CONTAINERNAME="gotify" -e 'GOTIFY_DEFAULTUSER_PASS'='admin' -l net.unraid.docker.managed=dockerman -l net.unraid.docker.webui='http://[IP]:[PORT:80]' -l net.unraid.docker.icon='https://raw.githubusercontent.com/A75G/docker-templates/master/templates/icons/gotify.png' -p '8070:80/tcp' -v '/mnt/user/appdata/gotify/':'/app/data':'rw' -v '/mnt/user/appdata/gotify/config/':'/etc/gotify':'rw' 'gotify/server:2.6' 3d73778914e7ceb914d36cbb52c28e3f2df4622a2b8545928a1a945ef9ebadd2 The command finished successfully! The Gotify container started itself and is now running again. Oddly it says "Up To Date" - maybe it only checks periodically? Thanks again for the help!
-
I just updated my Gotify Docker container in Unraid. Now it fails to start. The docker settings in Unraid don't seem to have a "revert update" options. The log messages are below. How can i fix this? panic: error while loading plugin gotify-smtp-emailer-linux-amd64-for-gotify-v2.6.3.so: plugin.Open("data/plugins/gotify-smtp-emailer-linux-amd64-for-gotify-v2.6.3"): plugin was built with a different version of package internal/goarch goroutine 1 [running]: github.com/gotify/server/v2/router.Create(0xc000410230, 0xc000358090, 0xc0003501a0) /src/gotify/router/router.go:93 +0x2e16 main.main() /src/gotify/app.go:48 +0x27a panic: error while loading plugin gotify-smtp-emailer-linux-amd64-for-gotify-v2.6.3.so: plugin.Open("data/plugins/gotify-smtp-emailer-linux-amd64-for-gotify-v2.6.3"): plugin was built with a different version of package internal/goarch goroutine 1 [running]: github.com/gotify/server/v2/router.Create(0xc00007b410, 0xc000358090, 0xc0003501a0) /src/gotify/router/router.go:93 +0x2e16 main.main() /src/gotify/app.go:48 +0x27a Starting Gotify version 2.7.3@2025-09-21-12:13:23 Loading plugin data/plugins/gotify-smtp-emailer-linux-amd64-for-gotify-v2.6.3.so Starting Gotify version 2.7.3@2025-09-21-12:13:23 Loading plugin data/plugins/gotify-smtp-emailer-linux-amd64-for-gotify-v2.6.3.so
-
Thanks @JorgeB here are the screenshots:


-
I would like to remove the snapshots off my VMs, but I read varying approaches here. I just want to get back to a single, clean .IMG file. I don't want to risk destroying my VMs. @SimonF gave a great intro on creating snapshots, but now that I have a better understanding, I want to remove them. I'm not finding good information - the official documentation apparently hasn't been written yet. As I explained above Gemini AI is taking me down an increasing complex path that seems risky, and has a good chance of being completely incorrect or destroying my VM. is there is simple, safe way to remove snapshots from a VM and get the VM back to operating from a single IMG file?
-
So I'm still working on this array drive upgrade, trying to minimize downtime and disruption. I discovered that stopping the array is not a simple matter, and may require in a full reboot, or hours of waiting with the system unavailable. So I'm trying to add these drives with the fewest times I need to stop the array. My goal is to replace the parity drive and one of the array drives with 24T drives. I now have 6 16T drives installed in 6 of the 8 bays in the T440. That is 1 for parity, 4 for array data, and one unassigned. Phase 1 - first array stop: 1) Stop the array. 2) remove the unassigned 16T drive, replace it with a 24T drive into the sled, and insert back into server. 3) From Array configuration assign one of the new 24T drive as an additional parity drive. 4) Leave the other 24T drives as Unassigned. 5) Bring up Array. Then I would wait 2 days until the 24T Parity drive has completed the parity check process. That would temporarily give me two parity drives. Phase 2 - second array stop once Parity check is completed. My next step would be logically replacing one of the 16T drives in the array with a 24T drive that was installed previously. 1) stop the array, 2) remove a 16T active data drive from the array, 3) add a 24T drive to the array, configure it as part of the array (how do I tell Unraid this is a replacement for the 16T drive I removed?) 4) Physically remove the 16T parity drive since the array will have a 24T drive in it a 16T parity is no longer possible. Install the 3rd 24T drive in that sled and leave as Unassigned. 5) Start the Array 6) Let Unraid update the 24T data drive based using the Parity (2 days) Please advise if this is the proper process. Would there be any time savings possible by copying data from one of the 16T array drives to the new 24T drive while it is unassigned and the parity check is underway on the new 24T parity drive? Would that data copied to the 24T when unassigned be usable by the array and reduce the copying needed from the parity once the 24T drive is part of the array? At the end of this process I will have 3 24T drives and 3 16T drives installed in the T440. The Unraid array will have 3 16T drives and 1 24T drive for data, 1 24T drive for parity, and 1 24T drive for unassigned.
-
I'm using Firefox 143.01 on Windows 11. Firefox usually works, but recently it has periodically lost the ability to paste text from the clipboard into messages here. Neither CTRL-V nor the right-click paste options work. Are there any workarounds? Is there a process for filing bug reports on the forum itself?

-
I am trying to clean up snapshots on my VM. The information provided above by Gemini was incorrect. Now it says the correct process is removing snapshots from newest to oldest: Step-by-Step Consolidation (Newest to Oldest) You must use the Remove option on each snapshot in this sequence: Remove: vdisk1.S20250927123248qcow2 (Newest) Action: The data from this file is merged into its parent, vdisk1.2025-09-01--generateqcow2. Result: The file vdisk1.S20250927123248qcow2 is deleted. Remove: vdisk1.2025-09-01--generateqcow2 Action: The combined data from this updated file is merged into its parent, vdisk1.S20250824132729qcow2. Result: The file vdisk1.2025-09-01--generateqcow2 is deleted. Remove: vdisk1.S20250824132729qcow2 Action: The combined data is merged into its parent, vdisk1.Windows--generateqcow2. Result: The file vdisk1.S20250824132729qcow2 is deleted. Remove: vdisk1.Windows--generateqcow2 (Oldest Snapshot) Action: The final combined data is merged into the base disk, vdisk1.img. Result: The file vdisk1.Windows--generateqcow2 is deleted. Upon completion, only the single, consolidated vdisk1.img file will remain, ready for offline backup. However, attempting to remove the newest gives "Execution error - Image currently active for this domain." The VM is stopped but apparently " the underlying disk image is still being held by the system's virtualization layer (libvirt/QEMU)." Then Gemini suggested releasing it like this: root@T440:~# virsh list --all Id Name State ----------------------------- 1 Debian running - Windows 11 shut off root@T440:~# virsh destroy "Windows 11" error: Failed to destroy domain 'Windows 11' error: Requested operation is not valid: domain is not running root@T440:~# That failed too. Now Gemini suggests: "undefine the domain. Undefining the domain removes its configuration from libvirt's memory, which is the final step that typically releases all persistent resource locks.." I'm getting suspicious of this long, complex rabbit trail from Gemini. Surely it can't be so difficult to use and manage snapshots. Can anyone point me to any guidelines or threads on best practices for managing and cleaning snapshots for Unraid VMs?
-
I started another thread describing my days of effort trying to get the NVS300 to work. Nobody responded, but it is there as a cautionary tale. I think I reached the end of the road on things to try to resolve the Error 43. Apparently there are QEMU features that can work around the issues, but they are not supported in Unraid. So I have given up on the NVS300 and ordered ZOTAC GeForce GT 710. It was more expensive, but now I understand why the NVS300 was lower cost.
-
I had to use IDRAC to power down the server to recover. Now it is doing the 2-day parity check. For future reference how can I discover open files and try to close them at the source, or if not possible, forcibly close them? This is a NAS after all, and multiple computers are accessing files on the array. I found the App Open Files v2. That might help on identifying. The steps for stopping the array would be: 1) Stop VMs 2) Stop Docker containers 3) Check Open Files v2 to see if any other files are open and close them at their source 4) Stop Array If 3) shows "phantom" files that appear to be open but have no real client, is there a way to force close them from an SSH terminal so the Stop Array will not hang?
-
I'm trying to add a drive, and stopped the array. It is a T440, which supports hot swap, but I understand the array has to stop to add/remove. After 15 minutes the status at the bottom of the browser is still: Array Stopping - retry unmounting user shares. However the dashboard says everything is stopped. Array Stopped, Cache Stopped, Unassigned Stopped. I've refreshed the Unraid browser and the note at the bottom status bar persists: Array Stopping - retry unmounting user shares. Now 30 minutes in, and I don't have the option to just restart the array and try again another day. The Start button is gone. Array operation says "Stopping" What is the proper way to handle this situation? Wait indefinitely? Shut Down? How can I debug? Edit 15 minutes later: Yikes - I can't even restart Unraid cleanly - Reboot - T440 Array Stopping Retry unmounting user share(s)... System is going down... 934
-
I have continued to work on this problem, and I'm apparently at the end of the line for suggestions from Gemini. Adding the ROM (VBIOS Passthrough) did not help. The VBIOS I read from the NVS300 using GPU-Z did not work. I downloaded 3 other BIOS files and tried them: https://www.techpowerup.com/vgabios/216753/216753 VGA BIOS Collection GT218 NVIDIA GT218 NVIDIA GT218 1024 MB BIOS 216753.rom 10/04/2025 02:51 PM 64,000 216753.rom https://www.techpowerup.com/vgabios/145002/145002 VGA BIOS Collection GT 218 NVIDIA GT 218 NVIDIA GT 218 1024 MB BIOS 145002.rom 10/04/2025 02:53 PM 64,000 145002.rom https://www.techpowerup.com/vgabios/169757/169757 VGA BIOS Collection gt218 NVIDIA gt218 NVIDIA gt218 512 MB BIOS 169757.rom 10/04/2025 02:55 PM 61,440 169757.rom Since these were not the full size of the ROM, I padded them to 65536 bytes using dd dd if=/dev/zero bs=1 count=1536 >> GT218_1GB_A.rom I ended up with root@T440:/mnt/user/isos/vbios# ls -l total 256 -rwxrw-rw- 1 root root 65536 Oct 4 14:45 GT218.rom* -rwxrw-rw- 1 root root 65536 Oct 4 15:09 GT218_512MB_145.rom* -rwxrw-rw- 1 root root 65536 Oct 4 15:06 GT218_512MB_169.rom* -rwxrw-rw- 1 root root 65536 Oct 4 15:09 GT218_512MB_216.rom* root@T440:/mnt/user/isos/vbios# I tested each of these, editing the XML while the VM was shut down. None worked - always error 43. Gemini suggested adding these lines to the <hostdev> for the NVS300: <qemu:arg value='-set-device'/> <qemu:arg value='pci-assign,id=hostdev1,x-vga=on'/> I didn't notice until later, but the VM system removed these lines silently. Later when I noticed, Gemini said to add them a different way, but that failed due to QEMU errors. Gemini also tried adding these to the <hyperv> block <ioapic state='on'/> <-- NEW FIX LINE 1 <msrs state='on'/> <-- NEW FIX LINE 2 That failed with "VM creation error unsupported configuration: unsupported HyperV Enlightenment feature: ioapic" when saving the XML I removed the ioapic, and it still failed with " VM creation error : unsupported configuration: unsupported HyperV Enlightenment feature: msrs " Then it tried a "Host Bridge Fix" <qemu:commandline> <qemu:arg value='-device'/> <qemu:arg value='ich9-rom'/> </qemu:commandline> When starting the VM, this caused this error: "Execution error -- internal error: process exited while connecting to monitor: 2025-10-04T20:50:45.374359Z qemu-system-x86_64: -device ich9-rom: 'ich9-rom' is not a valid device model name " Then Gemini suggested . Add the ROM Bar Flag. modifying the rom line like this: <rom file='/mnt/user/isos/vbios/GT218_512MB_145.rom' bar='off'/> Didn't work =- still error 43. At this point Gemini said to remove the previously added x-vga=on lines. They were gone. Gemini said that libvert will remove things it doesn't understand. So we tried doing it a different way: <qemu:commandline> <qemu:arg value='-set-device'/> <qemu:arg value='pci-assign,id=hostdev1,x-vga=on'/> </qemu:commandline> </domain> That resulted in this error when starting the VM: " Execution error -- internal error: process exited while connecting to monitor: qemu-system-x86_64: -set-device: invalid option " Gemini is out of options. I asked if there are any changes in Unraid 7.1.4 since 7.0.1 that might improve QEMU in this case. It said "The release notes do not explicitly confirm that the underlying QEMU or libvirt packages have been updated to support the specific features that failed" Does anyone have any further suggestions on how to get this to work? I've attached the transcript of my multi-day session with Gemini I am trying to make an NVIDIA NVS300 video card available to Windows in a VM running in Unraid 7.docx , as well as my XML for the VM. XML-2025-10-04f.xml
-
@JorgeB Thank you for your help. I finally got the storage expanded in the VM. It's disappointing the BOSS card didn't allow the SSDs to run under native Unraid control, but I was able to expand the space to use the new drives. That was just the first step in a more complex process, because the Windows VM recovery partition had to be moved to the end before I could expand the data partition. That required booting into Image For Linux, which meant mounting a new CDROM ISO in the VM, which had its own complications with IDE/SATA issues. The boot order must be adjusted in the VM settings since it is impossible to get an F12 keystroke through VNC before Windows starts booting. Once I got the partitions arranged and expanded, Windows was able to see the larger drive.
-
I have not performed this upgrade since I've been solving other issues. I had another thought about the process, though. Could I stop the array, install the new 24G drive, start the array and add the new drive as a 2nd parity? That would keep the existing 16G drive as a functional parity while the parity is generated on the new drive. Then when complete, I could remove the old parity drive or leave it installed but move it to Unassigned? Is it allowed to have a 16G parity drive at the same time as a 24G parity, as long as none of the array drives are larger than 16G? I also learned something about the parity check process. It seems to pause if the array is busy with reading or writing from clients. A parity check was running today from the crashes yesterday. It was at 53.4% when I started copying about 200G of data to the array. That took a couple of hours. During the copy, the parity did not move from 53.4%. After the copy was done, it started increasing again. I presume this is by design to keep from slowing down the system during parity checks. It's good to know in the context of drive upgrades, though.
-
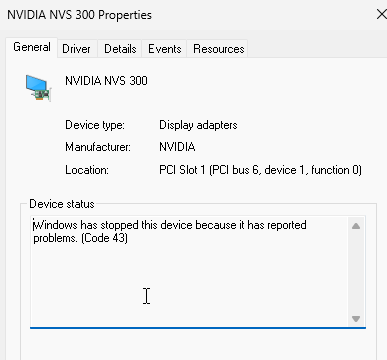
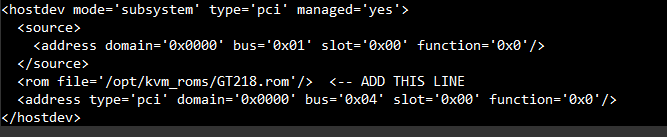
I installed an NVIDIA NVS 300 video card in my Dell T440. I know it is old - don't need any performance or GPU, just a basic HDMI video output that can be used with a Windows 11 VM. I didn't want to use my last PCIe x16 slot, so I found a video card with a PCIe X1 interface. I found from prior experience that passing through the Matrox video that is on the T440 motherboard to the Windows 11 VM crashes Unraid when the VM tries to restart. Apparently the passthrough doesn't share nicely with the T440 BIOS and/or Unraid's boot console. Now I have the NVS 300 installed. It is recognized by Unraid, and I have bound it to VFIO at boot: I have passed it through to the Windows 11 VM as a multifunction device with this XML: <hostdev mode='subsystem' type='pci' managed='yes'> <driver name='vfio'/> <source> <address domain='0x0000' bus='0x17' slot='0x0' function='0x0'/> </source> <address type='pci' domain='0x0000' bus='0x06' slot='0x1' function='0x0' multifunction='on'/> </hostdev> <hostdev mode='subsystem' type='pci' managed='yes'> <driver name='vfio'/> <source> <address domain='0x0000' bus='0x17' slot='0x0' function='0x1'/> </source> <address type='pci' domain='0x0000' bus='0x06' slot='0x1' function='0x1'/> </hostdev> The Windows 11 VM boots and recognizes the NVS300 in Device Manager. But it has "problems" - Error code 43. Searching on Gemini on this error, it recommended "spoofing" the hypervisor with the following XML code which I added to the VM's configuration, modifying the <features> section like this: <features> <acpi/> <apic/> <hyperv mode='custom'> <relaxed state='on'/> <vapic state='on'/> <spinlocks state='on' retries='8191'/> <vpindex state='on'/> <synic state='on'/> <stimer state='on'/> <vendor_id state='on' value='1234567890ab'/> </hyperv> <kvm> <hidden state='on'/> </kvm> </features> With that change I still have the same error. Gemini now recommends adding a VBIOS ROM. I was able to read the ROM using GPU-Z and now have a file GT218.rom. The recommendation is to add a tag to the <hostdev> block like this: (apologies for image - for some reason text Paste has stopped working...) I have not tried this yet. I'm going to be working on other things for a few days, so I wanted to get the input from experts here in the meantime before proceeding.

-
I selected the NVIDIA NVS 300 because it fits in an PCIe 1X slot. My use case is only a basic display, no GPU, video, or anything demanding is required. I'm having problems getting it to run - I've got the VFIO binding done, the XML for hostdev in the VM. Device Manager recognizes there is an NVS300 in the Windows VM, but it is giving Error 43. I will start another thread on that topic. Thank you for your help - by removing the Matrox pass-through I am now able to start and stop the Windows VM without crashing Unraid. The matrox VGA output now continues to display the Unraid boot terminal, and eventually goes to sleep. I'm not sure if memory ballooning was also a problem, but eliminating that alone did not stop the crashes. I'll leave it at 16G fixed for now.
-
Now on to making the NVIDIA NVS 300 card available to the Windows VM. Here are the details from Tools / System Devices. There is the option to click the checkboxes in that menu and click on the button "Bind Selected to VFIO at boot" Or there is the XML way, which would be presumably to add this to the VM configuration: <hostdev mode='subsystem' type='pci' managed='yes'> <driver name='vfio'/> <source> <address domain='0x0000' bus='0x17' slot='0x0' function='0x0'/> </source> </hostdev> Are these doing the same thing, or is there a benefit of one over the other? Edit1: checking the checkboxes for "Bind Selected to VFIO at boot" does not work. The NVIDIA is not visible to the Windows VM. The video is not initialized with a monitor connected. So I assume the XML is required. Unfortunately, the checkbox method in System Devices requires a full reboot of Unraid, so I'll have to reboot again. I'm discovering that the "Reboot" button on the Main page of Unraid doesn't seem to work right. It shuts down, but the system never came up again after 10 minutes. I had to use IDRAC to do a hard shutdown of the server, then Unraid started again. When I unchecked the VFIO bindings, I just used Shutdown directly from the Main page.

-
I am back to trying to solve this problem. I have set the memory size to 16384 for Min and Max, so that should stop balooning. However, the VM is still crashing and bringing down the host with every restart. When I start with VNC I can see the Unraid logo with the Windows spinning circle, which freezes, then the Unraid server restarts. I then disabled the Matrox passthrough in Tools / System Devices by removing the XML that I added earlier: <hostdev mode='subsystem' type='pci' managed='yes'> <driver name='vfio'/> <source> <address domain='0x0000' bus='0x03' slot='0x0' function='0x0'/> </source> </hostdev> Now I can shut down and restart the Windows VM and Unraid keeps running. I should be able to shut down a Windows VM either by using the Stop button in the Unraid VM control page, or from within the VM by using Start Menu / Shut Down. Are they completely equivalent? Either way better (safer) than the other? Also I notice a lot of problems with the Unraid VNC, where the mouse doesn't work right, I can't access Start menu, etc. It works fine from Keyboard so OK for BIOS and startup settings. Is this a known issue? I have a TightVNC server running in the VM, and I use the TightVNC viewer for day to day work, but the Unraid VNC is needed for startup tasks.
-
Coming back to this question - how do I maintain and manage snapshots? For example, after some system configuration change, I might want to have a clean snapshot baseline. Now I have a tree of snapshots dating back for months. How do I clear the current tree and start a new one? Here's what Gemini has to offer. Seems reasonable, but my experience is that AI is best for when you already are an expert on the subject, or at least know enough to spot hallucinations. Maybe someone very familiar with snapshots can review? To clean up your Unraid VM's vdisk folder, reduce storage usage, and consolidate to a single image file suitable for offline backup, you need to use the snapshot management features to merge the chained differential files back into the base disk. The process you are looking for is called consolidation or committing the snapshots. This will merge the data from all the .qcow2 differential files into the original base file, vdisk1.img. 1. How to Clean Up and Create a New Baseline The files in your directory represent a chain of snapshots where each subsequent snapshot (and the current running state) is dependent on the previous one: vdisk1.img: This is your original base disk image. vdisk1.Windows--generateqcow2: This is the first snapshot delta file. vdisk1.S20250824132729qcow2: This is the second snapshot delta file, dependent on the first. vdisk1.2025-09-01--generateqcow2: This is the third snapshot delta file. vdisk1.S20250927123248qcow2: This is the most recent snapshot delta file. The total space consumed by this VM is the sum of the base disk and all the differential files: 68.7 GB+28.4 GB+9.9 GB+13.4 GB+5.7 GB≈126.1 GB The Solution: Delete All Snapshots To clean up and get back to a single baseline file, you must delete all of the existing VM snapshots using the Unraid WebGUI's VM Manager. Stop the VM: The most critical step is to fully shut down the "Windows 11" VM in the Unraid WebGUI. Do not just pause or suspend it. Access Snapshot Manager: Navigate to the VMs tab in the Unraid WebGUI. Click on the "Windows 11" VM and locate the Snapshots section or option. Delete All Snapshots: You will typically need to delete the snapshots one by one, or you may have a "Delete All" option, depending on the Unraid/libvirt implementation. Start by deleting the oldest snapshot first, then proceed through the chain. Each deletion will trigger an automatic disk consolidation/merge process (libvirt/QEMU's blockcommit operation) in the background. This process merges the data from the deleted snapshot's differential file into its parent disk. Wait for Consolidation: Allow time for each consolidation to complete. This can take a significant amount of time depending on the disk size, the amount of data to be merged, and your disk speed. Verify Cleanup: Once all snapshots are deleted, the differential files (vdisk1.*qcow2) should disappear. The result: The base file vdisk1.img will now contain the latest state of your VM (which includes all the changes from the deleted snapshots), effectively becoming your new "baseline". The overall storage usage will drop significantly (likely close to the base file's initial size plus the total difference, which may still be over 100 GB, but you will have only one file).




