






1812
Members
-
Joined
-
Last visited
Everything posted by 1812
-
verified on safari and Firefox clicking log shows plugins tab: update check shows: and further on that tab, I can't click any plugin icon to access options for that plugin (I thought I was able to access them there) System information popup is working. OS update check: and further, it doesn't know what it is or who made it: feedback popup displays correctly clicking the help tab does nothing. clicking "download" for diagnostics presents a blank page. I was able to download the syslog though: brahms1-syslog-20181204-1430.zip Also, can not mount external drives but could in 6.6.5. I'm not 100% that all of this is because of 6.6.6 but this release may have compouned a another hidden issue? But all of what I listed above is new after updating.
-
It might also be something safari is doing in rendering the gui.
-
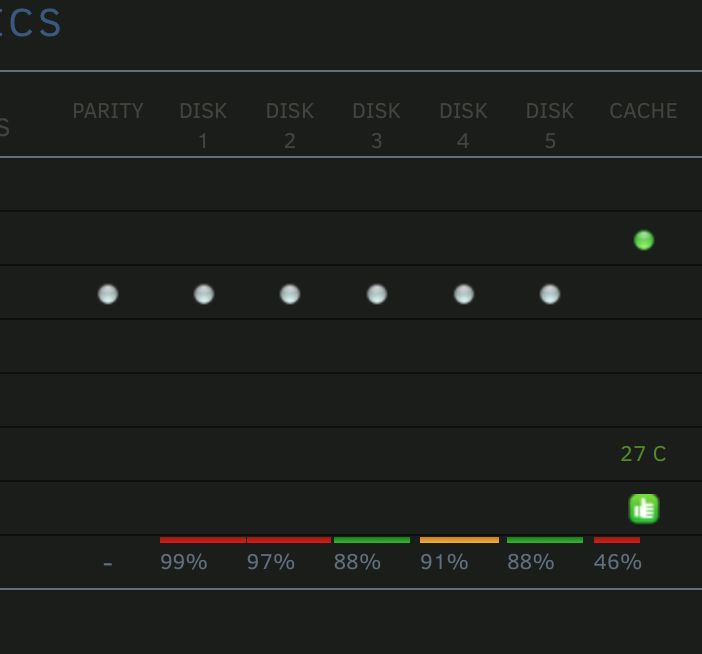
I actually thought that as well, but then the mike and ike color scheme that is in the hd capacity display might be overwhelming if expanded to the cpu usage bars:

-
I was compiling the hp proliant bzimage while running my pfsense firewall, and hosting an external facing cloud. It's usually not that active. Usually runs between 10-30% I'm using one of the baked in themes.
-
upgraded process on the ml30 g9 occurred without issue. This is kind of nice: colors.mov I mean, it's not as nice as multiple cache pools....but it's still nice.
-
710 runs w/out web drivers natively. So first step would be go back to basics and make it work that way first. Also, you may not get a full boot screen the entire time, or a distorted one depending on how you have the resolution set in the "bios"
-
up to 7xx series is supported natively in mac os currently iirc... (maybe 9's too?) I have 2 vm's running mojave, one with a 710 and the other a 730. Maybe someday we'll get web drivers for 10 series.....
-
last time I checked does not work like that with osx. you have to use smb/afp network share. shares via mount only work (again, iirc) in linux vm's.
-
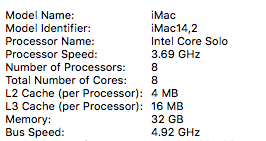
I haven't seen his new video, just the old one. But I don't think he covers removing topology. My testing and results are here: here is my current xml: <?xml version='1.0' encoding='UTF-8'?> <domain type='kvm' xmlns:qemu='http://libvirt.org/schemas/domain/qemu/1.0'> <name>BB Workstation</name> <uuid>eb4ee4d1-a9be-05f2-eb19-e4c933ce4131</uuid> <metadata> <vmtemplate xmlns="unraid" name="Linux" icon="unraid.png" os="linux"/> </metadata> <memory unit='KiB'>33554432</memory> <currentMemory unit='KiB'>33554432</currentMemory> <memoryBacking> <nosharepages/> </memoryBacking> <vcpu placement='static'>8</vcpu> <cputune> <vcpupin vcpu='0' cpuset='1'/> <vcpupin vcpu='1' cpuset='7'/> <vcpupin vcpu='2' cpuset='2'/> <vcpupin vcpu='3' cpuset='8'/> <vcpupin vcpu='4' cpuset='3'/> <vcpupin vcpu='5' cpuset='9'/> <vcpupin vcpu='6' cpuset='4'/> <vcpupin vcpu='7' cpuset='10'/> </cputune> <os> <type arch='x86_64' machine='pc-q35-3.0'>hvm</type> <loader readonly='yes' type='pflash'>/usr/share/qemu/ovmf-x64/OVMF_CODE-pure-efi.fd</loader> <nvram>/etc/libvirt/qemu/nvram/eb4ee4d1-a9be-05f2-eb19-e4c933ce4131_VARS-pure-efi.fd</nvram> </os> <features> <acpi/> <apic/> </features> <cpu mode='host-passthrough' check='none'/> <clock offset='utc'> <timer name='rtc' tickpolicy='catchup'/> <timer name='pit' tickpolicy='delay'/> <timer name='hpet' present='no'/> </clock> <on_poweroff>destroy</on_poweroff> <on_reboot>restart</on_reboot> <on_crash>restart</on_crash> <devices> <emulator>/usr/local/sbin/qemu</emulator> <disk type='file' device='disk'> <driver name='qemu' type='raw' cache='writeback'/> <source file='/mnt/disks/Samsung_SSD_850_PRO_128GB_S1SMNSAFC24811R/AI/vdisk.img'/> <target dev='hda' bus='sata'/> <boot order='1'/> <address type='drive' controller='0' bus='0' target='0' unit='0'/> </disk> <disk type='file' device='disk'> <driver name='qemu' type='raw' cache='writeback'/> <source file='/mnt/cache/domains/Apps Disk/vdisk1.img'/> <target dev='hdb' bus='sata'/> <address type='drive' controller='0' bus='0' target='0' unit='1'/> </disk> <disk type='file' device='disk'> <driver name='qemu' type='raw' cache='writeback'/> <source file='/mnt/cache/domains/Scratch/vdisk2.img'/> <target dev='hdc' bus='sata'/> <address type='drive' controller='0' bus='0' target='0' unit='2'/> </disk> <controller type='usb' index='0' model='ich9-ehci1'> <address type='pci' domain='0x0000' bus='0x00' slot='0x07' function='0x7'/> </controller> <controller type='usb' index='0' model='ich9-uhci1'> <master startport='0'/> <address type='pci' domain='0x0000' bus='0x00' slot='0x07' function='0x0' multifunction='on'/> </controller> <controller type='usb' index='0' model='ich9-uhci2'> <master startport='2'/> <address type='pci' domain='0x0000' bus='0x00' slot='0x07' function='0x1'/> </controller> <controller type='usb' index='0' model='ich9-uhci3'> <master startport='4'/> <address type='pci' domain='0x0000' bus='0x00' slot='0x07' function='0x2'/> </controller> <controller type='sata' index='0'> <address type='pci' domain='0x0000' bus='0x00' slot='0x1f' function='0x2'/> </controller> <controller type='pci' index='0' model='pcie-root'/> <controller type='pci' index='1' model='pcie-root-port'> <model name='pcie-root-port'/> <target chassis='1' port='0x10'/> <address type='pci' domain='0x0000' bus='0x00' slot='0x02' function='0x0' multifunction='on'/> </controller> <controller type='pci' index='2' model='pcie-root-port'> <model name='pcie-root-port'/> <target chassis='2' port='0x11'/> <address type='pci' domain='0x0000' bus='0x00' slot='0x02' function='0x1'/> </controller> <controller type='pci' index='3' model='pcie-root-port'> <model name='pcie-root-port'/> <target chassis='3' port='0x12'/> <address type='pci' domain='0x0000' bus='0x00' slot='0x02' function='0x2'/> </controller> <controller type='pci' index='4' model='pcie-root-port'> <model name='pcie-root-port'/> <target chassis='4' port='0x13'/> <address type='pci' domain='0x0000' bus='0x00' slot='0x02' function='0x3'/> </controller> <controller type='pci' index='5' model='pcie-root-port'> <model name='pcie-root-port'/> <target chassis='5' port='0x8'/> <address type='pci' domain='0x0000' bus='0x00' slot='0x01' function='0x0' multifunction='on'/> </controller> <controller type='pci' index='6' model='pcie-root-port'> <model name='pcie-root-port'/> <target chassis='6' port='0x14'/> <address type='pci' domain='0x0000' bus='0x00' slot='0x02' function='0x4'/> </controller> <controller type='pci' index='7' model='pcie-root-port'> <model name='pcie-root-port'/> <target chassis='7' port='0x9'/> <address type='pci' domain='0x0000' bus='0x00' slot='0x01' function='0x1'/> </controller> <controller type='pci' index='8' model='dmi-to-pci-bridge'> <model name='i82801b11-bridge'/> <address type='pci' domain='0x0000' bus='0x00' slot='0x1e' function='0x0'/> </controller> <controller type='pci' index='9' model='pci-bridge'> <model name='pci-bridge'/> <target chassisNr='9'/> <address type='pci' domain='0x0000' bus='0x08' slot='0x00' function='0x0'/> </controller> <controller type='pci' index='10' model='pcie-root-port'> <model name='pcie-root-port'/> <target chassis='10' port='0xa'/> <address type='pci' domain='0x0000' bus='0x00' slot='0x01' function='0x2'/> </controller> <controller type='virtio-serial' index='0'> <address type='pci' domain='0x0000' bus='0x01' slot='0x00' function='0x0'/> </controller> <controller type='scsi' index='0' model='lsilogic'> <address type='pci' domain='0x0000' bus='0x09' slot='0x01' function='0x0'/> </controller> <interface type='bridge'> <mac address='52:54:00:4f:66:44'/> <source bridge='br0'/> <model type='e1000-82545em'/> <address type='pci' domain='0x0000' bus='0x02' slot='0x00' function='0x0' multifunction='on'/> </interface> <serial type='pty'> <target type='isa-serial' port='0'> <model name='isa-serial'/> </target> </serial> <console type='pty'> <target type='serial' port='0'/> </console> <channel type='unix'> <target type='virtio' name='org.qemu.guest_agent.0'/> <address type='virtio-serial' controller='0' bus='0' port='1'/> </channel> <input type='tablet' bus='usb'> <address type='usb' bus='0' port='1'/> </input> <input type='mouse' bus='ps2'/> <input type='keyboard' bus='ps2'/> <hostdev mode='subsystem' type='pci' managed='yes'> <driver name='vfio'/> <source> <address domain='0x0000' bus='0x04' slot='0x00' function='0x0'/> </source> <address type='pci' domain='0x0000' bus='0x04' slot='0x00' function='0x0'/> </hostdev> <hostdev mode='subsystem' type='pci' managed='yes'> <driver name='vfio'/> <source> <address domain='0x0000' bus='0x04' slot='0x00' function='0x1'/> </source> <address type='pci' domain='0x0000' bus='0x05' slot='0x00' function='0x0'/> </hostdev> <hostdev mode='subsystem' type='pci' managed='yes'> <driver name='vfio'/> <source> <address domain='0x0000' bus='0x03' slot='0x00' function='0x0'/> </source> <rom bar='off'/> <address type='pci' domain='0x0000' bus='0x06' slot='0x00' function='0x0'/> </hostdev> <hostdev mode='subsystem' type='pci' managed='yes'> <driver name='vfio'/> <source> <address domain='0x0000' bus='0x03' slot='0x00' function='0x1'/> </source> <rom bar='off'/> <address type='pci' domain='0x0000' bus='0x07' slot='0x00' function='0x0'/> </hostdev> <hostdev mode='subsystem' type='pci' managed='yes'> <driver name='vfio'/> <source> <address domain='0x0000' bus='0x07' slot='0x00' function='0x0'/> </source> <address type='pci' domain='0x0000' bus='0x0a' slot='0x00' function='0x0'/> </hostdev> <memballoon model='virtio'> <address type='pci' domain='0x0000' bus='0x03' slot='0x00' function='0x0'/> </memballoon> </devices> <qemu:commandline> <qemu:arg value='-usb'/> <qemu:arg value='-device'/> <qemu:arg value='usb-mouse,bus=usb-bus.0'/> <qemu:arg value='-device'/> <qemu:arg value='usb-kbd,bus=usb-bus.0'/> <qemu:arg value='-smbios'/> <qemu:arg value='type=2'/> <qemu:arg value='-cpu'/> <qemu:arg value='Penryn,vendor=GenuineIntel,kvm=on,+invtsc,+avx,+aes,+xsave,xsaveopt,vmware-cpuid-freq=on,'/> </qemu:commandline> </domain> I've used an emulator pin in the past, but I was having issues with stability in the vm and not enough cores on my current system to use with my main desktop (and another remote vm that is used for dialing in,) so I removed the emulator pin and reassigned that core to the other vm. You gain about 5% bump using an emulator pin in an osx vm. It is advisable but I only have 12 cores on this machine, so I'd rather run 8 on the main vm, 3 on the remote, and reserve 1 for unraid and qemu functions. when you run with no topology, it reports it as but osx doesn't seem to care about not knowing what it is exactly. This is true for Mojave too. I currently use fcpx doing some 4k editing and adobe photo editing products on my osx vm on high Sierra using a gtx 1060 6GB. In testing, I found that between it and a windows 10vm, the cpu portion of benchmarking was near identical. Windows 10 still uses the gpu better than osx though, but I've recently been getting about 56-58fps in cinebench and around the same in unigene valley on ultimate. But this was only recently, as @SpaceInvaderOne and I have recently been conversing about low Nvidia gpu performances (as in 1/5th the fps of what I'm currently at.) I can't advise about how to best setup on thread ripper and all it's shared memory and whatnot. You'll have to read around and in the end, probably do trial and error. I also run 3 osx vm's on another 12 core machine all with their own GPUs, all with a similar setup, and all running well. I'm squeezing as much as I can out of it and it is 99.9% stable (which is better than any windows 10 bare metal install I've ever had.)
-
Pro Tip: remove the topology and you can go up to 64 cores, or down to 3 cores, or anywhere in-between. Your Mac vm will actually be faster because when you declare a topology, osx won't push all the threads to 100%, meaning you lose performance. Without topology, it has no idea what is what and uses all threads/cores to 100%.
-
Maybe ask on a Kubuntu forum? Or spend 60ish bucks and follow proven methods with using unRaid?
-
2 quick things I saw: clover.qcow2'/— pretty sure OS X doesn’t like this file type to boot from. Pretty much iso and Ingrid files . Second is your virtio Ethernet. OS X won’t recognize it. Consider starting over and follownthe video more closely. also, remove the osk key from being posted on here. Mods are sensitive to that.
-
"needs" isn't the correct word, since mine runs fine on only now with that said, it could run better, but i've only got it setup on one with vnc, and one vm with a gt730 passed through and havent had time to optimize it yet. never used it.
-
that "should" be an ok fan profile. HP is also offering a newer bios for everyone with the spectre mitigation which might be the same or improved fan cube. To connect to iLo, you need to connect another ethernet cable to the iLo port on the back of the server. When the server boots, it may give you an option to configure iLo if it hasn't been, which then you could view the IP address. If iLo is locked with a password, you'll have to lookup how to use the jumpers on the motherboard to reset it. The easier way is use a local ip range scanner and watch for the new address assignment after you plug in the port/and or reboot the server with the port plugged in.
-
its determined by the bios and how many pcie cards are in the system. have you tried the latest bios with spectre fixes? I believe some of the releases have quieter fan curves. Also, if you had a fan go out, the others will compensate by ramping up (you can check the fans in iLo or possibly on the server maintenance light area.)
-
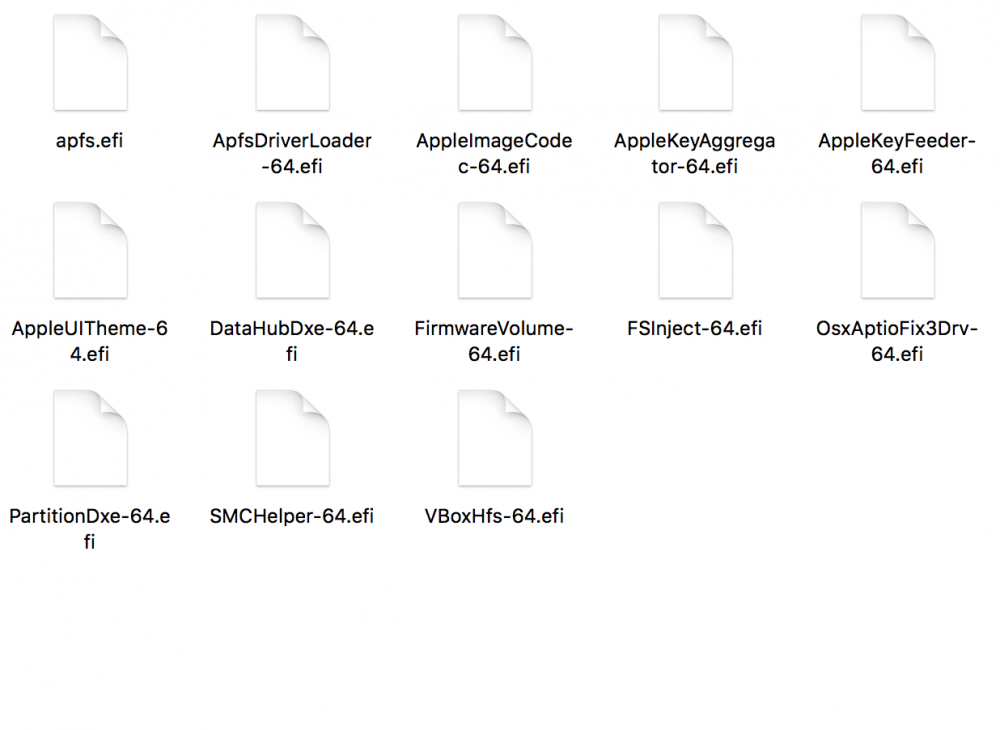
Just finished a new install of Mojave using latest clover and modified version of @SpaceInvaderOne‘s original vid. The vm survives reboot multiple times so probably correctly setup. I’ll post how I managed it shortly. Needless to say, I’m skipping out on 10.13.6! There may be some unneeded drivers/steps, but I'll leave that for the pros to figure out. You need: Mojave installer SpaceInvader's OS High Sierra Support files (from high Sierra installer vid/usb creator vid) Clover 2.4k_r4674 USB of at least 8GB Following the usb creator video (and using utils included with download), make usb with Mojave in replacement of High Sierra Clover install: Using Clover 2.4k_r4674 Follow video on specifying where to install. Customize: Check the following: UEFI only Install Clover in the ESP -Under UEFI Drivers AppleImagecodec AppleKeyAggregator AppleKeyFeeder AppleUITheme DataHub FirmwareVolume FSInject SMCHelper VBoxHfs ApfsDriverLoader (I’m not 100% sure you need this, as it says its for 10.13, but I checked it and mine installed, so it doesn't seem to hurt) OsxAptioFix3Drv PartionDxe Screenshot shows all contents of drivers64UEFI folder from working Mojave vm, confirming what was checked/installed. apfs.efi copied over later. Install clover on Mojave install disk/drive Follow video to mount efi (if not auto mounted) Copy apfs.efi (may not be needed, but as noted, my install works and survives rebooting.) Copy fakesmc (I put it in the 10.14 folder as well as “other” just for good measure) Copy q35.acpi Copy config.plist as described in video Follow high Sierra install video. I installed with 8GB ram and 4 threads. I used qemu 3.0 (on unraid 6.6.0) When it comes to clover install portion, follow video but using newer clover instead, then copy the clover folder from installer disk to vm. That's about it. I couldn't have wandered into getting this running without the previous work of @SpaceInvaderOne who will undoubtedly make a much cleaner install video in the near future!
-
I would also be interested to know this, as every time I've attempted upgrading beyond 10.13.2, I bork the vm.
-
I use this. it works, but would be nice for a gui option. Again, thanks Jonnie for setting up these instructions!
-
great vid, but curious why no benchmarks???
-
Sep 1 05:30:26 GSOBackup kernel: Hardware name: HP ProLiant ML30 Gen9/ProLiant ML30 Gen9, BIOS U23 12/02/2015 Sep 1 05:30:26 GSOBackup kernel: RIP: 0010:blk_cleanup_queue+0xd5/0x16c Sep 1 05:30:26 GSOBackup kernel: RSP: 0018:ffffc90000a27bc8 EFLAGS: 00010202 Sep 1 05:30:26 GSOBackup kernel: RAX: ffffffff81e32c00 RBX: ffff880176475a68 RCX: 0000000000000000 Sep 1 05:30:26 GSOBackup kernel: RDX: 0000000fffffff01 RSI: 0000000000000000 RDI: ffff880176475ba8 Sep 1 05:30:26 GSOBackup kernel: RBP: ffff880178a528c8 R08: 0000000000000000 R09: ffff88017fd1a540 Sep 1 05:30:26 GSOBackup kernel: R10: ffffea0005dd0000 R11: ffff880178945300 R12: ffff880176476140 Sep 1 05:30:26 GSOBackup kernel: R13: ffff880178a50008 R14: ffffffffa006126f R15: 0000000000000000 Sep 1 05:30:26 GSOBackup kernel: FS: 00001507adf29780(0000) GS:ffff88017fd00000(0000) knlGS:0000000000000000 Sep 1 05:30:26 GSOBackup kernel: CS: 0010 DS: 0000 ES: 0000 CR0: 0000000080050033 Sep 1 05:30:26 GSOBackup kernel: CR2: 000000000066df30 CR3: 00000001790b2006 CR4: 00000000003606e0 Sep 1 05:30:26 GSOBackup kernel: DR0: 0000000000000000 DR1: 0000000000000000 DR2: 0000000000000000 Sep 1 05:30:26 GSOBackup kernel: DR3: 0000000000000000 DR6: 00000000fffe0ff0 DR7: 0000000000000400 Sep 1 05:30:26 GSOBackup kernel: Call Trace: Sep 1 05:30:26 GSOBackup kernel: do_stop+0x45/0xab [md_mod] Sep 1 05:30:26 GSOBackup kernel: stop_array.constprop.17+0x77/0x9c [md_mod] Sep 1 05:30:26 GSOBackup kernel: md_proc_write+0x1223/0x163d [md_mod] Sep 1 05:30:26 GSOBackup kernel: ? walk_component+0xc2/0x249 Sep 1 05:30:26 GSOBackup kernel: ? proc_reg_open+0xdf/0xf9 Sep 1 05:30:26 GSOBackup kernel: ? proc_i_callback+0x13/0x13 Sep 1 05:30:26 GSOBackup kernel: ? _cond_resched+0x1b/0x1e Sep 1 05:30:26 GSOBackup kernel: ? dput+0x33/0xfc Sep 1 05:30:26 GSOBackup kernel: ? path_put+0xd/0x16 Sep 1 05:30:26 GSOBackup kernel: ? path_openat+0xb2d/0xc07 Sep 1 05:30:26 GSOBackup kernel: ? current_time+0x11/0x54 Sep 1 05:30:26 GSOBackup kernel: ? do_filp_open+0x83/0xa9 Sep 1 05:30:26 GSOBackup kernel: ? rcu_is_watching+0x5/0x9 Sep 1 05:30:26 GSOBackup kernel: proc_reg_write+0x41/0x5f Sep 1 05:30:26 GSOBackup kernel: ? proc_reg_poll+0x54/0x54 Sep 1 05:30:26 GSOBackup kernel: __vfs_write+0x2e/0x12e Sep 1 05:30:26 GSOBackup kernel: ? do_renameat2+0x114/0x423 Sep 1 05:30:26 GSOBackup kernel: vfs_write+0xc3/0x166 Sep 1 05:30:26 GSOBackup kernel: ksys_write+0x58/0xa6 Sep 1 05:30:26 GSOBackup kernel: do_syscall_64+0x57/0xe6 Sep 1 05:30:26 GSOBackup kernel: entry_SYSCALL_64_after_hwframe+0x44/0xa9 Sep 1 05:30:26 GSOBackup kernel: RIP: 0033:0x1507adb08e81 Sep 1 05:30:26 GSOBackup kernel: RSP: 002b:00007ffdb5cdcc58 EFLAGS: 00000246 ORIG_RAX: 0000000000000001 Sep 1 05:30:26 GSOBackup kernel: RAX: ffffffffffffffda RBX: 0000000000000000 RCX: 00001507adb08e81 Sep 1 05:30:26 GSOBackup kernel: RDX: 0000000000000004 RSI: 00007ffdb5cdcc90 RDI: 0000000000000005 Sep 1 05:30:26 GSOBackup kernel: RBP: 00007ffdb5cdcde0 R08: 0000000000000000 R09: 0000000000000000 Sep 1 05:30:26 GSOBackup kernel: R10: 0000000000000000 R11: 0000000000000246 R12: 0000000000402c60 Sep 1 05:30:26 GSOBackup kernel: R13: 00007ffdb5cdd050 R14: 0000000000000000 R15: 0000000000000000 Sep 1 05:30:26 GSOBackup kernel: Code: 00 00 e8 ff 5b 02 00 48 8b 83 98 01 00 00 48 8d b8 80 03 00 00 e8 f5 50 e0 ff 48 89 df e8 cb fe ff ff f6 83 04 02 00 00 02 74 02 <0f> 0b 48 83 7b 18 00 74 1c 48 89 df e8 93 56 00 00 48 8b 73 18 Sep 1 05:30:26 GSOBackup kernel: ---[ end trace 8465e42571602222 ]--- Usage seems unaffected. gsobackup-diagnostics-20180901-0538.zip
-
windows knows its a virtual machine, hence you getting virtual cores. Declaring a topology doesn't matter in a windows vm environment. it uses all assigned cores the same.
-
Set a static IP address in unRaid network settings and make it locked/registered to the MAC address of your unRaid server in pfsense. you can always access it via hostname tower.local or whatever you set it too. Just might a little longer to resolve without a dhcp server on the network.
-
watch the video above with attention to detail. your acs override using devices in the syslinux should look similar to this pcie_acs_override=id:8086:3a40,1b73:1100
-
probably because you didn't do it right.
-
Post full diagnostics zip. Also list what else is running on the server. Consider trying the “allow unsafe interrupts” syslinux change as a shot in the dark (fixed a problem I had with a vm shitting down tanking a system because the bios freaked out about the gpu changing states.)



