





Daniel15
Members
-
Joined
-
Last visited
Everything posted by Daniel15
-
Yeah it's pretty much the same as GVT-g. SR-IOV is a replacement for GVT-g. GVT-g was specifically for iGPUs, was mostly implemented in software, and had slower performance. SR-IOV can be implemented by any PCIe device, is partially hardware-based and partially software-based, and has near-native performance. It splits one physical device (a "physical function") into multiple "virtual functions" that appear as if they were individual PCIe devices. Instead of seeing just one iGPU, you see many of them (I think up to 7 with the UHD 770) that each provide the same functionality. Each one can be used for hardware-accelerated video encoding and decoding. As another example, it's common for higher-end network cards to support SR-IOV so that multiple VMs can use the same network card directly rather than having to use a virtio one, for improved performance. This can be done even if the network card only has one physical port. This was the most common use case for SR-IOV before Intel added support to their GPUs. RedHat have a decent overview in their virtualization documentation: https://access.redhat.com/documentation/en-us/red_hat_enterprise_linux/6/html/virtualization_host_configuration_and_guest_installation_guide/chap-virtualization_host_configuration_and_guest_installation_guide-sr_iov Hope that helps
-
Communication is all done over DBUS, so you don't have to pass through the USB device itself (and in fact, that can be problematic as the path can change between reboots, which will cause your container to fail to start). Just passing through /run/dbus should be sufficient.
-
This is a good idea! I'll try it when I get some free time.
-
I'm actually using both. A regular public IPv6 address is assigned via SLAAC, however my ISP uses dynamic addresses and assigns me a different /56 range every time I connect, so I also use DHCPv6 to assign a ULA address so I have consistent IPv6 addresses internally, for servers. I do see both addresses when I run `ip -6 a` on the Unraid server, but I'll try set DHCPv6 to "no" in Unraid and see if that helps.
-
IPv6 is the future, and there's no real reason to disable it in 2023. Not having to deal with NAT makes a lot of things simpler. I also have some IPv6-only servers so I can't disable it otherwise I lose access to those servers.
-
If 2 x 32GB works, then 4 x 32GB should also work with the same type of RAM. In theory the board supports 48GB DIMMs too (so you could do 2 x 48GB to get 96GB total RAM) but I haven't seen my suppliers actually stocking 48GB DIMMs. Seems like they're still rare.
-
I changed Unraid's web UI ports to 81 and 444: This usually works fine, however sometimes when I restart my system, Nginx decides to start listening on port 80 again, and to not listen via IPv6: root@DanHome:/var/log# netstat -tunlp | grep nginx tcp 0 0 0.0.0.0:81 0.0.0.0:* LISTEN 10352/nginx: master tcp 0 0 0.0.0.0:80 0.0.0.0:* LISTEN 10352/nginx: master tcp 0 0 0.0.0.0:444 0.0.0.0:* LISTEN 10352/nginx: master restarting Nginx fixes it: root@DanHome:/var/log# netstat -tunlp | grep nginx tcp 0 0 127.0.0.1:81 0.0.0.0:* LISTEN 19942/nginx: master tcp 0 0 127.0.0.1:444 0.0.0.0:* LISTEN 19942/nginx: master tcp 0 0 10.1.1.12:444 0.0.0.0:* LISTEN 19942/nginx: master tcp 0 0 10.1.1.12:81 0.0.0.0:* LISTEN 19942/nginx: master tcp6 0 0 2001:5a8:415c:c400:::81 :::* LISTEN 19942/nginx: master tcp6 0 0 2001:5a8:415c:c400::444 :::* LISTEN 19942/nginx: master tcp6 0 0 ::1:444 :::* LISTEN 19942/nginx: master tcp6 0 0 ::1:81 :::* LISTEN 19942/nginx: master How do I prevent this from happening? Diagnostics: danhome-diagnostics-20231103-2141.zip

-
I've got the MicroATX version (W680M-ACE SE) and can't even use my PCIe x1 slot as my Noctua NH-D15 cooler partially covers both the PCIe slot and one M.2 slot, so to remove the M.2 I have to remove the CPU cooler first 😂. The MicroATX one has a different layout where the M.2 slot sits where the RAM normally is, so RAM clearance isn't an issue at least. Not sure what I was thinking putting a giant CPU cooler on a MicroATX board, but at least it keeps the CPU nice and cool (~30°C with ~20% CPU usage even though the system is sitting in a closet). What I don't understand is that since they could embed the BMC/IPMI directly on the board in the MicroATX version, why couldn't they also do that on the ATX version where there's even more space available on the board?? So weird.
-
This only gives you KVM features - IPMI has more features than that, such as being able to read sensors, control fan speed, remotely mount USB devices and ISOs over the network when using KVM, maintain the system through a desktop app on another system (useful if you have a lot of servers), etc. The prebuilt PiKVM is over half the cost of the motherboard, too. If you need a lot of PCIe slots plus IPMI then you might want to consider looking at server motherboards (like Supermicro). You can reboot into the BIOS and get the full regular BIOS.
-
If you have the hddtemp integration enabled, I think it's a known issue that reading the drive temperature spins up the drive (that's an issue with hddtemp, not with Netdata)
-
This template is missing a bunch of Docker bind mounts, for example /var/lib/netdata (which stores the database so data is retained when Netdata is restarted). This is the docker command in Netdata's official documentation: docker run -d --name=netdata \ --pid=host \ --network=host \ -v netdataconfig:/etc/netdata \ -v netdatalib:/var/lib/netdata \ -v netdatacache:/var/cache/netdata \ -v /etc/passwd:/host/etc/passwd:ro \ -v /etc/group:/host/etc/group:ro \ -v /proc:/host/proc:ro \ -v /sys:/host/sys:ro \ -v /etc/os-release:/host/etc/os-release:ro \ -v /var/run/docker.sock:/var/run/docker.sock:ro \ --restart unless-stopped \ --cap-add SYS_PTRACE \ --cap-add SYS_ADMIN \ --security-opt apparmor=unconfined \ netdata/netdata Also, if you want to claim it on Netdata Cloud, you need to add NETDATA_CLAIM_TOKEN, NETDATA_CLAIM_URL and NETDATA_CLAIM_ROOMS, which can be found in Netdata Cloud by going to the nodes tab, clicking "Add node", then going to the Docker tab.
-
I think this means that the module is not actually loading properly. If you're on 6.12.4, the plugin in the Unraid apps section does not work properly (it only supports Linux kernels up until the version included with 6.12.3) and you'll instead have to install the one attached to this comment: Issues with the plugin itself (like the kernel module not loading at all) should go in this thread. If the module loads properly (i.e. lsmod shows it, and /sys/devices/pci0000:00/0000:00:02.0/sriov_numvfs exists) but there's issues with it, they should probably go in the GitHub project I linked to. I say "probably" because the code in that repo is actually taken from Intel's fork of the kernel which adds SR-IOV support, and I'm not sure if they're actually maintaining the code or not. It's probably the best place though. I've heard that Intel are working on upstreaming SR-IOV support (adding the code to the kernel) meaning a custom kernel module shouldn't be needed in the future.
-
Try do it at the command line: echo 2 > /sys/devices/pci0000:00/0000:00:02.0/sriov_numvfs then check if it was set successfully: cat /sys/devices/pci0000:00/0000:00:02.0/sriov_numvfs If that doesn't work, it's probably not Unraid-related and you can try get help here: https://github.com/strongtz/i915-sriov-dkms
-
It's already been posted in a comment on the first page of this thread:
-
I've never used SAS or a HBA card but to me this seems like it'd be fine. The two PCIe 5.0 x16 slots are connected directly to the CPU so I'd place the card in one of those slots. The other PCIe slots — 2 x PCIe 3.0 x16 and 1 x PCIe 3.0 x1 — go via the chipset, which is connected to the motherboard by a DMI 4.0 x8 connection. This has the same bandwidth as PCIe 4.0 x8, which is 15.754 GB/s, shared between all chipset connections: Other PCIe slots, second and third M.2 slots, onboard 4x SATA, onboard SlimSAS. This is fine for most use cases (you'll rarely if ever concurrently use every single device at its maximum speed), but I'd still put the highest bandwidth PCIe devices in the CPU-attached slots.
-
Yes, this works fine. I don't actually know which key enters the BIOS so I just mash escape, delete and F1... It's one of those lol Interesting... Mine doesn't show anything in the BIOS section of the web UI. I wonder if I needs a BIOS update or something, or if this is a difference between the MicroATX and the regular ATX. One thing missing from the screenshots above is that the web UI lets you change the fan speeds, either by selecting a preset (like silent, turbo, normal) or configuring your own fan curve.
-
AFAIK it's because the PCIe x1 bus doesn't provide sufficient power for the BMC plus all the fans. The only PSUs I know of that support PMBus are server PSUs (for rackmount servers) and some very old Corsair PSUs before they switched to using USB instead (they used to provide a PMBus to USB cable rather than it just being USB on both ends). I've got the MicroATX version that has IPMI built in, so I can't comment on the cables unfortunately.
-
It uses the I226-LM. I don't know what the difference is between the -V and the -LM. It's pretty hard to avoid Intel for onboard NICs. If you don't get an Intel one, you generally get a Realtek one, which are even worse. My desktop PC has the dreaded I225-V and I haven't actually experienced many issues with it. I can get the full 2.5Gbps speed in both directions (after a driver update - it only hit 800Mbps before), and it's never crashed or locked up the PC.
-
Where? The container generally doesn't have a network config; it's provided by the host. I'm running Debian in the LXC container. In any case, I got the DHCP assignment working.
-
EDIT: Sorry, this was my fault. The IP I was trying to use was already in use How do I force a container to use a particular IP? I added a DHCP reservation on my router for `10.1.1.14` using the correct MAC address, but the container kept using `10.1.2.1` on boot. I tried explicitly setting the IP in the config: lxc.net.0.ipv4.address = 10.1.1.14/16 10.1.255.255 But now the container has two IP addresses: The one I want (10.1.1.14) and the one I don't want (10.1.2.1)! 10.1.2.x is my un-reserved DHCP range so I don't want any servers in that range.
-
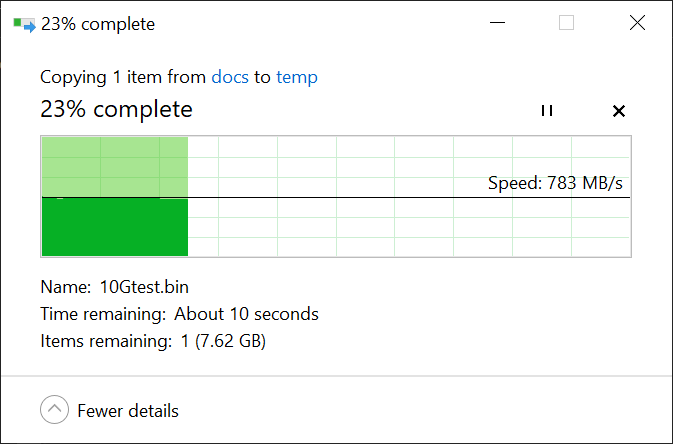
Unraid 6.12 added a feature called "exclusive shares" that essentially avoids FUSE / shfs for shares where: The share is pool-only with no secondary storage. All files for the share are in the pool (ie there's no files in the array from if you ever used secondary storage for that share in the past) It's not shared over NFS. You just need to enable it in the Global Share Settings. Using this feature, I was finally able to achieve fast speeds from my NVMe SSD pool (two NVMe drives in a ZFS mirror) over a 10Gbps network using SMB: Transfers from regular spinning drives are faster too, but obviously not as fast as this.
-
Is it possible to add support for LXC as well?
-
How'd you compile the kernel module for the new kernel version? Is there documentation for that somewhere?
-
Honestly I really doubt you'd actually notice the difference in performance between passing through the entire disk as a block device (ie adding /dev/disk/by-id/..... as a vdisk for the VM) vs passing through the M.2 controller as a PCIe device. A block device is already pretty low-level. Even a PCIe Gen 3 NVMe drive is usually sufficient for gaming, and passing through a Gen 4 NVMe drive as a block device would easily be faster than that.
-
I had an issue with Tips and Tweaks where I set the CPU governor to "power save" and enabled turbo, but it didn't actually enable turbo. If you're not seeing the CPU hit turbo speeds, you need to explicitly set the max scaling frequency to the max CPU frequency: for x in /sys/devices/system/cpu/cpu*/cpufreq/; do cat $x/cpuinfo_max_freq > $x/scaling_max_freq; done You should also set the the energy/performance preference for the hardware-managed P-states (HWP) to "balance_power". This is not currently exposed by the Tips and Tweaks plugin: for x in /sys/devices/system/cpu/cpu*/cpufreq/; do echo balance_power > $x/energy_performance_preference; done This'll make it less likely to turbo (and will only turbo individual cores as needed) and dropped power consumption another 2-3W for me. (you can combine both into a single loop if you'd like) Add these to /boot/config/go to make them persist across reboots.



