





RifleJock
Members
-
Joined
-
Last visited
Everything posted by RifleJock
-
This thread is the support topic for Storage Guard.Install the plugin, set your free-space thresholds, and use 'Main' page as usual. For bugs or feedback, post here with Unraid version, a quick note on array/pool layout, and what you expected vs what you saw. Screenshots of Settings and 'Main' help. Drive prices make replacing a failed disk the same day expensive. Storage Guard is a first-glance check on Main: set free-space thresholds for the array and each pool so you can see whether you still have room to move data after a disk fails. When free space falls to or below a threshold, the free space bar on Main is colored yellow (warning) or red (critical). Optional Unraid notifications use the same thresholds. INSTALLATIONPlugins → Install Plugin, paste this URL: https://raw.githubusercontent.com/ibigsnet/StorageGuard/main/storageguard.plg After install: Settings → User Utilities → Storage Guard WHAT IT DOESFree-space Warning and Critical thresholds for the array and each pool Thresholds from real disk sizes, or custom values (1.5T, 500G, 7.5T, etc.) Colors the Main free space bar (solid or outline, per array/pool) Optional Unraid notifications (independent of coloring) COMPATIBILITYTested on Unraid 7.1.3. Plugin allows Unraid 6.12.0+. Main free-bar coloring is built around Unraid 7 layout. Reports from other 7.x builds welcome. LINKSDocs: https://github.com/ibigsnet/StorageGuard/blob/main/DOCS.md GitHub: https://github.com/ibigsnet/StorageGuard Mods: first plugin author — I cannot start a topic in Plugin Support yet. Please move this thread there if appropriate. Thanks.
-
Hi mods / everyone, I can’t start a topic in Plugin Support yet. This is my first Unraid plugin. I’m a long-time Unraid user/supporter and would like this thread moved to Plugin Support if that’s the right place. Thank you! --- [Plugin] Storage Guard I’m a bit nervous and excited to share this—it’s my first plugin, and I really hope others find it useful. Testing, bug reports, and honest feedback would mean a lot. ### Why I built it Drive prices have gotten painful. I run large Red drives (26TB class). What used to cost me around ~$380 is now well over $1,100 to replace. When a data disk fails, Unraid can keep the array online with parity emulation—but the usual next step is “buy a replacement now.” What I actually want, at a glance on Main, is simpler: Can I still move data off the failed (emulated) disk onto the rest of the array (or free up space another way) without being forced to buy a new drive the same day? If free space is still high enough to evacuate that disk’s data, I have options. If it isn’t, I need to know early—not after the failure—because replacement cost is no longer casual money. Storage Guard is that first-glance check. You set free-space thresholds for the array and each pool. When remaining free space falls to or below a threshold, the total free space bar on Main is colored yellow (warning) or red (critical). Optional Unraid notifications use the same thresholds. ### What it does - Free-space Warning / Critical thresholds for the array and each pool - Thresholds from real disk sizes, or custom values (e.g. 1.5T, 500G, 7.5T) - Colors the Main free space bar (outline or solid, per array/pool) - Optional Unraid notifications (independent of coloring) - Settings under Settings → User Utilities → Storage Guard Full docs: https://github.com/ibigsnet/StorageGuard/blob/main/DOCS.md ### Install Plugins → Install Plugin, paste: https://raw.githubusercontent.com/ibigsnet/StorageGuard/main/storageguard.plg GitHub: https://github.com/ibigsnet/StorageGuard ### Requirements / testing The plugin file currently allows Unraid 6.12.0+, but I’ve only tested on Unraid 7.1.3. Main free-bar coloring is built around Unraid 7’s layout, so if you’re on something else, please try it and tell me what works (or breaks)—I especially want reports from other 7.x builds, and from 6.12 if anyone tries it. ### Looking for testers / feedback This is an early community release. As a first-time plugin author I’m especially keen on real-world testing. Please try it and report back: - Array-only, pools-only, and mixed layouts - Multiple named pools (any names—not only “cache”) - Main free-bar coloring (outline vs solid) - Alerts firing correctly - Anything that breaks after plugin update / uninstall When reporting a bug, please include Unraid version, brief disk/pool layout, what you expected, and what you saw (screenshots of Settings + Main help a lot). Feature ideas are welcome too—especially around how people think about “enough free space to survive a disk loss.” Thanks for reading, and thank you in advance to anyone who tries it. I hope Storage Guard helps you the same way I hoped it would help me. If we move the post, can we title: [Plugin] Storage Guard - free-space thresholds so you know if a failed disk still leaves room to move data
-
Was CTOP removed?
-
I can confirm, that I run into a lot of these problems as well. I had originally built the 7950x on Asus X670E Extreme. I ended up doing RMA's and other things that left my build in a messy state. While buying and swapping hardware around, I ultimately ended up building a secondary system. The other system, the 7950x3D and x670e Gene, seems to be a lot more stable. I will say that I went away from unraid due to the instability with it. Now both of those systems are on 7950x3D, and I notice, that there are lots of limitations with unraid and the x3D processors as well, having to send data through a specific core, and crashes after reserving specific cores for vm's. I'll be playing around with all the builds again on unraid soon, I'm sure I'll still run into the same issues, but seing as there as been a lot of BIOS updates and Kernel updates with unraid, perhaps there is some stability now? We will see.
-
How necessary is this process? (using ich777/minecraftbasicserver) --env 'UID=99' \ --env 'GID=100' \ The issue that I'm facing, is that my Minecraft (MC Eternal) server reboots will take literally forever to reboot due to this process. I've got hundreds of gigs of Dynmap and World data, and everytime the container reboots, this process will struggle to go through each of the directories created, mainly Dynmap and World folders will cause this to take forever as there are millions of folders/subdirectories. Can I set the necessary permissions one time, and disable this process from the bootup process?
-
Same boat here, AX1500i. Unraid 6.10.0-rc3 root@CRYZEN:~# lsusb Bus 008 Device 001: ID 1d6b:0003 Linux Foundation 3.0 root hub Bus 007 Device 001: ID 1d6b:0002 Linux Foundation 2.0 root hub Bus 006 Device 001: ID 1d6b:0003 Linux Foundation 3.0 root hub Bus 005 Device 003: ID 0b05:1984 ASUSTek Computer, Inc. USB Audio Bus 005 Device 002: ID 05e3:0608 Genesys Logic, Inc. Hub Bus 005 Device 001: ID 1d6b:0002 Linux Foundation 2.0 root hub Bus 004 Device 001: ID 1d6b:0003 Linux Foundation 3.0 root hub Bus 003 Device 003: ID 1b1c:1c02 Corsair Corsair Link TM USB Dongle Bus 003 Device 002: ID 05e3:0608 Genesys Logic, Inc. Hub Bus 003 Device 001: ID 1d6b:0002 Linux Foundation 2.0 root hub Bus 002 Device 001: ID 1d6b:0003 Linux Foundation 3.0 root hub Bus 001 Device 001: ID 1d6b:0002 Linux Foundation 2.0 root hub Bus 009 Device 001: ID 1d6b:0002 Linux Foundation 2.0 root hub Bus 010 Device 002: ID 090c:1000 Silicon Motion, Inc. - Taiwan (formerly Feiya Technology Corp.) Flash Drive Bus 010 Device 001: ID 1d6b:0003 Linux Foundation 3.0 root hub root@CRYZEN:~# root@CRYZEN:/sys/bus/usb/drivers# ls -al total 0 drwxr-xr-x 8 root root 0 Mar 19 04:13 ./ drwxr-xr-x 4 root root 0 Mar 19 04:13 ../ drwxr-xr-x 2 root root 0 Mar 19 04:13 hub/ drwxr-xr-x 2 root root 0 Mar 19 04:13 synaptics_usb/ drwxr-xr-x 2 root root 0 Mar 19 04:13 usb/ drwxr-xr-x 2 root root 0 Mar 19 04:13 usb-storage/ drwxr-xr-x 2 root root 0 Mar 19 04:13 usbfs/ drwxr-xr-x 2 root root 0 Mar 19 04:13 usbhid/ root@CRYZEN:/sys/bus/usb/drivers# cd hub/ root@CRYZEN:/sys/bus/usb/drivers/hub# ls -al total 0 drwxr-xr-x 2 root root 0 Mar 19 04:13 ./ drwxr-xr-x 8 root root 0 Mar 19 04:13 ../ lrwxrwxrwx 1 root root 0 Mar 19 09:08 1-0:1.0 -> ../../../../devices/pci0000:20/0000:20:01.1/0000:21:00.0/0000:22:01.0/0000:23:00.0/usb1/1-0:1.0/ lrwxrwxrwx 1 root root 0 Mar 19 09:08 10-0:1.0 -> ../../../../devices/pci0000:00/0000:00:08.1/0000:03:00.3/usb10/10-0:1.0/ lrwxrwxrwx 1 root root 0 Mar 19 09:08 2-0:1.0 -> ../../../../devices/pci0000:20/0000:20:01.1/0000:21:00.0/0000:22:01.0/0000:23:00.0/usb2/2-0:1.0/ lrwxrwxrwx 1 root root 0 Mar 19 09:08 3-0:1.0 -> ../../../../devices/pci0000:20/0000:20:01.1/0000:21:00.0/0000:22:08.0/0000:2a:00.1/usb3/3-0:1.0/ lrwxrwxrwx 1 root root 0 Mar 19 09:08 3-5:1.0 -> ../../../../devices/pci0000:20/0000:20:01.1/0000:21:00.0/0000:22:08.0/0000:2a:00.1/usb3/3-5/3-5:1.0/ lrwxrwxrwx 1 root root 0 Mar 19 09:08 4-0:1.0 -> ../../../../devices/pci0000:20/0000:20:01.1/0000:21:00.0/0000:22:08.0/0000:2a:00.1/usb4/4-0:1.0/ lrwxrwxrwx 1 root root 0 Mar 19 09:08 5-0:1.0 -> ../../../../devices/pci0000:20/0000:20:01.1/0000:21:00.0/0000:22:08.0/0000:2a:00.3/usb5/5-0:1.0/ lrwxrwxrwx 1 root root 0 Mar 19 09:08 5-1:1.0 -> ../../../../devices/pci0000:20/0000:20:01.1/0000:21:00.0/0000:22:08.0/0000:2a:00.3/usb5/5-1/5-1:1.0/ lrwxrwxrwx 1 root root 0 Mar 19 09:08 6-0:1.0 -> ../../../../devices/pci0000:20/0000:20:01.1/0000:21:00.0/0000:22:08.0/0000:2a:00.3/usb6/6-0:1.0/ lrwxrwxrwx 1 root root 0 Mar 19 09:08 7-0:1.0 -> ../../../../devices/pci0000:20/0000:20:08.1/0000:33:00.3/usb7/7-0:1.0/ lrwxrwxrwx 1 root root 0 Mar 19 09:08 8-0:1.0 -> ../../../../devices/pci0000:20/0000:20:08.1/0000:33:00.3/usb8/8-0:1.0/ lrwxrwxrwx 1 root root 0 Mar 19 09:08 9-0:1.0 -> ../../../../devices/pci0000:00/0000:00:08.1/0000:03:00.3/usb9/9-0:1.0/ --w------- 1 root root 4096 Mar 19 09:08 bind lrwxrwxrwx 1 root root 0 Mar 19 09:08 module -> ../../../../module/usbcore/ -rw-r--r-- 1 root root 4096 Mar 19 09:08 new_id -rw-r--r-- 1 root root 4096 Mar 19 09:08 remove_id --w------- 1 root root 4096 Mar 19 04:13 uevent --w------- 1 root root 4096 Mar 19 09:08 unbind root@CRYZEN:/sys/bus/usb/drivers/hub# cd ../synaptics_usb/ root@CRYZEN:/sys/bus/usb/drivers/synaptics_usb# ls -al total 0 drwxr-xr-x 2 root root 0 Mar 19 04:13 ./ drwxr-xr-x 8 root root 0 Mar 19 04:13 ../ --w------- 1 root root 4096 Mar 19 09:11 bind -rw-r--r-- 1 root root 4096 Mar 19 09:11 new_id -rw-r--r-- 1 root root 4096 Mar 19 09:11 remove_id --w------- 1 root root 4096 Mar 19 04:13 uevent --w------- 1 root root 4096 Mar 19 09:11 unbind root@CRYZEN:/sys/bus/usb/drivers/synaptics_usb# cd ../usb root@CRYZEN:/sys/bus/usb/drivers/usb# ls -al total 0 drwxr-xr-x 2 root root 0 Mar 19 04:13 ./ drwxr-xr-x 8 root root 0 Mar 19 04:13 ../ lrwxrwxrwx 1 root root 0 Mar 19 09:11 10-1 -> ../../../../devices/pci0000:00/0000:00:08.1/0000:03:00.3/usb10/10-1/ lrwxrwxrwx 1 root root 0 Mar 19 09:11 3-5 -> ../../../../devices/pci0000:20/0000:20:01.1/0000:21:00.0/0000:22:08.0/0000:2a:00.1/usb3/3-5/ lrwxrwxrwx 1 root root 0 Mar 19 09:11 3-5.1 -> ../../../../devices/pci0000:20/0000:20:01.1/0000:21:00.0/0000:22:08.0/0000:2a:00.1/usb3/3-5/3-5.1/ lrwxrwxrwx 1 root root 0 Mar 19 09:11 5-1 -> ../../../../devices/pci0000:20/0000:20:01.1/0000:21:00.0/0000:22:08.0/0000:2a:00.3/usb5/5-1/ lrwxrwxrwx 1 root root 0 Mar 19 09:11 5-6 -> ../../../../devices/pci0000:20/0000:20:01.1/0000:21:00.0/0000:22:08.0/0000:2a:00.3/usb5/5-6/ --w------- 1 root root 4096 Mar 19 09:11 bind --w------- 1 root root 4096 Mar 19 04:13 uevent --w------- 1 root root 4096 Mar 19 09:11 unbind lrwxrwxrwx 1 root root 0 Mar 19 09:11 usb1 -> ../../../../devices/pci0000:20/0000:20:01.1/0000:21:00.0/0000:22:01.0/0000:23:00.0/usb1/ lrwxrwxrwx 1 root root 0 Mar 19 09:11 usb10 -> ../../../../devices/pci0000:00/0000:00:08.1/0000:03:00.3/usb10/ lrwxrwxrwx 1 root root 0 Mar 19 09:11 usb2 -> ../../../../devices/pci0000:20/0000:20:01.1/0000:21:00.0/0000:22:01.0/0000:23:00.0/usb2/ lrwxrwxrwx 1 root root 0 Mar 19 09:11 usb3 -> ../../../../devices/pci0000:20/0000:20:01.1/0000:21:00.0/0000:22:08.0/0000:2a:00.1/usb3/ lrwxrwxrwx 1 root root 0 Mar 19 09:11 usb4 -> ../../../../devices/pci0000:20/0000:20:01.1/0000:21:00.0/0000:22:08.0/0000:2a:00.1/usb4/ lrwxrwxrwx 1 root root 0 Mar 19 09:11 usb5 -> ../../../../devices/pci0000:20/0000:20:01.1/0000:21:00.0/0000:22:08.0/0000:2a:00.3/usb5/ lrwxrwxrwx 1 root root 0 Mar 19 09:11 usb6 -> ../../../../devices/pci0000:20/0000:20:01.1/0000:21:00.0/0000:22:08.0/0000:2a:00.3/usb6/ lrwxrwxrwx 1 root root 0 Mar 19 09:11 usb7 -> ../../../../devices/pci0000:20/0000:20:08.1/0000:33:00.3/usb7/ lrwxrwxrwx 1 root root 0 Mar 19 09:11 usb8 -> ../../../../devices/pci0000:20/0000:20:08.1/0000:33:00.3/usb8/ lrwxrwxrwx 1 root root 0 Mar 19 09:11 usb9 -> ../../../../devices/pci0000:00/0000:00:08.1/0000:03:00.3/usb9/ root@CRYZEN:/sys/bus/usb/drivers/usb# cd ../usb-storage/ root@CRYZEN:/sys/bus/usb/drivers/usb-storage# ls -al total 0 drwxr-xr-x 2 root root 0 Mar 19 04:13 ./ drwxr-xr-x 8 root root 0 Mar 19 04:13 ../ lrwxrwxrwx 1 root root 0 Mar 19 09:12 10-1:1.0 -> ../../../../devices/pci0000:00/0000:00:08.1/0000:03:00.3/usb10/10-1/10-1:1.0/ --w------- 1 root root 4096 Mar 19 09:12 bind lrwxrwxrwx 1 root root 0 Mar 19 09:12 module -> ../../../../module/usb_storage/ -rw-r--r-- 1 root root 4096 Mar 19 09:12 new_id -rw-r--r-- 1 root root 4096 Mar 19 09:12 remove_id --w------- 1 root root 4096 Mar 19 04:13 uevent --w------- 1 root root 4096 Mar 19 09:12 unbind root@CRYZEN:/sys/bus/usb/drivers/usb-storage# cd ../usbfs/ root@CRYZEN:/sys/bus/usb/drivers/usbfs# ls -al total 0 drwxr-xr-x 2 root root 0 Mar 19 04:13 ./ drwxr-xr-x 8 root root 0 Mar 19 04:13 ../ --w------- 1 root root 4096 Mar 19 09:13 bind lrwxrwxrwx 1 root root 0 Mar 19 09:13 module -> ../../../../module/usbcore/ -rw-r--r-- 1 root root 4096 Mar 19 09:13 new_id -rw-r--r-- 1 root root 4096 Mar 19 09:13 remove_id --w------- 1 root root 4096 Mar 19 04:13 uevent --w------- 1 root root 4096 Mar 19 09:13 unbind root@CRYZEN:/sys/bus/usb/drivers/usbfs# cd ../usbhid/ root@CRYZEN:/sys/bus/usb/drivers/usbhid# ls -al total 0 drwxr-xr-x 2 root root 0 Mar 19 04:13 ./ drwxr-xr-x 8 root root 0 Mar 19 04:13 ../ lrwxrwxrwx 1 root root 0 Mar 19 09:13 5-6:1.7 -> ../../../../devices/pci0000:20/0000:20:01.1/0000:21:00.0/0000:22:08.0/0000:2a:00.3/usb5/5-6/5-6:1.7/ --w------- 1 root root 4096 Mar 19 09:13 bind lrwxrwxrwx 1 root root 0 Mar 19 09:13 module -> ../../../../module/usbhid/ -rw-r--r-- 1 root root 4096 Mar 19 09:13 new_id -rw-r--r-- 1 root root 4096 Mar 19 09:13 remove_id --w------- 1 root root 4096 Mar 19 04:13 uevent --w------- 1 root root 4096 Mar 19 09:13 unbind root@CRYZEN:/sys/bus/usb/drivers/usbhid# ^C root@CRYZEN:/sys/bus/usb/drivers/usbhid#
-
It's doing pretty well, though one major issue, can't run a GPU in PCIE slot one, New bios update came out yesterday, was going to do some testing again on it. Having GPU in slot one, board fails to do resets correct. Luckily, managed to get SLI working still using slot 3 and 7. Find it weird that slot 7 is hardware id 1:00:00. Additionally, raw windows 10 thinks the same, that the bottom gpu ends up being the primary. Doing research on other sites about the slot resets failing, I managed to find that it's apparently due to the chipset drivers, AMD has the version that supposedly fixes it labeled as Beta, so Asus doesn't officially include them in the bios updates. They are still using the lastest full release, which has been known to cause issues on Ryzen Threadrippers on gaming boards (which have the beta drivers as a beta bios) as well as the Threadripper Pros. Recommend using another item in the slot 1 as a work around. Anyways, I had once also though that the microSD card slot on the board would work for passthrough. While it did technically, I ended up confusing the licensing as this slot is IPMI passable. As well as some virtual USB's that you can upload files to using the web-ui for the board management. Was weird, because having the system boot, it would change the GUID of the microSD card slot every boot, and additionally, if I installed my valid USB, the licensing would see it correctly, and think its writing to the usb flash drive, but would actually write to the SD card (which showed up as flash). But os would see the usb's capacity and licensing. Other than that, or and the Kernel not showing a supported CPU on boot, it all has been working okay I suppose. Lots of troubleshooting for sure, and 6.10 rc2 is allowing the gui to work in UEFI boot, and tpm2.0 passthrough works as well. both cpu based and motherboard/hardware based. DM me or something if you have more detail questions or are interested in the board, can do some testing for you.
-
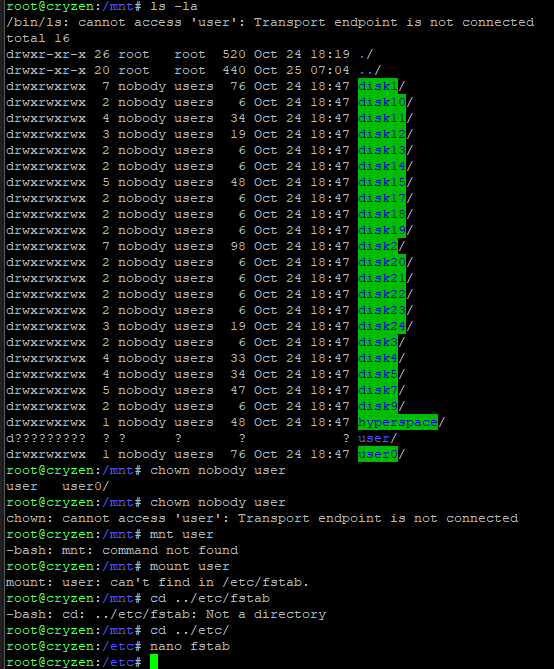
I've ran into this same problem multiple times as well. Now that I'm on a new system, I'm certain it's not the hardware that's at fault. I think I've narrowed it down, I've wiped and re-installed my flashdrive back to 6.9.3. I've rebuilt all my docker containers (I also use the vm/docker folders plugin) when on 6.9.3. Then, I upgrade (causing shares's settings to disable). I then re-enable the shares. All shares, disks and folders go missing. Trying from a fresh install using the windows flash creation/installation tool, I install 6.10.0-rc1. This time, enabling the shares appears to work. Next, the docker container's show they are errored, and that the images are missing. I delete and re-download them. Once completed, after a short time, my shares appear to go missing... I'm also running parity re-build in the background since it's a new OS, and I happened to add two drives. Once the parity build starts, it doesn't appear to like being paused. Logging also has stopped working through the web-ui since the disappearance of the shares. I can spin disks up, (the 1 and 2TB disks spun down, since party is still going, but not read from them.) But once spun up, they appear to not want to spin down manually again. I have to wait for my disk settings' 45 minute timer to kick off the spin down. On the first few attempts at a fresh install, after editing networking and other settings, I managed to get to a state where the web-ui was completely unresponsive, booting locally to the gui was also not working as I continued to get the plagued blinking cursor. I ran a tcpdump and saw my connections coming into the system, but the system did not respond to the web-ui requests. Also attempted multiple browsers. It appeared as if a core service of the web-browser was failing to start on startup. This last go around, the web-ui is sluggish, but working... The only thing I hadn't changed this last time compared to the first few attempts, was any networking settings (from the initial install to the flashdrive) as well as the identification settings. Same with management access (other than enabling ssh). Changing those before ended up leading to no web-ui. I'm not sure why this version seems to have issues when it comes to the web-ui, but there are too many things "fixed" from the previous versions, that I don't want to go back. For instance, even with "nomodeset", my ASPEED VGA adapter from the BMC's IPMI appears to be working now when booting UEFI (other than when the web-ui becomes completely unresponsive.) PS: Also, I'm only working in UEFI booting mode, as is required on this system to get all NVMe's and Sata drives to show up. Maybe a limitation of the bios, working with Asus to resolve those related issues. Here is the diagnostics. IDK what else I'm missing, not really sure of a lot of things when it comes to the software side of it. If anyone has any suggestions or questions, please let me know. Edit: I just realized my "user" folder has gone missing... what could cause this? cryzen-diagnostics-20211025-1004.zip So, I'm guessing something happened to bzmodules or something? and the user mount is unknown now? IDK, I'm too n00b to figure anything else out, I'll wait for a senior.


-
Looks like I still have this problem as well... I had thought it was just my hardware, seen with UEFI and Legacy, I've tried every CSM variation in my bios, even trying older and newer bios's. Asus z10pe-d16 ws. Board ended up dying a while back, and I ended up upgrading to the Asus PRO WS wrx80e SAGE SE WIFI, this uses a similar IPMI and BMC setup as the previous board, both used an ASPEED (VGA compatible controller: ASPEED Technology, Inc. ASPEED Graphics Family (rev 41)) This one being a newer revision. Not sure what I'm missing. I hadn't tried other modes, but I suspect that CSM usage and legacy boot will allow the gui to work once again. (version 6.9.2) cryzen-diagnostics-20211022-0913.zip cryzen-diagnostics-20211024-1119.zip
-
Hello all, curious the status of this plugin. Noticed my AX1500i isn't being recognized. Anyone else have an AX1500i working?
-
+1
-
I'm down to be a guinea pig for the multi-gpu tests... I'm sure I have some AMD's laying around somewhere I could slap in there as well to test cross vendor support. Also, I've noticed that they have some vGPU support when it comes to the Intel iGPU's... I'm curious if we can get stats on those as well.
-
While that is a valid point and what I currently do with my anime directories (for plex and other media servers). The goal with the GoPro libraries was not for that of economics, but rather, of performance from the array disks. With the anime libraries, it's setup to where a disk is accessed based on the series you are watching. If you decided to binge the series, the disk will stay spun up as the shows usually don't exceed 45 minutes (post full read and cache of the at each start of an episode) of which, is my disk spin down setting time. For instance Plex will read a disk at the start of an episode. Go full ape in transcode based on your transcode settings. Transcoded files then sit on the cache to be read back live during your stream. If the disk spun down, and the user either decided to change their quality settings, skip the episode at some point, or scrub backwards (sometimes, transcodes are discarded and need to be rerecorded (this was back in the day.. transcodes stick around a little longer now.).). Anyways, it just so happens that 45 minutes until spin-down works perfectly in all the scenarios that I could reference in my system. That combined with specific directory splitting, or disk allocation methods, I've not had to use the spin-up groups as of yet.. though I'm starting to see more of a need for them...
-
I've never used them. However, was considering it now, but seeing as they might go away, may consider not using them. I had a use case before, when I used 6x 8TB drives. This was on my Media share, where I had used "most-free" and changed the directories split such that each 30 minute GoPro video would be placed among these drives evenly. I would do this so that when reading videos from these drives whilst doing video editing that would reference 4 or 5 videos from the trip of the day, I could get full sequential reads from the Array disks per video. In order to prevent spin-downs, my work around would be to set the disk spin down delay to that of 45 minutes, that way, it was harder for the drive to spin down, while reading from all the drives.
-
So there is a big difference here... Your physical environment, and your virtual one. All things done within UnRAID are considered your virtual environment, and everything outside of that is considered your physicals. You can either setup UnRAID to have a L2 interface, of which you pass through as a bridge to your virtualized Palo Alto. (There wouldn't be much of a point in running a L2 within Palo if this is the case.) This will allow your Palo to communicate only on that physical L2 interface of UnRAID when trying to communicate with anything else on that same L2 interface in your physical environment. Perhaps a real Palo Alto with the same VLAN tagging for redundancy or whatever. Now lets say you have a virtual Check Point device and a virtual Palo both on your unraid, regardless of what physical interfaces are assigned in UnRAID, whatever bridge you passthrough to the virtual environments, you can create L2 interfaces within your CheckPoint and Palo Devices, and only devices on that same bridge (on UnRAID) in the same virtual L2 LAN will communicate. However, I believe any traffic destined to a network outside of UnRAID will get put onto UnRAID's physical configuration's interface when it is attempting to leave the UnRAID box itself. If your UnRAID is configured as a physical L3 with default tagging, then traffic will leave tagged as such. This type of configuration only separates the virtual traffic within the UnRAID box. Depending on what your scenario is, you could do either or both. It all comes down to your physical and virtual topology. LMK if you have any further questions, I can break this down further if needed. -Jockie.
-
https://www.youtube.com/watch?v=LkW3niAWAHs https://forums.unraid.net/topic/50882-guide-custom-vm-icons-automatically-downloaded-and-installed-to-unraid/ So, you have several physical interfaces in UnRAID, you can set these to their own VLAN in unraid, and then assign the bridge to Palo. You can also edit the xml I believe to be a different type of interface, rather than inet. Otherwise, just put a managed L2 switch next to your unraid box, and trunk your interfaces to Unraid.
-
Not exactly, the most recent post made by me I believe is the only thing seen on unraid's forum about Palo setup process. One thing to mention, that might not have been mentioned before is the licensing, if you are going to make this a legit license, you MUST not remove the UUID in your xml file for the device, as Palo Licensing is near impossible to move once established. Save a copy of it somewhere.
-
Nope, never did get this working. My USB ID's seem to be stable now however, and don't change at all. But the plugin still doesn't seem to ever detect any of the PSU's. -Jockie
-
So, I've got a bit of a weird situation. I do need assistance with setting this up as well. Not sure what I'm missing but I can't seem to figure out how to get the plugin to point to the correct device. Also, I happen to be running 3 AXi power supplies, thankfully all different wattage capabilities or I fear that might make things more complicated. Is there a way to setup multiple versions of this plugin to run at once so that I may monitor all three power supplies? By process of elimination, I unplugged one by one the usb to these PSU's to determine the correct device id. 1b1c:0c04 Corsair Link Cooling Node 1b1c:1d00 Corsair (AX1200i) 1b1c:1b12 Corsair (AX860i) 1b1c:1c02 Corsair (AX1500i) Here is the current output. Also, not sure why. but my Bus 003 Device 016: ID 1b1c:1c02 Corsair in this output keeps changing device numbers. 10 minutes ago, it was Device 014, then a few moments later 015. Nothing else seems to be "flapping" causing this counter to change. I believe this PSU is under roughly 98% load atm, and often blinks orange on the led. Also not sure what that means. IOMMU group 39:[8086:8d31] 00:14.0 USB controller: Intel Corporation C610/X99 series chipset USB xHCI Host Controller (rev 05) Bus 003 Device 001: ID 1d6b:0002 Linux Foundation 2.0 root hub Bus 003 Device 002: ID 0b05:180a ASUSTek Computer, Inc. Broadcom BCM20702 Single-Chip Bluetooth 4.0 + LE Bus 003 Device 003: ID 05e3:0608 Genesys Logic, Inc. Hub Bus 003 Device 004: ID 05e3:0608 Genesys Logic, Inc. Hub Bus 003 Device 005: ID 1b1c:0c04 Corsair Link Cooling Node Bus 003 Device 006: ID 174c:2074 ASMedia Technology Inc. ASM1074 High-Speed hub Bus 003 Device 007: ID 1b1c:1d00 Corsair Bus 003 Device 009: ID 13fe:4200 Kingston Technology Company Inc. USB DISK 2.0 Bus 003 Device 010: ID 05e3:0610 Genesys Logic, Inc. 4-port hub Bus 003 Device 011: ID 248a:8367 Maxxter Bus 003 Device 012: ID 0781:5571 SanDisk Corp. Cruzer Fit Bus 003 Device 013: ID 1b1c:1b12 Corsair Bus 003 Device 016: ID 1b1c:1c02 Corsair Bus 004 Device 001: ID 1d6b:0003 Linux Foundation 3.0 root hub Bus 004 Device 002: ID 174c:3074 ASMedia Technology Inc. ASM1074 SuperSpeed hub Any help would be greatly appreciated! -Jockie
-
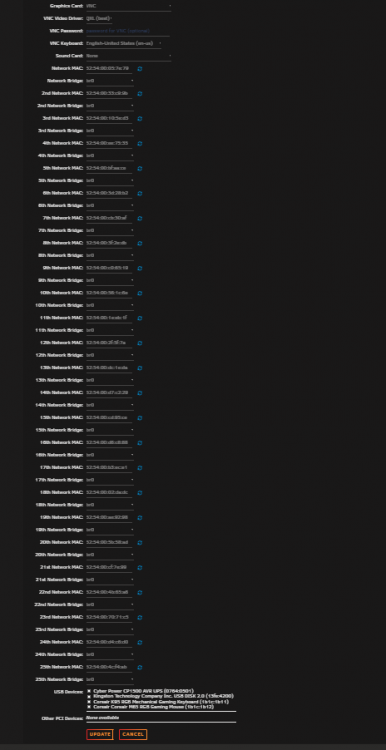
Hey jwiener3 and all others, As far as the perf: interrupt messages, I receive these as well, and the system seems to limit my login until it is done spitting those errors. Not sure if there are other processes still booting in the background. I'm assuming the "accessed a protected system..." is your banner/motd. As far as I know, those alerts don't actually cause any issues (that I have found). OH!!! Also, Update. Running Unraid 6.9.0-beta25. I'm now able to run much more interfaces. Currently running 25 (24 + mgmt). Adding the 26th does.... welp, apparently nothing. only eth1/1 - 1/24 show up, nothing after that. Even looking for the logical 26th unraid interface (25th palo alto, other than mgmt) I'm unable to find it's mac address. -Jockie
-
Not sure why, but unraid seems to limit jumbo frame sizing to 9000. However, my 10gbe switched network is currently configured for 16k+ frame sizing in accordance to 802.3 Standards for 10gbe NICs. Looking to get that 99% efficiency in my file transfers. Is this a limitation of unraid?
-
Version: 6.8.1 w/ NVIDIA drivers 440.44 In this example, br0 and br1 exist on my server, br1 spanning multiple interfaces, one of which is a 1gbe and another a 10gbe When reviewing my Docker Settings, I see IPv4 and IPv6 listings for both br0 and br1, as well as the custom added IPv4 for eth2 (which exist's within br1, but uses global network IP scheme) However, only br0 and eth2 show up as options (as well as bridge, host, and none) when creating a docker container... br1 missing!? One concern I have, is in the docker settings section. I've noticed that the gateway is listed automatically as the global IP address, which technically works based on my network configuration, but I am unsure of why. This should match interface settings right? Looking at the interface section, the gateway is configured to use 10.1.10.1 as my default gateway. This could be as simple as a configuration issue on my end. But I think this might be a bug as well. Additionally, When editing settings > Docker, I have only blanks to add networks to eth2, not sure if there is a way to manually edit which interfaces are associated with manual IP assignment, or if br1 can be removed or changed manually... Would I have to remove my docker image to start fresh with this? Also, here is the current routing table: Notice how default route for br1's 10.1.10.0 network shows correctly. The only manually assigned network here is the 96.x.x.x global addressing scheme. Someone help? Main concern(s) in summary: --Why does docker settings learn the global IP address as the default route? Even when default is specified for the local network in interface settings. --Why can I not edit the default gateway in the br1 network setting for Docker under Settings > Docker --Why does eth2 show up as the only setting that can be edited manually in docker settings? Because it doesn't have IP addressing directly assigned to it in interface settings? --Why does br1 not show up in creating docker containers, yet br0 and eth2 show? -Jockie dash-diagnostics-20200202-1029.zip
-
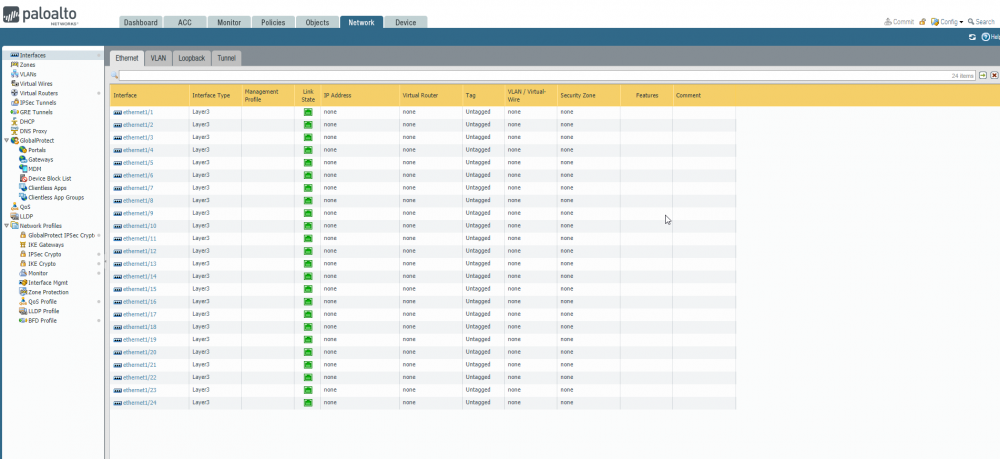
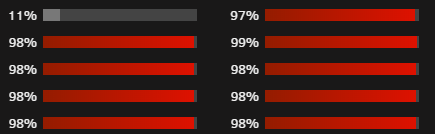
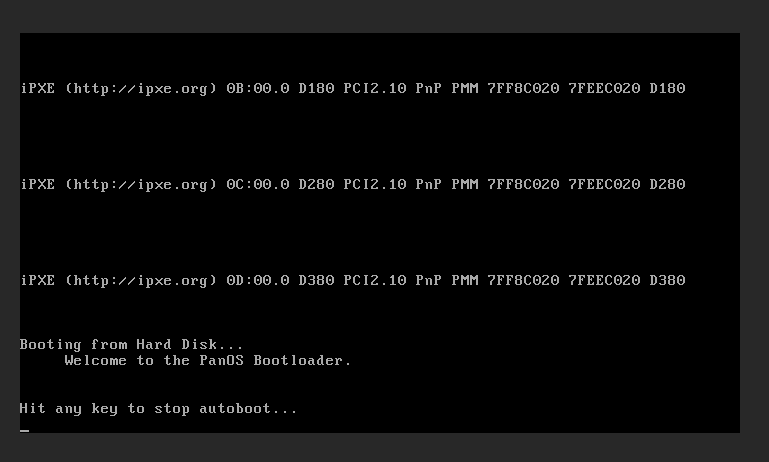
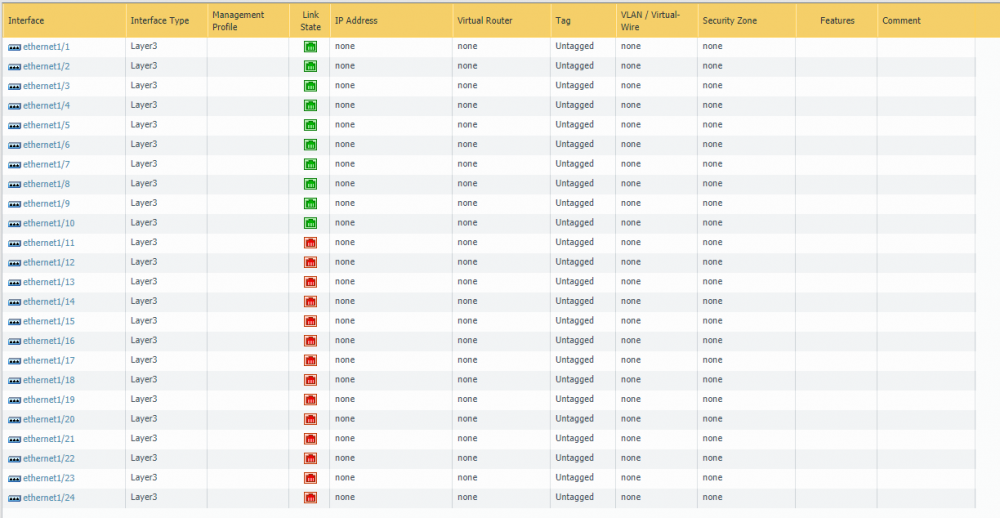
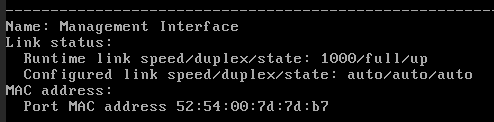
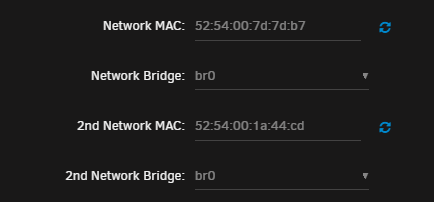
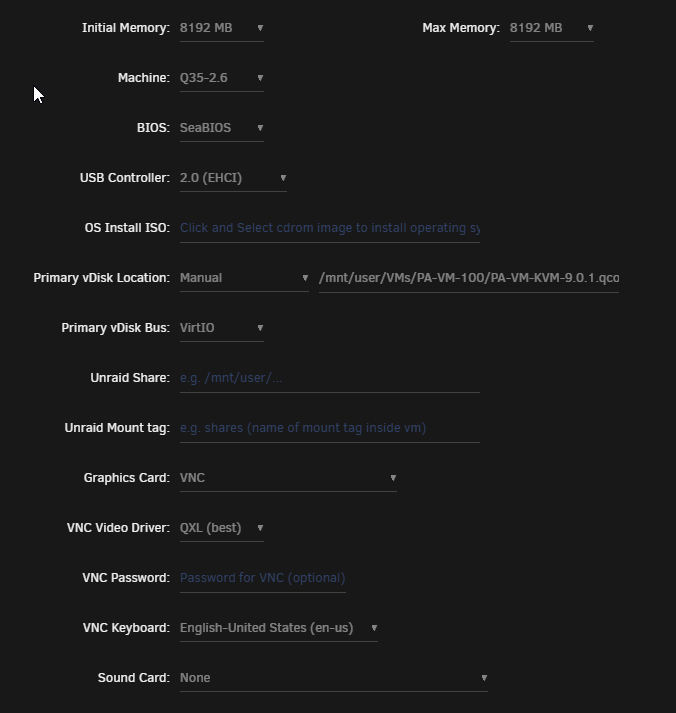
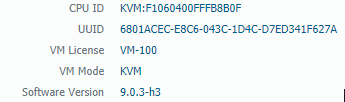
I've got PA-VM (KVM) working. Here are the settings so far and the issues I've ran into. =================================================== I've been able to get 11 network interfaces to work. Any time I attempt to add the 12th network, the "Guest has not initialized the display (yet)" comes up. I've got nothing out of the ordinary in the logs other than the "hostnet12" is never registered. Additionally, all but the first CPU max out when attempting to initialize. ... -netdev tap,fd=48,id=hostnet10,vhost=on,vhostfd=49 \ -device virtio-net-pci,netdev=hostnet10,id=net10,mac=52:54:00:b7:f8:2a,bus=pci.13,addr=0x0 \ -netdev tap,fd=50,id=hostnet11,vhost=on,vhostfd=51 \ -device virtio-net-pci,netdev=hostnet11,id=net11,mac=52:54:00:a4:8c:87,bus=pci.14,addr=0x0 \ -chardev pty,id=charserial0 \ -device isa-serial,chardev=charserial0,id=serial0 \ -chardev socket,id=charchannel0,fd=52,server,nowait \ ... A force stop and removal of the 12th interface works great! I'm beginning to wonder if this is a limitation with UnRAID's ability to have that many iPXE bootable nic's registered to a single host vm. I'm going to be looking into how to disable the PXE capabilities to troubleshoot this theory later. Anyways, here is what it looks like in the web-ui for the PAN-OS. Interfaces start off grey as they are by default in "tap" mode. Configuring them to all be layer3 (and committing configuration) will bring the link up/down lights active. Yes only 10 interfaces show here, because the management interface counts as the "first" interface. This can also be proven when reviewing the MAC address in the console (vnc window) and in the configuration of the vm via unraid's web-ui. Oh, and additionally, my br0 is a 10Gbe NIC, Palo is only registering this as 1Gbe. Not sure if this is a limitation of the linux vm profile or if this is a limitation of the PAN Software for their VM builds. I do know their physical device do have 10Gbe capabilities. Here is the rest of the configuration in order to get this to work: Started out with "Linux" VM. In the past, I've used CentOS, but this limited me to 5 interfaces (4 active + mgmt) and only when custom added by XML rather than adding them additionally via the gui template. Even though SeaBIOS was used here, I've gotten a UUID (which I believe means that the device is booting UEFI capable.) My initial image was the 9.0.1 kvm build downloaded from Palo's site. This should give you a .qcow file. You can place this in any share (I've placed mine in the VM share(/device name/file.qcow) and manually selected it and used VirtIO for the bus. This, by design of palo, created a 60G vdisk as seen below. I've not found a limitation yet on how many cores can be added (Unlike Check Point) Thus far, I've had up to 80 "cpus" or 40 cores and their respective threads. In my system, this spans my dual E5 2696 v4's which are 22cores 44threads a piece. VM runs fine when spanning across both CPU's in the system. Additionally, I was able to register a license via palo's website and gain a serial number for the device. Which also allowed me to download and install an even newer version of code. Based on these findings... This could be a promising setup for those wanting to run Palo in a Virtual environment from an UnRAID build.

-
I'VE DONE DONEIT! K, so here are my findings. Test was done with Check Point "R80.10_T462_Gaia.iso" downloaded to my ISO share. I generated a 30-day eval license from CP's website. You must create a RedHat VM. YOU MUST! You can see attached, but basically... In my environement (dual intel xeon) Tested with 80GB vdisk, 8GB RAM 4 cores and 8 threads... way overkill for CP. Also, I haven't seen CP utilize any threads.. I'm sure its just the nature of CP. =================================================== i440fx-2.11 SeaBIOS Sata (MUST HAVE) --- IDE and SCSI do not work. VirtIO disk (80GB in my case) No shares... VNC no sound selected two "v"-NIC's I'm running br0 and br1 =================================================== done! Check Point supports Red Hat Enterprise, so I guess we got lucky this time! On to Palo Alto!

-
I've upgraded my system since the last post. I'm now running dual E5 2696v4's with 512GB of 2,400Mhz ECC. Same board as before. Turns out, I was running single channel... now its in Octa-Channel. Much faster. Also, I have tweaked a few ECC settings. On the i7-6950x build with non-ecc, high RAM boot times are still outrageous. The dual Xeon ECC build and a 64GB RAM VM boots now in roughly 12 seconds. Looks like ECC plays a huge factor in the VM bootups. That, or I'm on a newer version of UnRAID and didn't realize it.





