





mgutt
Moderators
-
Joined
-
Last visited
Everything posted by mgutt
-
Habe schon länger keine guten Deals mehr gesehen. Ja, eigentlich alle. Aber Garantie gibt es nur bei ausgewählten Händlern bzw bei Toshiba nur mit Druck.
-
It's not recommend to use USB drives for Unraid. Their connection is unstable. Which means the USB HDD is running. Or are this even multiple HDDs?! Finally you should measure with the least amount of components possible, which means without those HDDs at all. As of my experience WD Black have negative impact on C-States and they can cause PCIe errors in the logs because of ASPM incompatibly. I don't know if it's because of the RGB, but a similar model is extremely inefficient: https://www.tweakpc.de/hardware/tests/netzteile/corsair_cx_f_rgb_550_650_750/s02.php I recommend PicoPSU or RM550x. But even now it does not explain the 63W which is measured through your USP. Are you sure its accurate? Or is your external USB HDD Case included?!
-
Settings are looking good to me. 63W can't be only the Motherboard, CPU and a single SSD. So please provide a list of your components.
-
Ad of my experience Gigabyte and Asus have power efficient boards. Maybe the GIGABYTE H610I DDR4 is worth a try. It has an Intel Ethernet Controller. Or the ASUS ROG Strix B660-I Gaming WIFI. It has 2.5G Ethernet. Something I would prefer nowadays.
-
Ok, hmm. Maybe I set the opposite values 100:99. Will test this again...
-
L1 is the only option or is L0sL1 available, too? (This allows L0s and L1)
-
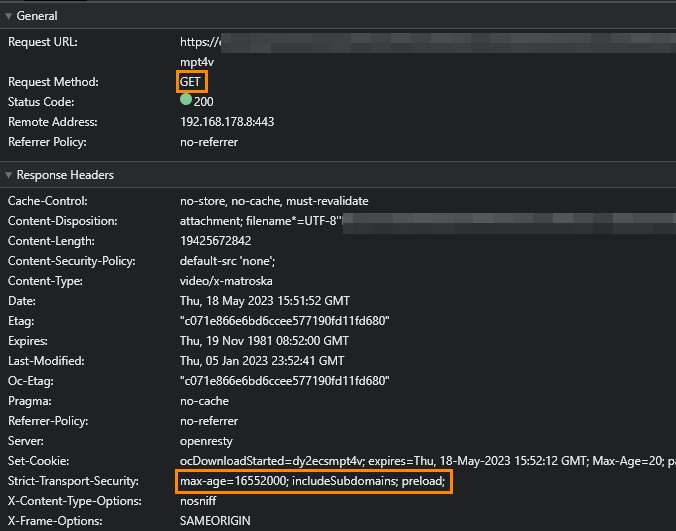
Ich versuche gerade die Download-Geschwindigkeit über NPM auf 10 Mbit/s zu begrenzen, aber aktuell greift das noch nicht. Hat jemand eine Idee warum? Hier der der komplette Code: location / { # limit download speed if ($request_method = GET ) { add_header Strict-Transport-Security "max-age=16552000; includeSubdomains; preload;"; # only for files bigger than 10MB limit_rate_after 10000k; # set speed to 10 MBit/s limit_rate 1250k; } add_header Strict-Transport-Security "max-age=15552000; includeSubdomains; preload;"; client_max_body_size 32G; proxy_set_header Upgrade $http_upgrade; proxy_set_header Connection $http_connection; proxy_http_version 1.1; # Proxy! include conf.d/include/proxy.conf; } location /.well-known/carddav { return 301 /remote.php/dav/; } location /.well-known/caldav { return 301 /remote.php/dav/; } Die Idee ist also, dass man nur bei "GET", also wenn Dateien heruntergeladen werden und nur wenn mehr als 10MB geladen werden, dass dann die Geschwindigkeit auf 10 Mbit/s limitiert wird. Laut Chrome Dev Tools kann ich sehen, dass ich GET verwendet und der add_header-Teil hat auch funktioniert (achtet auf die Zahl, ich habe "16552000" gesetzt). Ich kann also nicht so falsch liegen: EDIT: Ich habe die Zeilen auch mal außerhalb vom location Block positioniert und die Zahlen sehr klein eingestellt, aber auch das hat keine Wirkung 🤔
-
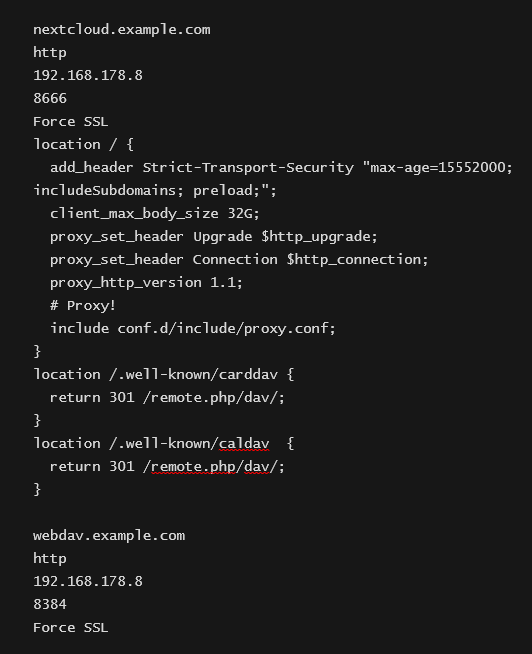
Today I killed my NPM my accidentally removing some files. I could have restored my backup, but instead I took the chance to test the newest NPM version. I even tested the PUID and PGID variables, but those simply does not work (something like "superuser is missing" error came up in the logs). So the current NPM template still works as expected. I would suggest everybody to take notes of each proxy host and do a fresh re-install of the current version. Re-installing with copy & paste takes less then 10 minutes depending on the amount of hosts you have. I wrote down my host settings to a simple text file:
-
Ok. I suggest to test with the Asus Board and the Samsung NVMe again. Then check the BIOS settings. You said you enabled all powersaving options. What does it mean? Did you only enable C-States or did you enable each C-State separately and set C10 as the maximum? As of my experience, the default "auto" does nothing. Do you have a SATA SSD to exclude the CPU M.2 Slot as the problem? Or maybe boot without any drive except the USB drive. Another idea would be to switch the USB ports. I would try one under the PS2 and after that one under the ethernet port. Sometimes this has an impact as well. PS I checked this photo of the Asus board and I can't see any additional controllers which could have a negative impact on C-States, but regarding the specs it is using a Realtek 1 Gbit Ethernet controller. Maybe this is the reason for the bad C-State. Regarding the Asrock board: Sadly those really often have bad C-States.
-
For those who like to disable the "Hide dot files" SMB setting: But want to hide the Recycle Bin folder for the user, can add "veto files" to their SMB Settings > SMB Extras Config: # disable access to recycle bin directory veto files = /.Recycle.Bin

-
Are you seeing other PKG states than C3? This is the best choice to test the c-statea I think. The Lexar could have a negative impact.
-
Kann es sein, dass das die IP von deinem Server ist? Weil der stellt ja den VNC Server zur Verfügung. Der SSH Server kommt dagegen von deiner VM. Wenn du in Ubuntu einen VNC Server installierst, könntest du dich darüber verbinden, allerdings logischerweise erst wenn die VM komplett hochgefahren ist.
-
Ich habe bisher stumpf den Stromverbrauch gemessen bzw man sieht auch an der Temperatur. Aber einen Befehle kenne ich gerade keinen. Muss ich selbst mal recherchieren.
-
Echt schade, dass es keine 4TB Modelle von Samsung gibt. Die Enterprise Modelle kennen jedenfalls alle keinen Standby 😔
-
Schon mal den Server neu gestartet? Wenn die Info dann immer noch da ist, dann weil sie auf dem Stick gespeichert ist oder ein Datenträger die Info enthält. Du kannst ja mal den Stick durchsuchen: grep -r b5f48a8e /boot
-
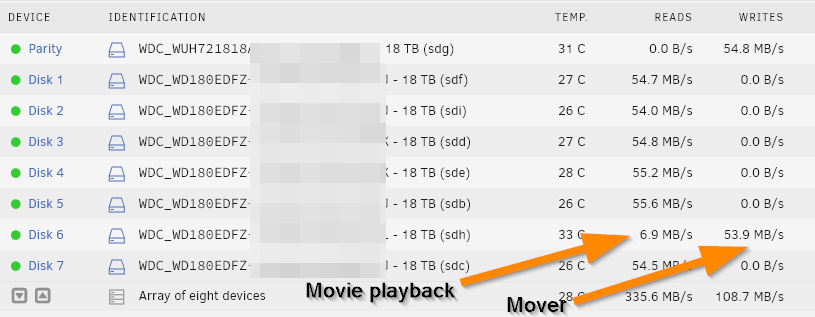
It works to enable turbo write: Set Disk Settings > Tunable (md_write_method) > reconstruct write By that the affected HDD is not hitting its read limit: Sadly this will have a huge negative impact on power consumption. At the moment I will try the Mover Tuning plugin and use its option to enable turbo write while mover is running. But this won't help for other parallel reads/writes. For example today I ripped multiple Blu-Rays directly to the array and it caused judder, too. 😩 I think the only solution would be if Limetech adds an option to throttle the parity creation process.
-
Naja. Wenn du das nicht brauchst, wozu willst du es drin lassen.
-
Die Unix Extensions brauchst du, wenn du auf einen zb gemounteten SMB Share sicherst. Tust du das oder ist es ein Pfad zu einem lokalen Datenträger? Bei letzterem hat es ja nichts mit SMB zu tun.
-
unRAID ist plug & play. Also jetzt mit alter Hardware rumspielen, dann Tiny PC und dann was auch immer. Geht alles. Hier passt zb eine M.2 und eine SATA SSD/HDD rein: https://www.refurbed.de/p/lenovo-thinkcentre-m910q-tiny/16809/?co=de&utm_cluster=gradeA&utm_content=lenovo-thinkcentre-m910q-tiny-16809&utm_group=lenovo-thinkcentre-m910q-tiny&gclid=CjwKCAjwjYKjBhB5EiwAiFdSfgsFMQH38PMik6wXZsdyzDp8TXyLMYQA3jRZ1dKyxEH5FYRl4kB80BoCCtsQAvD_BwE&gclsrc=aw.ds Es gäbe dann auch noch einen WiFi Slot, wo man mit dem Adapter (10cm) eine zweite M.2 verbauen könnte: https://m.de.aliexpress.com/item/1005002988719512.html?spm=a2g0n.order_detail.order_detail_item.4.6cbe6368Xka9yl&gatewayAdapt=glo2deu Es gibt auch noch den m910x/m920x, wo mehr reinpasst, aber ist selten. Hier mehr Infos:
-
Das geht nicht: Dort ist aber eine Lösung basierend auf MACVLAN Container beschrieben.
-
Damit kostet dich am Ende der Strom in 5 Jahren mehr als neue sparsame Hardware. Brauchst du nicht viel Speicher? Dann besorg dir lieber einen gebrauchten Tiny PC. Oder halt sowas: https://geizhals.de/wishlists/3054899
-
Wenn du es genau wissen willst, könntest du mit dd eine der beiden SSD kaputt schreiben und dann warten was passiert. Führe folgendes Kommando aus: lsblk Das zeigt dir alle Partionen. Sagen wir es waren zwei NVMe, dann zeigt er zb den Namen "nvme1n1p1" als Namen der 1. Partion von der zweiten NVMe. Den Namen sieht man auch im unRAID Dashboard. Jetzt könnte man ganz am Anfang der Partition 10MB zufällige Daten drauf schreiben: dd if=/dev/random of=/dev/nvme1n1p1 bs=1M count=10 Bei einer SATA SSD ist es statt nvme1n1p1 irgendwas mit /dev/sdX Damit ist die Partition zerstört. Nun schauen was passiert. Nutzung natürlich auf eigene Gefahr. Falsche Partition beschrieben und weg sind deine Daten! Also lieber 3x auf Schreibfehler prüfen. So könnte man zum Test einfach nur von der Partition lesen und im Dashboard sieht man dann den Lesezugriff: dd if=/dev/nvme1n1p1 of=/dev/null bs=1M count=1000 Dann weiß man verbindlich, dass man den richtigen Namen genommen hat.
-
I think using multiple containers for multiple databases is the best way to go. By that nothing depends on each other. You don't need SQL commands to manually create additional users and databases. You can monitor usage, load and problems for each application separately. You can have different database versions if some applications aren't compatible to most recent versions....
-
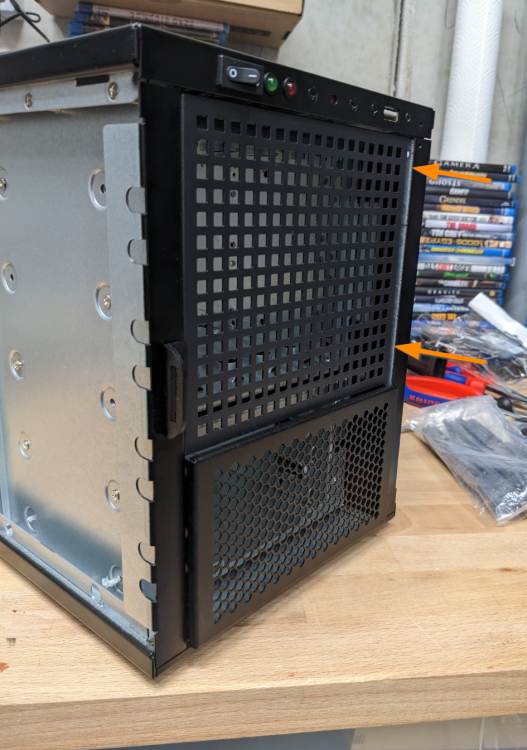
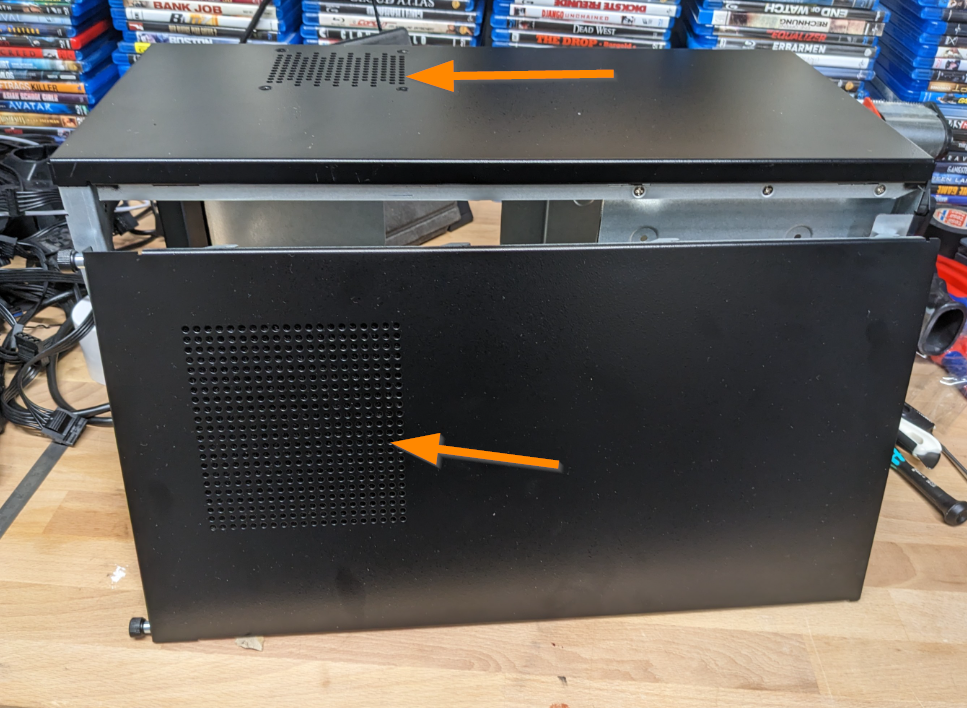
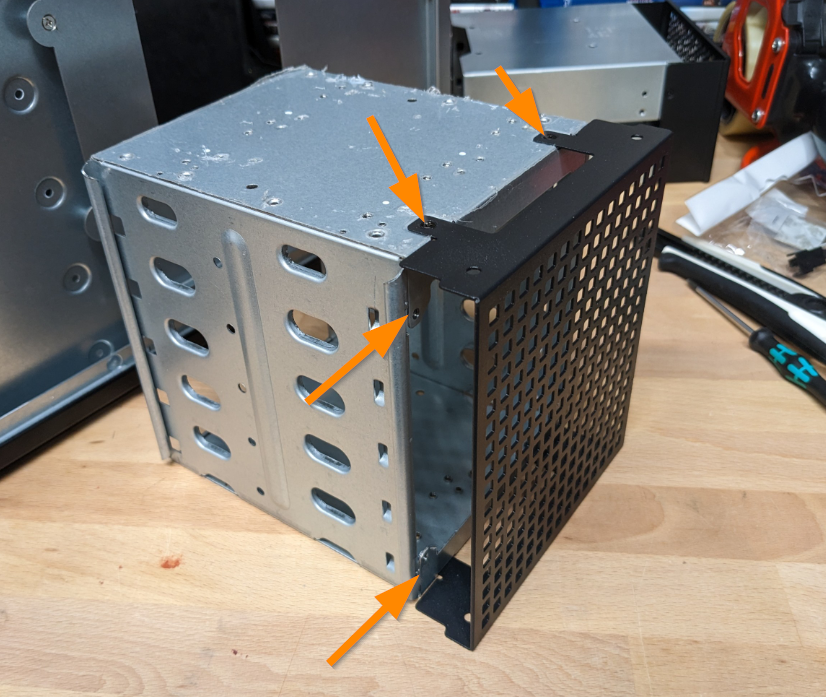
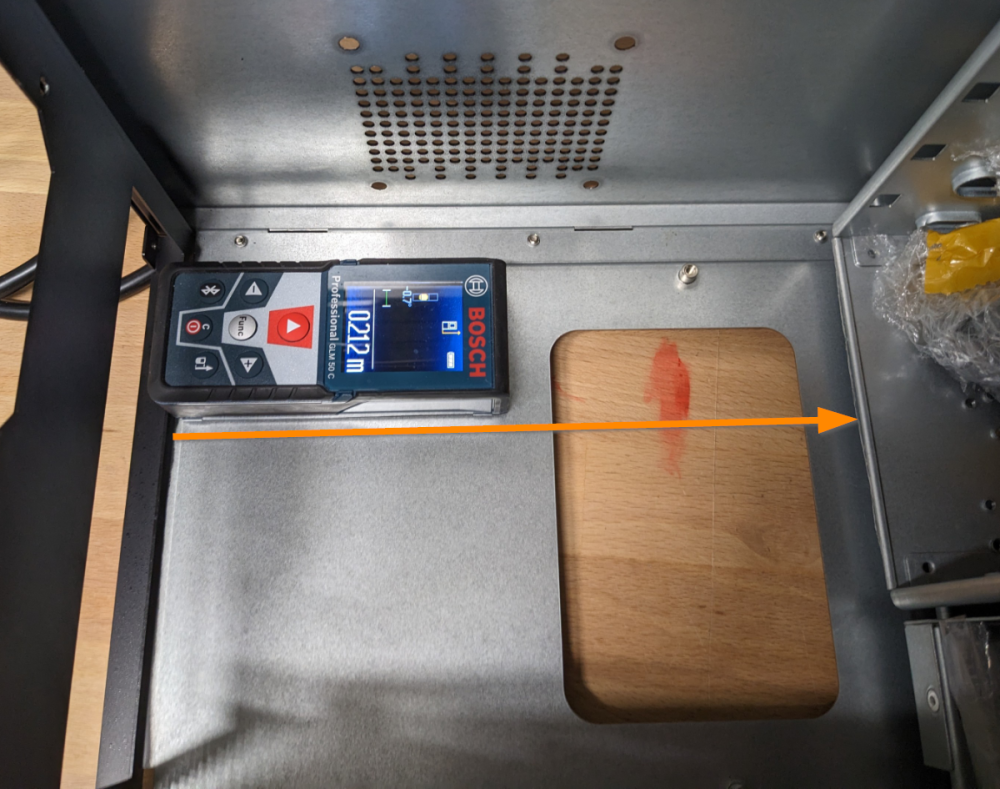
Für meinen zukünftigen Server habe ich ziemlich unvernünftig das iStarUSA S-915 für knapp 300 € importiert. Die Stabilität ist über jeden Zweifel erhaben. Meiner Ansicht nach könnte man die Bleche auch dünner ausführen und hätte immer noch ein stabiles Case. Beim Airflow bin ich allerdings noch nicht so sicher, was man sich da gedacht hat. Vom Prinzip gibt es nur eine (sehr kleine) Abluft oben, denn die Löcher an der Seitenwand sind ausschließlich für das Netzteil (innen ist Schaumstoff aufgeklebt, damit das Netzteil perfekt anliegt): Und wenn man bedenkt, dass man vorne sogar die Tür schließen kann, wird es noch konfuser. Man muss vorne auf jeden Fall ordentlich Druck machen, damit da genug Luft durchgeht. Aus China habe ich mir dann billige HDD Käfige geholt und probeweise verbaut, muss aber feststellen, dass deren Bohrungen total falsch sind. Auf dem Foto sieht man unten einen Halter für 3 HDDs, der etwas absteht. Das ist von dem Case auch so vorgesehen. Oben der größere 5er Käfig ist dagegen total falsch positioniert. Knapp 5mm nach innen versetzt: Wobei mir jetzt erst klar ist wie unkomfortabel diese Käfige sind, denn die schwarze Abdeckung, wo man später innen ein Lüfter draufschraubt, kann man von vorne gar nicht entfernen. Die ist seitlich verschraubt. Dh man müsste den kompletten Käfig demontieren, nach vorne rausziehen und erst jetzt könnte die schwarze Abdeckung entfernt werden. Allerdings nützt auch das nichts, denn von vorne kann man die Platten gar nicht wechseln, da dort ein Blech im Weg steht: Und die HDDs nach innen rausziehen, kann ich bei dem Case vergessen. Viel zu eng: Aber zumindest hat sich meine Hoffnung erfüllt, dass dort ein Deep Mini ITX Board reinpasst (8.2 Zoll = 20.83 cm). Steht also dem W680D4ID-2T nichts im Weg. Ich denke ich muss doch mal meinen Plan verwirklichen und einen eigenen HDD Halter konstruieren. Aber mit meinem aktuellen 3D Drucker ist das echt vergebene lebensmüh. Ich spare daher aktuell auf den Bambu Lab X1 😁
-
Alle unmounten und dann find /mnt/disks Die 1MB müssen ja irgendwo herkommen.




