


Coke84
Members
-
Joined
-
Last visited
-
Thanks @trurl but do I explicitly have to mention, that I cannot pull the diagnostics using the GUI as described in the link as I don't have access on the GUI anymore?
-
Hi, after having some issues with Nextcloud and MariaDB respectively, I rebooted my server the first time after months. Now, I have a lot of issues. After boot up I was not able to directly access the local IP (192.168.178.100) anymore. I always got the redirect to the hash.unraid.net page with a SSL error, regardless of whether I used the https://192.168.178.100 or http://.... Which ended up in disabling SSL in ident.cfg under /boot/config (USE_SSL="no"). After a reboot, the redirect to the hash.unraid.net is gone. I still cannot access with https:// (makes sense) but I get the login page with http://.... And that's it. I can use my credentials, but nothing happens. It again and again reloads the entry page to login. SSL, WebIfs from my Docker application etc., all is working fine with except for the login to unraid webif itself. Some ideas? Thanks
-
Is there any ETA of the new RC including this feature? Cannot install the latest updates on Win11 due to the TPM restrictions. Just want to avoid to setup / install some virtual solutions if a passthrough solution for using the onboard TPM hardware will be there in short time.
-
This is a matter of configuration and setup. Icloudpd works very very well and downloads very reliably.
-
Hey, since yesterday, I've experienced the issue that icloudpd does not let me convert heic to jpegs anymore. It properly downloads all files but when it comes to converting the files to jpeg, it brings me the issue that heif-convert does not exist. Sth changed in the sync-icloud.sh script in the last update? Or anybody with an idea how to fix? I've already tried to completely set up the docker from the scratch, but the issue remained. First attempt downloads and converts the files, after that the issue comes up again and conversion fails. Thank you so much! Update: was able to fix it. I did not update the new shell scripts in my dockerconfig folder which have been updated recently. As a consequnce, the healthcheck as well as the HEIC conversion was faulty. Update 2: see above. worked for the first try, second attempt and the error comes up again. update 3: the issue has been fixed and an updated Docker template has been published. Thanks for your effort! 2021-09-12 18:51:58 INFO Converting /home/user/iCloud/2021/08/IMG_6511.HEIC to /home/user/iCloud/2021/08/IMG_6511.JPG 2021-09-12 18:51:58 INFO Timestamp of HEIC file: Sat Aug 7 09:44:35 2021 2021-09-12 18:51:58 INFO Setting timestamp of /home/user/iCloud/2021/08/IMG_6511.JPG to Sat Aug 7 09:44:35 2021 2021-09-12 18:51:58 INFO Converting /home/user/iCloud/2021/08/IMG_6510.HEIC to /home/user/iCloud/2021/08/IMG_6510.JPG /usr/local/bin/sync-icloud.sh: line 504: heif-convert: not found 2021-09-12 18:51:58 INFO Timestamp of HEIC file: Sat Aug 7 09:44:32 2021 2021-09-12 18:51:58 INFO Setting timestamp of /home/user/iCloud/2021/08/IMG_6510.JPG to Sat Aug 7 09:44:32 2021 2021-09-12 18:51:58 INFO Converting /home/user/iCloud/2021/08/IMG_6509.HEIC to /home/user/iCloud/2021/08/IMG_6509.JPG /usr/local/bin/sync-icloud.sh: line 504: heif-convert: not found 2021-09-12 18:51:58 INFO Timestamp of HEIC file: Sat Aug 7 09:43:52 2021 2021-09-12 18:51:58 INFO Setting timestamp of /home/user/iCloud/2021/08/IMG_6509.JPG to Sat Aug 7 09:43:52 2021 2021-09-12 18:51:58 INFO Converting /home/user/iCloud/2021/08/IMG_6507.HEIC to /home/user/iCloud/2021/08/IMG_6507.JPG /usr/local/bin/sync-icloud.sh: line 504: heif-convert: not found
-
Hatte ein ähnliches Problem. Das Hauptproblem ist allerdings, dass du nicht nur bestimmten Docker-Apps den eth1 zuweisen kannst, sondern du nur allen Docker-Containern eine bestimmte Schnittstelle zuweisen kannst. Ich habe das Problem gelöst indem ich eine VM mit Ubuntu aufgesetzt habe, die ausschließlich über VPN nach außen kommuniziert. Von SpaceInviderOne gibt es dazu eine schöne Anleitung. In der VM lasse ich dann auch die paar Programme laufen, die über VPN kommunizieren sollen, halt nativ installiert und nicht als Docker-App. VM nutzt ebenfalls exklusiv eth1.
-
I use icloudpd to automatically download all my icloud photos and videos on a daily basis. icloupd stores all my files in my share /mnt/user/icloud. I've set up PhotoPrism only to access this share with readonly-mode which means, that PhotoPrism will not move, copy, adjust or delete any of the files stored in that share. I want to have PhotoPrism only to have the files in that share "visible" and not to use any filebrowser or something else. Is there a way to automate the indexing? Currently PhotoPrism works quite well and is able to show all the photos I have in that share, but it does not update on a regular basis automatically. In the end I have to trigger the indexing manually to also include all new files downloaded by icloudpd during the week/days. Do you guys have any idea, e.g. cronjob / user script to trigger the indexation?
-
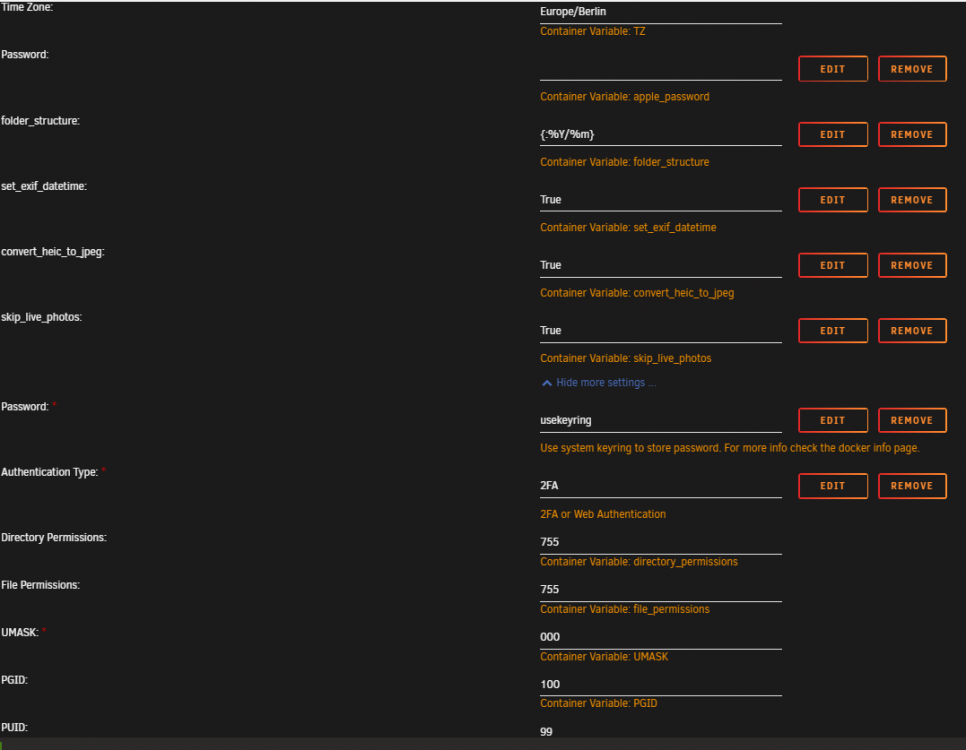
I set up my icloudpd this evening. It was a little bit trial and error but for now I guess it is working. It's currently downloading my more than 20.000 photos and videos. Although I used the parameter to convert HEIC to jpg, it downloads all the HEIC files - guess they will be converted to jpg afterwards and 'not on the fly'. At the very first start, it opened the icloudpd console by using the unraid docker web if and started the sync-icloud.sh manually. As I did not realize that there was no .mounted file in my mounted folder, I tried several things including executing the icloud and icloudpd file in /usr/bin/ which focusses on generating the keychain and 2FA cookie. This was all by accident, but then the cookie has been generated Anyway, I executed the sync-icloud.sh again and again because I still have not realized that I don't have a .mounted file. Took another 30min to realize and touch this file Regardless of the parameters, it seems that the tool analyses all pictures / videos uploaded to iCloud. In my case this took about 30min and then the download started. I also added a few parameters. Looks good so far, let's see whether the HEIC to jpg conversion will be executed after the download has been finished (in approx. 10 hours). Attached my docker image settings. Of course there are also a username / password, I've deleted these entries just for the screenshots.

-
Thanks for this hint. With this adjustment in xml I was able to launch Genchin Impact. Unfortunately this setting does not allow to launch Forza Horizon 4, Need for Speed Heat and FIFA 21 as all of them crash due to insufficient hardware specs. Went back to the old xml.
-
Yes you can keep using VNC for remote access, but VMC does not make use of hardware acceleration by your GPU.
-
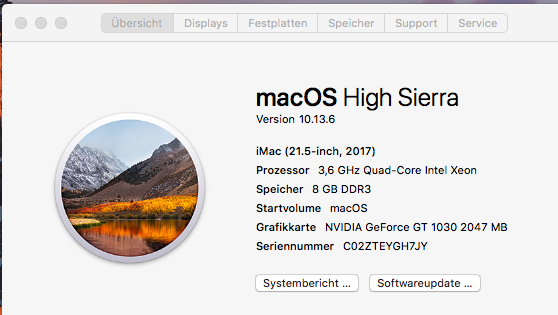
Basically it is AMD GPUs = compatible with every macOs Nvidia GPUs = compatible up to High Sierra using webdriver from my perspective, I never was able to get Nvidia GPUs running stable on macOS, regardless of macOS version or GPU.
-
Finally i also got my mac VM working with macinabox. The key was not to adjust anything the XML using the GUI, although I used to consider the few lines at the bottom - that crashed my VM all the time. Then I figured out that once I adjust anything using the GUI, not only the custom code will be gone, this will basically change everything (model types, bus assignments, etc.). Then I decided to keep the preconfigured xml as it is and only add my lines for passthrough dedicated graphics and keyboard as well as change the assigned RAM and CPU cores directly in the xml view. My steps (used at the end High Sierra at is has most compatibility with Nvidia): 1. Setup the VM by using macinabox (awesome docker, mate @SpaceInvaderOne!!) 2. ran through the installation process of High Sierra using VNC 3. in macOS started Clover Configurator 3.1 mounted the EFI and loaded the plist 3.2 SMBIOS -> changed to iMac 18,1 and refreshed UUID and serial + ensured that the UUID is not in use by someone 3.3 Sys Parameters -> activated Nvida Webdriver 4. installed TeamViewer and activated unattended remote access 5. Turned off the VM 6. edited VM -> Switch to xml view 6.1 increased memory for both lines to 8388608 (8GB RAM) 6.2 added two more cores (number of cores entries in lines 14 and 31 have to be increased to 4) 6.3 adjusted the maschine to the latest pc-q35-5.0 (i'm already on 6.9b25) 6.4 changed the model type for my internet bridge to e1000-82545em as the type in standardprofile did not allow to login to Apple services (e.g. iCloud) 6.4 copied the four entries starting with <hostdev [...] until ending with </hostdev> from my Win10 VM. The four entries are my USB devices I want to pass through as well as my Nvidia GT1030 (video + sound) 6.5 inserted the entries before line </devices> almost at the bottom of the xml 6.6 deleted the entries <graphics .... and <video ... as they are one necessary for VNC 6.7 saved the xml and bootet the VM 7. as picture on my TV (attached to the GT1030) looked as distorted as expected, I switched to TeamViewer 8. opened the Terminal, pulled and installed the nvidia driver by using the command posted by @SpaceInvaderOne bash <(curl -s https://raw.githubusercontent.com/Benjamin-Dobell/nvidia-update/master/nvidia-update.sh) 9. rebooted and done. At the end it was a lot of trial and error and especially editing the xml using the unraid GUI which everytime crashed the VM completely cost a lot of time and effort. But as soon as I realized not to touch the GUI at all and just edit the xml directly, it went smooth. What I forgot to mention: After step 5 I made a copy of the xml file and created a new VM using this xml file (with adjusted VM name and UUID) to have two VMs with the same disk. One low-end VM for VNC (2 cores + 4gb RAM) and one more powerful for my TV (4 cores + 8gb RAM + dedicated graphics). Fun fact: my 400 EUR "NAS" virtualizing macOS has more performance in macOS with 4k than my 2018 1600 EUR MacBookPro does with 2k Retina. Coming to the bad news: I did not manage yet to have audio (although passed through with my nvidia graphics) and bluetooth (onboard intel bluetooth chip; also passed through -> same way as in my Win10 VM for which it works perfectly) . Do you guys have any idea? Thanks!
-
Thanks for this app! Works quite well even with 6.9.0b22
-
I made it working with the following entry under extra Parameters (will show up under advanced view)

-
That's what I also would very appreciate.


