Leaderboard


Popular Content
Showing content with the highest reputation on 10/30/18 in Posts
-
Ups, forgot attachment as Frank mentioned. Sorry. I havn't read other comments yet. Download this file: https://github.com/arberg/dynamix/blob/master/unRAIDv6/dynamix.cache.dirs.plg Future updates will be posted to this github archive, till Bergware gets his up2date. I suspect that when I push updates to this location, you will automatically get update to your plugin just like dynamix 'official' plugin which I forked. It does also mean if you install my version of the above plugin, I think I can actually automatically update your servers and point you back to Bergwares plugin when his is up2date, if I feel like it. But maybe dis dynamix package is being deprecated because parts are incorporated directly into unRaid, i don't know. Anyway update to above, report back, and stay tuned for future updates. Best Alex2 points
-
NEW! For Unraid 6.x, this utility is named: unraid6x-tunables-tester.sh For Unraid 5.x, this utility is named: unraid-tunables-tester.sh The current version is 4.1 for Unraid 6.x and is attached at the bottom of this post. I will maintain this post with future versions (if there are any). The legacy version 2.2 for Unraid 5.x is attached at the bottom of this post. This version is no longer maintained. VERSION HISTORY # V4.1: Added a function to use the first result with 99.8% max speed for Pass 2 # Fixed Server Name in Notification messages (was hardcoded TOWER) # Many fixes to the SCSI Host Controllers and Connected Drives report # Added a function to check lsscsi version and optionally upgrade to v0.30 # Added a function to archive unprocessed Notifications # Updated report to show RAM usage in KB if below 0.5 MB # Cosmetic menu tweaks - by Pauven 08/14/2019 # # V4.0: Updated to work with Unraid 6.6.x and newer # No longer compatible with Unraid 5.x servers (still supported by UTT v2.2) # Changed /root/mdcmd to just mdcmd # Added an Unraid version check and compatibility warnings # Added a Unraid Mover warning if Mover has file moves queued # Removed md_write_limit # Added new tests for md_sync_thresh and nr_requests # Updated logic to handle dual parity servers # Refined test points and test running time # Added new logic to only test low, higher or ultra high points if necessary # Added a staggered spin-up of any sleeping array drives before running tests # Added lots of new server info to the output file # Added RAM consumption of md_num_stripes info on every test point # Added a separate CSV file for charting the results # Added Baseline test to measure performance of current configuration # Added Default tests to measure performance of stock Unraid values # Replaced B4B with new Thriftiest - all new algorithm 95% of fastest speed # Added a new Recommended Sync Speed at 99% of fastest speed # Removed Read/Write tests - not compatible w/ Unraid v6 # Menu polishing, code cleanup and bug fixes # Reformated report output and added system info to reports # Added an Unraid Notifications script wrapper to block notifications # Added a trap to handle script aborting to run cleanup routines - by Pauven 08/05/2019 # # V3.0: Internal version only, never publicly released # Added download/install/usage of lshw for hd info # Added a write test for checking md_write_limit values # Added a read test for checking md_num_stripe values - by Pauven 09/06/2013 # # V2.2: Added support for md_sync_window values down to 8 bytes, # Added a extra-low value special pass to FULLAUTO, # Fixed a bug that didn't restore values after testing - by Pauven 08/28/2013 # V2.1: Added support for md_sync_window values down to 128 bytes, # Fixed a typo on the FULLAUTO option - by Pauven 08/28/2013 # V2.0: Changed the test method from a "time to process bytes" to a "bytes # processed in time" algorithm, lowering CPU utilization during testing, # Updated menus to reflect time based options instead of % options, # Revamped FULLAUTO with an optimized 2-hour 2-pass process, # Added Best Bang for the Buck sizing recommendation, # Added logic to autocancel Parity Checks in progress, # Added a check to make sure the array is Started - by Pauven 08/25/2013 # v1.1: Increased update frequency 1000x to improve result accuracy, # Polished the formatting of the output data, # Various menu improvements and minor logic tweaks, # Added menu options for Manual Start/End Overrides, # Updated logic for identifying the best result, # Extended the range of the FULLAUTO test to 2944, # Added a memory use calculation to the report, # Added option to write new params to disk.cfg - by Pauven 08/23/2013 # v1.0: Initial Version - by Pauven 08/21/2013 EXECUTIVE SUMMARY Unraid Tunables Tester (UTT) is a utility that runs dozens of partial, non-correcting parity checks with different values for the Unraid Tunable parameters and reports on the relative performance for each set of values. Adjusting these values can improve system performance, particularly Parity Check speed, and this utility helps you find the right values for your system. On the new UTT v4.1 for Unraid v6.x, users can select from predefined Normal, Thorough, Long, and Xtra-Long tests. There are no manual controls. This version tests md_sync_window, md_num_stripes, md_sync_thresh, and optionally nr_requests (in the Thorough and Xtra-Long tests). On the legacy UTT v2.2 for Unraid v5.x, users can either manually select the test value ranges and test types, or alternatively choose a Fully Automatic mode that runs an algorithm designed to zero in on the best values for your system. This version tests Unraid Tunables md_sync_window, md_write_limit, and md_num_stripes. Users don't need to know any command line parameters, as all prompts are provided at runtime with friendly guidance and some safety checks. SUMMARY Since Unraid servers can be built in a limitless number of configurations, it is impossible for Lime-Technology to know what tunable parameters are correct for each system. Different amounts of memory and various hardware components (especially HDD controllers and the drives themselves) directly affect what values work best for your system. To play it safe, Lime-Technology delivers Unraid with 'safe' stock values that should work with any system, including servers with limited RAM. But how is a user to know what values to use on their server? This utility addresses that problem by testing the available tunable parameters: UTT v4.1 for Unraid 6.x UTT v2.2 for Unraid 5.x md_num_stripes md_num_stripes md_sync_window md_sync_window md_sync_thresh md_write_limit nr_requests Each test is performed by automatically setting the values and running a partial, Non-Correcting Parity Check, typically less than 1% of a full Parity Check. By running just a short section of a Parity Check before stopping it, this utility can test multiple values in relatively quick succession (certainly quicker than running a full Parity Check or doing this process manually). Depending upon the test chosen, the UTT script will try dozens or even hundreds of combinations of values, finding the combination that works best for your particular server hardware. There are no command line parameters, the entire utility is driven through a user prompt system. Each test is timed down to the millisecond, which is important when running shorter tests, so you can determine which set of values are appropriate for your system. NOTES on the New UTT v4.1 for Unraid 6.x For the new UTT v4.1, the output is saved to the current directory when you launch UTT. The report will be named based upon the test type you chose (i.e. NormalSyncTestReport_<datestamp>.txt). There is also an identically named CSV file generated that has all of the test results in spreadsheet format, making for easier charting of results. When the tests complete, you are provided the option to apply the Fastest, Thriftiest, or Recommended values that were discovered, or revert back to the previous values. In addition, if you apply new values, you are also given the option to SAVE the chosen values to the server's configuration, so it will re-apply after reboot. You can also manually apply your chosen values later by going to Settings > Disk Settings. The Fastest values represent the combination of Tunables that resulted in the fastest measured Parity Check speeds. If the fastest speed was observed in multiple combinations of values, then the combination that has the lowest memory utilization is chosen as the fastest. The Recommended values are the combination of values with the lowest memory utilization that achieves at least 99% of the Fastest speed. Often this provides a nice memory savings over the Fastest values, while only adding a few seconds or minutes to a full Parity Check. The Thriftiest values are the combination of values with the lowest memory utilization that achieves at least 95% of the Fastest speed. These usually provide a significant memory savings over the Fastest values, but might make your Parity Checks noticably longer. In case you're wondering, the formula for assigning the four Tunables values is of my own design. It tests a whole bunch of values for md_sync_window, assigns md_num_stripes as 2x md_sync_window, and tests various methods of assigning md_sync_thresh (md_sync_window -1, -4, -8, -12, -16, -20, -24, -28, -32, -36, -40, -44, -48, -52, -56, -60, -64, and md_sync_window/2) and optionally various values for nr_requests (128, 16, and 8). If nr_requests is not tested, then all tests use nr_requests=128, which typically provides both the fastest speeds and the most obvious speed curves, making it easier to find the best values for the other three Tunables. It should be noted that low values for nr_requests (i.e. nr_requests=8 ) seems to make all values for the other Tunables perform really well, perhaps 90-95% of maximum possible speeds, but in our testing we have always found that the maximum possible speeds come from nr_requests=128. For this reason, all of the default tests are performed at nr_requests=128, and we make the nr_requests tests optional (Through or Xtra-Long tests). In our experience, after the other values have been properly tuned for your server, these optional nr_request tests of lower values will only show slower speeds. That said, it is possible that your server hardware responds differently, and the only way to know for sure is to run these optional tests. NOTES on the Legacy UTT v2.2 for Unraid 5.x For the legacy UTT v2.2, regardless of what type of tests your run, the output is saved to a file named TunablesReport.txt, which lives in the same directory you install the utility. No CSV is generated for this version. While this utility tests changes to all three tunable parameters, these changes are not permanent. If you wish to make the settings permanent, you have to chose your preferred values from the report, and manually enter them on the Settings > Disk Settings menu page in unRAID. Additionally, after the tests are completed, the utility sets the tunable values back to unRAID stock values (for safety, in case you forget about setting them). A reboot will return you to your previously selected values, as will hitting Apply on the Settings > Disk Settings menu page. In case you're wondering, the formula for assigning the three values is of my own design. It assigns md_num_stripes as approximately 11% bigger than md_write_limit + md_sync_window, rounded to the nearest testing interval. md_write_limit is also set to the same value as md_sync_window for all values beyond 768 bytes. Based upon your test parameters (primarily the Interval setting), the md_num_stripes value will calculate differently. As far as I am aware my logic works okay, but this may have to be revisited in the future if new understandings are gained on how these three values correlate. There are no published hard and fast rules for how to set the three values together. OBLIGATORY WARNINGS Yup, here's my CYA prose, but since it is for your benefit, I suggest you read it. Outside of writing the results report file (most likely to your flash drive), this utility does not do any writing to the server. The Parity Checks are all performed in a read-only, non-correcting fashion. But that doesn't mean something can't go horribly wrong. For one, simply using this utility may stress your server to the breaking point. Weak hardware may meet an early demise. All array drives will be spinning simultaneously (smaller drives won't spin down like a normal Parity Check permits) and heat will build up in your system. Ensure you have good cooling. Running these tests, especially Fully Automatic, may be harder on your system than a full Parity Check. You have to decide for yourself which tests are appropriate for your server and your comfort level. If you are unsure, the default values are a pretty safe way to go. And if you decide after starting a test that you want to abort it, just hit CTRL-C on your keyboard. If you do this, the Parity Check will most likely still be running, but you can Cancel it through the GUI. (Note, the new UTT v4 has built-in functionality to stop any running Parity Checks and to restore original values if you perform a CTRL-C and abort the test. Yay!!!) Another issue that can crop is is out of memory errors. The three Unraid Tunable values are directly related to memory allocation to the md subsystem. Some users have reported Kernel OOPS and Out Of Memory conditions when adjusting the Unraid Tunables, though it seems these users are often running many add-ons and plug-ins that compete for memory. This utility is capable of pushing memory utilization extremely high, especially in Fully Automatic mode, which scans a very large range of assignable values beyond what you may rationally consider assigning. Typically, running out of memory is not a fatal event as long as you are not writing to your array. If you are writing to your array when a memory error occurs, data loss may occur! The best advice is to not use your server at all during the test, and to disable 3rd party scripts, plug-ins, add-ons and yes even GUI/menu replacements - something made easier with unRAID's new Safe Boot feature. On Unraid 6.x, it is also important to stop any VM's and Dockers. One last caution: If you have less than 4GB of RAM, this utility may not be for you. That goes doubly if you are running a barebones, lightweight 512MB server, which should probably stay at the default Tunable values. This utility was designed and tested on a server with 4GB, and ran there without any issues, but you may run out of memory faster and easier if you have less memory to start with. NEW UTT V4.1 INSTALLATION Installation is simple. Download the file unraid6x-tunables-tester.sh.v4_1.txt (current version at the bottom of this post) Rename the file to remove the .v4_1.txt extension - name should be unraid6x-tunables-tester.sh Create a new folder for the script, for example \\<servername>\flash\utt (or /boot/utt from the Unraid console) Copy the file to the folder you created Check to see if the file is executable by running ls -l in the install directory: -rwxrwxrwx 1 root root 21599 2013-08-22 12:54 unraid6x-tunables-tester.sh* If you don't see -rwxrwxrwx (for Read Write Execute) use command chmod 777 unraid6x-tunables-tester.sh to make it executable LEGACY UTT V2.2 INSTALLATION Installation is simple. Download the file unraid-tunables-tester.sh.v2_2.txt (current version at the bottom of this post) Rename the file to remove the .v2_2.txt extension - name should be unraid-tunables-tester.sh Copy the file onto your flash drive (I put it in the root of the flash for convenience) Check to see if the file is executable by running ls -l in the install directory: -rwxrwxrwx 1 root root 21599 2013-08-22 12:54 unraid-tunables-tester.sh* If you don't see -rwxrwxrwx (for Read Write Execute) use command chmod 777 unraid-tunables-tester.sh to make it executable RUNNING THE UTILITY The utility is run from the server's console, and is not accessible from the unRAID GUI. I like to use PuTTY or TELNET , plus SCREEN to manage my console connections, but use whatever you like best. You should always run this utility interactively. It is not designed to be something you put in your go file or in a cron job. To run, simply cd to the folder you placed the file (i.e. cd /boot/utt) then run the program (i.e. type: unraid6x-tunables-tester.sh, or ./unraid6x-tunables-tester.sh for those that like that convention). For the new UTT v4.1, remember that the name has 6x in it, unraid6x-tunables-tester.sh, while the legacy UTT v2.2 is just unraid-tunables-tester.sh Edited 08/22/2013 - Added chmod instructions Edited 08/23/2013 - Updated to version 1.1 Edited 08/26/2013 - Updated to version 2.0 Edited 08/28/2013 - Updated to version 2.1 Edited 08/28/2013 - Updated to version 2.2 Edited 08/05/2019 - Added new version 4.0 for Unraid 6.x Edited 08/14/2019 - Updated to version 4.1 for Unraid 6.x CONTINUED IN NEXT POST... Download legacy UTT v2.2 for Unraid 5.x: unraid-tunables-tester.sh.v2_2.txt Download the new UTT v4.1 for Unraid 6.x: unraid6x-tunables-tester.sh.v4_1.txt1 point
-
That did the trick. For anyone else who wants to do this the cache_dirs file is actually in this directory: /usr/local/emhttp/plugins/dynamix.cache.dirs/script The commands using the built-in Terminal popup to make the permission change are : cd /usr/local/emhttp/plugins/dynamix.cache.dirs/scripts chmod 777 cache_dirs EDIT: IF you reboot your computer you will have to make these changes again as you are making the change to the file in on the RAM disk that Unraid uses to install the OS on.1 point
-
Not to worry. I spoke to purevpn and it turns out that they had the wrongs files on their website!!! I got the latest certificate and the latest server details and it started working!! Thanks for your help though!1 point
-
Still fails here, I've never installed before, do I need to manually import / create some folders prior to installing via the PLG URL?1 point
-
Well the upstream code hasn't changed in six months, my additions are simply shell script code for the entrypoint. From what I can tell v3 protocol is still being developed, otherwise why blog about a whitepaper? If/when v3 becomes live I'll see if they change/update this container or just build a new one - if they update the container, things should update easy enough. If storj makes a new v3 container I'd look into making a template, and/or repo for Unraid support. Fundamentally my container is fork of https://github.com/zannen/docker-storjshare-cli. I don't think the container presently does support v3, but when the storj team (or 3rd-party) releases a v3-storj client or container I'd be happy to look into it. If people find it before I do, welcome track me down.1 point
-
So you were right, MakeMKV is also failing to invoke Java. However, the problem is that even with a functional java binary, a Java exception is shown in the log with Java 11 and 12. There is no exception in the log with Java 10, but some can be seen by strace'ing MakeMKV. Brief, since the the disc can be ripped successfully without Java, I cannot confirm if Java really works. I've sent an email to the author of MakeMKV, but I'm not expecting an answer soon.1 point
-
Somehow I feel you were secretly calling out to me to update the Unraid Tunables Tester. 😎 Maybe it is time.1 point
-
i am considering decrementing this in CA in favour of sickchill (rebadged sickrage), as im reasonably confident nobody really wants to use the current sickrage code (aka echel0n's) right?, anybody got any objections?, i will wait 1 week for replies, if no grumbles i will make it so.1 point
-
TR had the same issues as the normal Ryzen chips. I never checked if the newer BIOS in combination with the newer Kernel maybe fixed that issue. Might have to have a look into that. My issue was NVME related. A passed through SSD works fine but isn't recognized by Samsung Magician either. It's attached as block device and uses the Virtio SCSI driver from RedHat. I have tested a lot of combinations GPU in slot 1 Die0 or Die1 attached, GPU in slot 3 and Die0 or Die1 attached to a VM. I didn't noticed any big differences +-5fps no matter which memory configuration i tested with. UMA or NUMA didn't made any big differences for me. With "numactl -H" you can check which config you currently using. If it shows only 1 node you're in the default UMA mode. For memory bandwith intensive tasks it showed in some benchmarks thats the better mode. Better memory latency you gain in NUMA mode. In NUMA mode you can force unraid to only use the memory attached to a specific die. But for some reason it doesn't work for me. It's also reported by other users in the forum. My GPU in the first PCI slot is attached to the second die where also my NVME is attached to and the cores i use for a VM but as i said, 'strict' should only use memory from the node you set. It doesn't do it for me. I tested all the memory settings in the BIOS, nothing worked. Only if i set it to 'preferred' it uses memory of the node 1 + a couple MB from node 0 even if enough memory is available on node 1. I haven't found a fix for it yet. It looks like a couple people reporting that something might not work as expected. <numatune> <memory mode='strict' nodeset='1'/> </numatune>1 point
-
New to this but had a crack at it
 1 point
 -
I changed the unmount when the server is shut down to specify the cifs file system when the server is shut down that may help with this situation. The next time it happens, post the diagnostics captured from the shutdown so I can see more of what is happening. The shutdown diagnostics can be found on your flash drive in the /logs folder.1 point
-
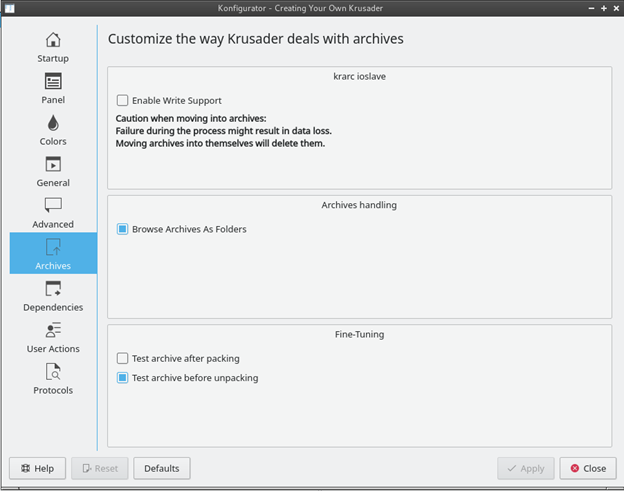
I fixed this by checking 'Enable Write support' under Konfigurator - Archives.
 1 point
 -
No need to trim often if you aren't constantly reusing the free space of the drive. With 120 GB free, you could figure out how long it takes you to write 10-60 GB and use that as a reasonable trim interval. But it doesn't sound like you need hourly trims - once/night should most probably handle your needs.1 point
-
Basically install unrar via the nerdpack plugin, then run command on completion: unrar x "%F/*.r*" "%F/"1 point
-
Open device manager You will see your unknown devices. Right click the unknown device and select "update driver". Select "Browse my computer for the driver software" Click browse Select the CDROM Drive virtio-win-x.x Then click next. Windows will scan the entire device for the location of the best-suited driver. It should find a RedHat network adapter driver, follow the prompts and you're in business. ** I never bothered to locate the actual subfolder of the driver on the virtio-win-1-1 image, I just let windows do it for me. ** Hope this helps.1 point
-
960 Evo? Hmmm...the controller on those runs toasty, you might try sticking on a little heatsink. I use cheap RAM heatsinks that are sold for use on a RaspberryPi on my 950 Pro which stops it throttling.1 point
-
I'm having this same issue... but I have a 500gb cache drive and there is 255gb free.... so its something else for me.... grrrr...1 point
-
Solved it today. Did some more searching around, trying to use virtfs etc to get some more data about what is happening. Didn't progress so much with that, buy while reading about different solutions to this type of problem, I found out that having your free disk space reduced below a certain point could create issues with VMs running that would instantly pause them without any appropriate messages whatsoever. It seemed a bit strange as my VMs have all their disk size (40GB each) pre-allocated, but the problem is with the amount of free space the system uses for this operation. People had issues with those files being on Cache Disks which, when dropped below a certain point, could cause this. My problem was a bit more obvious, if you knew where to look ofc. The drive hosting the VMs, and I suspect hosting other files for this reason, dropped to the amazing 20,5KB of free space. Which was strange as I had stopped all writes on this disk at 50+GB. That nice docker I have, which is a Minecraft server for the kids, ended up eating up all available free space due to daily backups. Clearing that space and returning the disk to 50+ free GB allowed my VM to start correctly. I can't tell you how nice it is to hit F5 and have the Web GUIs running on that VM to actual no say something rude to me... I hope this situation is also helpful to someone else to, especially you ashman70 I will change the topic to solved, and I hope it stays like that1 point
-
I have two different size cache devices, why is the reported space incorrect? Old Unraid bug when using different size devices (fixed on v6.9-beta30), usable size in default 2 device pool RADI1 config is always equal to the smallest device. Although free pool space is incorrectly reported the cache floor setting should still work normally (at least for unRAID v6.2 and above), i.e., set it according to the real usable space. To see the usable space with 3 or more different size devices in any profile use the calculator below: http://carfax.org.uk/btrfs-usage/1 point
-
If you used all 3 of those, 250, 240, 140, you would get 315. The extra space may not be worth using 2 extra ports, but you also get mirroring. btrfs disk usage calculator1 point


