Leaderboard


Popular Content
Showing content with the highest reputation on 06/09/19 in all areas
-
There have been 5 kernel patch releases since 6.7.1-rc1 and there don't appear to be any problems with Zombieland mitigation. We updated a few security-related patches, but I want to give this a few days of wider testing before publishing to stable. Please post here in this topic, any issues you run across which are not present in 6.7.0 also - that is, issue that you think can be directly attributed to the microcode and/or kernel changes. Version 6.7.1-rc2 2019-06-08 Base distro: curl: version 7.65.0 (CVE-2019-5435, CVE-2019-5436) docker: version 18.09.6 kernel-firmware: version 20190514_711d329 mozilla-firefox: version 66.0.5 samba: version 4.9.8 (CVE-2018-16860) Linux kernel: version: 4.19.48 (CVE-2019-11833) Management: shfs: support FUSE use_ino option Dashboard: added draggable fields in table Dashboard: added custom case image selection Dashboard: enhanced sorting Docker + VM: enhanced sorting Docker: disable button "Update All" instead of hiding it when no updates are available Fix OS update banner overhanging in Auzre / Gray themes Don't allow plugin updates to same version misc style corrections5 points
-
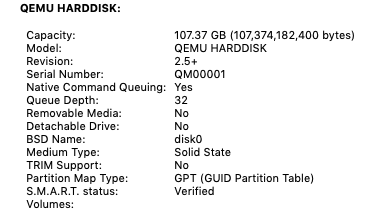
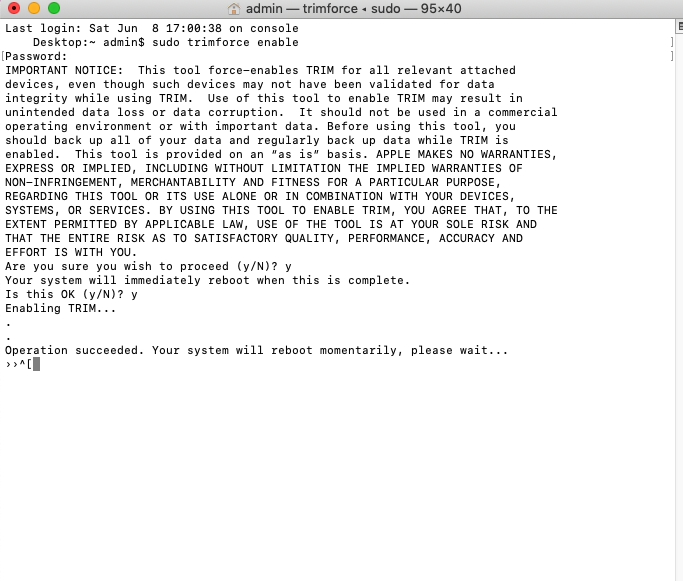
Tested on High Sierra and Mojave I've been looking off and on about how to enable trim support on a disk image in osx. Had a few more minutes today and found it on the Internet (https://serverfault.com/questions/876467/how-to-add-virtual-storage-as-ssd-in-kvm) Issue: QEMU disks in osx are presented to the OS in a manner which interprets them as a rotational disk, as shown under About This Mac>System Report>SATA/SATA EXPRESS. Even after forcing trim on all disks via terminal, trim does not work, or even show it as an option. The result is the OS slows over time and disk images bloat. To correct: FOR 6.9.2 and below (if you're worried about potential loss of data, borking a working vm, or other world ending scenarios, make a backup before doing this, and proceed at your own risk.) With the VM shutdown, edit xml settings, changing the disk image info from <disk type='file' device='disk'> <driver name='qemu' type='raw' cache='writeback'/> <source file='/mnt/disks/K/G/vdisk.img'/> <target dev='hda' bus='sata'/> <address type='drive' controller='0' bus='0' target='0' unit='0'/> to <disk type='file' device='disk'> <driver name='qemu' type='raw' cache='none' io='native' discard='unmap'/> <source file='/mnt/disks/K/G/vdisk.img'/> <target dev='hda' bus='sata'/> <address type='drive' controller='0' bus='0' target='0' unit='0'/> with the changes only happening on the second line. (note: it may be possible to leave cache on write back and not use the io native setting, but I didn't experiment much, just followed working directions on the link) make this change for any disk images you have that the vm uses. next scroll to the bottom of the xml and add the following in the QEMU arguments <qemu:commandline> <qemu:arg value='-set'/> <qemu:arg value='device.sata0-0-0.rotation_rate=1'/> </qemu:commandline> any other arguments you have will also still need to be included. I do not know if order matters, but mine is at the end of the arguments list. if you have any other drives, add an additional copy of the argument (both lines) and modify the "device.sata0-0-0.rotat...." accordingly to match your address type listed at the top with the disk image(s). If you only have one, then you can leave it as is, assuming you didn't change the address. If you did this correctly, the vm will boot normally. But this time will display: Recognized as an SSD but no trim support. To fix this, you must force trim on all drives. To do this, go to terminal and enter: sudo trimforce enable It will then give you some text that makes it seem like your computer will eat itself. The OS will then sit for a short bit, after which time it will reboot itself. After it restarts, to verify trim support is now enabled, go back to About This Mac>System Report>SATA/SATA EXPRESS. 6.10.0 RC1 and up Enjoy!

 1 point
 -
https://unraid.net/blog/unraid-new-users-blog-series1 point
-
Something wrong somewhere. But, I do have to say that unless I've picked up a switch at a dollar store then I've only very rarely seen any significant packet loss. And even the odd packet loss is OK. Most users who've questioned here about seeing packet loss shows, the statistics show that its < 0.0001% which is basically nothing (and bound to happen at times) (My current packet loss is 0.000000000175%)1 point
-
You can enable Reconstruct Write (Turbo Mode) in Disk Settings, but for the most part, I get in and around 70-80MB/s writes over the network to the array, and 100+ MB/s to a cache-enabled share (with it set to auto) On a 1G network, you're limited to ~110MB/s maximum, so at the end of the day I don't have any major problems with the speeds I get You can install the Mover Tuning plugin to allow you to fine tune the settings for when files get moved from the cache drive to the array. Personally though, most of my shares are set to not use the cache, as the speeds I get (see above) are good enough. I only enable them for when I really care about transfer speeds, or for the appdata. IE: My media creation is all handled automatically by various containers, and I don't notice (nor would I care) that a transfer from a download share to the array takes a minute longer. That's because it has to perform multiple checks to see if the file is in use, etc. No way around that. Once the move on the file begins though, it's going to work at the maximum speed allowed. But, if you're moving tons and tons of small files (.nfo files eg), then the overhead becomes quite extreme. Another reason to not bother with enabling use cache for media shares. For the initial data load, enable as wd_write_method Reconstruct write. Much faster at the expense of every drive having to spin, but you will never be able to exceed the speed of the network regardless of what drives you've got installed. (Assumes of course you're transfering directly to the array instead of the cache drive.) For the other settings, the easiest check is what is your parity check speed after it runs for around 10 minutes with no other activity happening on the array. The wiki sucks. Best to completely forget it ever exists, unless someone points you to a particular entry in it. While occasionally I do go to the reddit page (and the facebook page), I am actually always surprised that people keep asking questions there with problems. IMO, if you want the most reliable answer to any given question, then you're best off here. Not to say that any given answer on reddit or facebook is incorrect though. Welcome to the internet. Everything shows up that's ever been posted for ever. I keep expecting for my kids to sue me in later life when they discover some pictures I posted of them when they were babies. Several FAQ's exist here on the forum. Check out @SpaceInvaderOne's videos1 point
-
True Dat! But, had a brain storm of how it may be possible for a user to be able to do this, and 6.7.1-rc2+ prevents this particular chain of events.1 point
-
just my 2 cents... I always pre-clear my drives, usually on a separate computer, to complete my initial stress testing. No you do not need a dedicated computer for it, it only needs to be available for the dedicated purpose of running pre-clear on disks as it is pre-clearing disks! I have a few computers that I have a flash drive next to, that IF I need them to pre-clear a drive, I just stick the USB flash in the computer, hook up the drive(s) I need to pre-clear, boot and start pre-clearing. When I am done, I shut off the computer, remove the pre-cleared drives, and the USB flash, then I am ready to use the computer again under normal OS uses for the computer. One word of caution, either unplug the other hard drives in the computer before pre-clearing drives, or MAKE SURE YOU ARE TRIPLE checking you are selecting the correct drives to pre-clear! The alternative is that I actually run the pre-clear on the machine running unraid that is getting the new drive. I also find this method ok sometimes, but more frequently limiting as I also need to stop the array first, and shut down the computer. As long as the drive passes, no problem. If the drive fails however, which can and does happen with new drives or old drive being re-purposed, I have lost some additional server time with additional needed power downs. This is why I usually use a seperate computer for pre-clears. Also, the computers running pre-clear do not need to be as powerful as the one you would normally want to run unraid on now. All my computers that I run pre-clears on separately are just old P4 computers. they work very well for pre-clearing drives!1 point
-
Go to the Users tab and set a password for the ‘root’ user.1 point
-
Thanks so much it is working :)1 point
-
The unfortunate thing is that you were misled by the BIOS upgrade procedure. ASRock doesn't support any other operating system than Windows on its consumer motherboards (even high end ones, like the Taichi) so the instructions assume the user is running Windows and it seems that updating the BIOS without updating the graphics card driver first can leave you with a blank screen. None of this is relevant to the Linux user and the correct upgrade procedure is actually very straightforward. The only part that was relevant was the two step process - upgrade to 5.1 first then reboot and upgrade to 5.5. They seem to need to do that when there's a major upgrade - in this case, support for the 3000 series of processors.1 point
-
Since you have two parity disks you can afford to lose any two array disks (but no more) in your server and still recover the data. So if all the rest are OK you could have rebuilt the two corrupt ones. That's because they were corrupted outside of the Unraid environment. You formatted them inside the Unraid environment, which updates parity, which means you can now no longer recover them. (Not strictly true - a government agency could no doubt forensically recover your data, at a cost.) I don't know anything about your configuration. The only thing that matters about Docker containers is the appdata since the containers themselves can be re-downloaded easily. It is not uncommon for the docker.img file to become corrupt and need to be rebuilt. It is very easy to delete it and recreate it from scratch. But the appdata is where the containers store their configuration, databases, etc. Most people store their appdata share on their cache disk. If you did too and it's still intact then you're in the clear. The best two pieces of general advice I can give you are: If in doubt, ask here before proceeding; When Unraid formats an array disk it does exactly the same as when Windows formats a disk or a digital camera formats a flash card - it writes a new, empty file system to it and renders any data previously stored there inaccessible. That's what the format operation does and the presence of parity disks does not change that. TL;DR: If you format a disk, consider it's contents lost - but you already knew that, didn't you?1 point
-
enable trim on disk images hosted on SSDs:1 point
-
Awesome, thanks for taking the time to report it, it's a paper cut for sure.1 point
-
Waiting for reply from IPS.1 point
-
Upgraded to 6.7.0 from 6.5.3 and so far so good with nothing standing out as an issue, personal preference for a friendly colorful UI instead of the monotone aside.1 point
-
Fixed1 point
-
As far as I'm aware it doesn't work on a touch interface. On my touch screen laptop I have to remember to use the mouse.1 point
-
Thank you for this. I was able to get it running!! Much appreciated.1 point
-
So, I deleted all the Elasticsearch data and reinstall elasticsearch, reset the CHOWN. Deleted and reinstalled Diskover And it works. It seems if you don't put in the right details the first time, you need to clean up and start again. Like the config files are written to appdata on the first docker run and then not rewritten on config change. Also seems like it messed up the elastisearch data. Still, hint to anyone working on this: Install redis and elasticsearch, despite what it says they are not optional. chown -R 1000:1000 /mnt/user/appdata/elasticsearch5/ start redis and elasticsearch Set the hosts for these two services when you first install Diskover, if you get it wrong, remove it, clear the appdata folder and reinstall with the correct settings. Check the port numbers, they should be good from the start, but check. Check diskover on port 9181 it should show you workers doing stuff. If not; you started Diskover before redis or elasticsearch. If diskover asks you for indexes one and two; your elasticsearch data is corrupt, delete it and restart elasticsearch and Diskover.1 point